M SNAP i.d. 2.0 IHC User manual

Quick Start Guide
SNAP i.d.®2.0 IHC (Immunohistochemistry) System
Before using the SNAP i.d.® 2.0 IHC System, please read the full-length user guide available at www.millipore.com/ihc.
Component Features
Assembly Fixture
Accepts 25 × 75 × 1 mm slide
(slides not provided)
Tissue section target (guides tissue
section size and placement)
Volume markings (for estimating
solution volume required; each
line represents ~ 150 µL)
Disassembly slots
Slide Holder
Injection/recovery port accepts
1 mL pipette tip
Injection/recovery port Wash reservoir
(6 mL maximum volume)
Slide compression clips (4)
Tissue section chamber
(600 µL maximum volume)
Vacuum flush port
Injection/recovery
port fluid channel
Silicone gasket
IHC Frame
Holds up to 12 slide holders
Vacuum ports (12)
Port plugs (to maintain vacuum
when port is not being used)
Port plug storage holes
Center well for
assembly fixture
storage
Incubation Cover
linker
primary
blocker
reporter
chromogen
Task tracker (for keeping track of steps)
Stacking recesses
(to enable IHC frame stacking off-line)
SNAP i.d.® 2.0 IHC System
Accommodates one or two
IHCframes
Includes tubing assembly kit Vacuum control knob
For research use only
00119264_RevD.indd 1 1/14/2015 1:26:51 PM

Setup
General Guidelines
● Do not use the SNAP i.d.® 2.0 IHC system for
deparaffinization, rehydration, dehydration, or mounting
steps.
● Proper slide preparation is critical to successful use.
Before placing tissue on slide, make sure that it will not
extend beyond the target area of the assembly fixture.
● IMPORTANT! Do not touch the gasket on the slide holder
during assembly.
Slide Holder Setup
1. Place assembly fixture on a hard, flat surface.
2. Position slide in assembly fixture, with the tissue
section facing up. Verify that the tissue section does
not extend beyond the target area.
3. Hold the slide holder by the sides, clip side down, and
align it with the assembly fixture containing the slide.
Do not touch the gasket.
4. Press the slide holder down firmly over the slide until
the four compression clips slip over the slide edges
with an audible click.
5. To ensure that all clips are fully engaged, firmly press
down on the top edge of each slide holder corner, one
at a time, and listen for a click on each press.
Click 4
Click 1
Click 2
Click 3
6. Remove the slide holder assembly from the fixture
and closely inspect each clip to confirm that it is
in the proper position over the slide. If any clip is
not engaging the slide as shown below, place the
assembly back into the fixture and repeat step 5 on the
unengaged clip(s). Clip engaged Clip not engaged
IHC Frame Setup
The IHC frame can be set up either on or off the
SNAPi.d.®2.0 system.
1. Place assembled slide holders into any vacuum ports
on the frame, with slide labels oriented towards the
port numbers.
2. Press blue port plugs lightly into all unused ports
(excessive force is not required). Unused plugs can be
left in the port plug storage holes.
3. If the frame has been loaded off the SNAPi.d.®2.0
system, place it in either position on the system before
continuing.
Staining Protocol
Tips for adding solutions to slide holder
● Small volumes (up to 600 µL) should be dispensed with
a 1 mL pipette through the injection/recovery port.
Gently push the pipette tip into the port to create a seal.
Dispense slowly to avoid bubble formation in the tissue
section chamber.
● Larger volumes (up to 6 mL) can be loaded into the wash
reservoir.
● Make sure that the fluid completely covers the tissue
sections.
00119264_RevD.indd 2 1/14/2015 1:26:52 PM

Washing (optional)
1. If washing is required before blocking, fill the wash
reservoir of the slide holder with up to 6 mL of desired
wash solution.
2. To flush the wash solution out of the tissue chamber,
turn on the SNAP i.d.® 2.0 system vacuum.
NOTE: Residual fluid at the bottom of the tissue section
chamber will not impact subsequent steps.
Blocking
1. Load blocking reagent through the injection/recovery
port or the wash reservoir.
2. If incubation is required, place the cover on the IHC
frame and set the task tracker to “blocker”.
linker
primary
blocker
reporter
chromogen
blocker
primary
linker
reporter
chromogen
3. To flush the blocking solution from the slide holder,
remove the cover and activate the vacuum.
4. If wash steps are needed, fill the wash reservoir with
wash solution, then flush by applying vacuum. If
necessary, repeat wash step two more times.
Primary Antibody
1. Inject up to 600 µL of primary antibody through the
injection/recovery port, dispensing slowly to avoid
bubbles, and ensuring complete coverage of the tissue
section.
2. Cover the IHC frame and set the task tracker to
“primary”. When incubation is complete, remove the
cover.
3. Recover primary antibody with a pipette via the
injection/recovery port or flush to waste by applying
vacuum.
4. Fill the wash reservoir with wash solution, then flush
by applying vacuum. Repeat wash step two more times
if required.
Linker (secondary antibody)
1. Inject up to 600 µL of linker through the injection/
recovery port, dispensing slowly to avoid bubbles, and
ensuring complete coverage of the tissue section.
2. Cover the IHC frame and set the task tracker to
“linker”. When incubation is complete, remove
the cover.
3. Recover linker with a pipette via the injection/recovery
port or flush to waste by applying vacuum.
4. Fill the wash reservoir with wash solution, then flush
by applying vacuum. Repeat wash step two more times
if required.
Reporter (tertiary, if required)
1. Inject up to 600 µL of reporter through the injection/
recovery port, dispensing slowly to avoid bubbles, and
ensuring complete coverage of the tissue section.
2. Cover the IHC frame and set the task tracker to
“reporter”. When incubation is complete, remove the
cover.
3. Recover reporter with a pipette via the injection/
recovery port or flush to waste by applying vacuum.
4. Fill the wash reservoir with wash solution, then flush
by applying vacuum. Repeat wash step two more times
if required.
Chromogen
NOTE: Some stains such as hematoxylin and eosin may
permanently stain the SNAP i.d.® 2.0 system.
1. Inject up to 600 µL of desired chromogen through the
injection/recovery port, dispensing slowly to avoid
bubbles, and ensuring complete coverage of the tissue
section.
2. Cover the IHC frame and set the task tracker to
“chromogen”. When incubation is complete, remove
the cover.
3. Recover chromogen with a pipette via the injection/
recovery port or flush to waste by applying vacuum.
4. Fill the wash reservoir with wash solution, then flush
by applying vacuum. Repeat wash two more times if
required.
Slide Removal
1. After staining/counter-staining is complete, a final
wash is recommended before removing the slide from
the slide holder.
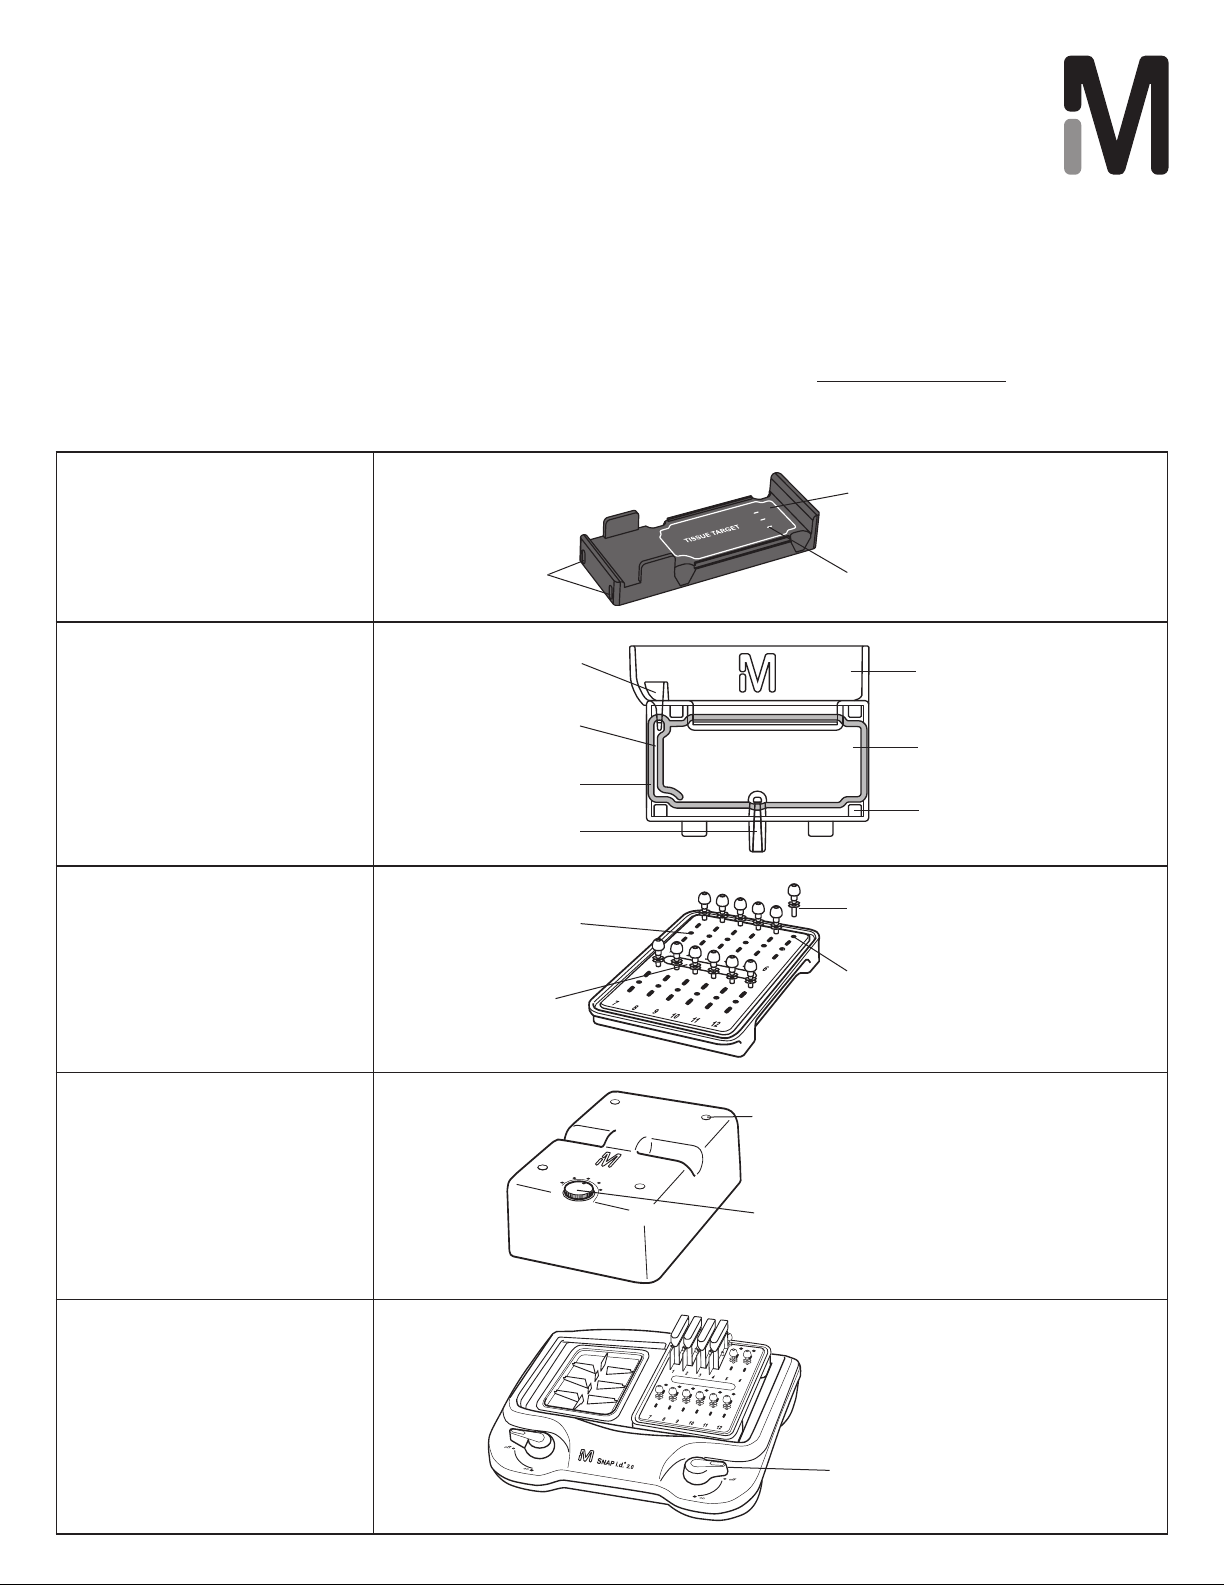
2. To remove the slide, push the assembly fixture
disassembly slot over one of the bottom clips (1).
2
1
2
1
Push slot onto clip
3. Bend the clip 90 degrees away from the slide (2).
Repeat with the other bottom clip.
Bent clip
Bend bottom clips
with assembly
fixture
00119264_RevD.indd 3 1/14/2015 1:26:53 PM

4. Carefully lift the slide up and out of the holder.
5. Discard the used slide holder. If required, proceed with
dehydration and cover slip mounting protocols.
NOTE: Do not use the SNAP i.d.® 2.0 IHC system for
dehydration or mounting steps.
The M logo, Millipore, and SNAP i.d. are registered trademarks of Merck KGaA, Darmstadt, Germany.
© 2015 EMD Millipore Corporation. Billerica, MA, U.S.A. All rights reserved.
00119264 Rev. D, 01/15
Made in U.S.A.
EMD Millipore Corporation
290 Concord Rd., Billerica, MA 01821
Slide Removal, continued Product Ordering Information
This section lists the catalogue numbers for SNAP i.d.®2.0
IHC System components. See the Technical Assistance
section for contact information. You can purchase these
products on-line at www.millipore.com/products.
Description Cat. No. Qty/Pk
SNAP i.d.® 2.0 Base SNAP2BASE 1
SNAP i.d.® 2.0 IHC Frame SNAP2FRIHC 1
SNAP i.d.® 2.0 IHC Slide Holder SNAP2SH 24
Notice
The information in this document is subject to change
without notice and should not be construed as a
commitment by EMD Millipore Corporation (“Millipore”) or
an affiliate. Neither EMD Millipore Corporation nor any of
its affiliates assumes responsibility for any errors that may
appear in this document.
Technical Assistance
For more information, contact the office nearest you. In the
U.S., call 1-800-221-1975. Outside the U.S., go to our web
site at www.millipore.com/offices for up-to-date worldwide
contact information. You can also visit the tech service page
on our web site at www.millipore.com/techservice.
Warranty
The applicable warranty for the products listed in this
publication may be found at www.millipore.com/terms
(“Conditions of Sale”).
00119264_RevD.indd 4 1/14/2015 1:26:53 PM
Popular Laboratory Equipment manuals by other brands

Thermo Scientific
Thermo Scientific Sorvall RC-4 instruction manual

Integra
Integra MEDIAJET operating instructions

Droplet
Droplet Genteel Instructions for use

Merand
Merand ATOUPAIN MILLENIUM user manual

Potter
Potter intelligen INS-1500 Installation, operation and instruction manual

Malmet
Malmet ES915 Operation, maintenance and installation manual

Varex Imaging
Varex Imaging Claymount Optica 10 Series user manual

Helmer Scientific
Helmer Scientific TCR Operation and service manual

CHUO PRECISION INDUSTRIAL
CHUO PRECISION INDUSTRIAL RMM-A3 instruction manual

ABB
ABB PGC5000 Series Service instructions

Qiagen
Qiagen Rotor-Gene Q MDx installation guide

GE
GE BioProcess LPLC operating instructions