MA Medi User manual

Medi Air Purifier
MA International Trading Co., Inc.
DBA: Medi Air Purifier
www.mediairpurifier.com
Phone: (800) 953-7228

WARRANTY
For warranty service, please contact MA International Trading
Co., Inc., DBA: Medi Air Purifier at 1(800) 953-7228
The Medi Air Purifier is built with unparalleled quality and is
designed for long lasting, efficient performance. The unit also
comes with a one year warranty which is automatically
activated on the date of purchase. This warranty guarantees
all aspects of the air purifier, excluding the plate and rear filter
assembly which require replacement due to normal use.
Though the
APCO cell is an exchangeable part, the cell is still covered
under warranty for a period of 12 months. The warranty only
guarantees your unit from defects and malfunctions related to
normal operational use. Any damage resulting from owner
misuse, such as dropping the unit, is not covered under the
warranty. There is no need to register your product as your
receipt will serve as proof of purchase, therefore granting you
all the warranty benefits of a Medi Air Purifier owner.

SPECIFICATIONS
Unit
Dimensions: 12 inches high x 9 inches wide x 10
inches
deep
Coverage: 250 sq. ft. to 4000 sq. ft. (23 sq. meters to
372 sq. meters)
Power Cord
Input: 110 VAC 60 Hz
Output: 110 VDC 50W
See the power supply label for certifications and
warnings
APCO Cell
Normal Mode Output: <0.02 ppm ozone (ambient room
concentration)
Purification Plate
High Mode Output: 25-600mg ozone per hour
Ionization Needle
-9FV to 9FV. Positive and negative ion generation
Two DC needle ion generators

BENEFITS
The Medi Air Purifier is a powerful machine, capable of
turning a home full of unhealthy contaminates, such as mold,
dust, pollen, and harmful pathogens into a clean, sanitized
and healthy environment with just the click of a button. Relax
with the peace of mind that you are breathing fresh, safe air,
filtered by the most advanced technology on the market
today.
The Medi Air Purifier sanitizes not only the air, but all surfaces
in your home and office as well, such as counters, carpets,
appliances, cabinets and much more. With the Medi Air
Purifier you can rest assured that both the air you’re
breathing and the surfaces you’re touching are safe and
pollution free.
Ease of Use
The Medi Air Purifier utilizes complex and advanced
technology to clean your home or office, but is also designed
to be extremely simple to operate. With just the touch of a
button, the Medi Air Purifier goes to work for you, purifying
your air with ease. The unit also exceeds the highest
standards of quality and with regular cleaning will run
smoothly and efficiently for many years.
Support
For many of the most common issues with the unit, please
refer to the troubleshooting section of the manual. If you need
further support, please contact MA International Trading Co.,
Inc., DBA: Medi Air Purifier at (800) 953-7228.

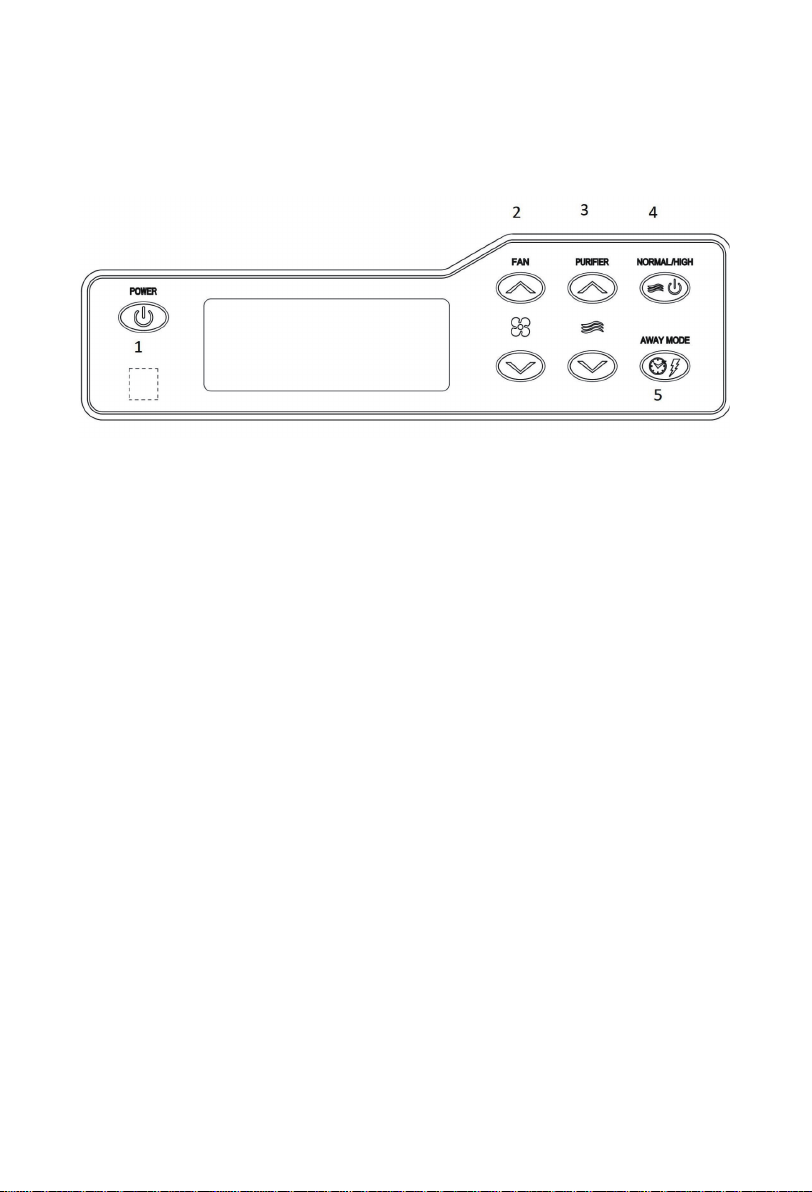
STATE OF THE ART TECHNOLOGY
Revolutionary Plasma Ion Technology
The most unique feature of the Medi Air Purifier is our Plasma Ion Technology. Unlike
most units which produce only negative ions, the Medi Air Purifier emits both positive
and negative ions. These ions separate and rejoin around harmful particles. When the
ions join around the toxins, they become trapped in the plasma filter. Once trapped,
the harmful particles are actively attacked and removed from the environment.
Advanced Photo Catalytic Oxidation
This revolutionary technology far exceeds any standard HEPA filter, breaking down air
pollutants instead of merely trapping them. A powerful UV light beam strikes titanium
dioxide and other catalytic metals within the unit which activate electrons that then
interact with water molecules. This reaction results in the creation of agile, hydroxl
radicals which attack and destroy the bonds of pollutant particles, leaving behind only
the harmless substances of carbon dioxide and water. The result: A clean, sterilized
and healthy atmosphere within your home or office.
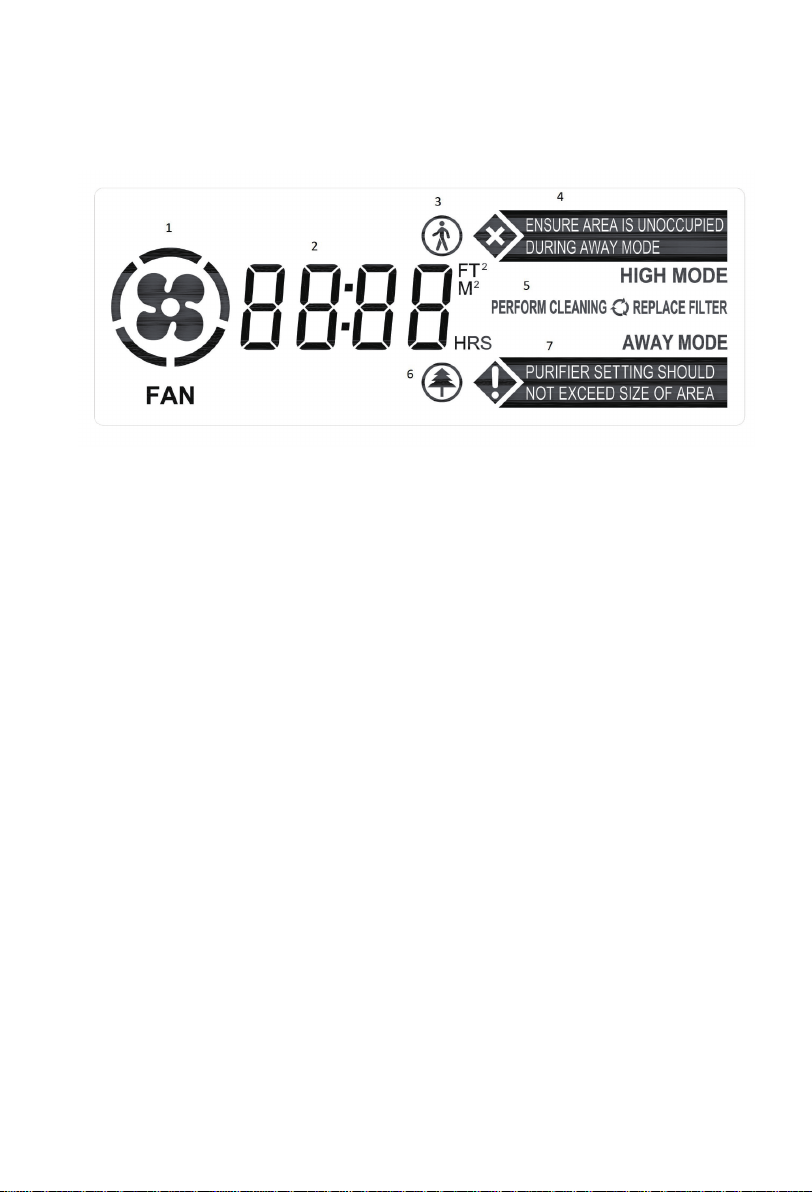
Versatility of Air Purification Coverage
The Medi Air Purifier can sanitize up to 4000 sq. ft. of space. If you want to purify a
smaller space, the unit is also highly adaptable, allowing you to set it to sanitize
smaller spaces as needed. With the Medi Air Purifier, you have the flexibility of creating
a safe, healthy environment in both the largest and smallest of spaces.
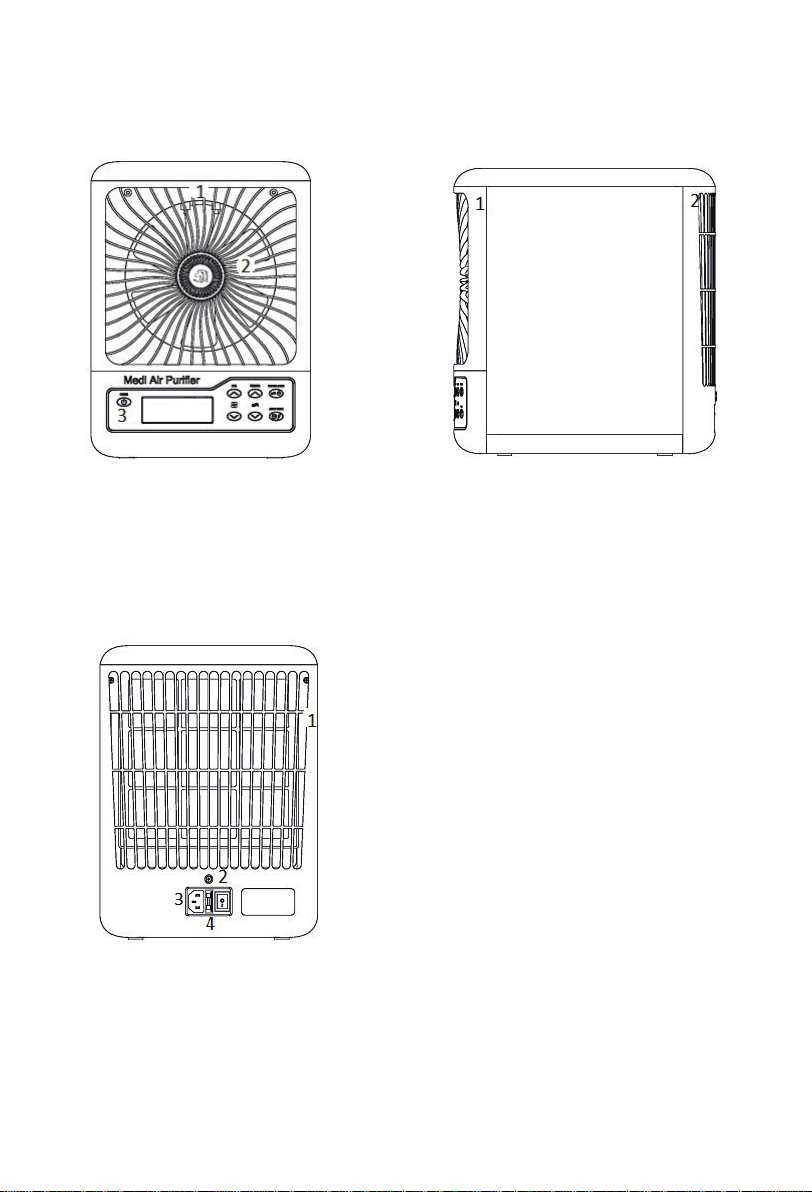
Needlepoint Ionization
The Medi Air Purifier utilizes needlepoint ionization to gather odors and other pollutants
together, so that your HVAC unit can more easily remove them from your living space.
The technology works when electron voltage is emitted across metal needles, causing
millions of negative ions and positive ions to travel through the air, making harmful
contaminants heavier. By making them heavier, your HVAC system can then easily
remove contaminants from your home or office. The Medi Air Purifier contains two
separate needles. For increased safety, the needles are positioned inside the unit,
preventing people from accidentally touching them.
Soft Start Technology
The Medi Air Purifier uses soft start technology, which not only increases the life span
of the ceramic plate, but also allows the unit to perform in any indoor environment,
including high humidity.
Washable Filter
The Medi Air Purifier has a washable, multi-layered filter, collecting any of the heavy
particulates from the needlepoint ionization process that may not have been removed
by the HVAC system. With normal cleaning, this filter can be used many times before it
needs to be replaced.
Activated Carbon Deodorization
The honeycomb layer of the filter is coated in activated carbons. This enhances the
purification process by removing a greater number of contaminates and more
effectively eliminating bad odors.

DIAGRAMS
1.Ionization Needles
2.Front Grille
3.Control Panel
1.Front Grille
2.Rear Cover
1.Rear Cover Clasp
2.Rear Cover Screw
3.Power Cord Insert
4.Fuse

DIAGRAMS
1.Thumbscrew
2.Filter Assembly
3.Filter Assembly Clasp
1.APCO Cell
2.APCO Cell Nut
3.Purification Plate
4.APCO Cell Connector

DIAGRAMS
1.Power Button
2.Fan Speed Control
3.Purifier Level Control
4.Normal/High Mode Control
5.Away Mode Control

DIAGRAMS
1.Fan Speed Indicator
2.Purification Level Indicator
3.Away Mode Indicator
4.Away Mode Warning
5.Maintenance Reminder
6.Ion Indicator
7.Purification Level Warning

DIAGRAMS
Normal Mode
High Mode
Away Mode

DIAGRAMS
Remote Control

SET UP AND OPERATION
OPERATION
Initial Set Up
Before beginning to purify the air in your home or office, there are a
few things to consider regarding the placement of the unit.
Set the Medi Air Purifier five feet or higher off the floor in a large open
area within your home or office. Never run the unit while on the floor.
Choose a location that is a good distance away from HVAC vents.
Ensure there is plenty of room in front of the unit for purification, so
that it can operate at maximum capacity.
Starting the Unit
Before turning on the unit, first determine the square footage of the
area you wish to purify. Only calculate the area of rooms whose
doors are open. If you wish to purify a smaller area than the entire
house, close the doors to those rooms.
Now you can begin turning on your Medi Air Purifier. Attach the power
cord into the unit. Once firmly connected, plug the power cord into
the wall and turn the unit on.

SET UP AND OPERATION
CONTROLLING THE UNIT
To turn the unit on, simply press the Power button. By default, the air
purifier will set to Normal Mode. To turn the unit off, press the Power
button again and the unit will shut off.
Operating the Unit in Normal Mode
To operate your Medi Air Purifier in Normal Mode, press the Normal
button. In this mode, square footage settings are not available.
However, you have the option of controlling the fan speed by
pressing the Fan Up/Fan Down buttons.
Operating the Unit in High Mode
When in Normal Mode, press the Normal/High Mode. The High Mode
will then show on the LCD screen. Once on High Mode, you can then
adjust the square footage settings by pressing the Purifier Up/Purifier
Down buttons. You also have the option of controlling the fan speed
by pressing the Fan Up/Fan Down buttons.
Warning: Do not set the unit to a square footage larger than the area
you wish to purify.
Operating the Unit in Away Mode
To operate your Medi Air Purifier in Away Mode, simply press the
Away Mode button. The unit should then show Away Mode on your
LCD Screen. You can set the Away Mode Timer in 2-hour increments
by continuing to press the Away Mode button. The Away Mode Timer
has a maximum setting of 12 hours.

SET UP AND OPERATION
LCD Notification
Perform Cleaning Notification
After every 900 hours of use, a Perform Cleaning notification will
appear on the unit’s LCD screen. This means the ceramic plate
needs to be cleaned for the unit to run at peak performance. To clean
the ceramic plate, follow the instructions laid out in this manual. After
cleaning the ceramic plate, press the Away Mode button for five
seconds and the Perform Cleaning notification will disappear. The
unit has now been re-set and will again notify you to perform a
cleaning after another 900 hours of use.

SET UP AND OPERATION
WARNINGS
Do not operate the Medi Air Purifier near anything flammable, an
open flame, such as a fireplace or near any area of heat generation,
such as a heat duct.
Only use the Medi Air Purifier if all parts are fully and properly
installed. Never operate the unit with a broken plate.
Do not stare directly into the lamplight inside the unit.
Do not set the unit to cleanse an area larger than the square footage
of your home or office.
Never use the Away Mode while your home or office is occupied.
Always power off and unplug your Medi Air Purifier prior to
performing any service or maintenance to your unit.
Individuals with asthma or respiratory and lung conditions should not
be in the room while using the Purify feature.

DISSASSEMBLING THE MEDI AIR PURIFIER
Instructions
In order to work on the Medi Air Purifier, you will need a large flat
area, such as a table to disassemble/reassemble the unit. Remember
not to lose any screws while in the process of servicing the unit.
Disassembling the Rear Cover Instructions
First, turn the unit off and unplug the power cord. Next, unscrew the
Rear Cover and remove it from the unit. Then,slide the rear cover
down toward you until it is free of the unit. Once removed, you can
wipe the Rear Cover with a damp cloth.
Disassembling the Filter Instructions
To remove the Filter, unscrew two screws on the top corners of the
unit. Gently pull the top of the Filter Assembly free of the unit. Unlock
the tabs on the Filter to expose the mesh, foam and honeycomb
membranes of the Filter.
Disassembling the Purification Plate Instructions
First tear away and dispose of the two rubber seals that secure the
purification plate in place for shipping.
Disassembling the APCO Cell Instructions
The APCO Cell is located on the rear of the unit. To remove,
disconnect the APCO Power Connector from the APCO Power Outlet
by holding down the tabs and carefully separate the connection. Now,
find the thumb nuts below the APCO power cell and unscrew.
Carefully slide the APCO Cell out from the unit.
Disassembling the Front Turbine Grille
Find the two screws that hold the Front Turbine Grille in place on the
corners of the unit and unscrew. Clean the grille with a damp cloth or
a vacuum.

REASSEMBLING THE MEDI AIR PURIFIER
Reassembling the Medi Air Purifier is as simple as reversing the steps of
disassembly. Use the screws that were removed in the disassembly
process to re-attach any aspect of the unit you took apart. However,
there are a few things to keep in mind when reassembling the unit.
Front Turbine Grille
When reassembling the Front Turbine Grille, carefully align it with the
screw holes so as not to damage the two ionization needles at the top
center of the unit.
APCO Cell
For the APCO Cell, position the tabs so that they face the bottom interior
of the unit and slide the holes in the tabs over the two Screw Posts from
which they were disassembled. Now orient the APCO Cell with the
APCO Power Connecter Outlet and continue to slide the cell in until the
tabs lock into place.
Purification Plate
To reassemble the purification plate, carefully slide it back into the
Purification Plate slot. Be very gentle when re-installing the plate. Do not
force it into the slot as this could cause serious harm to your unit.
However, ensure the Purification Plate is fully inserted.
Filter Assembly
When re-installing the filter assembly, make sure the honeycomb layer is
facing towards the unit. Ensure you place the three membranes back into
the filter assembly in the correct order: Honeycomb, foam, then mesh.
See picture below. When standing behind the unit, the honeycomb layer
of the filter should face the back of the unit. Fit the filter assembly into the
tabs, ensuring that they are connected properly. Once properly seated,
screw the Filter Assembly back into place.
Rear Cover
To reassemble the rear cover, simply align it with the tabs and screw
back into place.
Power Cord
Re-conect the power cord to unit then plug it into a wall outlet. Now you
can turn the unit back on by pressing the Power button. The unit will
automatically set to Normal Mode.

MAINTENANCE/CLEANING
For best performance, clean your unit every 6 to 12 months,
depending on the level of contaminates in your home or office.
BEFORE ANY MAINTENANCE OR CLEANING ALWAYS POWER
OFF AND UNPLUG THE UNIT!
Exterior Cleaning
If needed, wipe down the unit with a damp cloth and dry with a soft
cloth.
Cleaning the Filter Assembly
Make sure you clean each membrane of the filter separately
(honeycomb, foam and mesh) with compressed air or water. Let dry
and place them back into the filter in this order: Honeycomb, foam
and mesh. Lastly, attach the rim onto the filter.
Ionization Needles
Gently clean the ionization needles with a Q-tip soaked in rubbing
alcohol.
Purification Plate
Soak the Purification Plate in a 50/50 mix of warm water and clear
ammonia or use a 50/50 mix of water and rubbing alcohol. Leave the
plate in the solution mix for 2 hours. Next, gently scrub the
Purification Plate’s mesh with a soft bristled brush until you no longer
see any debris. Rinse off, air dry and use a soft cloth to clean the
Purification Plate contacts. Re-install Purification Plate into the unit.
Cleaning the Interior
Gently clean the interior with a vacuum, a damp cloth, compressed
air etc. after the unit has been disassembled.
Changing the Fuse
The fuse is located next to the switch on the backside of the unit. Use
a small flathead screwdriver and gently remove the fuse. One extra
fuse is included. 110 volt models: Use 3.5 amp slow blow fuse.

TROUBLESHOOTING
For parts or service, go to www.mediairpurifier.com or call (800)
953-7228.
Email: [email protected]
Unit Won’t Power On
Make sure the Power cord is properly connected to both the unit and
the wall. Press the Power button to see if it displays on the air
purifier’s LCD screen. If it doesn’t display, try turning the unit on with
the remote control.
The Unit is Powered On, but is not Purifying the Air
Clean the Purification Plate. Then, clean and check to make sure the
contacts are touching the metal weave. To see if the unit is
operational, turn off the lights in the room. Also, turn off the APCO
light with your remote control and look for a purple or blue light
glowing within the unit.
The APCO Cell is not Giving Off a Light
Check to make sure the APCO power connector is properly installed.
Also check if you have turned off the APCO light on your remote by
clicking APCO.
The Ionization Needles are Sparking
The needles need to be cleaned. Gently clean the needles with a
Q-tip soaked in rubbing alcohol.
The Fan is not Working
Disassemble the Front Turbine Grille to make sure nothing is stuck in
the fan. Also, you can try switching the fan speeds.
The Air Purifier Rattles when Moved
Check to make sure all screws are attached. Disassemble unit to
ensure there are no loose parts in your unit.

Medi Air Purifier
Table of contents