MAC E-Power e-MM/MT User manual

E-Power
e-MM/MT 230V
Manual De Instalacin User Manual
made in Italy
/620030202 Rev.7

Index
1Advertencia - Warning ...............................................................................................................3
2Gua del comprador - Guide to purchase..................................................................................4
3Suministro y contenido - Package contents.............................................................................4
4Gua rpida de arranque - Start Up procedure .........................................................................5
4.1 Instalacin hidrulica - Hydraulic Installation...........................................................................5
4.2 Installacin elèctrica - Electrical Installation.............................................................................5
4.3 Instalacin Software - Software Installation.............................................................................6
5Generalidades - General Remarks ............................................................................................9
5.1 Descripcin del producto - Product Description.......................................................................9
5.2 Condiciones de uso - Usage Condition .................................................................................10
5.3 Caractersticas Tècnicas - Technical Features......................................................................11
5.4 Proteccin - Protections........................................................................................................12
6Funcionamiento y uso - Functioning and Use........................................................................13
6.1 Conexión hidráulica - Hydraulic installation...........................................................................13
6.2 Conexión eléctrica - Electrical Connection ............................................................................15
7Conexiones adicionales - Additional connections.................................................................19
7.1 Conectar un flotador externo (nivel minimo) - Dry running float Configuration .......................19
7.2 Configuración Relay - Relay Configuration............................................................................19
7.3 Configuración Booster (bomba ON/OFF) - Booster Configuration (ON/OFF pump)...............20
7.4 Configuración Multibomba - Multipump Configuration ...........................................................23
8Menù Software - Software Menu.............................................................................................26
9Solución de problemas y mantenimiento - Troubleshooting&Maintenance.........................26
10 Menu Avanzado - Extended Menu...........................................................................................30
10.1 Tabla de Parámetros - Parameter Table ...............................................................................32
11 DECLARACIÓN DE CONFORMIDAD - CONFORMITY DECLARATION..................................35

Istruzioni-epower-14112017 (Cod.620030202 Rev. 7) EsEng.doc
3
1 Advertencia - Warning
PELIGRO
Riesgo de lesiones personales y materiales si no
se cumple con los requisitos
DESCARGA ELCTRICA
Riesgo de choque eléctrico si no se cumple con
los requisitos
DANGER
Risk of personal injury and property if not
complied with the requirements
ELECTRIC SHOCK
Risk of electrical shock if not complied with the
requirements
ADVERTENCIA
Riesgo de daños a la propiedad o el medio
ambiente si no se cumple con los requisitos.
WARNING
Risk of damage to property or the environment if
not complied with the requirements.
ADVERTENCIA
Antes de instalar y de usar el producto lea este
manual de instalacin en su totalidad. La
instalacin y mantenimiento deben ser
realizados por personal calificado.
Mac3 no se hace responsable de los daos
causados por un uso inadecuado del variador
EPOWER por una mala instalacin,
manipulacin no autorizada.
El uso de refacciones no orginales, anulara
automticamente la garanta.
WARNING
Before installing and using the product read this
book in all its parts. Installation and maintenance
must be performed by qualified personnel in
accordance with current regulations.
MAC3 will not be held responsible for any
damage caused by improper or prohibited use
and is not responsible for any damages caused
by a not correct installation or maintenance.
The use of non-original spare parts, tempering or
improper use, make the product warranty null.
ADVERTENCIA
El variador EPOWER debe ser instalado de
acuerdo con el apartado titulado como
“funcionamiento y utilizacin”. En la instalacin
del variador EPOWER enfriado por agua, la red
hidrulica debe estar diseada para evitar una
presin excesiva, como la provocada por los
golpes de ariete. Los dispositivos instalados para
proteger contra el exceso de presin deben ser
revisados peridicamente.
El EPOWER es un dispositivo elctrico, si su
estructura mecnica es daada por la presin
excesiva, las fugas de agua pueden ser
perjudiciales para los componentes elctricos.
WARNING
EPOWER must be installed as described in the
paragraph “Functioning and Use”
You must project correctly the hydraulic
connection of EPOWER to avoid pressure
shocks. The shock absorber, installed to avoid
pressure shocks, must be keep under a correct
maintenance.
Epower is an electric device, if the case will be
damage by pressure shocks a possible water
infiltration could be dangerous due to the contact
between electric components and the water flow.
PELIGRO
El variador EPOWER est certificado bajo la CE,
pero en el caso de una incorrecta instalacin
puede causar interferencias electromagnticas.
En el caso de interferencia electromagntica,
antes de cada procedimiento, asegrese de
que el variador EPOWER est desconectado
de la fuente de alimentacin.
No lleve a cabo ninguna maniobra con el
variador EPOWER encendido.
La puesta en marcha del variador EPOWER
debe ser realizada por personal calificado.
El variador EPOWER debe estar protegido por
un interruptor trmico y conectado a un sistema
de tierras.
DANGER
EPOWER is CE labelled but in the case of wrong
installation can cause electromagnetic
interference.
Verify the correct operation of other electronic
devices with EPOWER on and running.
Malfunction of equipment can be harmful to
people and property.
In the case of electromagnetic interference
contact technical support and stop the plant.
Before any intervention censure that the
EPOWER is disconnected from the electricity
supply.
Do not attempt operations with the EPOWER
open
The connection of the EPOWER to the electric
panel must be carried out by qualified personnel
in accordance with current norms
EPOWER must be protected by a thermal
switch.
EPOWER must be connected to an efficient
earthing system

Istruzioni-epower-14112017 (Cod.620030202 Rev. 7) EsEng.doc
4
2 Gua del comprador - Guide to purchase
ES Gracias por su preferencia hacia nuestros productos, y
por elegir nuestro equipo. Considere la siguiente infomacin
para utilizar e instalar correctamente su variador.
1. Seleccin de bombas: Con el fin de aprovechar
adecuadamente el funcionamiento del variador EPOWER
debe tener especial cuidado en la seleccin de la bomba. Un
variador EPOWER por su propia naturaleza acciona la
bomba a diferentes frecuencias con diferentes flujos de
demanda, logrando as alcanzar un alto ahorro energtico y
un incremento en la vida til de la bomba. Para obtener el
mejor comportamiento, debe elegir la curva correcta y una
bomba con caractersticas adecuadas (ver fig.), por lo
general las bombas centrfugas estn diseadas para poder
trabajar a diferentes frecuencias (bajo el mandato de un
variador EPOWER). La carga y caudal de la bomba debe ser
adecuados a las necesidades del sistema.
EN Thanks to have bought Epower! We would like to
notice some useful information to correctly use and
install EPOWER and the available accessories.
1. How to choose pump: to take advantage of
performance of EPOWER it is essential to choose the
correct pump.
The inverter pilots the pump on several frequencies
depending on the variation of flow. This is why it is
possible to save energy and to increase life time of the
pump.
For having correct behaviours it is essential to choose a
pump with slope characteristic curve (see fig.), usually
multiimpeller pumps; this kind of pump permits the
EPOWER to pilots pump at variables speed.
The head and capacity of the pump must correct for
request of the plant.
2. Adaptador para conexiones de largas distancias
(ACL): El cable de conexin entre el variador EPOWER y
una bomba, puede crear un efecto capacitivo que afecte el
correcto funcionamiento entre el variador y la bomba. Para
cancelar la distorsin creada por el cable, MAC3 ofrece un
adaptador para las conexiones de gran longitud L> 15m,
hasta 80 metros. Este accesorio se utiliza generalmente en
aplicaciones con bombas sumergibles y se debe cotizar por
separado
3.Filtro EMI: Los variadores Mac3 estn certificados con la
EMI para uso domstico. Cuando se instala en un ambiente
especialmente sensible a las interferencias
electromagnticas, MAC3 tiene a sudisposicin filtros
EMI, los cuales se deben instalar entre el suministro de
voltaje y el variador EPOWER con el fin de eliminar
cualquier interferencia (se debe cotizar por separado).
2. Long Connection Adapter (LCA)The connection
cable creates, between EPOWER and pump, a
capacitive effect. For removing the disturbance Mac3
produces an adapter for long connection L>15mt (50
feet), up to 80 mt (260feet) of cable.
This device is normally used with submersible pumps in
well applications.
3.EMC filter: Mac3 inverters have domestic use EMC
approval.
If inverter is installed in enviroments particularly sensitive
to electromagnetic interference, Mac3 makes available
additional EMI filters, to be installed between the supply
and inverter, so as to eliminate.
3 Suministro y contenido - Package contents
ES Epower est integrado a un tubo de 1 ¼” y cuenta con
terminales de fcil montaje y cableado.
EN Epower is provided on metal pipe 1 ¼ "and easily
accessible terminals for wiring.
Flow –Q(m3/h)
Head –H(m)

Istruzioni-epower-14112017 (Cod.620030202 Rev. 7) EsEng.doc
5
4 Gua rpida de arranque - Start Up procedure
4.1 Instalacin hidrulica - Hydraulic Installation
ES A continuacin se presenta un diagrama a modo de
ejemplo sobre la correcta conexin del EPOWER en la red
hidrulica, para obtener ms detalles e instrucciones,
consulte el apartado de “Uso y Funcionamiento”.
EN Hereafter a scheme, as example, for more details
and warnings see the section "Functioning and Use"
4.2 Installacin elèctrica - Electrical Installation
ES Enseguida usted puede observar el diagrama tpico de
conexiones para la alimentacin al variador y a la bomba.
Para una informacin ms detalla consulte el apartado de
“Uso y Funcionamiento”
EN Hereafter a scheme, as example, for more details
and warnings see the section "Functioning and Use”.
Bomba
Pump
Alimentacin
Power Supply
Bomba
Pump
Alimentacin
Power Supply

Istruzioni-epower-14112017 (Cod.620030202 Rev. 7) EsEng.doc
6
4.3 Instalacin Software - Software Installation
Descripcin de cada botn Keyboard use
Botn/Button
Accin
EFFECT
ON/OFF
Permite encender o apagar la operacin del
variador sobre la bomba.
- Mantener presionado por 5 segundos.
- Luz encendida: el variador est en operacin.
- Luz apagada: el variador est apagado.
To set the device in stand by and switch off
the pump.
- Keep pressed for 5 seconds:
Light on: device is operating
Light off: device in stand by
SAVE/DISPLAY
Permite pasar del modo ajuste al modo de
supervision (Monitoreo).
-Mantener presionado por 1 segundo para entrar al
modo de monitoreo.
-Mantener presionado por 5 segundos para entrar
en el modo de ajuste.
-Presione una segunda vez para grabar algn
valor y regresar al modo monitoreo.
It allows to switch from display mode to set
mode:
Press for 1 second to see the value set
Press for 5 sec. to enter into set mode
Press a second time to save the value and
return to display mode
+/-
Si el led del botn SAVE/DISPLAY est encendido
de color verde, al presionar estos botones
podemos visualizar los valores de operacin en
tiempo real de la bomba.
Si est encendido en color rojo, podemos modificar
el valor seleccionado.
If LED SAVE / DISPLAY green: it Allows to
scroll through the parameters
If LED SAVE / DISPLAY red: it allows to
change the selected parameter value.
Botones de navegacin + e –para
desplazarse sobre los parmetros.
Keys +and –scroll the parameters
and change the set values
Botn SAVE/DISPLAY: para modificar o
visualizar algn parmetro.
SAVE/DISPLAY Button: to change and to
save the set value
Botn ON / OFF: para encender o
apagar el variador
ON/OFF button: to put on standby
the VFD
Display 2 led
Led parpadeando de color rojo: indica
alarma.
Led flashing red: indicates alarm
Presin de la red
System Pressure
Presin de arranque
Restart pressure
Frequencia actual Frequency
Corriente de la bomba
Motor Current
Indicadores leds para cada valor mostrado en el
display.
Led indicators for the value shown on the display.

Istruzioni-epower-14112017 (Cod.620030202 Rev. 7) EsEng.doc
7
Configuracin inicial Procedure
ES Al energizar el variador EPOWER, despus de 2
segundos mostrar la siguiente pantalla: modelo y la version
del software utilizado.
EN Power the EPOWER and in 2 seconds it will be
displayed the model of the device and the version of the
software.
MM
01
Muestra el valor de corriente que usted podr ajustar.
Presione el botn “+” para aumentar y “–” para disminuir
hasta obtener el valor deseado.Presione el botn SAVE para
grabar el valor deseado y para pasar al siguiente parmetro.
Displayed the value of current to be set. Press the +
button to increase the value and - to decrease.
Press the SAVE key to save the value and move to the
next.
6.8
Muestra el valor de la presin del sistema que usted podr
ajustar. Presione el botn “+” para aumentar y “–” para
disminuir hasta obtener el valor desado. Presione el botn
SAVE para grabar el valor deseado y para pasar al siguiente
parmetro.
Displayed the value of System Pressure to be set. Press
the + button to increase the value and - to decrease.
Press the SAVE key to save the value and move to the
next.
3.0
Muestra el valor de presin de arranque que usted podr
ajustar. Presione el botn “+” para aumentar y “–” para
disminuir hasta obtener el valor deseado. Presione el botn
SAVE para grabar el valor deseado. La configuracin inicial
ha terminado.
Displayed the value of Restart Pressure to be set. Press
the + button to increase the value and - to decrease.
Press the SAVE key to save the value. The installation
procedure is finished.
2.6
El EPOWER graba los valores y muestra la palabra “OF”
(off) para indicar que la bomba no est energizada.
The device saves the parameters and displays OF (off).
the pump is not powered. activates the pump.
OF
Para activar la motobomba presione el botn ON/OFF hasta
que el display muestre la palabra “ON”.
To activate the pump push the ON/OFF button till the led
display shows ON..
ON
El display muestra el valor de presin actual en el sistema.
The LED display shows the value of the measured
pressure of system.
3.0
Durante la operacin del EPOWER podemos visualizar los
valores sensados en los parmetros (presin del sistema,
presin de arranque, corriente consumida por el motor y
frecuencia a la cual el motor esta operando) presionando los
botones “+” y “-” . Para leer los valores de los parmetros,
presione el botn SAVE / DISPLAY por un segundo. El led
indica a que parmetro corresponde el valor visualizado.
During operation, you can read the measured values of
the parameters (pressure in the system, restart
pressure, current consumption of the pump and
frequency at which the pump is running) by pressing the
+ / - keys.
To read the values set of the parameters press the
SAVE / DISPLAY button for 1 second. The link between
the value displayed and the parameter is identified
accordingly by the LED flashing.

Istruzioni-epower-14112017 (Cod.620030202 Rev. 7) EsEng.doc
8
Sentido de rotacin
En caso de necesitar que el motor invierta su sentido de giro
es posible hacerlo a travs del men extendido (ver
parámetro “Sentido de rotación”)
NB:
Para que el EPOWER esté configurado
correctamente después de la instalación, es
necesario hacer funcionar la bomba a la
velocidad máxima, durante al menos 60
segundos. De esta manera el EPOWER
almacenar el valor máximo de la potencia
absorbida por la bomba.
Rotation sense
In case of need to reverse the rotation sense of the
pump is possible to do so via software, entering the
extended menu (Parameter “Rotation sense”)
NB:
In order for EPOWER is configured
properly after the installation, you need
to work the pump at full speed for 60
seconds. In this way the EPOWER will
store the maximum value of the power
absorbed by the pump

Istruzioni-epower-14112017 (Cod.620030202 Rev. 7) EsEng.doc
9
5 Generalidades - General Remarks
ES Este manual ofrece la informacin esencial para la
correcta instalacin, uso y mantenimiento del EPOWER.
Es muy importante que el usuario y/o instalador lea
cuidadosamente este manual antes de realizar cualquier
operacin del equipo. Una instalacin incorrecta puede
causar fallas o la anulacin de la garanta.
Especifique siempre las siglas exactas del modelo, si se van
a solicitar información técnica o piezas de repuesto a
nuestras ventas y servicio post-venta.
Para instrucciones, situaciones y eventos que no están
cubiertos por este manual, póngase en contacto con el
servicio de post-venta.
EN This manual intends to provide essential information
for the installation, use and maintenane of the
EPOWER.
It is important that the user and/or installer carefully
reads the manual before installing and using the product.
Incorrect use may cause faults and result in the
annulment of the guarantee terms.
Always specify the exact identification of the model if
transit requests for technical information or spare parts
from our sales and service support.
In the event of instructions, situations and events not
contemplated in the present manual, please contact
technical customer support.
5.1 Descripcin del producto - Product Description
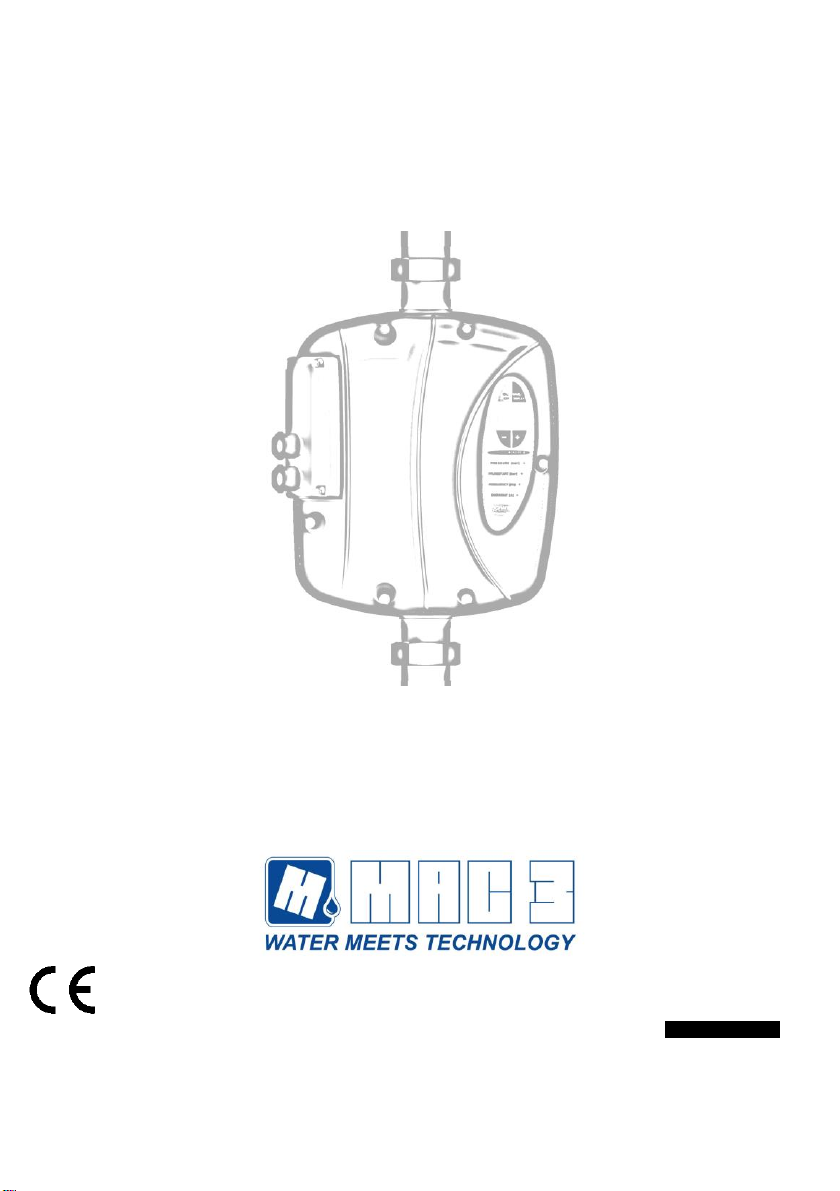
ES . El EPOWER es un variador de frequencia enfriado por
agua para sistemas de presión constante.
EPOWER, regula automáticamente una bomba en función
de la necesidad de agua, regulando el número de ciclos del
motor.
Epower està disponible en los siguientes modelos:
EPOWER-MM: variador enfriado por agua para,
alimentación monofásica para bomba monofásica.
EPOWER-MT: variador enfriado por agua para,
alimentación monofásica para bomba trifásica.
Sistemas de presurización
Es posible configurar el EPOWER para controlar un
segundo motor a plena carga ON/OFF a velocidad fija
(bomba booster). Para una correcta instalación, siga las
instrucciones que aparecen en el diagrama de cableado
y se refieren a los "Enlaces adicionales". Mac3 ofrece
en su catálogo un tablero de control de la bomba ya
preparado para esta
Una configuración multibomba (modelo ADVANCED)
está disponible para correr hasta 8 bombas.
La versión ADVANCED está compuesto por un
MASTER que los pilotos de hasta 7 SLAVES. El inverter
Master determina la función del sistema.
N.B: La instalación debe ser realizadas por personal
calificado
IMPORTANTE: Para esta aplicación se deben
seleccionar bombas con las mismas características:
potencia motor (hp), prevalencia (Hmax).
Con el dispositivo "Wifi Bridge", que se vende por
separado, se puede conectar EPower a Internet que
permite el control remoto del inversor con el PC o
smartphone.
EN The EPOWER is a variable frequency drive
(inverter) for lifting units under constant pressure.
EPOWER, according to the actual water requirements
undertakes the automatic regulations of the number of
revs of the electro-pump whilst maintaining the system
pressure constant.
The Epower is available in the following versions:
EPOWER-MM: inverter water coooled, single-
phase line for single-phase pump.
EPOWER-MT: inverter water coooled, single-
phase line for three-stage pump.
Pressurization groups
The Epower allows to drive a second pump
ON/OFF at a fixed rate (booster pump). For
correct installation, follow the wiring diagram and
instructions refer to paragraph “Additional
connections”. Mac3 has in the catalog a control
panel specifically design for this application.
A multipump configuration (ADVANCED model) is
available for running till 8 pumps.
The ADVANCED version is composed by a Master
that pilots till 7 Slaves.
The inverter Master determines the function of the
system.
NB: Installation must be performed by qualified
personnel
IMPORTANT: The pumps used must be of the
same characteristics: power engine (hp), head
(Hmax).
You can connected the EPower on internet allowing
remote control of the inverter via PC or smartphone
with the device "Access Bridge", sold separately.

Istruzioni-epower-14112017 (Cod.620030202 Rev. 7) EsEng.doc
10
5.2 Condiciones de uso - Usage Condition
ES Temperatura de operacin: 0°C ÷ +40°C
Mxima humedad: 50% a +40°C (sin condensación)
Temperatura lìquido: compresa tra +1°C e +40°C
Tipo de lìquido a bombear: agua libre de productos químicos
o residuos (ph 5÷9).
ADVERTENCIA
EPOWER debe ser instalado en ambientes que estèn
protegidos contra la congelacin e intemperie. Se deben
dimensionar correctamente las conexiones hidrulicas de
EPOWER y su ubicación para evitar golpes de presión.
El tanque precargado, asì como elementos de protección de
la red hidráulica debe ser revisado periódicamente.
El EPOWER no debe trabajar con liquidos abrasivos,
sustancia solidas o fibrosas, asì como lìquidos inflamables o
explosivos
EN Operational temperature:0°C ÷ +40°C
Max.humidity: 50% at 40°C (no condensate)
Temperature of fluid: +1°C +40°C
Nature of fluid: water with no chemical add (ph 5÷9)and
no debris.
WARNING
EPOWER must be installed in environments that are
protected from freezing and weather-proof.
You must project correctly the hydraulic connection of
EPOWER to avoid pressure shocks. The shock
absorber, installed to avoid pressure shocks, must be
keep under a correct maintenance.
EPOWER cannot be used on pipes containing abrasive
liquids, fibrous solid substances or inflammable liquids or
explosives.

Istruzioni-epower-14112017 (Cod.620030202 Rev. 7) EsEng.doc
11
5.3 Caractersticas Tècnicas - Technical Features
Frequecia de salida
5-100 hz
Output frequency
5-100 hz
Tiempo de aceleración
1,5 –5 s
Acceleration time
1,5 –5 s
Seguridad electrica
Compatibilidad
Electromagnètica
EN60730
EN61000-6-3
EN61000-6-4
Electrical safety
Electromagnetic
compatibility
EN60730
EN61000-6-3
EN61000-6-4
Display
2 digitos alfanuméricos
Display
2 digit alphanumeric
Posición de montaje
cualquiera
Assembly position
any
Presión de regulación
0,3 –8 bar [4-116 psi]
Pressure to be set
0,3 –8 bar [4-116 psi]
Max sobrepresión
12 bar [174 psi]
Max overpressure
12 bar [174 psi]
T de funcionamiento
5 - 40 °C
Operational Ta
5 - 40 °C
Grado de protección
IP65
Protection category
IP65
Entrada/Salida
1 ¼” macho
Input/output
1 ¼” male
Dimensioni
33 x 20 x 15 cm
Dimension
33 x 20 x 15 cm
Peso
2kg
Weight
2kg
E-power MM
Alimentacin monofsica
1x230 Vac 50/60 hz
(da 170 a 270 Vca)
Power Supply
1x230 Vac 50/60 hz
(170 ÷270 Vca)
Potencia max. Bomba (P2)
230 Vac monofásico
1.1 kw (1.5 hp)
Max Pump Power (P2)
230Vac single phase
1.1 kw (1.5 hp)
Max. corriente de fase
8 A
Max. Phase current
8 A
E Power MT
Alimentacin monofsica
1x230 Vac 50/60 hz
(da 170 a 270 Vca)
Monophase power supply
1x230 Vac 50/60 hz
(da 170 a 270 Vca)
Potencia max.Bomba (P2)
230Vac trifásica
2.2 kw (3 hp)
Max Pump Power (P2)
230Vac three-phase
2.2 kw (3 hp)
Max. Corriente de fase
10 A
Max. Phase current
10 A

Istruzioni-epower-14112017 (Cod.620030202 Rev. 7) EsEng.doc
12
5.4 Proteccin - Protections
ES . En caso de alguna anomala el EPOWER apaga la
bomba y realiza intentos automticos o programados para el
restablecimiento del sistema.
EN In the event of anomaly conditions Epower protects
the autoclave by switching off, but to ensure water,
attempts automatic or programmed reset operations.
Tipo de protección
Restablecimiento
Type of protection
Reset
Bajo Voltaje
Automàtico (ver apartado de
Solución de problemas y
mantenimiento)
Power voltage too low
Automatic (see “Troubleshooting
& Maintenance”)
Alto Voltaje
Automàtico (ver apartado de
Solución de problemas y
mantenimiento)
Power voltage too high
Automatic (see “Troubleshooting
& Maintenance”)
Cortocircuito
Intentos automáticos *.
Short circuit
Automatic attempts *
Corriente de salida
mayor del umbral
permitido durante más
de 1 minuto.
Intentos automáticos *.
Output current above
threshold for over 1 min.
Automatic attempts *
Temperatura del agua
por encima de 75 °C
Automàtico (ver apartado de
Solucin de Problemas u
Mantenimiento)
Water temperature
above 75 °C
Automatic (see “Troubleshooting
& Maintenance”)
Presin insuficiente
Intentos automáticos *.
Insufficient pressure in
the system
Automatic restart attempts *
Falta de agua o aire en
la tubería
Intentos automáticos *.
Lack of water or air in
the pump
n° programmable attempts**
Fallo del sensor
---
Pressure sensor fault
---
Golpe de ariete
Intentos automáticos *.
Pressure shock
Automatic
Antibloqueo
(solo versin MM)
Si la bomba es detenida por màs de
24 horas,el variador reinica la
bomba elevando la presión en 0.5
bares
Anti-lock
(only vers MM)
If the pump is stopped for more
than 24 hours, the device restarts
the pump raising the pressure of
0.5 bar
*Nùmero programable de intentos para el restablecimiento
del sistema (programado de fbrica a 5 intentos).
Si al terminar los intentos programados no se restablece el
servicio, es necesario hacer lo siguiente:
1. Desenergizar el EPOWER
2. Espere a que la pantalla se apague.
3. Energice de nuovo EPOWER.
* programmable number of automatic restart attempts -
factory default 5).
On exhausting the reset attempts you need to :
1. disconnect power
2. wait for display to switch off
3. re-power

Istruzioni-epower-14112017 (Cod.620030202 Rev. 7) EsEng.doc
13
6 Funcionamiento y uso - Functioning and Use
6.1 Conexión hidráulica - Hydraulic installation
ES Epower puede ser instalado en cualquier posición. Sin
embargo, se recomienda la colocación vertical. En caso
necesita tener el dispositivo en posición horizontal, se
recomienda instalarlo con una ligera inclinación, a causa de
las secciones horizontales de tubería y simultáneamente con
bajo flujo de agua (3-5 litros / minuto), usted podría tener un
aumento significativo de la temperatura, que enviaría el
dispositivo en la protección.
Precauciones:
- Asegúrese de que la bomba esté perfectamente
cebada, antes de instalar el EPOWER.
- Instale el EPOWER cerca de la bomba, si es directa la
instalación verifique no existan vibraciones que afecten
al EPOWER.
- No utilice una tubería de descarga menor al diámetro
del EPOWER.
- Evite lugares húmedos.
- Instale un tanque precargado para proteger eI equipo
contra golpes de presión y continuos arranques con
demandas mínimas.
Ejemplo. del dimensionamiento del tanque de acuerdo a la
presión de trabajo:
Bomba 6 bar tanque 10bar
Ejemplo del dimensionamiento del tanque de acuerdo a la
bomba.
Bomba de 100LPM, tanque precargado de 10L (10%
del máximo flujo de la bomba).
La presión de precarga del tanque debe ser de un 80% de la
presión de trabajo del sistema.
Ejemplo.
Presión del sistema = 3bar (43 psi)
Presión de arranque = 2,6bar (37 psi)
Valor de precarga del tanque = (0,8 x 3) = 2,4bar
(34psi)
Si la presión de arranque es programada a más de 1bar
(14psi) sobre la presión de trabajo, entonces establezca el
80% de la presión de arranque.
Ejemplo.
Presión del sistema = 3bar (43 psi)
Presión de arranque = 2bar (29psi)
Valor de precarga del tanque = (0,8 x 2) = 1,6bar
(23.2psi)
Notas de instalación
- Se recomienda instalar una llave de pruebas.
- Insertar filtros en la red hidráulica para proteger que
sólidos en el agua dañen tanto a la bomba como al
EPOWER (Nota 1).
- Es necesario utilizar válvulas check en la red
hidráulica de acuerdo a la distancia y las características
de la red.
- Para facilitar el mantenimiento instale el EPOWER
utilizando tuercas unión.
- Instale una válvula de compuerta antes de la
conexión al tanque de precarga y un grifo cerca de
EPOWER para facilitar su mantenimiento.
EN Epower can be installed in any position. However,
we recommend the vertical positioning. In case you need
to have the device in a horizontal position, it is
recommended to install it with a light inclination, because
in horizontal sections of pipe and simultaneously with
low water flow (3-5 liters / minute), you could have a
significant increase in temperature, which would bring
the device in protection.
Warnings:
- Make sure pump is perfectly primed, before installing
EPOWER.
- Install EPOWER near the pump; if installed directly
on the pump, verify that there are no harmful
vibrations.
- Use tube diameter not less than those of EPOWER
attacks.
- Avoid places where is possible precence of
condensation
- Install an expansion tank to protect the product
against water hammer and to avoid continuous
restarting in presence of small losses.
Eg. Size, according to pressure of work:
Pump 6 bar expansion tank 10 bar
Eg. Size, in liters per minute according to the pump:
Pump 100lt/min expansion tank from 10lt/min
(10% of the maximum flow of the pump)
Preload value of the expansion tank should be about 0.8
x value of system pressure.
Eg.System pressure = 3 bar
Restart pressure = 2.6 bar
value of precharge = (0.8 x 3) = 2.4 bar
If the restart pressure is at least 1 bar lower than the
system pressure, then the precharge value of the
expansion tank should be about 0.8 x pressure value of
restart pressure.
Eg.System pressure = 3 bar
Restart pressure = 2 bar
value of precharge = (0.8 x 2) = 1.6 bar
Installation Notes
- Recommended to install a tap sampling.
- Insert a cartridge filter to protect both the system that
the device from impurities, always present in the
water (Note1)
- The inclusion of an external check valve is
mandatory.
- For easy maintenance, mount the drive using a 3-
piece union fittings
- Install a tap near the drive to facilitate the control of
the drive
- Install a gate valve in series with the expansion tank
for easy maintenance

Istruzioni-epower-14112017 (Cod.620030202 Rev. 7) EsEng.doc
14
Nota1: El agua en ocasiones contiene restos de sólidos, por tal motivo
es necesario colocar filtros para evitar que estos entren en la tubería y
ocasionen daños en el sistema de presión..
Diagrama de instalación hidráulica:
Note 1: The water always contains sand, iron, debris; such
impurities should not enter the hydraulic system because they
cause corrosion of pipes, damaging the equipment connected to
plumbing.
Water filtration for domestic use is required under the UNI-CTI
8065 and by decree of the Ministry of Health of 12.21.1990.
Installing a filter is not an option but a provision.
Hereafter a typical system diagram with surface
pump suction head:

Istruzioni-epower-14112017 (Cod.620030202 Rev. 7) EsEng.doc
15
6.2 Conexión eléctrica - Electrical Connection
EPower MM
ES El EPOWER esta provisto de 2 terminales (línea
/bomba) las cuales están disponibles al desatornillar la tapa
de conexiones, pase cada uno de los cables a través de los
prensacables provistos en esta tapa
Retire la tapa de conexiones, dejando al descubierto los
terminales y pasar los cables en sus prensacables:
- Conecte el cable de salida (pump) a la bomba (2 fases
ytierra). Utilice los terminales “V y W” para la
conexión monofásica de la bomba.
EN The device is provided with two terminals (line /
pump) accessible through a door with built-in cable
glands, which is connected to the device with screws.
Remove the door, exposing the terminal and passing the
cables in their cable glands:
- Connect the output cable (ground, single phase)
to the pump. Use the terminals “V and W” for
the single-phase pump.
Utilice los terminales “V y W” para la
conexión monofásica de la bomba.
Use the terminals “V and W” for the
single-phase pump.

Istruzioni-epower-14112017 (Cod.620030202 Rev. 7) EsEng.doc
16
ES Conecte el cable de entrada (alimentación-2 fases y
tierra) a través de un interruptor de 2 polos de acuerdo a la
máxima corriente de la motobomba.
A continuación un diagrama, a modo de ejemplo.
EN Connect the input cable (phase, neutral, ground) to
the single-phase line through a circuit breaker sized
according to the pump rating.
Hereafter an electrical link schema just for example.
-
- Cierre la puerta y asegurar la posición correcta de la
junta tórica. Para evitar la infiltración del agua es
necesario respetar el correcto montaje de la junta
tórica.
- Después de haber acercado a la puerta de manera
uniforme sobre la junta tórica, continuará el
endurecimiento.
NB: Para evitar problemas de condensación y
evitar la posible infiltración de agua, es necesario
apretar los tornillos con un par entre 0,25 a
0.35Nm, recomendado 0.30Nm.
(secuencia en la figura)
-
- Close the door and ensure the correct position of
the O-Ring. To prevent any water infiltration is
necessary to respect the correct assembly of the
O-Ring.
- After having approached the door uniformly on the
O-ring, continue the tightening.
NB: To avoid condensation problems and to
prevent the possible water infiltration, you
need to tighten the screws using a torque
between 0.25 to 0.35Nm, recommended
0.30Nm.
(see the sequence in figure)
-
2
4
1
3

Istruzioni-epower-14112017 (Cod.620030202 Rev. 7) EsEng.doc
17
Epower MT
ES El EPOWER esta provisto de 2 terminales (línea/bomba)
las cuales están disponibles al desatornillar la tapa de
conexiones, pase cada uno de los cables a través de los
prensacables provistos en esta tapa.
- Conecte el cable de salida (pump) a la bomba (3 fases
y tierra) configuración () 230Vac
- Conecte el cable de entrada (alimentación—3 fases y
tierra) a través de un interruptor de 2 polos de acuerdo
a la máxima corriente del variador
A continuación un diagrama, a modo de ejemplo:
EN The device is provided with two terminals (line /
pump) accessible through a door with built-in cable
glands, which is connected to the device with screws.
Remove the door, exposing the terminal and passing the
cables in their cable glands:
- Connect the output cable (ground, triple-phase,
screen) to the three-phase pump with ()triangle
configuration 230 Vac.
- Connect the input cable with three wires (phase,
neutral and ground) to the power supply through a
single-phase 230Vac circuit breaker sized in
function of the pump rating.
Hereafter an electrical link schema just for
example.
- Cierre la puerta y asegurar la posición correcta de la
junta tórica. Para evitar la infiltración del agua es
necesario respetar el correcto montaje de la junta
tórica.
- Después de haber acercado a la puerta de manera
uniforme sobre la junta tórica, continuará el
endurecimiento.
NB: Para evitar problemas de condensación y
evitar la posible infiltración de agua, es necesario
apretar los tornillos con un par entre 0,25 a
0.35Nm, recomendado 0.30Nm.
(secuencia en la figura)
-
- Close the door and ensure the correct position of
the O-Ring. To prevent any water infiltration is
necessary to respect the correct assembly of the
O-Ring.
- After having approached the door uniformly on the
O-ring, continue the tightening.
NB: To avoid condensation problems and to
prevent the possible water infiltration, you
need to tighten the screws using a torque
between 0.25 to 0.35Nm, recommended
0.30Nm.
(see the sequence in figure)
-
2
4
1
3

Istruzioni-epower-14112017 (Cod.620030202 Rev. 7) EsEng.doc
18
ES . EPOWER está certificado por:
EN60730 seguridad
EN61000-6-4 Las emisiones electromagnéticas industriales
EN61000-6-3 Las emisiones electromagnéticas
residenciales, con el cable de salida siguiente:
EN EPOWER is certified:
EN60730 safety
EN61000-6-4 EMC industrial environment.
EN61000-6-3 EMC residential environment, with the
following output cable:
Longitud –Lenght
Sección cable de salida - Section Output Cable
(cable blindado a tierra - Screen to GND)
2 m
1.5 mm2
ES Sección del cable de alimentación en función a la
distancia.
EN Section power supply cable linked to cable length.
Model MT- MM
S mm2
L max mt
1.5
20
2.5
50
Todas las partes internas del variador están
energizadas, en caso de contacto puede sufrir lesiones.
Toda instalación y/o mantenimiento deberá ser
efectuada por personal calificado, utilizando las herramientas
correctas y los equipos de seguridad adecuados. En caso de
algún fallo desenergice el variador.
Antes de realizar cualquier modificación en el
cableado del variado espere al menos 5 minutos para que el
capacitor interno se descargue.
Peligro de electrocución, se corre el riesgo de sufrir lesiones
severas en caso de no seguir esta precaución.
Dispositivos de protección
Póngase en contacto con la compañía eléctrica de
suministro, para información sobre el equipo de protección
necesario.
Aplicable:
- Puesta a tierra de protección;
- Los dispositivos de protección con corriente residual CA y
CC (RCD);
- sistemas TN.
Puesta a tierra de protección
- Teniendo en cuenta la presencia de condensadores en el
filtro de entrada, es posible ocurrir corriente a tierra.
- Seleccionar una unidad de protección adecuado de
conformidad con las normas locales.
Dispositivo de corriente residual (RCD / RCCB)
- Cuando se utiliza un dispositivo de corriente residual
(RCD), su intervención debe ser seguro en caso de un
cortocircuito en la conexión CC a tierra del inversor!
=> Utilice RCD sensible a pulso de corriente
- Seleccionar a unidad de protección, de corriente residual,
adecuado de conformidad con las normas locales!
interruptor automático
- Utilice un disyuntor automático con curva característica tipo
C.
- Para el dimensionamiento de la seguridad de red, consulte
el capítulo Datos técnicos.
All internal parts of the drive are unde power
supply. In case of contact may sussit risk of death.
All installation and maintenance work ,must be
performed by qualified staff using suitable instruments!
Staff must use suitable protective equipment.
In the event of a fault, disconnect or switch off the power
supply.
Before performing repairs on the drive wait at
least 5 minutes to allow the capacitor to discharge.
Danger of electrocution, burning or death if this
precaution is not observed.
Safety devices
Contact the electricity provider for information
concerning safety devices.
Applicable:
- safety earthing;
- safety devices operating with residue alternating and
direct current (RCD);
- TN systems.
Safety earthing
- Given the presence of condensers in the inlet filter,
current to mass may occur.
- Choose a suitable safety device according to local
regulations.
Residual current circuit breaker (RCD/RCCB)
- When a residual current circuit breaker (RCD) is used,
make sure it trips even if a short circuit occurs in the DC
part of the earth connection of drive!
=> use RCD's that are sensitive to pulse currents.
- Install the residue current circuit breaker according to
local bylaws!
Automatic switch
- Use an automatic circuit switch with a type-C
characteristic curve.
- Consult the Technical Specifications for the size of the
mains protection system.

Istruzioni-epower-14112017 (Cod.620030202 Rev. 7) EsEng.doc
19
7 Conexiones adicionales - Additional connections
ES El variador está provisto de:
- Terminal de entrada para la conexión de un flotador
externo o un arranque remoto, si esta terminal está
programada, el EPOWER permanecerá en stand by.
- Terminal de salida relay, para:
1. controlar una segunda bomba a pilotar una
segunda bomba a frecuencia fija
2. activar una alarma externa.
Conexión con otros ePower (modo multipump)
La tapa de conexiones está diseñada para la perforación y la
inserción del cable para conexiones adicionales.
Para activar estas funciones ingrese al menú avanzado
"extended menu"(parámetro 50 active la operación de la
segunda bomba y parámetro 55 active el uso de flotador).
EN The internal terminals are provided of:
- Input for dry running floating or remote control. If this
input is enable, Epower is set in standby.
- Output relay:
1. To pilot a second pump at fixed rate
2. To activate an external alarm.
- Connection with other ePower (multipumps mode)
The terminal cover is designed for drilling and insertion
of the cable for the additional links.
To set these options enter in extended menu.(parameter
50 for 2nd pump and 55 for floating)
7.1 Conectar un flotador externo (nivel minimo) - Dry running float Configuration
ES Es posible utilizar un switch flotador externo para
detener la bomba al llegar a un nivel mínimo de agua.
Para habilitar esta función:
- Conecte el switch flotador en la terminal J11 (ver la
imagen de arriba)
- Habilite la función de control remoto "remote control" en
el menú extendido (parámetro 55 “Habilita remoto”).
-
Conectar una segunda bomba a plena carga (ON/OFF):
Es posible utilizar la terminal "relay run" para controlar el
arranque de una segunda bomba a plena carga (ON/OFF).
- La terminal puede ser usada para controlar un contactor
o un relevador del arrancador que gobierna la bomba a
plena carga.
- Para habilitar esta función vea los parámetros 50 y 51
del menú extendido estableciendo el valor “BO”.
EN You can use a float switch stop the pump at the
minimum water level.
To enable this function:
- Connect the floatswitch on the terminals J11 (see
picture above)
- Enable “remote control” function on extended menu
(par.55 paragraph Extended Menu)
EG. How to connect a second pump ON/OFF (fixed
rate)
You can use the RELAY RUN to pilot a second pump
ON/OFF.
- The relay can be used to operate a contactor or a
relay, with adequate power to drive the pump.
- Enable Booster function (see parameters 50 and 51
in the Extended Menu) setting the value “BO”
7.2 Configuración Relay - Relay Configuration
ES Es posible utilizar el relé (J10) en la placa madre como
una señal de alarma, de bomba activa, o para construir el
sistema con una segunda bomba en frecuencia fija. Las
funciones pueden ser habilitado por el menú ampliado
(par.50).
EN It’s possible to use the relay (J10 ) on the mother
board as a warning signal, run pump, or to build boosting
system with a second pump at fixed rate.The functions
can be enabled by the extended menu (par.50).
J11
J10
J20
GALLEGGIANTE
FLOATSWITCH

Istruzioni-epower-14112017 (Cod.620030202 Rev. 7) EsEng.doc
20
7.3 Configuración Booster (bomba ON/OFF) - Booster Configuration (ON/OFF pump)
ES
Conecte el control de BOOSTER en el terminal J10 entre
"C" y "NO". (Mira figura in párrafo “Conexiones
adicionales”).
Ajuste el parámetro 50: "Configuration.Relay" = "BO"
Ajuste el parámetro 51 "Inc Pres Booster" para aumentar
el valor de la presión (estandard = 0,2 bar). Este valor
determina el aumento en la presión del sistema requerida
después de arranque la bomba ON / OFF.
Booster Operación:
Modalidad de alimentación de la segunda bomba ON / OFF:
Cada vez que NO se alanza la presión del sistema y la
frecuencia del inversor ha llegado a la frecuencia máxima de
funcionamiento de la bomba (es.50Hz/60Hz), se acciona el
comando para arrancar la bomba ON / OFF.
Con la puesta en marcha de la segunda bomba se
incrementa la presión del sistema de un valor igual a la fijada
en el parámetro 51 "Inc Pres Booster" (por defecto 0,2
bar). Este parámetro determina el aumento en la presión del
sistema para evitar la oscilación. En caso de necesidad se
puede aumentar hasta un máximo de 1,5 bar (por defecto =
0,2 bar).
Modo de parada de la bomba Segunda ON / OFF:
El parámetro que desactivación a la segunda bomba es:
- parámetro 64 "umbral mínimo" (de fábrica = 50%)
Cuando el porcentaje de la potencia suministrada por el
variador está por debajo del umbral mínimo (par.64) y la
presión medida es mayor que la presión del sistema, a
continuación el comando desactiva la segunda bomba.
ES:
Parámetro 47 "Potencia del motor" = 1000 watts
parámetro 64 "Umbral Mínimo" = 50%
parámetro 72 "Press. del sistema" = 2,5 bar
Teniendo en cuenta los datos anteriores, la potencia para
desactivar la segunda bomba es 'igual a 50% de 1000 vatios
osea 500 vatios.
Si la presión medida es "mayor o igual a 2,5 bar y la potencia
medida es menor a 500 vatios, está, apaga la segunda
bomba.
N.B. El Booster Configuración se activa sólo
cuando el modo de funcionamiento del inverter
es AUTOMÁTICO (consulte el parámetro 28 en el
menú ampliado)
EN
Connect the control of booster on J10 between “C” and
“NO”.
Set parameter 50 : ”Configuration Relay” = “BO”
Set the parameter 51 “Inc Pres Booster”the value of
pressure rise (default = 0.2 bar). This value determines
the increase of the system pressure required after the
starting of the pump ON / OFF.
Booster Operation:
How to start second pump ON / OFF:
If the first pump cannot reach pressure system and the
frequency is at the maximum working value
(es.50Hz/60Hz), the drive switch on the command to
start the second pump ON / OFF.
As soon the second pump is started, the drive increase
the system pressure value by an amount equal to the
parameter 51 “Inc Pres Booster”(default 0.2bar [2.9psi]).
This parameter determines the increase of the system
pressure to avoid oscillation. In case of need can be
increased up to a maximum of 1.5 bar [21.75 psi]
(default = 0.2 bar [2.9psi]).
How to stop the second pump ON / OFF:
The parameter that switches off the control for the
second pump is:
-parameter 64 “MinTresholdPar”(default = 50%)
When the percentage of power is lower than the
threshold and the measured pressure is higher than the
system pressure, then the drive switches off the second
pump.
Eg:
Parameter 47 “Motor Power”= 1000 watts
parameter 64 “MinTresholdPar”= 50%
parameter 72 “System Pressure”= 2.5 bar [36.26 psi]
The power value to switch off the second pump is equal
to 50% of 1000 watts then: 500 watts. So that if pressure
is greater or equal to 2.5 bar [36.26 psi] and power is
less than 500 watt the drive switch off the second pump
N.B. The Booster configuration is only active
when the operating mode of the inverter is
AUTOMATIC (see parameter 28 in the
Extended Menu)
Table of contents