Mackworth Hazel Classic Universal User manual

®
HAZEL
CLASSIC UNIVERSAL
INSTRUCTIONS FOR USE
DESIGNS AVAILABLE
(with and without head
section)
FITTING INSTRUCTIONS (DIFFERENCES):
Please note that the Hazel Classic Universal Sling is available in both long loop and short loop inner leg designs. These products are
optional for customers to purchase and are noted at time of order via an appropriate product code. Both styles are suitable for
use and only offer varying lifting positions / comfort, subject to the clinicians / carers and indeed the end users needs.
Providing that these instructions are followed carefully and a general risk assessment is taken, then both systems are usually
suitable for most patient groups (subject to clinicians application). The difference in inner leg designs are clearly shown in picture
*A below.
The
Short leg loop
comes as standard with a single white outer webbing and a short red loop in the middle. The
Long leg loop
comes as standard with a yellow inner loop, red middle loop and white larger outer loop as shown in picture *B. Both sling styles
use the same long outside leg webbing which is the same length as circled in picture *B below.
*A
Long loop style (example seated)
Short loop style (example seated)
INNER LEG WEBBINGS
INNER LEG WEBBINGS
PRIOR TO USE
Please ensure that these User Instructions and the General User Safety Guide are read prior to first use of any
moving and handling practice. Mackworth Healthcare Ltd recommend that prior to using any sling, a full risk
assessment must be completed by a qualified professional, in order to determine that the correct sling, positioning
and transfer procedure is suitable for each individual.
●Ensure you are aware of the hoist manufacturer's fitting instructions. Please identify if the hoist requires a loop
or clip fitting. If a clip fit sling is required, please refer to the enclosed clip instructions for use. (Do NOT use a
clip fit sling on a loop designed spreader bar. Do NOT use a loop designed sling on a stud/clip designed
spreader bar.) For all other sling information/clip & hoist size compatibility, please refer to pages 8 & 9 of the
General User Safety Guide. To view our clip fitting video please visit: www.mackworth-healthcare.com/training.
For general guidance for how to fit a sling, please visit: www.mackworth-healthcare/category/guides.
●Inspect the sling for wear and damage, with particular attention being paid to the body of the sling,
webbings and stitch lines (Be Aware of LOLER 1998 - Lifting Operation and Lifting Equipment). For further
information please visit: www.hse.gov.uk/work-equipment-machinery/loler.htm
●If the sling is fitted with a head support, ensure the two head stays are fitted in the head pockets.
●If following inspection, there is any doubt (points 1-3), the sling should be placed aside and not used.
*B
NB The short loop style allows different methods of fitting the sling to the patient, continued on next page:

®
Fitting method - Option A
Please follow the how to fit from seated or laying position then refer to this section for the leg fitting.
Feed the outer leg webbing through the short red loop of the inner leg webbing as in pictures 1 and 2.
Attach the long outer webbing to the spreader bar by the appropriate loop. Repeat operation for the other leg.
1 2 3
Short loop leg webbing fitting methods
Fitting method - Option B
Please follow the ‘how to fit from seated or laying position’ instructions then refer to this section for the leg
fitting.
Feed one of the inner leg webbings through the short red loop of the other inner leg webbing so that the left leg
inner webbing rests on the right leg and vice-versa, pictures 1 and 2.
Feed each of the outside leg webbing through the white loop on the short inner leg loop, as shown in pictures 3
and 4.
Please note that as there are many hoist and spreader bar designs available, it is the clinician/carer’s responsibility
to ensure that any sling is correctly fitted on the patient and relevant spreader bar. An appropriate risk assessment
should be carried out prior to use and indeed application. The carer/clinician conducting the lift operation is
responsible for the correct use of the sling at all times. Other applications of the sling can be considered at the
discretion of the clinician, however all responsibility differing from this user instruction is taken solely by them at
that time.
1 2 3 4 5

How to fit from a seated position:-
Place the sling behind the patient ensuring that all handles and labels are on the outside and visible. Feed the sling
down behind the patient (using the courtesy pocket if available) to position the sling at the base of the spine. The
sling should now lie square across the patient's shoulders.
Raise each leg individually and gradually feed the leg straps under each leg, ensuring no fabric twists are evident and
follow the relevant pictured fitting instructions for either long or short loop style sling contained in this instruction
sheet. By carrying out this arrangement, you are ensuring comfort and safety for the patient during the lifting
process. The front of the sling legs should be about 2 inches behind the knee. If you find that you cannot achieve
these positions then a different size sling may need to be considered.
With the sling now in place, attach desired loops to the hooks or clips to the studs on the spreader bar, to replicate
the sitting position that the patient is in whilst seated. The straps should be positioned accordingly, subsequently the
tension on all straps should take at the same time. This is the carer/clinicians ultimate responsibility.
Make sure that the loops or clips selected are the same on each side of the sling and ensure that they are still
securely attached before lifting the patient. The patient can now be lifted as required. To remove the sling, carry out
the fitting procedure in reverse. Important: Always peel the sling away gently from the patient as to minimise skin
shear and friction forces.
Long loop leg webbing fitting methods
Please follow the ‘how to fit from seated or laying position’ instructions then refer to this section for the leg fitting.
The procedure below of how to fit a long loop style sling by fitting the leg sections appropriately is as follows.
Feed both leg section under the patient as in the pictures (and text) as required below.
Pass one of the leg webbings through the modesty loop (small yellow loop) on the other leg as in picture 2 and
attach all four leg webbing and the shoulder webbings to the spreader bar, as in the final fitting as in picture 4.
1 2 3 4
®

Mackworth Healthcare Ltd, Mackworth House, Millers Avenue, Brynmenyn Industrial Estate,
Brynmenyn, Bridgend, Wales, CF32 9TD Freephone: +44 (0)800 779 7218 Fax: +44 (0)1656
ISSUE 5 14.04.15
®
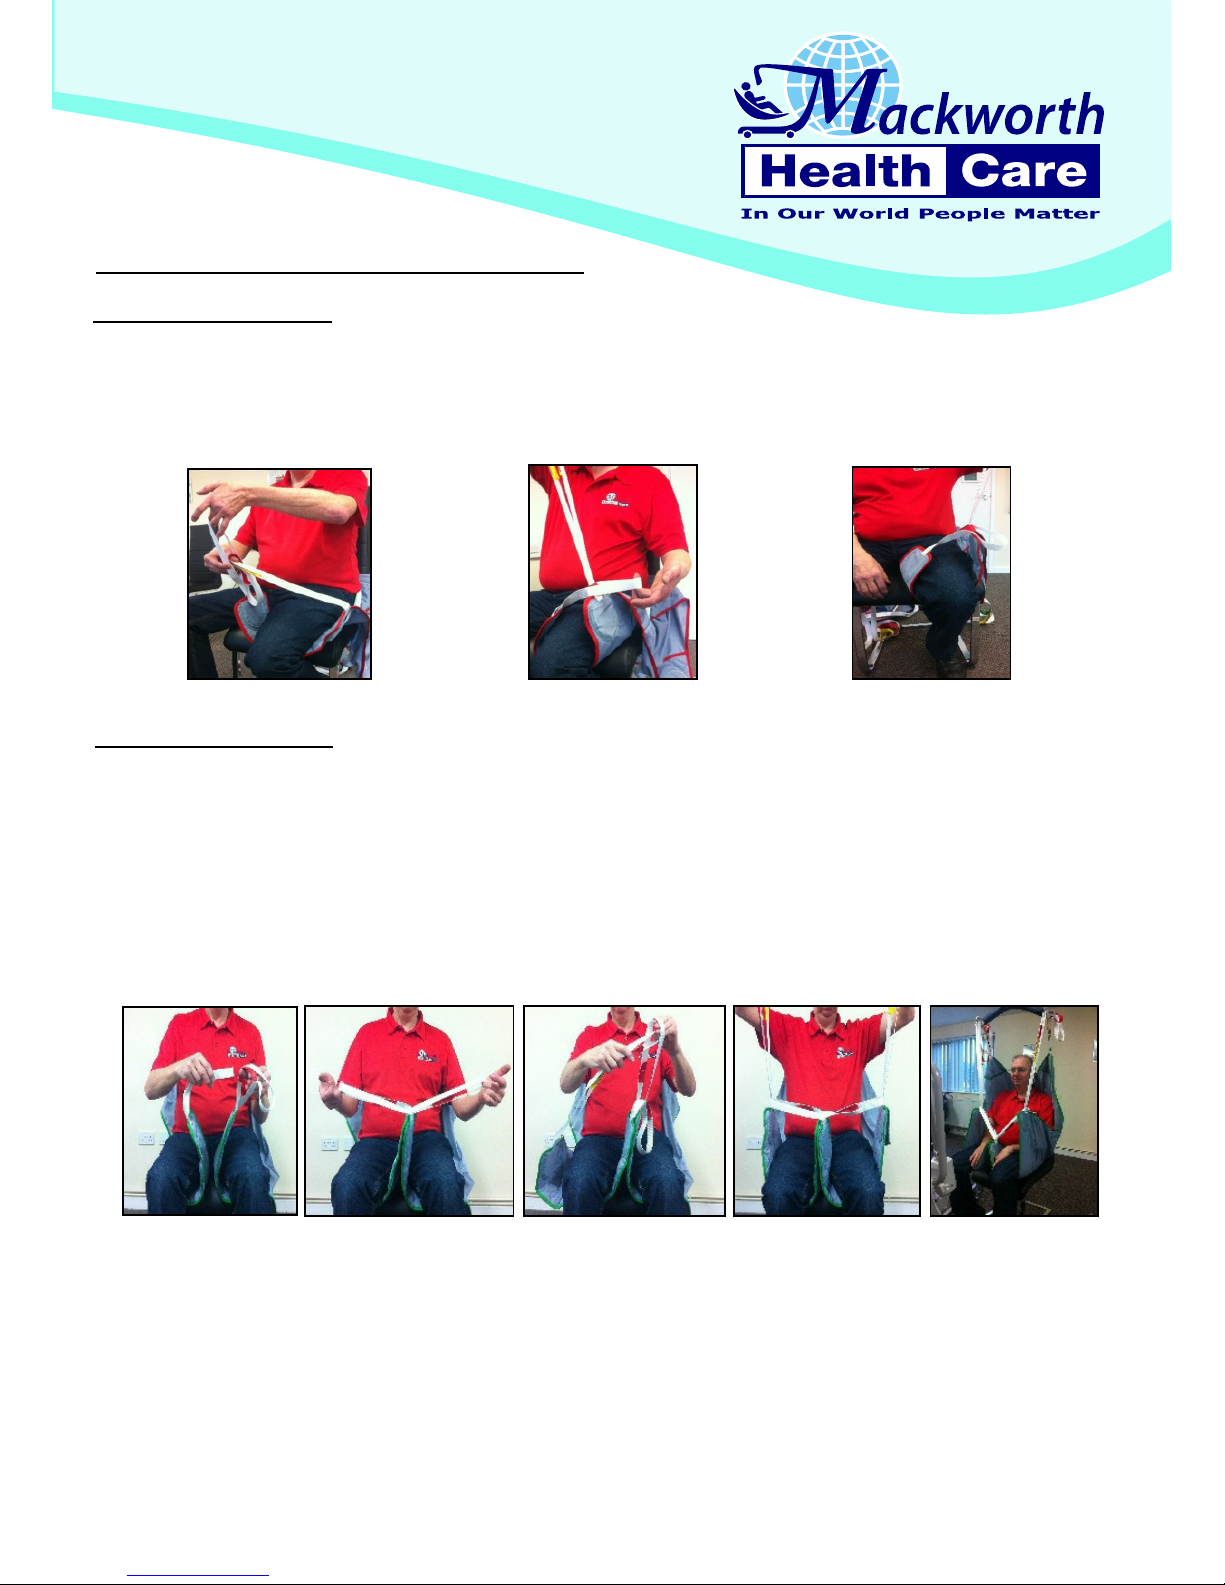
How to fit from a lying position (Head section slings only):-
1. Using good manual handling techniques, roll the patient towards you so they are positioned on their side. To
introduce the sling, roll half of the sling up under itself so that when the patient is rolled onto their opposite
side, the sling can be unrolled until it is flat. Use the centre label at the nape of the neck to ensure the sling is
central with the body. Ensure that handle loops are to the outside.
2. Raise each leg individually and gradually feed the leg straps under each leg, ensuring no fabric twists are
evident and follow the relevant pictured fitting instructions for either long or short loop style sling contained
in this instruction sheet. By carrying out this arrangement, you are ensuring comfort and safety for the patient
during the lifting process. The front of the sling legs should be about 2 inches behind the knee. If you find
that you cannot achieve these positions then a different size sling may need to be considered.
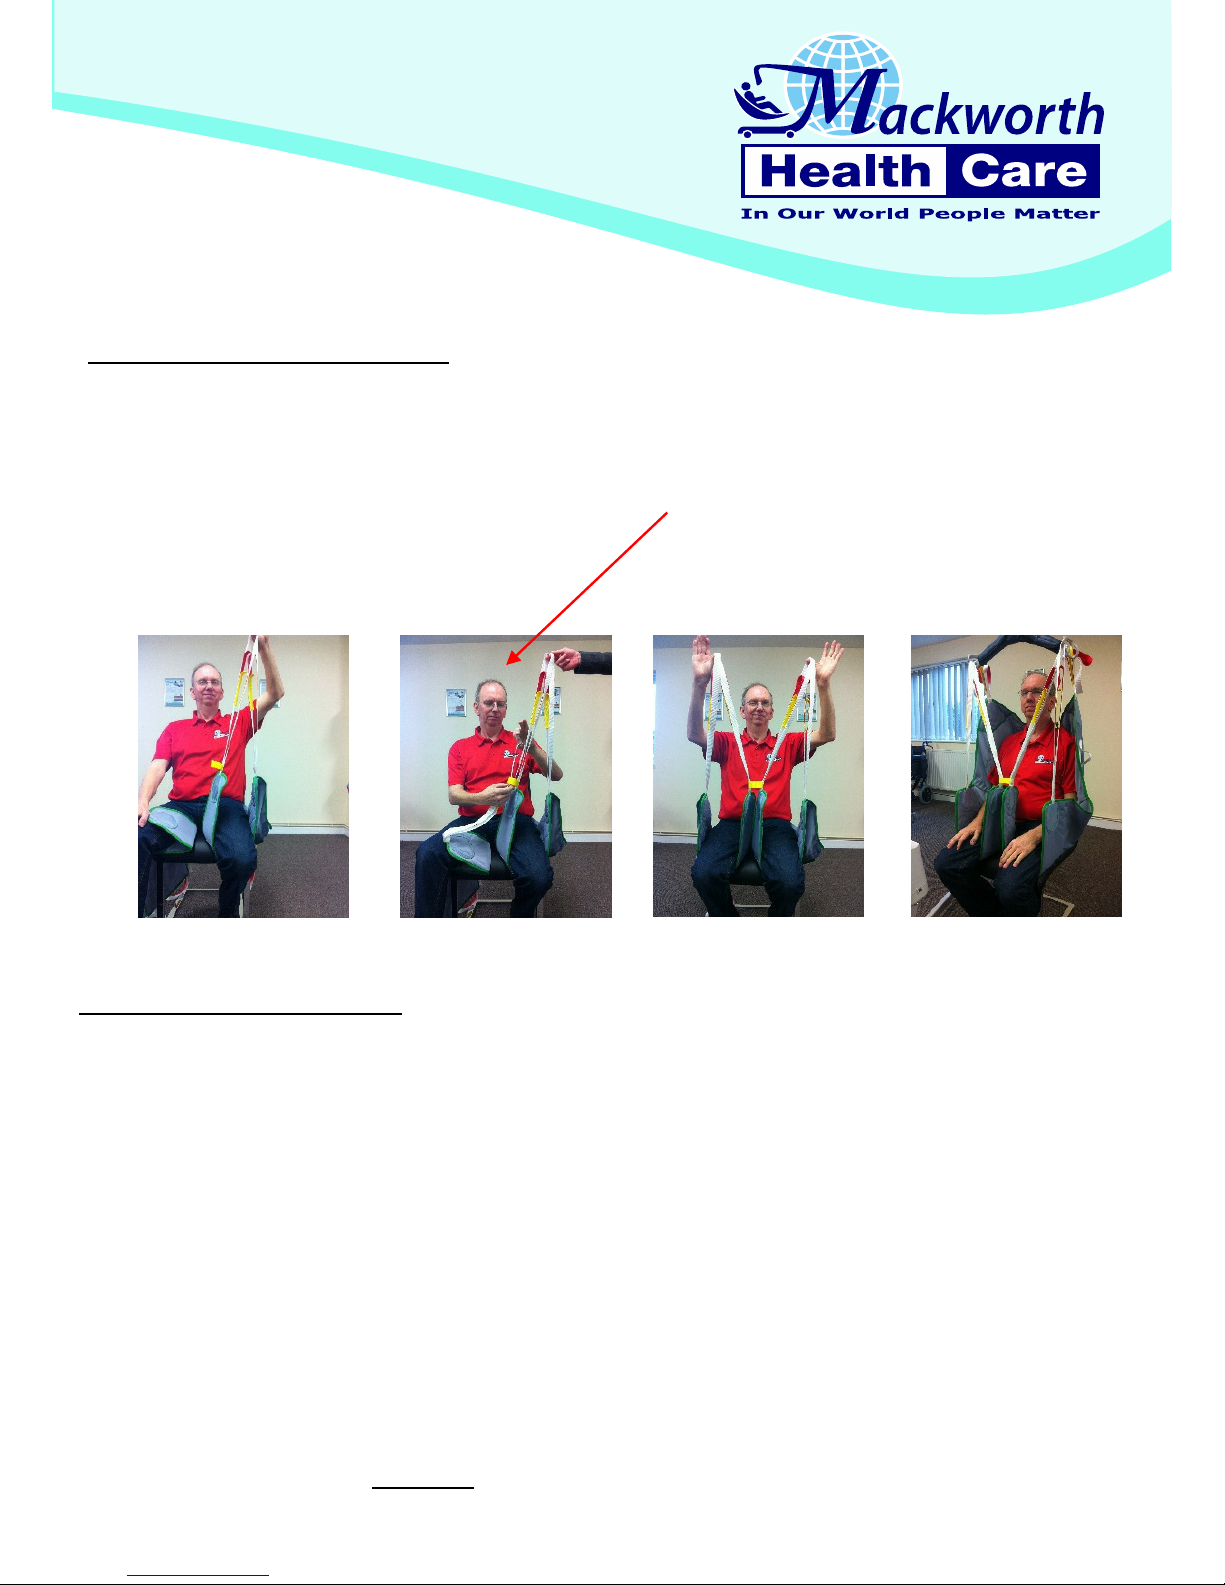
3. With the sling now in place attach the desired loops to the hooks or clips to the studs on the spreader bar.
NB:Do not apply short leg straps directly to the spreader bar. Feed through as instructed within this leaflet.
*A. Raise the carry bar just enough to tension the straps and make sure that the loops or clips selected are the
same on each side of the sling and ensure they are securely attached before lifting the patient. The patient can
now be lifted as required. To remove the sling, carry out the lifting procedure in reverse. Important: Always peel
the sling away from the patient - this avoids skin shear and friction forces.
Please note:-
AS OF THE 1ST NOVEMBER 2011, IN ADDITION TO THE NORMAL PRINTED LABEL THE SAFE WORKING LOAD AND SERIAL
NUMBER IS NOW EMBROIDERED INTO THE SLING CENTRE TAB.
Washing Guidelines:-
*Follow the wash recommendations detailed on the label of your product.
*Always ensure that all Velcro® fastenings are fully closed before washing.
*For optimum fabric longevity, all products should be washed using non-biological washing detergents (inc. Conditioners
and fabric softeners), ensuring a full rinse to prevent deterioration to the sling fabric and skin irritation.
*Customers wishing to use biological washing detergent are advised that this may ultimately affect the fabric
integrity and longevity of the product. Customers are also advised that using biological washing detergent will
invalidate any future warranty claims due to possible deterioration in function of the product by not following the
manufacturers guidelines.
*Ensure any head stays are removed prior to washing. REPLACE HEAD STAYS AFTER WASHING.
*Never iron any sling product.
*Always wash your product at the temperature stated on the label.
Drying Guidelines:-
*Follow the recommended drying instructions on the label of your product.
*Overheating a textile product can cause deterioration in the material components.
*Do not place the product on a convector heater or steam pipes.
Table of contents
Other Mackworth Medical Equipment manuals

Mackworth
Mackworth SA180E User manual

Mackworth
Mackworth 180 Mobile Hoist User manual

Mackworth
Mackworth SA400 User manual

Mackworth
Mackworth M180 User manual

Mackworth
Mackworth TX440 Advanced PT User manual

Mackworth
Mackworth M Series User manual

Mackworth
Mackworth HOLLY User manual

Mackworth
Mackworth Raiser User manual

Mackworth
Mackworth M180 User manual

Mackworth
Mackworth FSG Quick start guide