Macpower & Tytech MovieStar User manual

MovieStar
User Guide & Manual
Version 1.3

September 2004
Congratulations in buying your MovieStar Portable Media Center.
MovieStar is a Portable Digital Multimedia Storage and Player that you can connect to any PC
or Mac via USB 2.0 (plug & play) in order to copy your favorite contents (music, movies,
pictures, and/or data files). Once you have transferred your data to MovieStar, you can
connect it to any TV set to enjoy your movies, music, and photos. You can watch your favorite
films in HDTV quality video and Dolby Digital or DTS quality audio.
MovieStar has a pocket design that lets you take it wherever you go.
This document will provide you with full and comprehensive instructions on how to use your
MovieStar and benefit from its unique features.
Please start reading the “MovieStar Features” chapter in order to have an overview of the
enhanced capabilities of your device. A more technical description of these features is
presented in the “Specifications” chapter.
Before using the MovieStar, be sure that you have received the complete set of accessories by
checking the “Package Contents” section.
To have a detailed description of MovieStar functionality, read the “PC Connection” and “TV
Connection” chapters in order to explore the full set of operations.
In order to maintain your MovieStar device in safe operating conditions and to guarantee life
extension, please read the “Safety Information” section.
MovieStar is not designed or intended to, and may not be used to violate any copyrights
or other IP (Intellectual Property) rights. Each user of MovieStar may only use it in
connection with materials legally owned by or licensed to the user and only extend such
ownership or license rights that will permit such use.
All rights reserved. Windows is a registered trademark of Microsoft Corporation. All rights reserved. Macintosh, Mac, Mac OS are registered
trademarks of Apple Computer, Inc. All rights reserved. DivX®Certified and DivX® Video are registered trademarks of DivXNetworks, Inc. All
rights reserved. Dolby® and Dolby® Digital are registered trademarks of Dolby Laboratories, Inc. All rights reserved. All other trademarks and
registered trademarks are property of their respective owners. All rights reserved.
■

Table of Contents
FEATURES OF MOVIESTAR..................................................................................................1
COMPACT DESIGN......................................................................................................................1
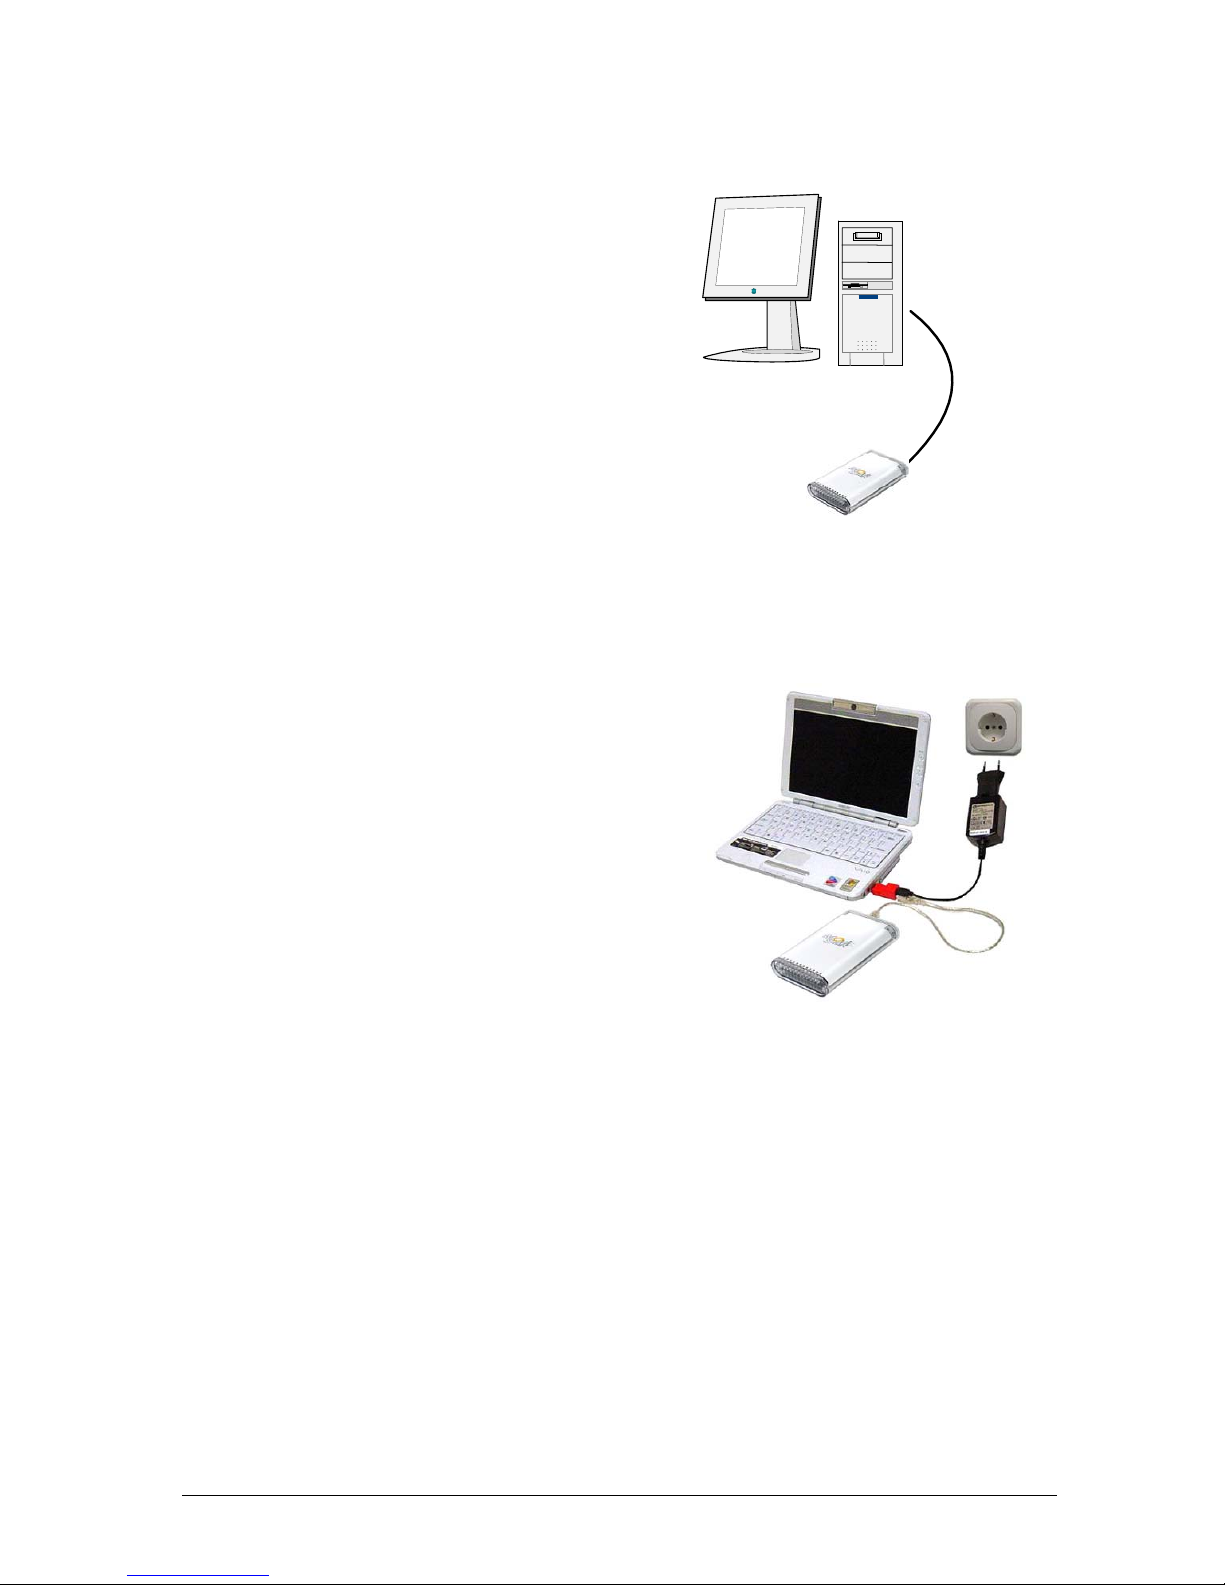
PC CONNECTION........................................................................................................................2
TV CONNECTION ........................................................................................................................2
AUDIO FEATURES ....................................................................................................................... 2
VIDEO FEATURES ....................................................................................................................... 2
MULTILINGUAL............................................................................................................................ 2
REMOTE ....................................................................................................................................3
FIRMWARE UPDATE....................................................................................................................3
ENJOY.......................................................................................................................................3
FORMATTING THE HDD.........................................................................................................4
FORMATTING ON A PC (WIN2000/XP)........................................................................................4
FORMATTING ON A MAC (OS X)..................................................................................................4
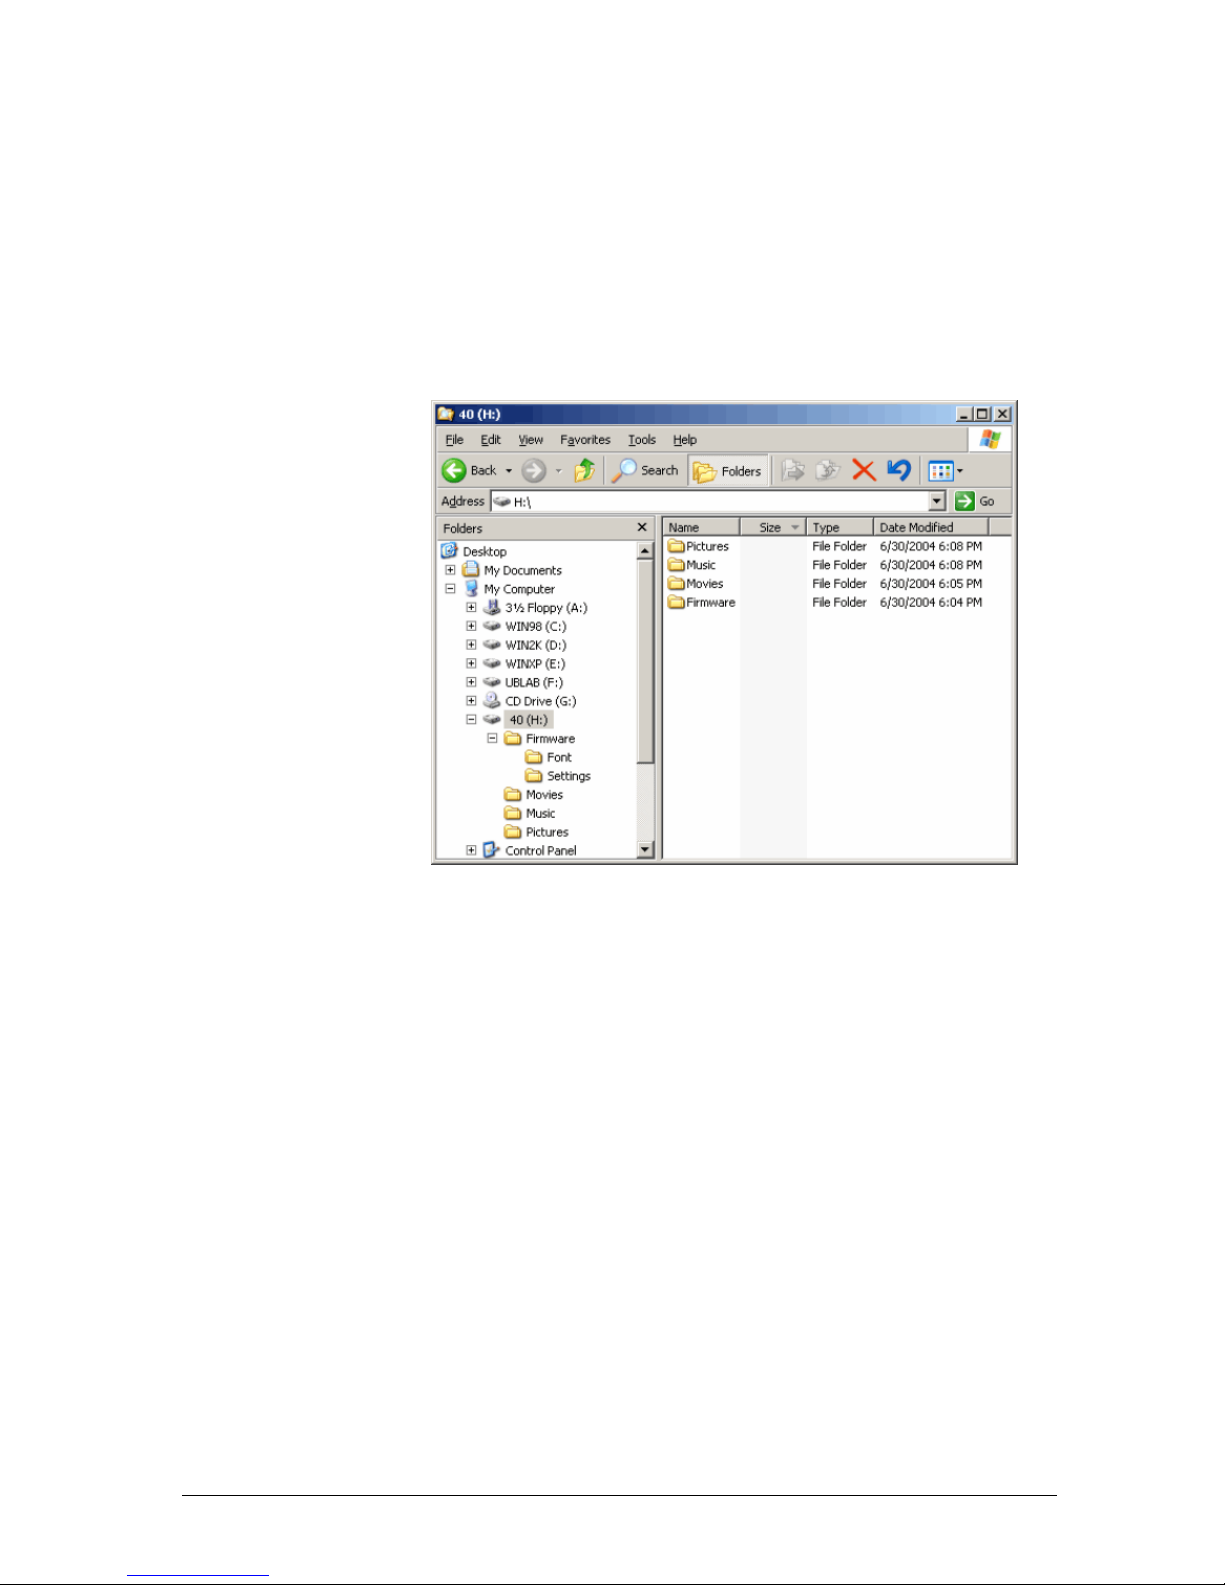
CREATING THE DIRECTORIES.............................................................................................5
FONT SUPPORT..........................................................................................................................5
TV CONNECTION....................................................................................................................8
ANALOG AUDIO SETUP ..............................................................................................................9
DIGITAL AUDIO SETUP ...............................................................................................................9
THE REMOTE CONTROL.....................................................................................................10
REMOTE CONTROL KEYS.......................................................................................................... 11
MENU FUNCTIONS....................................................................................................................14
MAIN MENU.............................................................................................................................. 14
MOVIES ................................................................................................................................... 14
MUSIC ..................................................................................................................................... 15
PICTURES ................................................................................................................................15
SETTINGS ................................................................................................................................16
BACKGROUND IMAGE CUSTOMIZATION...................................................................................... 18
.ISO COMPATIBILITY ...........................................................................................................20
XVID COMPATIBILITY..........................................................................................................20
DIVX COMPATIBILITY..........................................................................................................21
DIVX® VOD COMPATIBILITY...............................................................................................21
SPECIFICATIONS .................................................................................................................22
PACKAGE CONTENTS.........................................................................................................23
STANDARD PACKAGE...............................................................................................................23
OPTIONAL CABLES AND CONNECTORS.....................................................................................25
SAFETY INFORMATION.......................................................................................................26
POWER ON/OFF PRECAUTIONS..................................................................................................26
LOCATION AND PLACING PRECAUTIONS ....................................................................................26
ELECTRICITY AND POWER PLUG................................................................................................26
CABLES...................................................................................................................................26
DECLARATION OF CONFORMITY ......................................................................................27
■

Features of MovieStar
Compact Design
Everything you love about multimedia, movies,
music, and photos is brought to you with
MovieStar.
MovieStar features an elegant, light, and high
quality case to protect your device. The
dimensions of MovieStar, as depicted in the
adjacent figure, make this device a true
portable multimedia center.
With a compact and smart interface design,
MovieStar requires only three (3) external
ports to provide all its features. In the rear
panel there are the following interfaces:
•SPDIF: Digital audio output with either
copper coaxial or optical cable
•TV: Multi-Connector for Analog
Audio/Video. This multi-pin connector
provides all the video and analog audio
signals for your TV set.
•USB-2: This port has two functions
depending on the operation mode of
MovieStar. When connected to a PC or
Mac, it is the USB-2 port providing power
and data transfer. When operating as a
media player connected to a TV, it is the
power supply input connected to the
electric outlet through the power adaptor.
The front panel of MovieStar is transparent,
allowing the user to see the infrared receiver
and two indicative LEDs:
•PC mode LED: green when power-on and
green-yellow during disk activity
•TV mode LED: green when power-on and
yellow when in stand-by mode. It “blinks”
(yellow intervals) to confirm a command,
whenever a button on the remote control is
pressed.
14 cm
SPDIF USB-2
8.8 cm
2.7
cm
TV Multi-connector
TV
LED
PC
LED
IR
Receiver
■
1

PC connection
MovieStar can be connected to any PC or Mac via USB interface supporting all file formats:
FAT32, NTFS, HFS+ (Mac OS extended). With up to 480 Mbps transfer rate (in USB 2.0
connections), you can quickly move large multimedia files from your computer to MovieStar.
Please note that you do not need an external power adaptor, because MovieStar is powered
through USB bus power.
TV connection
MovieStar provides the optimum multimedia quality in both audio and video outputs when
connected to your TV set and audio system.
Audio features
•Audio file formats supported: WMA, WAV, MP3, MPEG-4 (AAC), AC3 (Dolby Digital).
•Audio Output Formats: Dual Stereo analog audio, Coaxial SPDIF digital Audio (supports
compressed Dolby Digital 5.1 and DTS pass through).
Video features
•Video file formats supported: MPEG-1, MPEG-2 (AVI, VOB, ISO),
MPEG-4(AVI, DivX, XviD).
•Video Output Formats: NTSC/PAL composite and S-video, Analog YPbPr video
(progressive or interlaced) scalable up to 1920x1080i or 1280x720p. RGB via SCART.
VGA scalable up to 1024x768.
DivX compatibility
Supports DivX 3.11, 4.x, 5.x
Supports external text subtitles (.srt, .sub)
Supports any language text subtitles
Please refer to the “DivX Compatibility” chapter for more details.
XviD compatibility
Please refer to the “XviD Compatibility” chapter for more details.
DVD (.ISO) compatibility
ISO=One Image file backup of the complete DVD.
MovieStar will play the ISO file exactly the same as if it was running from the original DVD.
Supports .ISO of any size (FAT32/up to 4GB, NTFS/unlimited, HFS+/unlimited).
Supports external text subtitles (.srt, .sub).
Supports any language text subtitles.
Only with MovieStar can you create your own Virtual DVD Library by storing your private
collection of DVDs (.ISO format) and watch them as if they were running from the original
DVDs. Please refer to the “.ISO Compatibility” chapter for more details.
Multilingual
MovieStar has been designed to meet everyone’s expectations. With sophisticated Unicode
character handling, it supports most of the major languages used in the menu selection and
the subtitle feature. Refer to “Font Support” for further details.
■
2

Remote
MovieStar is equipped with an elegant infrared remote control, providing standard DVD
functionality buttons. Please refer to the chapter “TV Connection” for a detailed description of
the remote control.
Firmware update
You will be able to upgrade your device with new features and capabilities by following the
firmware1upgrade procedure:
•Get the latest update from your vendor’s web site.
•Connect MovieStar to your computer and copy the firmware file to the “firmware” folder.
•Connect MovieStar to the TV and choose “Firmware Update” from Settings.
•Wait a few minutes for the new firmware to be updated.
•Never disconnect or turn off your unit before the firmware has been completely
updated!!
•Turn off MovieStar by disconnecting the power supply, wait a few seconds, and then
connect the power supply again. Wait a few seconds and your MovieStar will appear.
•Done!
Powerful Media Processor
The heart of your MovieStar device is a powerful media processor supporting the demanding
MPEG-1, MPEG-2 (AVI, VOB, ISO) and MPEG-4(AVI, DivX, XviD) decoding.
Enjoy
MovieStar is the ultimate Portable Digital Multimedia Storage and Player that can be
addressed to a wide variety of users:
•Home users who want to build a state-of-the-art, versatile home theatre.
•Stores, Agencies, Exhibitors, and Companies that want audio/visual promotion of their
products (indoor advertising).
•Car Holiday travelers with kids (the “keep’em-quiet kit”).
•Business people on the road who want some entertainment.
•Parents who want to back-up and replay their family videos.
•Movie and music lovers who want to enjoy their favorites at all times.
•People downloading large number of movies and music from the internet.
•Everyone who normally takes a stack of CDs & DVDs with him wherever he goes.
•Parents who want to create a “DVD/CD-safe” environment.
•DivX enthusiasts that want to enjoy their DivX/MPEG4 videos with exceptional Dolby
Digital (AC3) sound.
•Every computer fan owning a TV, home theatre, or other A/V equipment.
1Firmware is the software stored in MovieStar Flash memory that contains the programs running in your
device. These programs remain stored even when the system is switched off.
■
3

Formatting the HDD
Formatting on a
PC (Win2000/XP)
Use the Disk Management
Utility
•Right click on “My
Computer” and choose
“Manage”
•Select “Disk Management”
•Choose the drive you want
to format and right click on
the Disk or drive field for
further commands
•Create a primary partition
and format it
•Follow the Wizard
instructions
You can also format MovieStar using FAT32 but this will have the limitation of max disk being
32GB and max file size being 4GB. Note: To be able to use the MovieStar on all Operating
Systems, you will need to use FAT32. To create one single disk over 32GB use the DOS
command prompt and the “fdisk” command on Win98/SE or WinME.
Formatting on a Mac (OS X)
Mac OS9.2 and earlier, do not
support creation of partitions
on an external drive. To do
that, you will need to
purchase additional 3rd party
software, connect the drive to
the internal IDE bus, or
upgrade to OS X. Initializing
the drive can be done on all
Operating Systems.
For Mac OS X, use the Disk
Utility to format and create
partitions on your external
disk.
•Select “Disk Utility” in the
utilities folder
•Choose your external drive and format it according to your requirement. For Mac only,
choose “Mac OS Extended”
NOTE: To be able to use the MovieStar on all Operating Systems, you will need to use
FAT32 (max file size limited to 4GB!). To create one single disk over 32GB, use the DOS
command prompt and the “fdisk” command on Win98/SE or WinME.
■
4

Creating the Directories
For MovieStar to be able to find the files on the hard drive, four (4) folders with the exact name
shown below must be created first! ALL the prerequisite folders should have the READ
ONLY attribute and should never be deleted or renamed, because your MovieStar uses
these exact names as a reference to locate the respective files. Under these directories
you can have any directory structure that is convenient to you. Create the folders as shown
below, now.
“Firmware”: this folder
contains the MovieStar
firmware files. Inside this
folder there are two (2)
subfolders:
•“Font,” for
Europe and US,
this is an empty
directory.
•“Settings”
contains the
“Settings.txt” file.
This file is a
Unicode text file
with two strings.
The first line
string is the
default TV mode
(PAL or NTSC) in
which MovieStar
should start before the user applies his settings. The second line string is the string
used from the MovieStar screen saver. This string is user editable and should not be
more than 16 characters. Create this file if required, otherwise leave the folder empty.
“Movies”: This folder contains your movie files.
“Music”: This folder contains your music files.
“Pictures”: This folder contains your image files.
If you need a directory to transfer your files from one computer to another, you may certainly
create more directories and name it whatever you like. These folders won’t affect MovieStar
but will NOT show up on your TV screen!
Font Support
For additional font support other then English, we recommend copying the ‘Arial Unicode MS’
font to the “Font” folder located in the “Firmware” directory. On a PC, you can find this font by
going to Control Panel and then selecting Fonts. After copying the font to MovieStar, rename
the file to “font.ttf”. Example: If original is “arialuni.ttf,” rename to “font.ttf”.
You may use any other Unicode true type font (TTF) you have or which is available on the
internet, but remember to rename the file to “font.ttf’ after copying it to MovieStar.
■
5

PC/Mac Connection
MovieStar automatically operates as an external USB
2.0 hard disk when connected to a PC or Macintosh.
Use the included USB 2.0 cable to connect your
device to the computer system. Your system will
automatically recognize MovieStar as an external hard
disk in which you can copy any file(s) you want
(music, movie, picture, and/or data). It is strongly
recommended to empty the “Recycle Bin” after
your file(s) deletions to free the HDD space.
MovieStar supports all file formats: FAT32 (Windows
98SE, Windows ME, Mac) NTFS (Windows 2000,
Windows XP), HFS+ (Mac) with up to 480 Mbps
transfer rate (in USB 2.0 connection). If your computer system does not have a USB 2.0
interface, but only USB 1.1, you will receive a warning. You can still use the device with USB
1.1, but with a slower performance level.
MovieStar
PC or Mac
USB
Cable
MovieStar is an external USB 2.0 hard disk device that can be connected to a variety of
Operating Systems supporting the USB interface:
•Win98/SE (Install driver from CD first)
•Windows Me/2000/XP
•Mac OS9, OSX
NOTE: You do not need the external power adaptor
when connected to the computer. MovieStar is
powered through USB bus power. If bus power is
insufficient, use the USB power adaptor! Connect the
power adaptor to the mini 5-pin USB port on the USB
power adaptor and connect the MovieStar to the 4-pin
USB connector.
“Firmware”: this is the folder in which you copy the latest MovieStar firmware files found at
your vendor’s web site. Inside this folder, you may have or create two (2) subfolders:
•“Font” for your external Unicode true type font.
•“Settings” for the “Settings.txt” file, which includes your initial standard setting.
“Movies”: You will copy your favorite movie files to this folder.
“Music”: You will copy your favorite music files to this folder.
“Pictures”: You will copy your favorite image files to this folder.
NOTE: ALL the prerequisite folders listed above have the READ ONLY attribute and
should never be deleted or renamed because your MovieStar uses these exact names
as a reference to locate the respective files. Under these directories you can have any
directory structure that is convenient to you.
If you need a directory to transfer your files from one computer to another, you may certainly
create more directories and name it whatever you like. These folders won’t affect MovieStar
but will NOT show up on your TV screen!
■
6

In order to safely remove your MovieStar from your
system, please follow the same procedures as for
any Plug & Play external USB device. Specifically:
Double click on the taskbar icon to “Unplug or Eject
hardware”. The adjacent dialogue box will appear,
displaying the Plug & Play external devices. In the
current example, you can see MovieStar as a USB
Mass Storage Device.
In order to remove it, click the device in the list and
then click Stop.
Click OK on the next dialogue box. The operating
system will automatically stop the device and inform
you for its safe removal. If you are using MovieStar
(e.g. you are working on a Word document or a
picture located in its disk), the operating system will
notify you that it is unable to remove the device. In
this case, close all the applications affecting or
accessing MovieStar and try again.
■
7

TV Connection
MovieStar provides high quality video and audio output when connected to your TV set and audio
system.
The TV connection is straightforward. Just connect MovieStar to your TV set (NTSC or PAL)
using the included AV cable, plug the Power Supply adaptor to the USB connection on the
MovieStar, and then into the electrical outlet.
When using the default AV Cable provided with MovieStar, you have Composite video signal,
S-Video, and stereo (Left/Right) analog audio out connected to your TV set. If your TV does
not have Composite or S-Video, then use the optional SCART adapter to connect it to the
SCART port on your TV.
You have the choice to purchase the following optional cables (See page 24):
•AV Cable with Analog YPbPr video (progressive or interlaced) scalable up to
1920x1080i or 1280x720p
•AV Cable with full SCART (RGB) support
•SCART to composite adaptor
•VGA AV adaptor for VGA interface
Both above cables provide analog L/R audio.
Along with the two extra cables, there is one more available cable that provides VGA output
scalable up to 1024x768
MovieStar offers the option for two kinds of audio connections: analog or digital. Each requires
a cable setup in which the following paragraphs will describe.
■
8

Analog Audio Setup
The simplest configuration is when
the analogue audio system on your
TV set is used. In this case, no matter
what type of AV cable you use (the
default providing Composite/S-Video
signal, one of the optional cables
providing Video Component YPbPr,
or SCART), the analog audio is
provided to the stereo input of your
TV by the Left/Right RCA jacks.
S-VIDEO
T
Vor
This configuration uses only one AV
cable connected to the multi-
connector port on MovieStar.
With this simple setup, you can get the highest video quality, but the audio quality remains the
stereo analog quality provided by the TV set speakers.
Digital Audio Setup
This configuration provides the best mix
of video and audio quality.
In this setup, you can connect any of the
available AV cables except the stereo
L/R RCA jacks to the TV set speakers.
Instead, you use the Digital Audio Port of
MovieStar. Connect this port using the
SPDIF copper coaxial or the optional
optical audio cable to the digital input of
your Dolby Digital or DTS Home Theatre
Receiver/Processor. Provided the quality
of this receiver and the correct setup of
the 5.1 Speaker System, you can
experience optimum multimedia quality in both audio and video.
MovieStar
Composite
or
Video Component YPbPr
or
SCART
Analogue
L-R Audio
5.1 Speaker
System
T
V
MovieSta
r
S-VIDEO
o
r
Composite
o
r
Video Component YPbP
r
o
r
SCART
Digital Audio Out
(SPDIF)Dolby Digital o
r
DTS Home Theatre
Receiver/Processo
r
■
9

The Remote Control
The MovieStar remote has all the functional capabilities to fully control your device and enjoy
your multimedia files. The next figure describes each button’s function.
INFO, displays file information (e.g. size, format, etc)
ANGLE, view DVD with different angle
VIDEO OUTPUT, toggle video out format
POWER On/Off
DVD MENU
HOME, displays the main menu
DVD TITLE
Text SUBTITLE position
ZOOM to image
THUMBNAILS On/OffROTATE picture
VOL +, increase volume
VOL -, decrease volume
NUMERICAL PAD
SHUFFLE, Play all files randomly
NAVIGATION BUTTONS
PLAY ENTER
SEARCH for Time or Title/Chapter
SUBTITLE, toggle language subtitles
REPEAT chapter or title REPEAT between points A-B
FAST FORWARD
NEXT TRACK
PAUSE/STEP
SLOW forward function
PREVIOUS TRACK
AUDIO, toggle audio language
PLAY ALL Files
RETURN, to the previous menu
STOP PLAYBACKREVERSE PLAY
MUTE
■
10

Remote Control Keys
MovieStar’s Remote Control has a full set of buttons in order to provide the user with complete
control of the device. The following paragraphs describe the functions of some important
buttons; while in the sequent table, there is a list of all the keys and their functions.
VIDEO OUTPUT
This key toggles video out format. You can switch between the individual video outputs
pressing this button. The video output selected at any time will be shown on the screen. If you
cannot see the correct image on the TV or VGA screen, press this button until the image
appears. The video indication banner appears for a few seconds each time you press the
VIDEO OUTPUT button and also each time you switch on MovieStar.
Toggling VIDEO OUTPUT does not save the video settings. To do so, select the “Video
Settings” from the Settings menu.
INFO, 0, 1, 2, RETURN
To return to factory default settings, press the above keys successively.
c
SUBTITLE
d
This key allows you to position the external subtitles of DivX movies. When it is pressed, a dual
set of white template lines will appear for you to position using the cdkeys. Press the
Subtitle button again when done positioning.
THUMBNAILS
Pressing this key, turns the image preview of your photos ON or OFF.
See next page for a summary of all control keys for the remote control!
■
11

MovieStar User Guide
■
■
12
Button Functionality
Movie Music Picture Settings
HOME Displays the main menu Displays the main menu Displays the main menu Displays the main menu (not when you select
Firmware update)
TITLE DVD TITLE (.ISO files only) N/A N/A N/A
MENU DVD MENU (.ISO files only) N/A N/A N/A
POWER POWER On/Off POWER On/Off POWER On/Off POWER On/Off (not when you select Firmware
update)
ZOOM ZOOM IN (using ⇒key), ZOOM OUT (using ⇐key),
SCROLL UP (using ⇑key), SCROLL DOWN (using ⇓
key)
N/A ZOOM IN (using ⇒key), ZOOM OUT (using ⇐
key), ENLARGE image (using ⇑key), SHRINK
image (using ⇓key)
N/A
ROTATE N/A N/A Rotate picture N/A
THUMBNAILS Not used button Not used button Preview Image ON/OFF Not used button
c
SUBTITLE
d
Text SUBTITLE position, for DivX files
N/A
N/A
N/A
NUMERICAL PAD
VOL + Increase volume Increase volume N/A N/A
VOL - Decrease volume Decrease volume N/A N/A
MUTE Mute Mute N/A N/A
AUDIO toggle audio language N/A N/A N/A
PLAY ALL PLAY ALL Files PLAY ALL Files PLAY ALL Files N/A
SHUFFLE Play all files randomly Play all files randomly Play all files randomly
SUBTITLE toggle language subtitles N/A N/A N/A
PLAY/ENTER SELECT/PLAY movie SELECT/PLAY song SELECT/DISPLAY image SELECT
ANGLE view DVD with different angle (.ISO files only) N/A N/A N/A
INFO displays file information (e.g. size, format, etc) displays file information (e.g. size, format, etc) displays file information (e.g. size, format, etc)
RETURN Return to the previous menu Return to the previous menu Return to the previous menu Return to the previous menu
SLOW SLOW forward function (.ISO files only) N/A N/A N/A
PREVIOUS TRACK PREVIOUS TRACK (.ISO), PREVIOUS 5 MIN (DivX),
PREVIOUS page in file list
Select PREVIOUS song and display
PREVIOUS page in file list
Select PREVIOUS image and display PREVIOUS
page in file list
N/A
PAUSE/STEP PAUSE/STEP PAUSE N/A N/A
NEXT TRACK NEXT TRACK (.ISO), NEXT 5 MIN (DivX), NEXT
page in file list
Select NEXT song and display NEXT page in
file list
Select NEXT image and display NEXT page in file
list
N/A
REVERSE PLAY REVERSE PLAY REVERSE 10 seconds of the song N/A N/A
STOP PLAYBACK STOP PLAYBACK STOP PLAYBACK STOP DISPLAY N/A
FAST FORWARD FAST FORWARD FORWARD 10 seconds of the song N/A N/A
VIDEO OUTPUT
VIDEO OUTPUT, toggle video out format. You can
switch between the individual video outputs pressing
this button. The video output selected at any time will
be shown on the screen. If you cannot see the correct
image on the TV or VGA screen, press this button
until the image appears.
VIDEO OUTPUT, toggle video out format. You
can switch between the individual video
outputs pressing this button. The video output
selected at any time will be shown on the
screen. If you cannot see the correct image on
the TV or VGA screen, press this button until
the image appears.
VIDEO OUTPUT, toggle video out format. You can
switch between the individual video outputs
pressing this button. The video output selected at
any time will be shown on the screen. If you
cannot see the correct image on the TV or VGA
screen, press this button until the image appears.
VIDEO OUTPUT, toggle video out format. You can
switch between the individual video outputs
pressing this button. The video output selected at
any time will be shown on the screen. If you cannot
see the correct image on the TV or VGA screen,
press this button until the image appears.
REPEAT REPEAT chapter or title,
applicable ONLY for .ISO files
N/A N/A N/A
REPEAT A-B REPEAT between points A-B,
applicable ONLY for .ISO files
N/A N/A N/A
SEARCH SEARCH for Time or Title/Chapter
applicable ONLY for .ISO files
N/A N/A N/A
INFO 0 1 2 RETURN
Pressing consecutively the buttons: INFO 0 1 2
RETURN, MovieStar is set to the factory defaults
Press the buttons consecutively: INFO 0 1 2
RETURN, MovieStar is set to the factory
defaults
Press the buttons consecutively: INFO 0 1 2
RETURN, MovieStar is set to the factory defaults
Press the buttons consecutively: INFO 0 1 2
RETURN, MovieStar is set to the factory defaults
(not when you select Firmware update)

MovieStar User Guide
■
Remote Control Battery Installation
MovieStar’s Remote Control uses one (1) 3Volts CR2025 type Lithium Battery. This battery
may be packaged separately from the remote control. To load it into the remote, do the
following:
•Remove the battery compartment
cover/holder.
•Load the battery onto the battery
cover/holder.
•Position the “+” side of the battery
according to the “+” symbol of the
battery holder.
•Slide the battery compartment
cover/holder into the remote.
NOTE: Remove the battery if the remote control will not be used for an extended
period of time.
■
13

Menu Functions
This paragraph presents the various menus and their functions when operating MovieStar.
Main Menu
This is the menu (as shown in the adjacent
figure) that appears when you turn on
MovieStar.
You have four (4) main selections that you
can access with the navigation buttons and
by pressing PLAY/ENTER:
•Movies
•Music
•Pictures
•Settings
Please look at the following paragraphs for a
more detailed description of these menus.
Movies
Selecting the Movies menu will bring you to
the adjacent image on your TV screen. On
the right side, you will see the directory list of
the Movies organized in your device’s hard
disk. Each directory is named under left/right
brackets: “[“, “]”.For example, in the directory
“[MPEG]” we store various mpeg movie files.
You can make any directory you want with
your desired name and store any movie you
want in it (use your computer to create and
change directories!). Please note that every
directory can contain one or more
subdirectories and that the directory
organization is free to the user.
By using the navigation buttons and the PLAY/ENTER on your remote, you can select the
movie you want to play.
Please note that on the left side of the screen are the four main menus also available for your
selection.
■
14

Music
Selecting the Music menu will bring you
to the adjacent image on your TV
screen. On the right side you will see
the directory list of the Music files
organized in your device’s hard disk.
Each directory is named under left/right
brackets: “[“, “]”. For example, in the
directory “[Rock]” we store various rock
music files. You can make any
directory you want with your desired
name and store any music file you want
in it. Please note that every directory
can contain one or more subdirectories
and that the directory organization is
free to the user (Use your computer to
create and change directories!).
By using the navigation buttons and the PLAY/ENTER on your remote, you can select the
music file you want to play.
Please note that on the left side of the screen are the four main menus also available for your
selection.
Pictures
Selecting the Pictures menu will bring
you to the adjacent image on your TV
screen. On the right side you will see
the directory list of the Pictures
organized in your device’s hard disk.
Each directory is named under left/right
brackets: “[“, “]”. For example, in the
directory “[January 2003]” we store
various digital pictures taken in January
2003. You can make any directory you
want with your desired name and store
any movie you want in it. Please note
that every directory can contain one or
more subdirectories and that the
directory organization is free to the user
(Use your computer to create and change directories!).
By using the navigation buttons and the PLAY/ENTER on your remote, you can select the
digital picture you want to display. Press the THUMBNAILS button to turn on the image
preview.
Please note that on the left side of the screen are the four main menus also available for your
selection.
■
15

Settings
The MovieStar Settings menu is extremely important in order to correctly configure your
device and benefit from its advanced features. In the following paragraphs, there are detailed
descriptions of the various settings and parameters.
Languages
MovieStar provides the unique feature to support a multilingual audience. With sophisticated
Unicode character handling, it supports most of the major languages used in the menu
selection and the subtitle feature of movies. Refer to the “Font Support” paragraph for
further details on how to enable languages other than English.
Use the ▲▼ navigation buttons to select your language and press the PLAY/ENTER button
to activate it. Press the HOME button of the remote to save the language setting. Once
activated, all the menu selections and wording will switch to the selected language.
AUDIO SETTINGS
These settings configure the provided Audio Output Format:
•Analog for the Dual Stereo analog audio,
•Digital for the Coaxial S/PDIF digital audio (supports compressed Dolby Digital 5.1 and
DTS pass through).
Use the ▲▼ navigation buttons to select your audio setting and press the PLAY/ENTER
button to activate it. Press the HOME button on the remote to save the audio setting.
Selecting analog audio out will output the stereo audio to the L/R RCA jack from your AV
cable.
Selecting digital audio output will provide digital sound through its S/PDIF Digital Audio Port.
In this case, you have to connect this port using the S/PDIF copper coaxial or optical cable to
the digital input of your Dolby Digital or DTS Home Theatre Receiver/Processor in order to
take advantage of the high audio quality.
■
16

VIDEO SETTINGS
These settings configure the provided
Video Output Format:
•NTSC Composite/S-Video
•PAL Composite/S-Video
•NTSC Component
•PAL Component
•NTSC SCART
•PAL SCART
•High Definition TV at 480
•High Definition TV at 720
•High Definition TV at 1080
•VGA (at 1024x768)
Use the ▲▼ navigation buttons to select your Video setting. Press PLAY/ENTER button to
activate it. Press the HOME button of the remote to save the setting. Once activated, the
video out will switch to the selected format. Please note that you should have already
connected the correct cable before configuring the video settings; otherwise, it is the
TV screen may not display properly. For example, before enabling the “NTSC SCART”
option, you should have already connected the SCART cable.
In case of any setting errors (e.g. the simple Composite AV cable is connected and
you setup NTSC Component with no display on the TV screen), press the “VIDEO
OUTPUT” key on the remote control repeatedly until you see the correct display. You
can then choose the right Video via “Setting” and save it via the HOME button.
TV Type
Select one of the listed types of TV display physical aspect rations.
Press the HOME button on the remote to save the setting.
Screen Saver
Select the time interval to enable the screen saver when your MovieStar device is idle.
There are three (3) predefined time intervals of 5, 10, and 30 minutes, and one disable
setting you can select for your screen saver.
Use the ▲▼ navigation buttons to select your screen saver. Press the HOME button of the
remote to save the setting.
■
17
Table of contents
Other Macpower & Tytech Portable Multimedia Player manuals