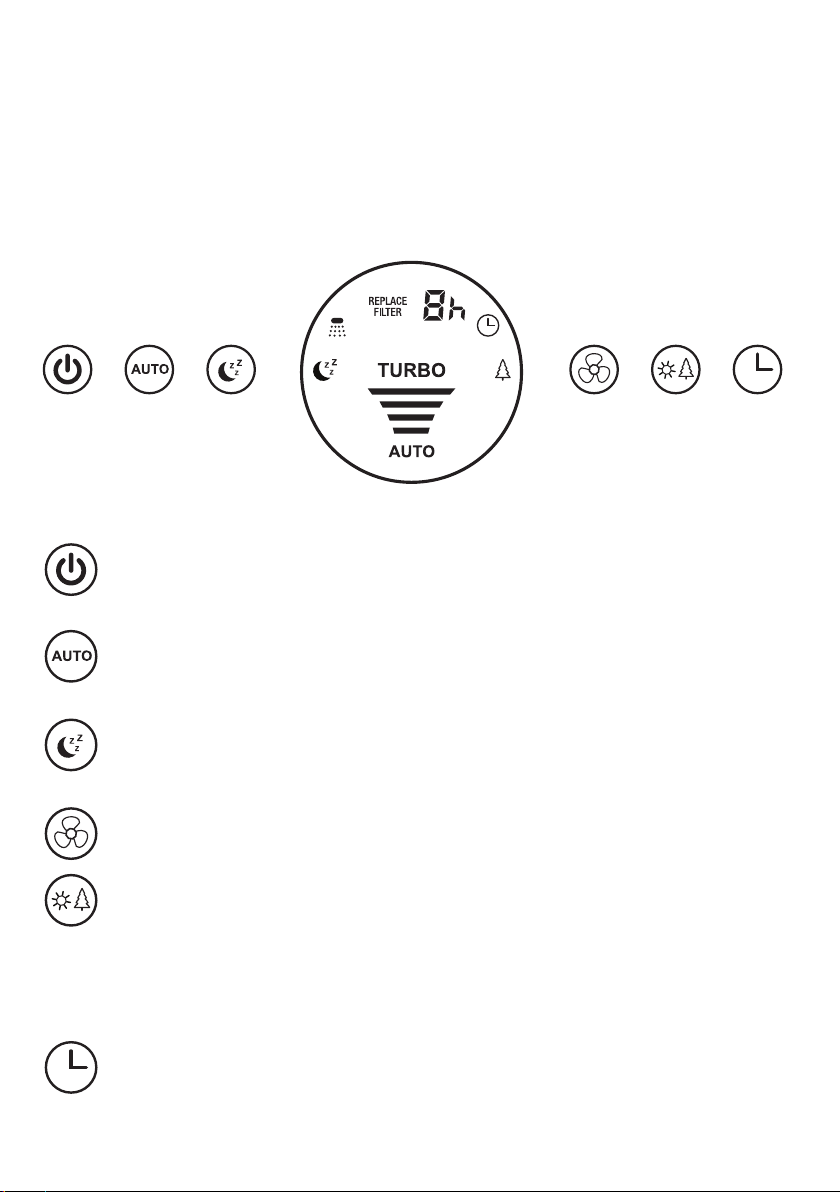
Display Panel
Fan Speed Indicator Lights
The air quality indicator is a ring around the display panel. The ring is illuminated in
one of four colours which correspond with levels of air quality. In auto mode the fan
speed adjusts to the air quality as follows:
BLUE RING - Good quality (0~49g/m). Fan adjusts to Low.
YELLOW RING – Moderate quality (50~99g/m). Fan adjusts to Medium.
ORANGE RING – Lightly polluted (100~150g/m). Fan adjusts to High.
RED RING – Heavily polluted (>150g/m). Fan adjusts to Turbo.
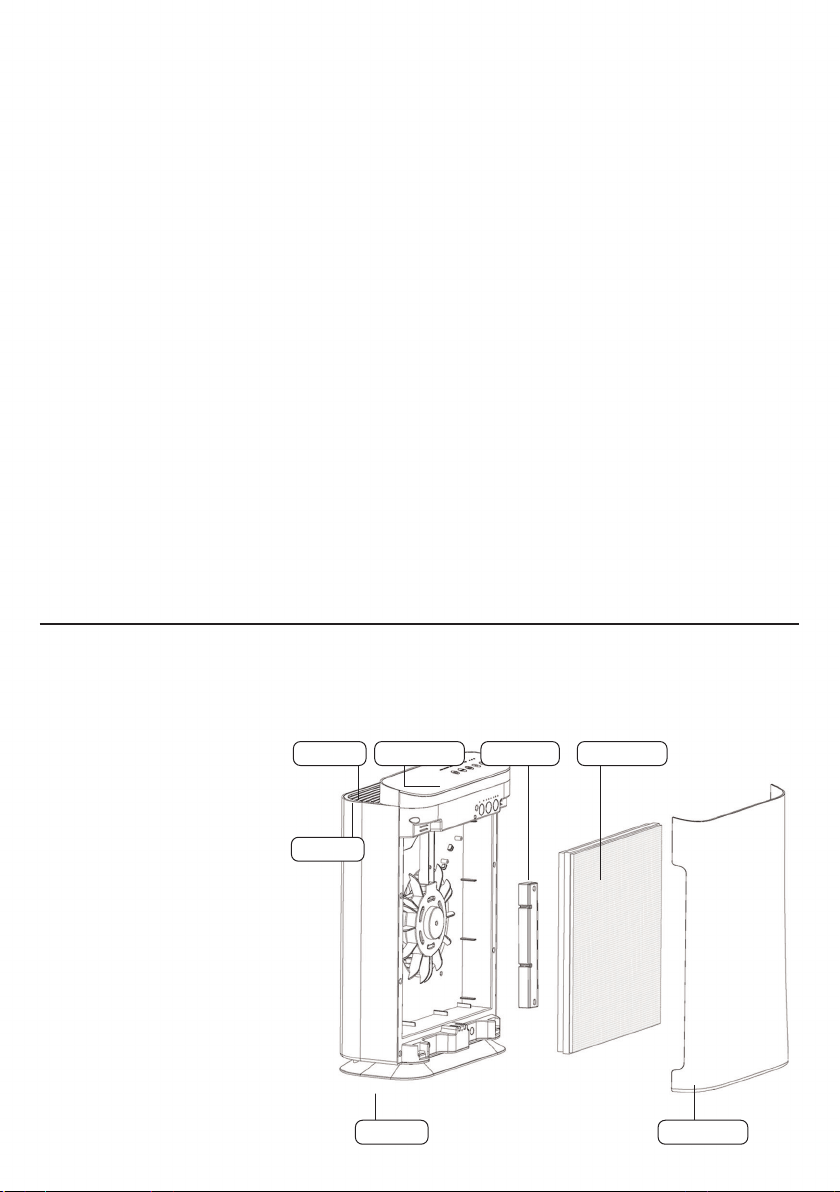
Installing and Removing the Combination Filter
The Combination filter incorporates three filtration technologies:
PARTICULATE FILTER: Captures dust, particulates and allergen particles.
ACTIVATED CARBON FILTER: Absorbs gases and odors.
HEPA FILTER: Captures fine particulates, smoke, pollen, and other allergens.
When the REPLACE FILTER indicator is illuminated on the display, the Combination
filter needs to be replaced.
1. Open the front cover from the top and remove the existing Combination filter
by pulling the two strips at either side at the same time.
2. Remove the new Combination filter from its packaging and insert into the unit
ensuring that the two strips at either side are sticking outwards.
3. Reattach the front cover and securely latch into place.
4. Long press POWER ICON for 3~5 seconds to reset filter.
The filter will last up to 6 months depending on the air quality conditions.
Cleaning and Maintaining the Maestro Air Purifier
The Maestro Air Purifier should be cleaned once every month. Use a clean, dry,
soft cloth to wipe the external surface. Do NOT stick any foreign objects or your
fingers inside the unit. Do NOT use petrol, benzine, thinner, alcohol, solvents, harsh
cleaners, etc. on and/or in the unit while cleaning as they will damage the product.
Ongoing Filter Maintenance
The Combination filter should also be cleaned
once every month. There are 2 sections to
clean, the pre-filter and the remainder of the
Combination filter.
CLEANING THE PRE-FILTER:
1. Open the front cover and remove the
Combination filter by pulling on the tabs
as discussed previously.
2. On the front of the Combination filter is
the light grey particulate filter, sometimes
known as the pre-filter. The particulate
filter is easily peeled off the front of the
Combination filter for cleaning.
3. Clean the particulate filter with a vacuum
or in a gentle hand wash.
4. Ensure the particulate filter is dry before
re-attaching it to the Combination filter.
CLEANING THE COMBINATION FILTER:
1. It is best to vacuum the Combination filter
outside of the home such as on a covered
balcony or porch.
2. Use a vacuum cleaner to remove all loose
particulates, dust and pollution. Switch
on the vacuum and hold it close to the
Combination filter but do not rub the
nozzle along the surface of the filter.
Cleaning the Combination Filter may be
required more regularly than once a month
when the pollution levels in a home are high.
Specifications
220-240V, 50/60Hz, 55 Watts
2-Year Warranty
Maestro Air certifies that the Maestro Air Purifier is
free from defects in material and workmanship from
the date of purchase.This warranty does not cover
damage caused by misuse or abuse, accident, the
attachment of any unauthorized accessory, alteration
to the product, or any other conditions beyond
the control of Maestro Air. Maestro Air shall not be
responsible for any type of incidental, consequential,
or special damages. This warranty provides you
with specific legal rights. You may have additional
rights which may vary from state to state. Because
of individual state regulations, some of the above
limitations and exclusions may not apply to you.
Please do not hesitate to contact:
Maestro Air
4 Pirelli Street Southport 4215
1800 616 248 l info@maestroair.com.au
Product Model: CF-8426A l Country of Origin: China
Please dispose of packaging thoughtfully
and recycle where possible.
TurboHighMediumLow
Replace
Filter
Reminder
UVC Light
Sleep Mode
Auto Mode
Air Quality
Indicator
Timer
Ioniser
4 Speed