MagCore Plus II User manual


Safety Precautions . . . . . . . . . . . . . . . . . . . . . . . . . . . . . . . . . . . . . . . . . . . . . . . . . . . . . . . . 1
Specification . . . . . . . . . . . . . . . . . . . . . . . . . . . . . . . . . . . . . . . . . . . . . . . . . . . . . . . . . . . . . 2
━ Operating Parameters . . . . . . . . . . . . . . . . . . . . . . . . . . . . . . . . . . . . . . . . . . . . . . . . . . . . . . . . . . 2
━ Operating Environment . . . . . . . . . . . . . . . . . . . . . . . . . . . . . . . . . . . . . . . . . . . . . . . . . . . . . . . . . 2
━ Applications . . . . . . . . . . . . . . . . . . . . . . . . . . . . . . . . . . . . . . . . . . . . . . . . . . . . . . . . . . . . . . . . . 2
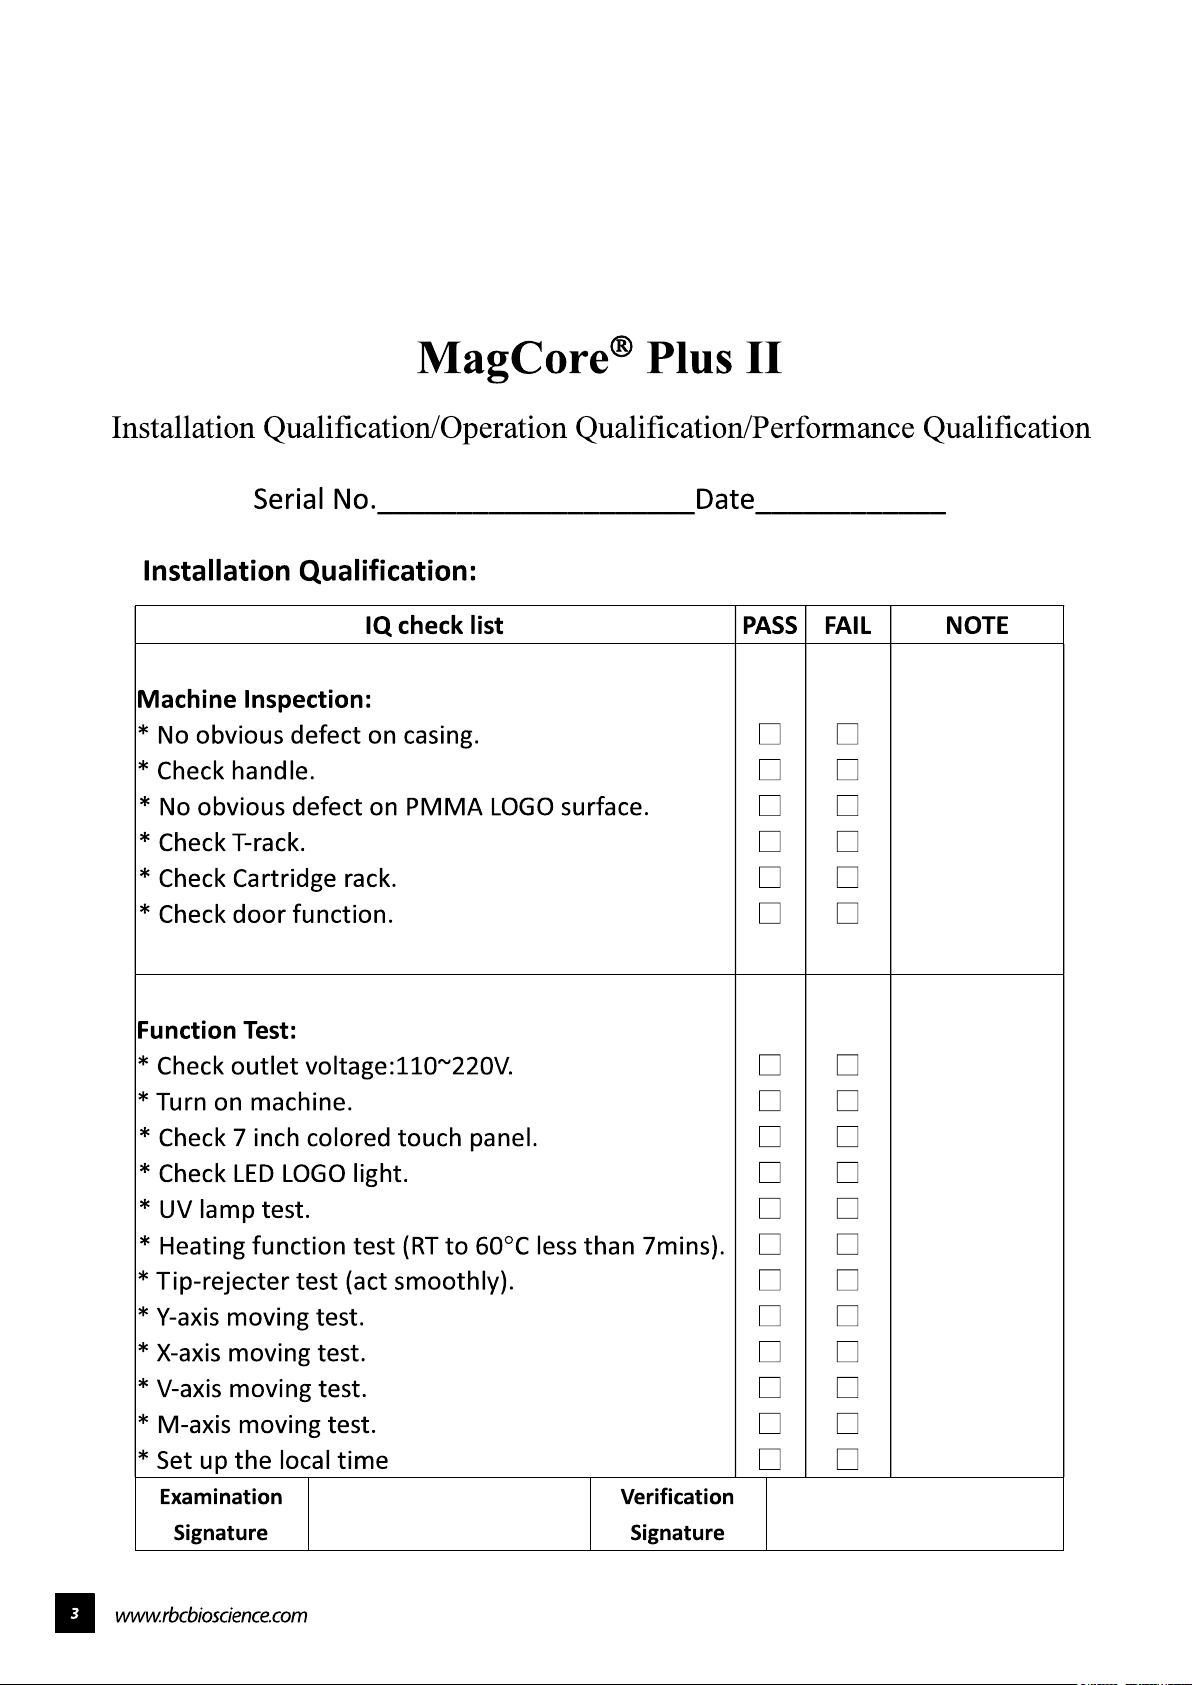
IQ/OQ/PQ Documents . . . . . . . . . . . . . . . . . . . . . . . . . . . . . . . . . . . . . . . . . . . . . . . . . . . . 3
━ IQ Documents . . . . . . . . . . . . . . . . . . . . . . . . . . . . . . . . . . . . . . . . . . . . . . . . . . . . . . . . . . . . . . . 3
━ OQ Documents . . . . . . . . . . . . . . . . . . . . . . . . . . . . . . . . . . . . . . . . . . . . . . . . . . . . . . . . . . . . . . 4
━ PQ Documents . . . . . . . . . . . . . . . . . . . . . . . . . . . . . . . . . . . . . . . . . . . . . . . . . . . . . . . . . . . . . . 5
Accessories . . . . . . . . . . . . . . . . . . . . . . . . . . . . . . . . . . . . . . . . . . . . . . . . . . . . . . . . . . . . . 7
Installation . . . . . . . . . . . . . . . . . . . . . . . . . . . . . . . . . . . . . . . . . . . . . . . . . . . . . . . . . . . . . . 7
━ Before Installation . . . . . . . . . . . . . . . . . . . . . . . . . . . . . . . . . . . . . . . . . . . . . . . . . . . . . . . . . . . . . 7
━ System Overview . . . . . . . . . . . . . . . . . . . . . . . . . . . . . . . . . . . . . . . . . . . . . . . . . . . . . . . . . . . . . 8
━ Install Reagent Cartridge . . . . . . . . . . . . . . . . . . . . . . . . . . . . . . . . . . . . . . . . . . . . . . . . . . . . . . . . . 9
━ Install Tube, Tip . . . . . . . . . . . . . . . . . . . . . . . . . . . . . . . . . . . . . . . . . . . . . . . . . . . . . . . . . . . . . . . 9
━ Installation Settings And Test . . . . . . . . . . . . . . . . . . . . . . . . . . . . . . . . . . . . . . . . . . . . . . . . . . . . . . 10
━ Installation . . . . . . . . . . . . . . . . . . . . . . . . . . . . . . . . . . . . . . . . . . . . . . . . . . . . . . . . . . . . . . . . . 11
Touch Panel and User Interface . . . . . . . . . . . . . . . . . . . . . . . . . . . . . . . . . . . . . . . . . . . . . 13
Operation Before Starting the Instrument . . . . . . . . . . . . . . . . . . . . . . . . . . . . . . . . . . . . . . . . . . . . . . . 14
━ Emergency Stop . . . . . . . . . . . . . . . . . . . . . . . . . . . . . . . . . . . . . . . . . . . . . . . . . . . . . . . . . . . . . 15
━ Start Programs . . . . . . . . . . . . . . . . . . . . . . . . . . . . . . . . . . . . . . . . . . . . . . . . . . . . . . . . . . . . . . 16
━ Saved Settings . . . . . . . . . . . . . . . . . . . . . . . . . . . . . . . . . . . . . . . . . . . . . . . . . . . . . . . . . . . . . . 17
━ Access to Saved Settings . . . . . . . . . . . . . . . . . . . . . . . . . . . . . . . . . . . . . . . . . . . . . . . . . . . . . . . . 17
━ Set and Select Users . . . . . . . . . . . . . . . . . . . . . . . . . . . . . . . . . . . . . . . . . . . . . . . . . . . . . . . . . . . 18
━ Set User . . . . . . . . . . . . . . . . . . . . . . . . . . . . . . . . . . . . . . . . . . . . . . . . . . . . . . . . . . . . . . . . . . 18
━ Select User Name . . . . . . . . . . . . . . . . . . . . . . . . . . . . . . . . . . . . . . . . . . . . . . . . . . . . . . . . . . . . 18
━ Scan Sample / Elution Tube . . . . . . . . . . . . . . . . . . . . . . . . . . . . . . . . . . . . . . . . . . . . . . . . . . . . . . 19
━ Scan Kit Lot . . . . . . . . . . . . . . . . . . . . . . . . . . . . . . . . . . . . . . . . . . . . . . . . . . . . . . . . . . . . . . . . 19
━ Pause and Abort . . . . . . . . . . . . . . . . . . . . . . . . . . . . . . . . . . . . . . . . . . . . . . . . . . . . . . . . . . . . . 20
━ Set Up the System Time . . . . . . . . . . . . . . . . . . . . . . . . . . . . . . . . . . . . . . . . . . . . . . . . . . . . . . . . 20
━ Set the Instrument Nickname . . . . . . . . . . . . . . . . . . . . . . . . . . . . . . . . . . . . . . . . . . . . . . . . . . . . . 21
━ Network Connection Settings . . . . . . . . . . . . . . . . . . . . . . . . . . . . . . . . . . . . . . . . . . . . . . . . . . . . . 21
━ LIMS Data Collection . . . . . . . . . . . . . . . . . . . . . . . . . . . . . . . . . . . . . . . . . . . . . . . . . . . . . . . . . . 22
Easy Maintenance . . . . . . . . . . . . . . . . . . . . . . . . . . . . . . . . . . . . . . . . . . . . . . . . . . . . . . . 23
━ Replace O-Ring . . . . . . . . . . . . . . . . . . . . . . . . . . . . . . . . . . . . . . . . . . . . . . . . . . . . . . . . . . . . . 23
━ Piston Test . . . . . . . . . . . . . . . . . . . . . . . . . . . . . . . . . . . . . . . . . . . . . . . . . . . . . . . . . . . . . . . . . 23
━ Clean Piercing Needles . . . . . . . . . . . . . . . . . . . . . . . . . . . . . . . . . . . . . . . . . . . . . . . . . . . . . . . . . 26
━ Eject Tip . . . . . . . . . . . . . . . . . . . . . . . . . . . . . . . . . . . . . . . . . . . . . . . . . . . . . . . . . . . . . . . . . . 26
━ Heater Test . . . . . . . . . . . . . . . . . . . . . . . . . . . . . . . . . . . . . . . . . . . . . . . . . . . . . . . . . . . . . . . . 27
━ UV Sterilization . . . . . . . . . . . . . . . . . . . . . . . . . . . . . . . . . . . . . . . . . . . . . . . . . . . . . . . . . . . 27
━ Alarm History . . . . . . . . . . . . . . . . . . . . . . . . . . . . . . . . . . . . . . . . . . . . . . . . . . . . . . . . . . . . . . . 28
━ System Status . . . . . . . . . . . . . . . . . . . . . . . . . . . . . . . . . . . . . . . . . . . . . . . . . . . . . . . . . . . . . . . 28
━ Program Update . . . . . . . . . . . . . . . . . . . . . . . . . . . . . . . . . . . . . . . . . . . . . . . . . . . . . . . . . . . . 29
━ Clean the Waste Box . . . . . . . . . . . . . . . . . . . . . . . . . . . . . . . . . . . . . . . . . . . . . . . . . . . . . . . . . . 29
━ Replace Fuse . . . . . . . . . . . . . . . . . . . . . . . . . . . . . . . . . . . . . . . . . . . . . . . . . . . . . . . . . . . . . . . 30

Advanced maintenance . . . . . . . . . . . . . . . . . . . . . . . . . . . . . . . . . . . . . . . . . . . . . . . . . . . 31
━ Disassemble the housing . . . . . . . . . . . . . . . . . . . . . . . . . . . . . . . . . . . . . . . . . . . . . . . . . . . . . . . . 33
━ Axis directions . . . . . . . . . . . . . . . . . . . . . . . . . . . . . . . . . . . . . . . . . . . . . . . . . . . . . . . . . . . . . . 37
━ Replace the UV lamp . . . . . . . . . . . . . . . . . . . . . . . . . . . . . . . . . . . . . . . . . . . . . . . . . . . . . . . . . . 38
━ Replace LED light . . . . . . . . . . . . . . . . . . . . . . . . . . . . . . . . . . . . . . . . . . . . . . . . . . . . . . . . . . . . 39
━ Replace RGB light . . . . . . . . . . . . . . . . . . . . . . . . . . . . . . . . . . . . . . . . . . . . . . . . . . . . . . . . . . . . 40
━ Replace the pistons . . . . . . . . . . . . . . . . . . . . . . . . . . . . . . . . . . . . . . . . . . . . . . . . . . . . . . . . . . . 41
━ Replace the ejector rod module. . . . . . . . . . . . . . . . . . . . . . . . . . . . . . . . . . . . . . . . . . . . . . . . . . . . 42
━ Replace the heater module . . . . . . . . . . . . . . . . . . . . . . . . . . . . . . . . . . . . . . . . . . . . . . . . . . . . . . 43
━ Replace the M-axis sensors . . . . . . . . . . . . . . . . . . . . . . . . . . . . . . . . . . . . . . . . . . . . . . . . . . . . . . 44
━ Replace the sensors of V, Y-axis . . . . . . . . . . . . . . . . . . . . . . . . . . . . . . . . . . . . . . . . . . . . . . . . . . . . 45
━ Replace the sensor of X-axis . . . . . . . . . . . . . . . . . . . . . . . . . . . . . . . . . . . . . . . . . . . . . . . . . . . . . . 46
━ Replace the X-axis motor belt . . . . . . . . . . . . . . . . . . . . . . . . . . . . . . . . . . . . . . . . . . . . . . . . . . . . . 47
━ Replace the Y-axis motor . . . . . . . . . . . . . . . . . . . . . . . . . . . . . . . . . . . . . . . . . . . . . . . . . . . . . . . . 48
━ Replace the V-axis motor . . . . . . . . . . . . . . . . . . . . . . . . . . . . . . . . . . . . . . . . . . . . . . . . . . . . . . . . 49
━ Replace M-axis motor . . . . . . . . . . . . . . . . . . . . . . . . . . . . . . . . . . . . . . . . . . . . . . . . . . . . . . . . . 50
━ Replace the timing belt of the lift motor of the base . . . . . . . . . . . . . . . . . . . . . . . . . . . . . . . . . . . . . . . . 51
━ Replace PCB . . . . . . . . . . . . . . . . . . . . . . . . . . . . . . . . . . . . . . . . . . . . . . . . . . . . . . . . . . . . . . . 52
━ Replace touch panel . . . . . . . . . . . . . . . . . . . . . . . . . . . . . . . . . . . . . . . . . . . . . . . . . . . . . . . . . . . 53
━ Replace PLC. . . . . . . . . . . . . . . . . . . . . . . . . . . . . . . . . . . . . . . . . . . . . . . . . . . . . . . . . . . . . . . . 54
━ Replace power supply . . . . . . . . . . . . . . . . . . . . . . . . . . . . . . . . . . . . . . . . . . . . . . . . . . . . . . . . . 55
━ Replace Solid State Relay (SSR) . . . . . . . . . . . . . . . . . . . . . . . . . . . . . . . . . . . . . . . . . . . . . . . . . . . . 56
Electrical control and engineering software . . . . . . . . . . . . . . . . . . . . . . . . . . . . . . . . . . . . 57
━ Main board configuration . . . . . . . . . . . . . . . . . . . . . . . . . . . . . . . . . . . . . . . . . . . . . . . . . . . . . . . 58
━ PLC Software Update . . . . . . . . . . . . . . . . . . . . . . . . . . . . . . . . . . . . . . . . . . . . . . . . . . . . . . . . . . 59
━ HMI Software Update . . . . . . . . . . . . . . . . . . . . . . . . . . . . . . . . . . . . . . . . . . . . . . . . . . . . . . . . . . 64
━ Program Update . . . . . . . . . . . . . . . . . . . . . . . . . . . . . . . . . . . . . . . . . . . . . . . . . . . . . . . . . . . . . 67
━ Trouble Shooting for Alarm Code . . . . . . . . . . . . . . . . . . . . . . . . . . . . . . . . . . . . . . . . . . . . . . . . . . 70

Safety Precautions
Before Use
WARNINGS and CAUTIONS stated below are intended to protect the individual from injuries
and avoid damage to machines.

Specification
━ Operating Parameters
━ Operating Environment
━ Applications

IQ/OQ/PQ Documents
━ IQ Documents

━ OQ Documents

━ PQ Documents


Accessories
Installation
1234 5
7
6
8 9
10 11
━ Before Installation

━ System Overview

━ Install Tube, Tip
Warning :
Please do not use the Tips and Tubes which are not provided by the original manufacturer.
The test result may be not correct and the machine may be damaged due to different Tips
and Tubes usage.
━ Install Reagent Cartridge
Please install the Tip and Tube according to
the instructions of extraction kit user manual.
Please insert the front end of the cartridge into the
space below the fixing plate of the Cartridge Rack.
W5 Elution Tube
W1
W2
W3
W4
W5
W4 200μl SP Tip
W3 Pipette Tip
W2 DNase / Tip Holder set
W1 Sample Tube - FS Tip
1. Put consumables and tips into the
corresponding wells according to the left figure
2. Put T-Rack on cartridge rack, then install and
push cartridge rack to the innermost gently

━ Installation Settings And Test
Step 1.
Please Set Up the Local Time.
Step 2.
Set the Instrument Nickname
Go to Page 15
Step 3.
Network Connection Settings
Go to Page 15
Step 4.
Test Piston
Please refer to Piston Test chapter for information
about the operation.
Step 5.
Test Heater
Please refer to Heater Test chapter for information
about the operation.

━ Installation


Touch Panel and User Interface
MagCore® Plus II provides 7-inches full-color touch panel and easy-to-use user interface.
Operator only needs to pay attention to the panel to know the current status, ending time and
test report of the machine. The figure below shows the function list of the operation screen and
the description of the status icons.
Start
Report
Setup
Saved Protocols
Maintenance
Eject Tip
Execute Extraction Execute quick run with
selection of pre-saved
protocols
System Maintenance
Functions
Overview of the latest
runs with barcodes
System Settings
Status Column Icons Panel Board Lighting
Front Door is Open
Front Door is Closed
Machine Connected to Network
Machine is not Connected to
Network
USB Flash Drive Plugged In
* Format USB Flash Drive to FAT32
The Panel will light up the following lights when the
instrument is in operation:
Blue Light: The Instrument is on Stand-by
Green Light: The Instrument is in Operation
Red Light: The Instrument Gives a Warning Alert

Operation Before Starting the Instrument
Close the door after the setting is completed and
press START to run the extraction.
Please Follow the Instructions Below to Operate the Instrument:
After loading the reagents, cartridges and tips, see page 5 and set the required parameters without
opening the door.
After closing the door, press START to start operation.
Plunged Upward from
the Lower Edge of the
Front Door
The Front Door Will
Rise Automatically For the sake of safety, the front
door will not open to the top.
Please push the front door up to
raise it to the top when needed.
Precautions When Opening the Front Door
A.
B.
BA

━ Emergency Stop
Please read the security information to correctly stop the machine
when an accident takes place.
When an emergency situation occurs and the machine is
operating, please press the stop button or open the front
door to stop the machine immediately.

Select DNase Treatment. (Only for RNA kit.)
Select Sample Volume.
Select Elution Buffer. (Only for tissue kit.)
Close the door and press Start.
Please pretreat the sample according to the
instructions of the user manual of the MagCore®
Kit and put consumables into the machine.
Press Start to go to the next step.
To Select User and Scan Barcodes: See Page 12
Press Next to choose the code number.
Please confirm the reagent set code number to be
used in the extraction.
Select the number of the cartridge.
━ Start Programs
The number
can be found in the
sticker on the cartridge.
If you need to save this setting, please
refer to page 11 to know how to save
customized settings.

If you need to save a customized setting, you can
save it here and use the predetermined parameters
for later uses.
After selecting the parameters, the confirmation
of your settings will be displayed. Press SAVE AS to
open the Saved Protocols page.
Select the parameters that you want to save shown
in the blue area. Saved Protocol option saves up to
six records.
Press Save Protocol to save the customized
parameters.
Press Back to confirm your settings.
After loading the Tips and Cartridges:
Press Saved Protocols on the start page
Select the parameters that you want to execute
shown in the blue area.
Press Start Protocol
Press Start after confirmation of your selected
parameters.
━ Saved Settings ━ Access to Saved Settings
Other manuals for Plus II
2
Table of contents
Other MagCore Laboratory Equipment manuals
Popular Laboratory Equipment manuals by other brands

IET Labs
IET Labs GenRad 1403 Series Operation manual

EMD Millipore
EMD Millipore Pellicon XL operating instructions

Xylem
Xylem SI Analytics TITRONIC 500 operating manual

IKA
IKA RW 16 basic operating instructions

Bertin Technologies
Bertin Technologies PRECELLYS 24 Touch user manual

Agilent Technologies
Agilent Technologies ZORBAX RRHT Series user guide