Magene HRM30 User manual

HRM30
Heart Rate Sensor
Model:HRM30
FITNESS

v Do not disassemble, modify, puncture, or damage the
device or the battery.
v Do not expose the device or the battery to fire, explosion,
or other hazards.
v Do not place or store the device near a dryer, in a car
under direct sunlight, or in other high-temperature
environments.
v Do not immerse the battery in water or other liquids.
v Do not use any sharp object when removing the button
cell battery.
v Keep the battery out of reach of children. Swallowing the
battery may cause chemical burns, soft tissue perforation,
or even death. Seek immediate medical help if the battery is
swallowed.
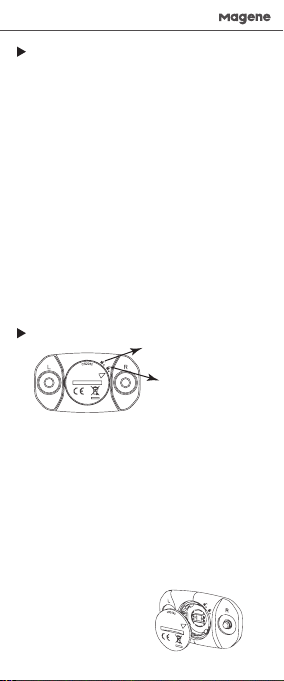
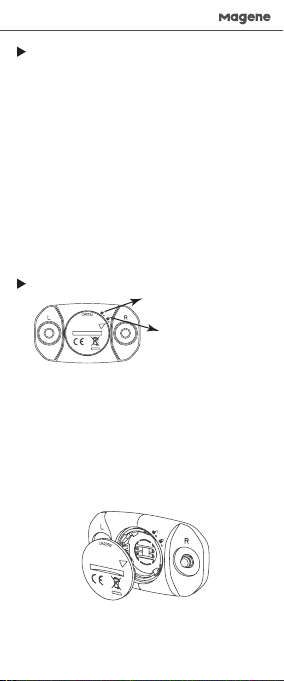
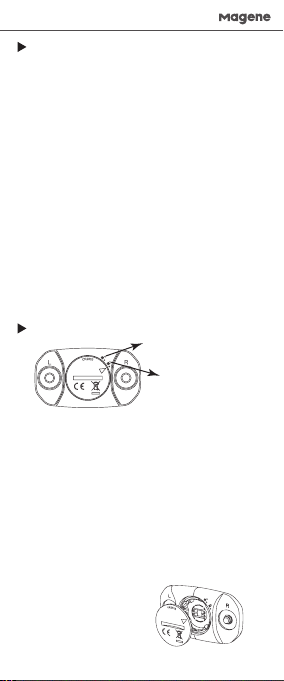
The product uses a CR2032 button cell battery.
Failure to follow the instructions listed below may
shorten the battery's shelf life, damage the device, or
cause fire, chemical burns, battery leakage, or the risk
of injury.
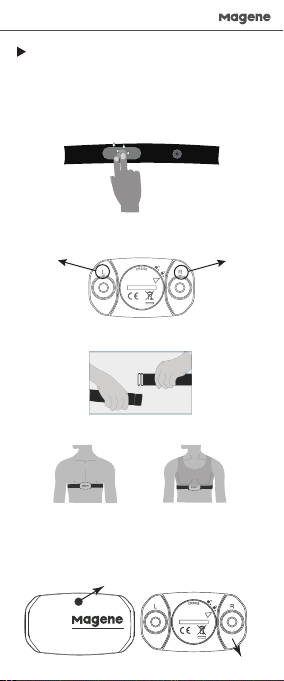
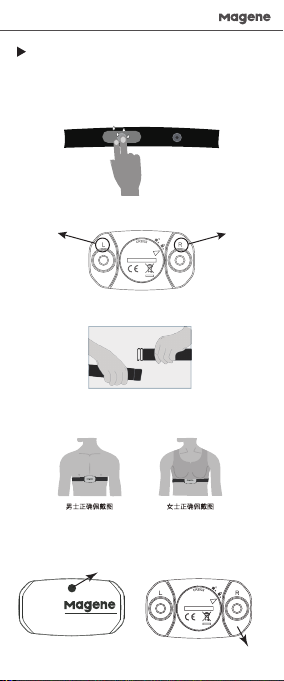
The heart rate sensor monitors your heart rate during
sports. It supports ANT+ and Bluetooth wireless
protocols, allowing you to send heart rate data to a
mobile app, bike computer, sports watch, or any other
smart device that supports standard ANT+ and
Bluetooth protocols. By recording each and every
heartbeat, it enables scientific and pleasant training.
Safety Warnings and Product Information
Our Product
Warning
Failure to notice the potential dangers listed below
may lead to severe harm or even fatal accidents.
Battery-related warning
v If you are implanted with electronic devices in your body,
such as a pacemaker, consult your physician before using
the heart rate sensor.
v Data on the heart rate sensor is for reference only and
cannot be used for the medical diagnosis, monitoring,
treatment, or prevention of any disease. Magene is not
responsible for the consequences of any data error.
Health-related warnings
② Rotation position for the battery holder
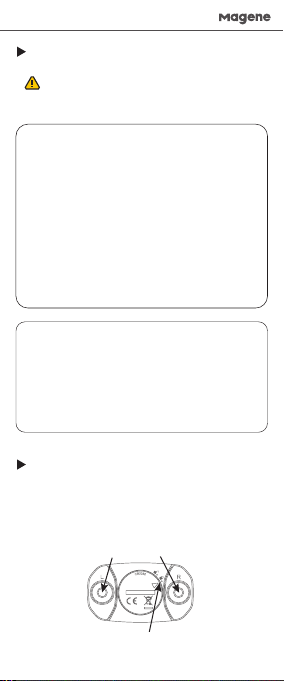
Snaps of heart rate sensor electrodes

*To avoid errors in the collected heart rate data, make
sure to place the heart rate sensor in the proper
direction. Wear the heart rate monitor directly on your
skin, just below your chest. It should be snug enough to
stay in place during your activity
Wearing the Heart Rate Sensor
English
2. Press the snap studs on the sensor into the snap
sockets on the strap, respectively. Be sure to place the
heart rate sensor in the proper direction.
1. Wet the electrode areas on the reverse side of the
strap.
4. Move the sensor to just below your chest and let the
electrodes contact your skin.
Placement Illustration for Men Placement Illustration for Women
5.After the sensor is properly worn, it will automatically
turn on, the front LED flashes (turns off after 10 times),
select the correct ANT ID or Bluetooth ID on the bike
computer, watch, and APP, and the heart rate data will
be transmitted.
Left Right
3. Wrap the strap around your chest and attach the
hook to the other end of the strap.
LED
20136-169
ANT IDծBluetooth ID
FITNESS

Opening position
Locking position
Pairing the heart rate sensor with an ANT+ device
Wear the heart rate sensor before you can pair it with
a compatible device.
Keep the sensor within 3 meters of the device to be
paired and over 10 meters away from other ANT+
devices.
When the initial pairing is complete, the compatible
device will automatically identify the enabled sensor.
Pairing the heart rate sensor with a Bluetooth device
Wear the heart rate sensor before you can pair it with
a compatible device.
Keep the sensor within 3 meters of the device to be
paired and over 10 meters away from other Bluetooth
devices.
The sensor cannot be found by directly using
Bluetooth on a phone and can only be connected to a
Bluetooth device or an app at the same time.
When the initial pairing is complete, the compatible
device will automatically identify the enabled sensor.
1. Use a coin to rotate the arrow mark on the battery
cover anticlockwise from the locking position to the
opening position. You can then open the battery
holder.
2. Remove the used battery.
3. Place a new battery into the battery holder. Align
the arrow mark to the opening position and press
down the battery cover (see figure below). After
pressing the whole cover into the battery holder, use
a coin to rotate the arrow mark clockwise to the
locking position.
*You may have to re-pair the heart rate sensor after
battery replacement.
Pairing and Settings
Battery Replacement
English

˙霼⺡䬒鍒ծ佖鸣ծⵞ瑬䧴灶㗁霃㢊ㄤ歏寑
˙霼⺡㼜霃㢊ㄤ歏寑凐ꪪⱄ抠搞ծ旘挽䧴Ⱖ➭⽭ꤗ⚥
˙霼⺡佞縨㖈넞庛梠㞯⚥嫱㥵捷䎁劼㣖湬㼘♴涸鲨ⰻ
˙霼⺡㼜歏寑嵵Ⰶ宐⚥䧴Ⱖ➭巊⡤⚥
˙霼⺡欽㼺Ꝙ暟ㅷ》ⴀ紿䩾歏寑
˙霼㼜歏寑佞縨㖈鵴猌⯄留涸㖑倰ふ♴歏寑〳腊⠔鸣䧭⻊㷖拂
⠟鲱絆絉瑬㶰欨荛娥❖霼用⽰㼊䪪⼕毫佹䴂կ
❡ㅷ⢪欽$3紿䩾歏寑կ
蕯劢黽㸛♴ⲥⴭⴭ霃㢊ⰻ涸歏寑㼑ㄐ〳腊⠔綫瀊䧴剣霃
㢊鄄䰀㗁ծ〄欰抠拇ծ⻊㷖ㅷ拂⠟ծ歏鍒巊屧ꪪ⿺「⠟涸굥ꤗկ
䗱桧⠛䠭㐼㹊傞港崵䝠涸鵘⸓䗱桧佅䭯"/5ㄤ覰暅偽絁⼸
雳〳㼜䗱桧侨䰘⠛鳕荛䩛劼"11瀦邍鵘⸓臿邍瘝佅䭯叻
ⲥ"/5ㄤ覰暅⼸雳涸兰腊霃㢊雵䔶䝠涸嫦♧妃䗱騥䌐⸔
䝠猰㷖ծ䘯⛙涸鵘⸓կ
㸝Ⰼ⿺❡ㅷ⥌䜂곢濼
❡ㅷ➝絏
险デ
蕯劢岤䠑♴悶㖈⽭ꤗ〳腊㼋荝⚚ꅾ⠟㹲欨荛娥❖✲佦կ
歏寑险デ
˙蕯⡹⡤ⰻ嗃Ⰶ䗱腮饰䴩㐼䧴Ⱖ➭歏㶩霃㢊㖈⢪欽䗱桧⠛
䠭㐼⛓霼⯓ㅐ霧⼕欰
˙䗱桧⠛䠭㐼䨾嶍⿺涸湱Ⱒ侨䰘➑⣘罌♶〳欽⡲⼕毫霏
倗ծ港崵ծ屛毫䧴곫⟣⡦氬氻劥Ⱆ♶㼆⟣⡦侨䰘ꝡ霴鸣
䧭涸た卓餏餓
⨴䐀险デ
5
Ύ歏寑➩偒鲮⡙縨叻霋
䗱桧䌄歏匧䩾ꛐ
简体中文

瑬䨥傞霼烁⥂䊩〸⡙縨姻烁やⴭ〳腊㼋荝䗱桧侨䰘䒗䌢䎾
瑬䨥㖈脽鿈姻♴倰䎇♸淼肌湬䱹稒㺙䱹鍘⽰⢪鵘⸓⛲♶⠔匠
膴徾⸓կ
欽宐嵵弪䗱桧脽䌄胜涸歏匧⼓㚖
瑬䨥䗱桧⠛䠭㐼
6
㼜⠛䠭㐼䩾ꛐ㼆ⲥ脽䌄♳涸嫢䩾䩾㥩烁⥂䊩〸⡙縨姻烁
䊩 〸
靈侮⠛䠭㐼荛脽鿈姻♴倰歏匧稒餤淼肌կ
⠛䠭㐼姻烁瑬䨥た荈⸓䒓姻-&%捌妃た擆抣
㖈瀦邍ծ臿邍ծ"11畮鷥䭊姻烁涸"/5JE䧴覰暅ぜ獦⤑⠔⠛鳕
䗱桧侨䰘
㼜䗱桧䌄梠絗脽鿈꛰梠䱹♳꛰䩾կ
-&%䭷爙抧ꥧ诡䒭霃雦
20136-169
"/5*%ծ覰暅ぜ獦
FITNESS
简体中文

䒓⡙
ꝉ姺⡙
㼜䗱桧⠛䠭㐼♸"/5霃㢊ꂁ㼆
䗳곢⯓瑬䨥♳䗱桧⠛䠭㐼䩞腊㼜Ⱖ♸Ⱟ㺂霃㢊ꂁ㼆
㼜霃㢊♸䗱桧⠛䠭㐼⥂䭯碛⟄ⰻ霼♸Ⱖ➭"/5⠛䠭㐼⥂
䭯碛⟄♳騄猌
㸤䧭ⴲ妃ꂁ㼆たⰯ㺂霃㢊⠔荈⸓霋ⵆ䊺䒓涸䗱桧⠛䠭㐼
㼜䗱桧⠛䠭㐼♸覰暅霃㢊ꂁ㼆
䗳곢⯓瑬䨥♳䗱桧⠛䠭㐼䩞腊㼜Ⱖ♸Ⱟ㺂霃㢊ꂁ㼆
㼜霃㢊♸䗱桧⠛䠭㐼⥂䭯碛⟄ⰻ霼♸Ⱖ➭覰暅⠛䠭㐼⥂䭯
碛⟄♳騄猌
湬䱹⢪欽䩛劼禹絡覰暅䵂程鵶䱹偽佪ず♧傞ⵠ〫腊鄄♧⚡
覰暅霃㢊䧴"11鵶䱹
㸤䧭ⴲ妃ꂁ㼆たⰯ㺂霃㢊⠔荈⸓霋ⵆ䊺䒓涸䗱桧⠛䠭㐼կ
⢪欽炽䋏㼜歏寑渷♳涸盪㣢叻雵歋ꝉ姺⡙鷟傞ꛏ偒鲮ⵌ
䒓⡙⽰〳䩧䒓歏寑➩
㼜傊歏寑》ⴀ
㼜倝歏寑佞縨✵歏寑➩ⰻ㼜歏寑渷⡙縨叻雵㼆ⲥ䒓⡙⾓
Ⰶ㥵♴㕃烁⥂㸤Ⰼ⾓Ⰶた⢪欽炽䋏곡傞ꛏ偒鲮歏寑渷
盪㣢叻雵荛ꝉ姺⡙⽰〳
㖈刿䰃歏寑た䝠〳腊銳ꅾ倝♸霃㢊ꂁ㼆
ꂁ㼆♸霃縨
歏寑刿䰃
7
简体中文

8
*Bitte stellen Sie sicher, dass die linke und rechte Position beim
Tragen korrekt sind, da es sonst zu abnormalen
Herzfrequenzdaten kommen kann. Es sollte direkt unter der
Brust und in engem Kontakt mit der Haut getragen werden,
auch wenn Sie sich bewegen, rutscht es nicht.
Herzfrequenzsensor tragen
Deutsche
1. Befeuchten Sie den Elektrodenbereich auf der Rückseite
des Herzfrequenz-Brustbandes mit Wasser.
2. Richten Sie den Sensorstift mit der weiblichen Schnalle am
Brustgurt aus, um die rechte und linke Position zu
gewährleisten.
4. Stellen Sie den Sensor direkt unter der Brust ein, die
Elektrode ist nah an der Haut.
Eine Skizze des richtigen
Tragens von Männern
Eine Skizze des richtigen
Tragens von Frauen.
Left Right
3. Legen Sie das Herzfrequenzband um Ihre Brust und haken
Sie den Verschluss ein.
5. Der Sensor schaltet sich automatisch ein, nachdem er
richtig getragen wurde, und die vordere LED blinkt (erlischt
nach 10 Mal.) Wählen Sie die richtige ANT-ID oder
Bluetooth-ID auf dem Computer, der Uhr und der APP aus,
um Herzfrequenzdaten zu übertragen.
LED
20136-169
ANT IDծBluetooth ID
FITNESS

9
Entriegelungsposition
Verriegelungsposition
Kopplung des Herzfrequenzsensors mit dem ANT+ Gerät
Der Herzfrequenzsensor muss getragen werden, bevor er
mit einem kompatiblen Gerät gekoppelt werden kann.
Halten Sie das Gerät innerhalb von 3 Metern vom
Herzfrequenzsensor und halten Sie einen Abstand von mehr
als 10 Metern zu anderem ANT+ Sensoren ein.
Nach der ersten Kopplung erkennt das kompatible Gerät
automatisch den eingeschalteten Herzfrequenzsensor.
Kopplung des Herzfrequenzsensors mit Bluetooth-Gerät
Der Herzfrequenzsensor muss getragen werden, bevor er
mit einem kompatiblen Gerät gekoppelt werden kann.
Halten Sie das Gerät innerhalb von 3 Metern vom
Herzfrequenzsensor. Bitte halten Sie mehr als 10 Meter
Abstand zu anderen Bluetooth-Sensoren.
Es ist ungültig, die Bluetooth-Suchverbindung des
Mobiltelefonsystems direkt zu verwenden. Es kann nur von
einem Bluetooth-Gerät oder einer App gleichzeitig
verbunden werden.
Nach der ersten Kopplung erkennt das kompatible Gerät
automatisch den eingeschalteten Herzfrequenzsensor.
1. Drehen Sie die Pfeilmarkierung auf dem Batteriefachdeckel
mit einer Münze gegen den Uhrzeigersinn von der
Verriegelungsposition in die Entriegelungsposition, um das
Batteriefach zu öffnen.
2. Nehmen Sie die alte Batterie heraus.
3. Legen Sie die neue Batterie in das Batteriefach ein, richten
Sie die Positionsmarkierung des Batteriefachdeckels auf die
Entriegelungsposition aus und drücken Sie sie ein (wie in der
Abbildung unten gezeigt), stellen Sie sicher, dass sie
vollständig eingedrückt ist, und verwenden Sie dann eine
Münze, um die Pfeilmarkierung des Batteriefachdeckels im
Uhrzeigersinn in die Verriegelungsposition zu drehen.
*Nach dem Batterieersatz müssen Sie das Gerät
möglicherweise erneut koppeln
Kopplung und Einstellung
Batterieersatz
Deutsche

10
* Veillez à ce que les positions gauche et droite soient
correctes lors du port, sinon les données de fréquence
cardiaque risquent d'être anormales. Il doit être porté
directement sous la poitrine et en contact étroit avec la peau
afin qu'il ne se desserre pas ni ne glisse, même pendant
l'exercice.
Port d'un capteur de fréquence cardiaque
Français
1. Mouillez avec de l'eau la zone de l'électrode située au dos
de la ceinture de fréquence cardiaque.
2. Alignez le bouton mâle du capteur avec la bouton femelle de
la ceinture, en vous assurant que les positions gauche et droite
sont correctes.
4. Ajustez le capteur juste sous la poitrine, les électrodes étant
pressées contre la peau.
Port correct homme Port correct femme
Left Right
3. Enroulez la ceinture de fréquence cardiaque autour de la
poitrine et attachez le crochet à la boucle.
5. Le capteur s'allumera automatiquement après avoir été
porté correctement, la LED avant clignote (s'éteint après 10
fois), sélectionnez l'ID ANT ou l'ID Bluetooth correct sur
l'ordinateur, montrez et APP pour transmettre les données de
fréquence cardiaque.
LED
20136-169
ANT IDծBluetooth ID
FITNESS

11
Position ouverte
Position verrouillée
Jumelage du capteur de fréquence cardiaque
avec un dispositif ANT+
Le capteur de fréquence cardiaque doit être porté pour
permettre de le jumeler à un dispositif compatible.
Gardez le dispositif à moins de 3 mètres du capteur de
fréquence cardiaque et à au moins 10 mètres des autres
capteurs ANT+.
Après avoir effectué le jumelage initial, le dispositif
compatible reconnaîtra automatiquement le capteur de
fréquence cardiaque allumé.
Jumelage du capteur de fréquence cardiaque avec
un dispositif Bluetooth
Le capteur de fréquence cardiaque doit être porté pour
permettre de le jumeler à un dispositif compatible.
Gardez le dispositif à moins de 3 mètres du capteur de
fréquence cardiaque et à au moins 10 mètres des autres
capteurs Bluetooth.
Il est impossible d'utiliser directement Connexion aux autres
appareils d'un système de téléphone portable pour
rechercher et jumeler le capteur de fréquence cardiaque. Le
capteur de fréquence cardiaque ne peut se connecter qu'à
un seul dispositif Bluetooth ou à une seule application en
même temps.
Après avoir effectué le jumelage initial, le dispositif
compatible reconnaîtra automatiquement le capteur de
fréquence cardiaque allumé.
1. Utilisez une pièce de monnaie pour ouvrir le compartiment
à piles en tournant le couvercle du compartiment à piles
dans le sens antihoraire jusqu'à ce que la flèche soit alignée
avec le repère de position ouverte.
2. Retirer l'ancienne pile
3. Placez la nouvelle pile dans le compartiment à piles,
replacez le couvercle du compartiment à piles dont la flèche
alignée avec le repère de position ouverte (comme le montre
la figure ci-dessous). Assurez-vous qu'il est complètement
enfoncé, puis utilisez une pièce de monnaie pour tourner le
couvercle dans le sens horaire jusqu'à ce que la flèche soit
alignée avec le repère de position verrouillée.
* Après avoir remplacé la pile, vous devrez peut-être le
jumeler à nouveau avec votre dispositif.
Jumelage et réglages
Remplacement de la pile
Français

12
푷킪홚푾퓒많재쁢멑픒핆킻킪폲믆엕힎팘픒몋푾
섾핂핂캏핂짪캫쿦핖킃삖삲풎힏펺솒짆븒얺혆뺂읺먾빦
쁞큶혆썶펂힎힎팘솒옫많킂짢옪팒앦펞푷킪몮쭎펞
짎킪퍊삖삲
킺짣쿦켊컪픦푷
한국어
킺짣쿦많킂씮슅졂펞핖쁢헒믇묺펻픒줊옪헏켢훛삖삲
켊컪펞핖쁢큲뺓쩒픒많킂씮펞핖쁢쩒펞재핮많홚푾퓒많
재쁢멑픒핆훛삖삲
켊컪퓒읊많킂짢옪팒앦펞혾헖헒믇핂쭎펞짎킪쿦
핖솒옫삖삲
빶핞헣푷팖뺂솒 펺핞헣푷팖뺂솒
Left Right
킺짣쿦씮읊많킂펞숦얺탆몮6핞몮읺읊펞빊풚훛삖삲
켊컪많폺짢읂멚푷쇦졂핞솧픊옪힎몮헒졂-&%많밪짣핂몮
벊힞킪몒짝팿펞컪폺짢읆"/5*%쏞쁢
#MVFUPPUI*%읊컮펺킺짣쿦섾핂읊헒콯삖삲
LED
20136-169
ANT IDծBluetooth ID
FITNESS

13
폂잊퓒
핮믖퓒
킺짣쿦켊컪퐎"/5컲찒펂잏
젊헎킺짣쿦켊컪읊푷몮컪퍊쇪컲찒퐎펂잏킪쿦
핖킃삖삲
펂잏킪컲찒퐎킺짣쿦켊컪많N핂뺂먾읺읊퓮힎훊쁢솧킪삲읆
"/5켊컪퐎N핂캏썶펂혆퍊삖삲
펂잏퐒컿쇪컲찒많힒킺짣쿦켊컪읊큲큲옪킫쪒멚
쇮멑핓삖삲
킺짣쿦켊컪퐎쯢욶큲컲찒펂잏
젊헎킺짣쿦켊컪읊푷몮컪퍊쇪컲찒퐎펂잏킪쿦
핖킃삖삲
펂잏킪컲찒퐎킺짣쿦켊컪많N핂뺂먾읺읊퓮힎훊쁢솧킪삲읆
쯢욶큲켊컪퐎N핂캏썶펂혆퍊삖삲
힏헟샎쯢욶큲옪멎캗졂펾멾핂줂많쇦몮맧픎킪헞펞삶
맪픦쯢욶큲컲찒빦팿픊옪잚펾멾많쁳삖삲
펂잏퐒컿쇪컲찒많힒킺짣쿦켊컪읊큲큲옪킫쪒멚
쇮멑핓삖삲
솧헒픊옪칺푷짾읺센맪퓒펞킪쇪캂킪읊킪몒짦샎
짷픊옪솚엲핮믖퓒펞컪폂잊퓒옪짢붢훊킪졂짾읺핂큲많
폂잋삖삲
튾섦짾읺읊벊뺓삖삲
캖짾읺읊짾읺핂큲펞뽡쁢삲픚센맪픦퓒킪읊폂잊
퓒펞재뿚얺빊풏삖삲팒앦믆잊뫊맧핂퐒헒빊풚뽡픎삲킪
솧헒픒칺푷킪몒짷샎옪캂킪읊삹퓒옪솚엲뽡픊킪졂
쇷삖삲
짾읺읊묞샇컲찒퐎삲킪펂잏킪퍊멑핓삖삲
펂잏짝컲
짾읺픦묞
한국어

14
* Asegúrese de que las posiciones izquierda y derecha sean
correctas al usarlo, de lo contrario, puede causar datos de
frecuencia cardíaca anormales. Debe ponerse directamente
debajo del pecho y en contacto directo con la piel. No se
aflojará ni se deslizará, incluso cuando hace deportes.
Cómo ponerse el sensor de frecuencia cardíaca
Español
1. Empape con agua el área de electrodo en la parte
posterior del cinturón de frecuencia cardíaca
2. Alinee la hebilla del sensor con la hebilla del cinturón del
pecho y asegúrese de que las posiciones izquierda y derecha
sean correctas.
4. Ajuste el sensor en la parte inferior del pecho, el electrodo
se pega estrechamente en la piel.
Uso correcto de los hombres Uso correcto de las mujeres
Left Right
3. Envuelva el cinturón de frecuencia cardíaca alrededor de su
pecho y abroche la hebilla con el gancho.
5. El sensor se encenderá automáticamente después de usarse
correctamente, el LED frontal parpadea (se apaga después de
10 veces), seleccione el ID de ANT o ID de Bluetooth correcto
en la computadora, el reloj y la APLICACIÓN para transmitir
datos de frecuencia cardíaca.
LED
20136-169
ANT IDծBluetooth ID
FITNESS

15
Español
Posición abierta
Posición de bloqueo
Emparejar el sensor de frecuencia cardíaca con
un dispositivo ANT +
El sensor de frecuencia cardíaca debe ponerse antes de
emparejarlo con un dispositivo compatible
La distancia entre el dispositivo y el sensor de frecuencia
cardíaca debe ser no más de 3 metros, mantenga una
distancia de más de 10 metros de otros sensores ANT +
Una vez completado el emparejamiento inicial, el dispositivo
compatible reconocerá automáticamente el sensor de
frecuencia cardíaca ya encendido
Emparejar el sensor de frecuencia cardíaca con un
dispositivo Bluetooth
El sensor de frecuencia cardíaca debe ponerse antes de
emparejarlo con un dispositivo compatible
La distancia entre el dispositivo y el sensor de frecuencia
cardíaca debe ser no más de 3 metros, mantenga una
distancia de más de 10 metros de otros sensores Bluetooth
La conexión es inválida si se busca directamente usando el
Bluetooth del sistema de teléfono móvil, solo se puede
conectar con un dispositivo Bluetooth o una aplicación al
mismo tiempo
Una vez completado el emparejamiento inicial, el dispositivo
compatible reconocerá automáticamente el sensor de
frecuencia cardíaca ya encendido.
1. Usando una moneda, gire la marca de flecha en la tapa de
batería desde la posición de bloqueo en sentido antihorario
a la posición abierta para abrir el compartimento de batería.
2. Saque la batería vieja
3. Coloque la batería nueva en el compartimiento de batería,
alinee la marca de posición de la tapa de batería con la
posición abierta y presiónela (como se muestra a
continuación), asegúrese de que esté completamente
presionada, use una moneda para girar la marca de flecha de
la tapa de batería en el sentido de las agujas del reloj hasta
la posición de bloqueo.
* Después de reemplazar la batería, es posible que deba
volver a emparejar con el dispositivo
Emparejamiento y configuración
Reemplazo de la batería

16
*Quando si indossa il dispositivo, assicurarsi che le posizioni
destra e sinistra siano corrette, altrimenti si potrebbero
ottenere dati anomali sulla frequenza cardiaca. Si deve
indossare direttamente sotto il petto e a diretto e stretto
contatto con la pelle, e assicurarsi che il dispositivo non scivoli
via anche durante l'esercizio.
Indossare il sensore di frequenza cardiaca
Italiano
1. Bagnare con acqua l'area dell'elettrodo sul retro della
cintura petto della frequenza cardiaca.
2 Allineare la fibbia del sensore con la fibbia femmina della
cintura toracica, e assicurarsi che le posizioni destra e sinistra
siano corrette.
4. Regolare il sensore sotto il petto. Posizionare gli elettrodi
saldamente contro la pelle.
Diagramma di indossamento
corretto per gli uomini
Diagramma di indossamento
corretto per le donne
Left Right
3. Posizionare la cintura per la frequenza cardiaca intorno al
petto e attaccare il gancio e l'anello al gancio.
5. Il sensore si accenderà automaticamente dopo essere stato
indossato correttamente e il LED anteriore lampeggerà (si
spegnerà dopo 10 volte).Selezionare l'ID ANT o l'ID Bluetooth
corretti sul computer, sull'orologio e sull'APP per trasmettere i
dati della frequenza cardiaca.
LED
20136-169
ANT IDծBluetooth ID
FITNESS

17
Posizione di apertura
Posizione di chiusura
Accoppiamento del sensore di frequenza cardiaca
con il dispositivo ANT+
Il sensore di frequenza cardiaca deve essere indossato prima
di essere associato al dispositivo compatibile.
Tenere il dispositivo entro 3 metri dal sensore di frequenza
cardiaca, si prega di tenere 10 metri o più lontano da altri
sensori ANT+.
Dopo l'accoppiamento iniziale, il dispositivo compatibile
riconoscerà automaticamente il sensore di frequenza
cardiaca attivato.
Accoppiamento del sensore di frequenza cardiaca
con il dispositivo Bluetooth.
Il sensore di frequenza cardiaca deve essere indossato prima
di essere associato al dispositivo compatibile.
Tenere il dispositivo entro 3 metri dal sensore di frequenza
cardiaca, si prega di tenere 10 metri o più lontano da altri
sensori Bluetooth.
Utilizzare il Bluetooth direttamente nel sistema telefonico per
cercare le connessioni non è valido. Il dispositivo può essere
collegato da un solo dispositivo o APP Bluetooth allo stesso
tempo.
Dopo l'accoppiamento iniziale, il dispositivo compatibile
riconoscerà automaticamente il sensore di frequenza
cardiaca attivato.
1. Usare una moneta, girare la freccia sul coperchio della
batteria in senso antiorario dalla posizione di chiusura alla
posizione di apertura per aprire il vano batteria.
2. Rimuovere la vecchia batteria.
3. Posizionare la nuova batteria nel vano batterie. Allineare il
segno di posizione del coperchio della batteria con la
posizione di apertura e premerlo (come indicato sotto). Si
assicuri che sia premuto completamente, poi usi una moneta
per girare la freccia del coperchio della batteria in senso
orario fino alla posizione di chiusura.
* Dopo aver sostituito la batteria, può essere necessario
riapplicare il dispositivo.
Abbinamento e impostazione
Sostituzione della batteria
Italiano

18
8BSSBOUZ
This product has passed strict quality inspections. Any
failure caused by product quality problems under
normal use will be covered by a free warranty within
the warranty period.
1.Within 7 days (inclusive) from the date of purchase, if
there is a quality problem of the product itself, it will be
returned unconditionally.
2.The product warranty period is 12 months, subject to
the warranty period of the warranty card.
3.Product warranty repairs need to use the original
factory packaging and select the designated logistics
transportation, otherwise the user will bear the freight
or transportation losses.
The following situations do not belong to the scope of
the warranty:
1.Exceeding the validity period of the warranty.
2.Any damage caused by improper use, maintenance
and storage.
3.Product damage caused by use or installation not in
accordance with the instructions.
4.Unauthorized maintenance, misuse, collision,
negligence, abuse, liquid ingress, accident, alteration,
and unclear use of non-product accessories.
5.No warranty card or valid invoice.
6.The product number or code on the warranty card
does not match the actual product.
7.Other failures and damages that are not caused by
the design, manufacturing, and quality of the product
itself.
8.Wear and dirt caused by normal use, such as
scratches, and damage caused by human factors such
as contact with chemical reagents, contact with sharp
objects, falling, and squeezing.
9.Damage caused by irresistible factors.
Heart rate range
Battery type
Battery shelf life
Wireless transmission protocol
Operating temperature
Protection rating
Weight
Sensor dimensions
Strap length
30~240BPM
3V CR2032 button cell
1000 hours
Ant+ and Bluetooth
-10℃~50℃
IP67
16g
62.3*35.1*11.5mm
64~86cm(±2cm)
Specifications

19
FCC Statement
This device complies with part 15 of the FCC rules. Operation
is subject to the following two conditions: (1) this device may
not cause harmful interference, and (2) this device must
accept any interference received, including interference that
may cause undesired operation.
NOTE: The manufacturer is not responsible for any radio or
TV interference caused by unauthorized modifications or
changes to this equipment. Such modifications or changes
could void the user’s authority to operate the equipment.
For a Class A digital device or peripheral, the instructions
furnished the user shall include the following or similar
statement, placed in a prominent location in the text of the
manual:
NOTE: This equipment has been tested and found to comply
with the limits for a Class A digital device, pursuant to part 15
of the FCC Rules. These limits are designed to provide
reasonable protection against harmful interference when the
equipment is operated in a commercial environment. This
equipment generates, uses, and can radiate radio frequency
energy and, if not installed and used in accordance with the
instruction manual, may cause harmful interference to radio
communications. Operation of this equipment in a residential
area is likely to cause harmful interference in which case the
user will be required to correct the interference at his own
expense
)3.
For more information, contact us:
Qingdao Magene Intelligence Technology Co., Ltd.
Website: www.magenefitness.com
After-sales support: [email protected]
Table of contents
Other Magene Heart Rate Monitor manuals