Magick woods FM.UP240 User manual

CONCORD UPPER UNITS
INSTALLATION INSTRUCTIONS FOR:
COMPONENTS
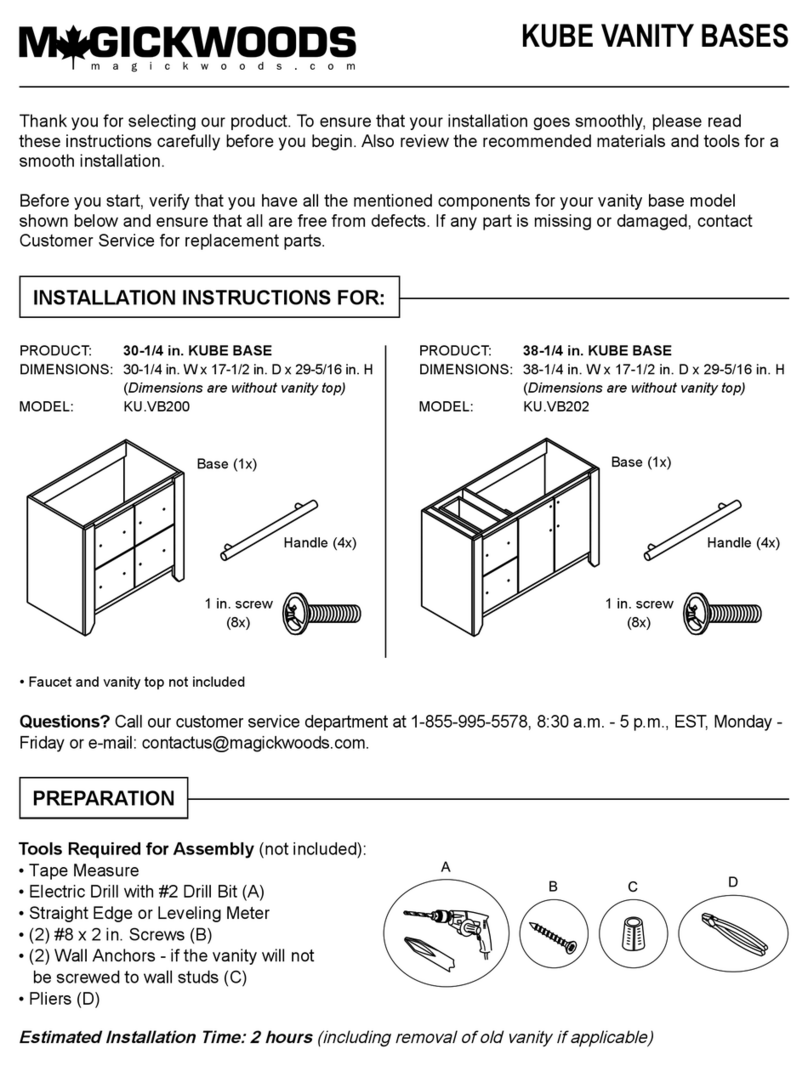
PRODUCT: 30 in. CONCORD UPPER UNIT
DIMENSIONS: 30 in. W x 7-3/8 in. D x 28 in. H
MODEL: FM.UP130
PRODUCT: 40 in. CONCORD UPPER UNIT
DIMENSIONS: 40 in. W x 7-3/8 in. D x 28 in. H
MODEL: FM.UP240
Left cabinet
(1x) Shelf (1x)
Thank you for selecting our product. To ensure that your installation goes smoothly, please read these
instructions carefully before you begin. Also review the recommended materials and tools for a smooth
installation. Before you start, verify that you have all the components shown below for your upper unit model
and ensure that all components are free from defects. Questions, problems, missing parts? Before
returning to your retailer, call our Customer Service department at 1-855-995-5578, 8:30 a.m. - 5 p.m., EST,
2 in. screw (6x)
Washer (6x)
Knob (2x)
Right cabinet
(1x)
Valance (1x)
Mirror
(1x)
Lightset (with 2 lights) (1x)
1-1/4 in. screw (2x)
1 in. screw (2x)
WARNINGS & CAUTIONS
WARNING:
Two people are required for safe installation. Take extra precautionary measures to ensure a secure grip on
the cabinet when lifting.
CAUTION:
• Do not turn on the lights of the unit for prolonged periods of time (i.e.: more than 12 hours continuously).
• Maximum weight limit of the cabinet: 28 lbs (excluding cabinet). The weight bearing capacity of this cabinet is
conditional upon materials and methods used in its installation. It is essential to ensure directions are followed
correctly.
• To maintain the beauty of the cabinet nish, avoid placing the cabinet in direct sunlight.
• Avoid exposing the cabinet to extreme temperatures by installing away from heat and air vents.
• The bathroom wall must be nished prior to installation of the cabinet.

2
INSTALLATION
Step 1: 1) Determine the desired location
for the left side wall cabinet. 2) Mark the
location for the cabinet corners on the wall
ensuring that they are level.
Note: It is recommended that the cabinet
be installed to at least 1 wall stud. In order
to locate wall studs, you can use a stud
nder or tap along the wall until you nd a spot
that sounds solid. If you are unable to locate a
wall stud, it is recommended that you use wall
anchors (B) (not included) to secure your wall
cabinet.
Step 2: Drill through the back of the cabinet near
the top and in another location near the bottom
directly into the wall. Figure 1.
Figure 1
Tools Required for Assembly (not included):
• Tape measure
• Electric drill with #2 drill bit (A)
• Straight edge or leveling meter
• (6x) wall anchors - if the cabinet will not be screwed to wall studs
(type dependent on wall material and local building code
(if building code applicable)) (B)
Estimated installation time: 1/2 hour
PREPARATION
B
A
A
A
A
B
Step 3: 1) Remove the cabinet from the marked
locations and enlarge the new holes accordingly
for the wall anchors (B) (not included - if
applicable). 2) Insert the wall anchors into the
new holes.
Step 4: To hang the cabinet, insert (2x) of
the 2 in. screws provided with washers through
the drilled holes directly into the wall. Figure 1.
Step 5: Attach the knob by using (1x) of the 1 in.
screws provided. Figure 1.
Figure 2
A
A
B
Step 6: 1) Place the mirror in position on the wall
aligned with the left cabinet and mark the hanging
hole locations. 2) Remove the mirror and drill 2
holes in the wall according to the hole positions
marked. It is recommended that you use wall
anchors (B) (not included) to secure your mirror.
3) Insert the wall anchors (if applicable) into the
new holes. 4) Insert (2x) of the 2 in. screws
Marking line

3
Step 8: 1) Position the shelf between the two wall cabinets and carefully slide downward to align with the
bottom of both cabinets. Insert the shelf so its brackets rest securely on top of the pre-installed mounting
screws in the sides of each wall cabinet. Figure 4.
Step 9: Hang the mirror on the wall with the provided hanging hardware attached to the back of the mirror. Figure 4.
Figure 4
Figure 3
A
A
B
provided through the drilled holes/anchors directly into the wall. Figure 2.
Step 7: 1) Determine the location for the right side wall cabinet (aligned with the left cabinet and mirror).
2) Repeat steps 1 through 5 to hang the right side cabinet. Figure 3.
Step 10: 1) Position the valance above the unit, aligned on all edges. 2) Carefully lower the valance and attach
it to the tops of the wall cabinets (on both left and right cabinet) using the 1-1/4 in. screws and washers
provided. Figure 5.
Figure 5
A
Step 11: 1) Insert each light wire through each valance hole from the bottom (the light transformer and wires will
sit on top of the valance). Figure 6. 2) Insert each light into each valance hole from the bottom. Figure 7.
Figure 6
Light connectors
(sockets)

4
TROUBLESHOOTING
Problem: Cabinet/mirror is higher on one side than the other.
Possible Cause: 1) Hanging hardware or mounting screws are not level.
Corrective Action: 1) Remove the cabinet/mirror from the wall and check the mounting screws. Adjust as
needed. 2) Measure the position of the hanging hardware on the back of mirror and ensure that it is level.
Adjust as needed.
WARRANTY
3) Connect each light connector (socket) with its respecting adapters and then connect to the power supply. Figure 8.
Figure 7
Light
Figure 8
Connect to
power supply
Adapter
Light
connectors
(sockets)
What This Warranty Covers: Magick Woods Exports Pvt. Ltd. warrants its parts to be free from substantial defects in materials and workmanship from
the original date of purchase under normal home use. This warranty is offered only to the original consumer purchaser and may not be transferred.
How Long The Warranty Lasts: Coverage for all vanity cabinets, xed vanities, drawer banks, bath storage cabinets, linen cabinets, wall hutches,
llers, toe kicks, medicine cabinets, mirrors, and accessories lasts from 3 years from the original date of purchase.
What Magick Woods Exports Pvt. Ltd. Will Do Under The Warranty: During the warranty period, Magick Woods Exports Pvt. Ltd., at its option, will
repair or replace any part or product that proves to have substantial defects in materials or workmanship, or Magick Woods Exports Pvt. Ltd. will provide
an equivalent replacement product. In keeping with our policy of continuous product improvement, Magick Woods Exports Pvt. Ltd. reserves the right to
change specications in design and materials without notice and with no obligation to retrot products we previously manufactured.
Implied Warranties: Magick Woods Exports Pvt. Ltd. disclaims any implied warranty of merchantability, and there are no warranties that extend beyond
the descriptions on the face hereof.
Wood, Aging and Printing Limitations: Because of the varying natural characteristics of wood and the effects of aging, product shown in displays
and/or printed materials will not be an exact match to the cabinetry you will receive. Depending on the wood characteristics, the age of a sample and the
environment of the showroom, samples will show some degree of variation from new product. In addition, you should not expect all doors, drawer fronts,
trim, or moulding to match exactly in either nish or grain. Variation in wood is normal and unavoidable. In addition, it is not possible to exactly match our
colors in printed materials. Therefore, you should view the actual samples when making your color selection.
What This Warranty Does Not Cover: This warranty does not cover any problems or damage which result from improper transportation, improper
installation, mishandling, misuse, abuse, neglect, abnormal use, commercial use, improper maintenance, non-Magick Woods Exports Pvt. Ltd. repairs,
accidents, or acts of God, such as hurricanes, re, earthquakes or oods. The warranty and any applicable implied warranties do not cover incidental or
consequential damages arising from any defects in the product such as labor charges for installation or removal of the product or any associated
products. This warranty does not cover defects or damage caused by normal wear and tear, alterations, environmental conditions, humidity
absorption, or mold. In addition, variations in wood grain, nish color, aging, or other natural wood stain characteristics are not considered defects and
are not covered by this warranty.
How to Obtain Warranty Service: If you need replacement parts or would like to make a warranty claim, please contact our Customer Service
Representative by mail, email, fax, or telephone at the address or telephone number listed. All warranty claims must include the model number of the
product, copy of the original receipt, and the nature of the problem. In addition, Magick Woods Exports Pvt. Ltd. may at its discretion require inspection
of the installation site, photography, or authorize the prepaid return of the claimed defective part. Merchandise not pre-approved for return will not be
accepted and the associated claim not accepted. If upon inspection you nd your product is damaged or missing parts, it is not necessary to return the
unit to the store of purchase. Please contact Magick Woods Exports Pvt. Ltd. Customer Service to obtain a replacement part.
Magick Woods Exports Pvt. Ltd. Customer Service: 1-855-995-5578 • Fax: 905-738-5579
This manual suits for next models
1
Table of contents
Other Magick woods Indoor Furnishing manuals
Popular Indoor Furnishing manuals by other brands

FIAM.
FIAM. RITRATTO Product information

GFW
GFW HANNOVER NON-STORAGE BEDFRAME Assembly instructions

Bush Business Furniture
Bush Business Furniture HATB24DGM-03K Assembly instructions

Baxton Studio
Baxton Studio BBT 6431 TWIN HB Assembly instructions

Forte
Forte TMZK223 Assembling Instruction

hygena
hygena Harcourt 412/1806 Assembly lnstructions