MAGICVIEW OC-300 User manual

MagicView OC-300 User Manual

MagicView OC-300 User Manual
1__Introduction ------------------------------------------------------2
1-1 Specifications ------------------------------------------------------------------------2
1-2 Setting Up the Digital Presenter ------------------------------------------------3
2__Installation -------------------------------------------------------5
2-1 The Installation Process ----------------------------------------------------------5
2-2 How to Install the Driver & the Viewer Programs---------------------------6
2-3 How to Install the Hardware -----------------------------------------------------8
2-4 How to Install the DirectX 9.0 & WM Encoder -----------------------------10
2-5 Precautions ------------------------------------------------------------------------11
2-6 How to Verify Proper Driver Installation ------------------------------------12
3__Using the Viewer Program --------------------------------14
3-1 Getting Started -------------------------------------------------------------------14
3-2 Menu --------------------------------------------------------------------------------15
3-3 Key Features ----------------------------------------------------------------------16
4__Troubleshooting ----------------------------------------------23
5__Precautions --------------------------------------------------- 25
6__Did you know? ------------------------------------------------26
Contents
1

MagicView OC-300 User Manual
1-1 Specifications
2
1__ Introduction
Lens Z#3.0, Focus Distance 8.4MM
Focus Powered Focus
Exposure (IRIS) Auto
Image Sensor 1/2” CMOS
Frame Rate 7.5 fps at 2048 X 1536, 20 fps at 1024 X 768, 30 fps at 1024 X 510
Resolution Max. QXGA (2048 x 1536)
S/N Ratio 46dB
Lens Holder 37MM Standard Size
Resolution 7.5 fps at QXGA, 20 fps at XGA, 30 fps at DV, 8 fps at HF
Storage Format WMV
Lighting Built-in Super Bright White LED / 10,000mcd
Power / Switch USB Power, Manual On & Off Switch
Body Three-axis Articulated Body
Height About 330MM – After Extension
Video Shooting 20 fps at XGA (1024 x 768)
Camera Video and Camera Control
Adjustment /Editing Resolution Adjustment and Image Editing
Operating Systems Windows 2000 SP2, Windows XP SP1 or Higher
Minimum
Specifications Pentium IV 1.8 GHz, 256MB RAM , 10GB HDD or Higher
Interface USB 2.0, 480Mbps
Operating Ambience Temperature 0℃to + 40℃, Humidity 30% to 90%
Power Consumption Ghost Power, PC USB 5 Volts, Consumption Max. 400mA
Net Weight 900 grams
Dimensions 65MM(W) x 110MM(H) x 175MM(D) When Folded
Miscellaneous
Accessories Included Digital Presenter, Hard Carrying Case, Lens Cover, Set-up CD, User Manual
PC Interface
Viewer
Body
Lighting
Video
Camera
Optics
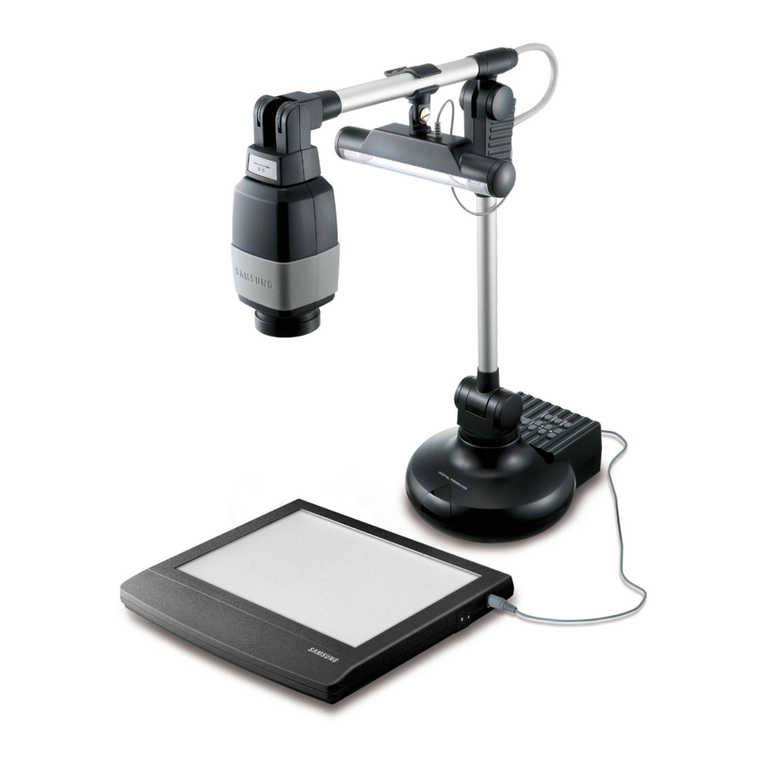
MagicView OC-300 User Manual
1-2 Setting up the Digital Presenter
The ‘Powered Focus’ switch of the MagicView OC-300 allows focusing adjustments
to be made according to an object’s height and depth.
1-2-1 The three-axis articulated arm
The angle and height of the
extendable/foldable arm easily adjusts to the
object.
1-2-2 The buttons
SHOT LIGHT POWERED FOCUS
MANUAL FOCUS ZOOM
3
1__ Introduction

MagicView OC-300 User Manual
There is an ultra-bright 10,000mcd LED light on the upper arm of the main unit. This
light enables the user to use the MagicView in dark environments . There is an on &
off switch on the back of the lighting panel.
The ‘SHOT’ button on the back of the camera head is for shooting. When the button
is pressed for the first time, it enters the ready mode, then, when the button is
pressed for the second time, the shooting is done. Shooting can be done under the
basic menu of the OC-300 Viewer program. Please refer to section 3 for details.
1-2-3 The hard carrying case
There is a strong magnetic stick inside the inclusive aluminum carrying case. You
can place the digital presenter on the case when capturing A4 size documents.
The red square indicates where the digital
presenter should be positioned on the
case.
Place the Digital Presenter on the carrying case
as shown in this picture.
4
1__ Introduction

MagicView OC-300 User Manual
The following steps will lead you through the auto installation process, which
installs the driver and viewer software automatically for you. Also, you can install
or uninstall the individual programs manually as necessary.
The set-up CD contains the following:
DirectX 9.0 DirectX 9.0 Runtime Software
MagicView Driver MagicView OC-300 Driver Software
MagicView MagicView Viewer Software
WM Encoder Window Media Encoder
MagicView Manual.pdf MagicView Software User Manual
(PDF Acrobat Reader file)
2-1 The Installation Process
3. Install the DirectX 9.0 Software & WMEncoder
2. Install the MagicView 3.0 Viewer Program
1. Install the MagicView OC-300 Driver
4. Reboot the PC
5. Connect the USB cable of the digital presenter to a PC
Contents of the Set-up CD
5
2_Installation

MagicView OC-300 User Manual
1. After inserting the MagicView OC-300 Set-up CD, the auto-installation program
will start automatically. Click the auto-installation button to continue the installation.
2-2 How to Install the Driver & the Viewer Programs
2. After the MagicViewer 3.0 program InstallShield Wizard appears select ‘Next’ to
complete the installation.
6
Do not connect the USB cable to a PC before installing the driver
and viewer programs. Otherwise, improper installation may result. When
inserting the Set-up CD into the CD-Rom, the MagicView OC-300 Viewer
Program will be installed first, then the MagicView OC-300 Driver will be
installed.
Note
2_Installation

MagicView OC-300 User Manual 7
3. After the driver installation is finished, the MagicView 3.0 Viewer installation program
will start running. Type in a username and click ‘Next’ to continue with the installation.
4. Choose a folder to install the software in and click ‘Next’ to continue with the installation.
5. Installation is finished once this progress window is displayed .
2_Installation

MagicView OC-300 User Manual
1. After installing the MagicView OC-300 Viewer Program, connect the USB cable
of the Digital Presenter to the USB port at the front or the rear of your PC.
USB ports at the rear
of the PC.
2. When the ‘Found New Hardware Wizard’ comes up choose the ‘No, not this
time (T)’ option, and then click ‘Next’ to continue with the installation.
The MagicView OC-300 digital presenter can only be used with
USB 2.0. Check if the PC supports USB 2.0.
2-3 How to Install the Hardware
8
Note
2_Installation

MagicView OC-300 User Manual
3. In the ‘Found New Hardware Wizard’ window, select the ‘Install the software
automatically (Recommended)’ option and click ‘Next’.
4. A security warning window will come up. Click the ‘Continue’ button.
5. When the ‘Install Complete’ dialogue window comes up click ‘Finish’ to complete
the installation.
9
2_Installation

MagicView OC-300 User Manual
1.If ‘DirectX 9.0’ is not yet installed on your PC or you have an olderversion of DirectX 9.0 on your PC,
you will need to install the ‘DirectX 9.0’ software on your PC.
Double click the ‘dxsetup.exe’ file under the ‘Direct9.0’ folder to start installing the ‘Direct 9.0’ software.
A dialogue window comes up oncethe installation process has started. Click the ‘Agree’ button,
then ‘Next’. The installation process only takes a few minutes to complete. The PC reboots itself
once the installation is completed.
2-4 How to Install DirectX 9.0 & WM Encoder
2. If ‘WM Encoder’ is not yet installed on your PC or you have an older version of ‘WM Encoder’ on your
PC, you will need to install the ‘WM Encoder 9 Series’ software on your PC.
Double click the set-up file under the ‘WM Encoder’folder to start installing the ‘WM Encoder’software.
A dialogue window comes up oncethe installation process has started. Click the ‘Agree’ button,
then ‘Next’. The installation process only takes a few minutes to complete. The PC reboots itself
once the installation is completed.
10
2_Installation

MagicView OC-300 User Manual
2-5 Precautions
USB Recognition
on Windows 2000
When connecting the USB cable to Windows 2000, you
may see a ‘DigitalSignature Warning’ message displayed
on the monitor. Ignore it. Continue with the installation.
Precautions for
Installation on
Windows 98
When installing on Windows 98, you may not be able to
install the Window Media Encoder 9. You will need to install
a ‘WM Encoder’ for Windows 98.
When the installation is complete, reboot the system. When
you connect the USB cable to your PC for the first time after
rebooting the system, you may need the Windows 98 CD.
Insert the Windows 98 CD and install the drive. After the
driver installation is complete, proceed with the rest of the
program installation.
When Changing
USB Ports
After installing the MagicView Digital Presenter to your PC,
if you connect the Digital Presenter to a different USB port,
the auto-recognition process will be repeated. This is not an
installation error. When changing USB ports, it requires you
to go through the auto-recognition process.
11
2_Installation

MagicView OC-300 User Manual
1. To confirm if the MagicView 3.0 installation has been installed properly, right click
the ‘My Computer’ icon on your PC to activate the Quick Menu or to activate the
Control Panel.
2. Choose ‘Hardware’ on the ‘System Properties’ menu and press the ‘Device Manager’
button on the ‘Hardware’ tap.
2-6 How to verify proper driver installation
12
2_Installation

MagicView OC-300 User Manual
4. you see an exclamation mark or a question mark next to the ‘TAMTUS OC-300
Driver’ the driver is not recognized in the Windows system. Please take the
following steps:
4.1 Right click the ‘Wrongly Recognized Device’, and then execute the ‘Driver
Update.’
4.2 Choose ‘Install from a list or specific location’ on the ‘Hardware Update
Wizard.’
4.3 Choose ‘Don’t search, but select the driver to install’ on the menu.
4.4 Choose ‘Tamtus MagicView OC-300’ in the ‘Show Compatible Hardware’ box.
3. If you see the following picture under the ‘Imaging Device’ on the ‘Device
Manager’ window, the driver has been successfully installed.
13
2_Installation

MagicView OC-300 User Manual
3-1 Getting Started
1. First, connect the MagicView Digital Presenter to your PC. Double click the execute
icon on the PC screen or follow the steps: Start After Install ÆProgram ÆMagicView
ÆMagicView 3.0
<The Execute Icon appearing on the PC screen>
2. When running the MagicView 3.0 Viewer, the camera turns itself on and you will
see a default display as shown in the picture below.
< The Default Display >
Current Resolution
Basic Menu
Recording Indicator
Zoom In / Out
Voice Adjustment
Device Select
Resolution Switch
MagicView Browser
Video Folder
Delete Images
Image Folder
Image / Video List
Device
Video/Camera Control Panel
MagicView 3.0
14
3_Using the Viewer Program

MagicView OC-300 User Manual
3-2 Menu
15
Preview
The Digital Presenter can start projecting images.
To activate the button, the Digital Presenter must be connected to a PC.
Video Shot/Stop
To save a moving action on the PC screen as a video file, press ‘REC.’the
‘REC’button turns to ‘STOP’
To stop video, press ‘STOP.’
The indicator light on the top right is on while a video file is being stored.
Snap-Shot
You can shoot the image that you are viewing, and store it in graphics file
format.
Graphics are stored in JPG format and at the resolution of the preview
image. Stored files can be confirmed in the search box.
Flip
Images can be rotated clockwise at 90, 180 or 270 degrees.
Display Size Adjustment
Display sizes can be adjusted - full window, normal window and half window.
You can also resize the window by right clicking the mouse.
Resolution Switching Button
The native resolution is switched to 640×480(VGA) and
1280×1024(XGA).
Other resolutions can be adjusted at the Video ControlMenu.
You may have difficulty adjusting focuses at a high resolution (1280X1024)
due to a time delay. The delay occurrence depends on the PC specs and
object environment. To solve this problem, focus at a low resolution first,
then switch to a high resolution.
You can switch the resolution to the 640 x 480(VGA) from the current
resolution you have set. You can switch the resolution from 640 x480(VGA)
to the previous resolution.
3_Using the Viewer Program

MagicView OC-300 User Manual
3-3 Key Features
Browser
OC-300 Viewer offers a file preview and a media file playback function. It plays back
image, audio and video files.
Image Formats bmp, jpg, gif, tga
Audio Formats mp3, wav
Video Formats wmv, mpg, avi, asf
You can change file locations in the ‘Media Browser’ window to save media files on
your PC
Browser To open the Media Playback window.
Video Folder To open video files saved.on the PC.
Image Folder To open image files saved on the PC
Delete To delete image and video files that you have selected.
Browser
Video Controls Camera Controls
Voice & Device Select
Image Editor
Filter / Home / Minimize / Camera Exit
Zoom In & Out
16
3_Using the Viewer Program

MagicView OC-300 User Manual
Operating the Media Browser Window
You can adjust the screen size, video and audio play/stop and
audio mute functions by right clicking the ‘Media File Preview’
window you have chosen.
To play back video and audio files you can select the mode
and function by using the Media Control menu in the Media
Playback window.
The folders displayed in the Browser Window are located in
the following folders.
C:₩Program Files₩MagicView3.0₩Image
C:₩Program Files₩MagicView3.0₩Video
To change folders click the ‘Select’ button to open the ‘Folder
Setting’ window. Choose a folder to save the file in according
to the file format, and click ‘OK.’
17
3_Using the Viewer Program

MagicView OC-300 User Manual
Video Control
You can set-up the quality, speed and output resolution (1024 x 768 by default) of
the image of the Digital Presenter to meet your needs.
The MagicView OC-300 viewer supports a various range of image resolutions up to
QXGA (2048 x 1536). As for the compression of camera image data, it supports the
RGB24 format.
QXGA 2048 x 1536 6.7 fps
SXGA 1280 x 1024 6.7 fps
XGA 1024 x 768 20 fps
DV 1024 x 510 30 fps
HF 1024 x 190 78 fps
Resolution / Frame Rates
When using real-time video in the classroom, it is recommended to
have a resolution of 1024 x 768(VGX). For still images, close-up or macro shots,
it is recommended to have a resolution of 2048 x 1536(QXGA).
18
Note
3_Using the Viewer Program

MagicView OC-300 User Manual
Camera Control
Screen contrasts, definition, freshness, and auto/manual exposures can be adjusted. Only advanced
users are recommended to use this function. Camera settings may affect the screen’s distortion.
Adjusting Brightness
The brightness of images can be adjusted when the screen image is too bright or too dark.
Press the default value button to correct image distortions.
Adjusting the Camera Exposure
The MagicView OC-300 viewer exposure is set automatically. When adjusting by hand, remove the
check button of the auto exposure. In the case of a manual adjustment, you will need to adjust the
camera exposure according to the shooting environment every time you shoot, therefore, it is
recommended to keep the auto setting and to use the AE target that adjusts the camera exposure
automatically for you.
Removing flicker
You may have flicker depending on the exposure or lighting of the environment. Press the ‘Flicker
Remove’ button to remove the flicker.
Choosing colours
You can choose the colour you want or convert a colour image to B&W. To convert to B&W, remove
the ‘Colour Check’ button.
19
3_Using the Viewer Program
Table of contents