Magikist iCoin CP900U User manual

iCoin Model CP900U
Electronic Multi-Coin Acceptor
Instruction Manual
v 1.2


1) MOUNTING
Mount the iCoin to the faceplate of the meter box using the 5 holes on the stainless
steel edgemount. Ensure that the iCoin is mounted vertically and is not tilted in any
direction.!
2) ELECTRICAL CONNECTION
The supply voltage for the iCoin is 24 volts AC. Do not connect the iCoin to 120
volts AC. Before connecting power to the iCoin, check the supply voltage with an
AC voltmeter. It must be 24 volts AC ±5 volts.!
When turning power offand on to the iCoin power must remain offfor a minimum of
5 seconds before being turned back on to ensure that the iCoin powers up
correctly.!
The yellow and black wires of the iCoin are for supply voltage of 24VAC. Yellow is +
and black is –(ground). Electronic pulsing units have a blue and purple wire. The
blue wire is a DC switch used for pulsing that will sink a maximum of 200mA at
5-40VDC to black (ground). The purple wire is an AC switch used for pulsing that
will sink a maximum of 500mA up to 600VAC to black (ground). Relay pulsing units
have two red wires (non-polarized) that utilize a normally open contact rated at
maximum 1A, 125VAC, 60VDC to pulse.!
Following are the wiring connections for several brands of timers. If your timer is not
listed, consult your supplier for further information.!
Magikist MagikTimer MT580 or iTimer MT580U
YELLOW-24VAC HOT #2 terminal!
BLACK-COMMON #3 terminal!
BLUE-COIN SWITCH+ #6 terminal!
Do not use this
mounting hole

Grace Timer & PEM7 timer
YELLOW-#3 terminal!
BLACK-#1 terminal!
BLUE-#4 terminal!
Dixmor DigitTimer 3
YELLOW-red wire on timer!
BLACK-green wire on timer!
BLUE-brown wire on timer!
Ginsan GS7 timer
YELLOW-24VAC #3 terminal!
BLACK-24VAC #1 terminal!
BLUE-#4 terminal!
3) DISPLAY PANEL AND BUTTONS
The iCoin utilizes a display panel and pushbuttons for setup and self-diagnostics.
The display panel has several indicator lights that show power status, which coins
the iCoin is currently accepting, and setup information regarding tokens. The
pushbuttons allow one to change the coins that the are to be accepted and to set
the tokens (if any) that the iCoin is to accept.!
4) DISPLAY DURING POWER UP
During the initial power up sequence, the iCoin displays the current settings for
several options. For the first second after power up, the 5 indicator lights 1, 2, 4, 8,
and 16 for #pulses for Selected Token show the current Token Sensitivity setting,
the Pulse Speed setting, and the Preprogrammed Coins Number of Pulses Setting.
Immediately following this, indicator lights 1 and 2 for #pulses for Selected Token
will display for approximately 1 second to show normal power up. Finally, the
normal operating display will show the current coin and token settings!
For more information on the Token Sensitivity setting, the Pulse Speed setting, and
the Preprogrammed Coins Number of Pulses setting, see the appropriate section
that follows.!
5) US QUARTER AND DOLLAR COIN SELECTION
The iCoin is preprogrammed to accept one or both of the U.S. quarter and $1 coin
(Sacagawea Golden dollar and Susan B. Anthony dollar). Once the iCoin is powered
up, the display panel shows which coins the iCoin is activated to accept. For

example, if the indicator lights
for US-$0.25 and US-$1 are lit
as in figure 5.1, then the iCoin
will accept both the U.S.
quarter and the $1 coin. If only
the indicator light for US-$0.25
is lit, as in figure 5.2, then the
iCoin will accept only the U.S.
quarter.!
To change which coins that the
iCoin is activated to accept,
press the button labeled Press
to Set Active Coins. Pressing
this button will change the
activated coins that the iCoin is
to accept as shown by the
display panel. By repeatedly
pressing the button you will
arrive at the setting you wish
for coins that the iCoin is to
accept.!
The iCoin will send 1 pulse to
the timer for each U.S. quarter
that is accepted, and 4 pulses
to the timer for each U.S. $1
coin that is accepted. Ensure
that your timer is setup
correctly based on the number
of pulses that the iCoin will
send for the coins that you
have enabled it to accept. It is
possible to change the iCoin
so that is will send only 1 pulse
for each U.S. $1 coin if the U.S.
quarter is disabled. Please see the section Preprogrammed Coins Number of
Pulses Setting for more information.!
6) TOKEN SETUP
The iCoin can be easily programmed to accept up to 3 different tokens of your
choice. Ensure that you have selected good quality tokens, and that other
operators in your area are not using a similar size token of the same alloy. The iCoin
is compatible with most tokens. Consult your distributor who can then confirm that
the token you have selected is compatible with the iCoin .!
The tokens that the iCoin learns are stored as TokenA, TokenB, or TokenC. The
panel display of the iCoin shows TokenA, TokenB, and TokenC, and which of these
tokens is currently learned. If the indicator light under Learned next to TokenA,
Power
Activated
TokenB
TokenA
TokenC
Press to
Learn
Selected
Token
Learned Selected
#pulses for
Selected
Token
4
1
2
8
16
Press to
set# pulses
for Token
Press to
Select
Token
Press to
Set Active
Coins
Cdn-$2
Cdn-$0.25
Cdn-$1
figure 5.1
figure 5.2

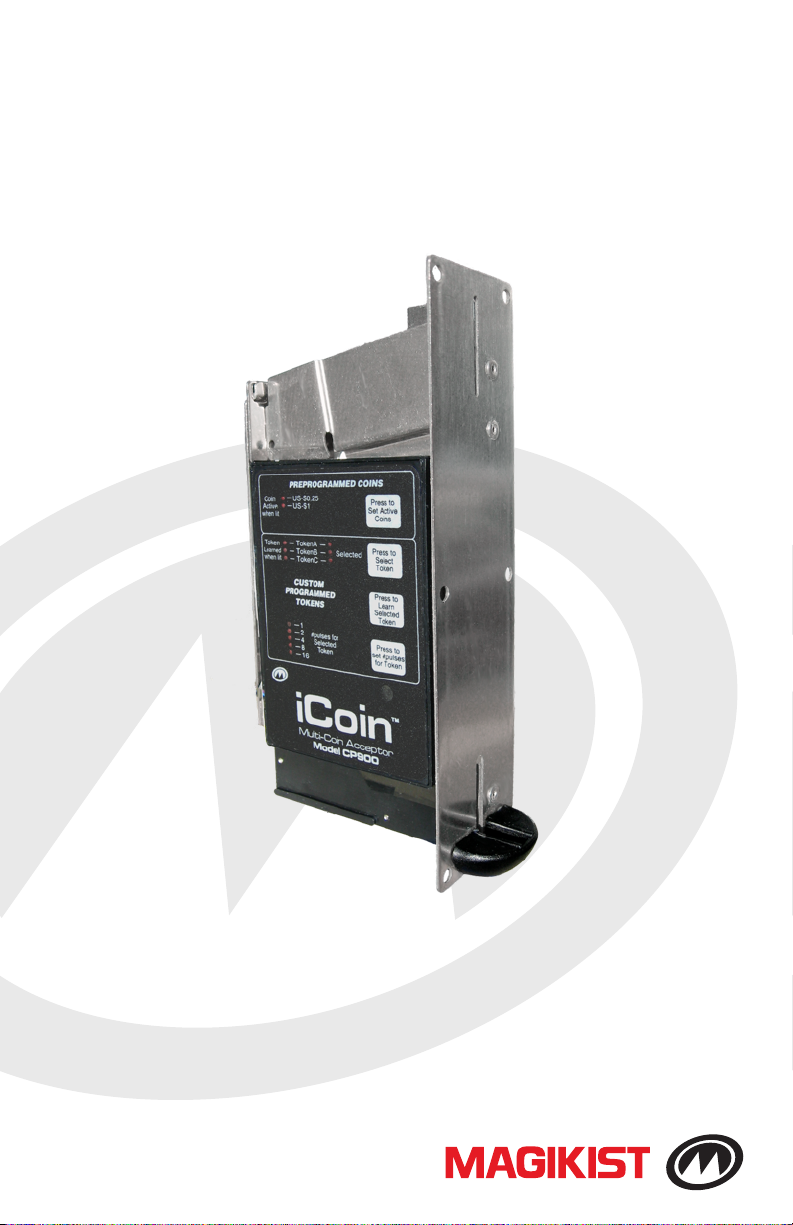
TokenB, or TokenC is lit, then that token has already been learned. For example,
figure 6.1 shows a setting where TokenA and TokenC have been learned. All learned
tokens will be accepted by the iCoin.!
The currently lit indicator light under Selected shows which token is currently
selected. Pressing the pushbutton labeled Press to Select Token advances the
indicator light under Selected to the next token. For example, if the indicator light
under Selected and next to TokenB was lit, pressing the Press to Select Token
pushbutton would light the indicator light next to TokenC. Pressing the pushbutton
again would now move the indicator light to TokenA.!
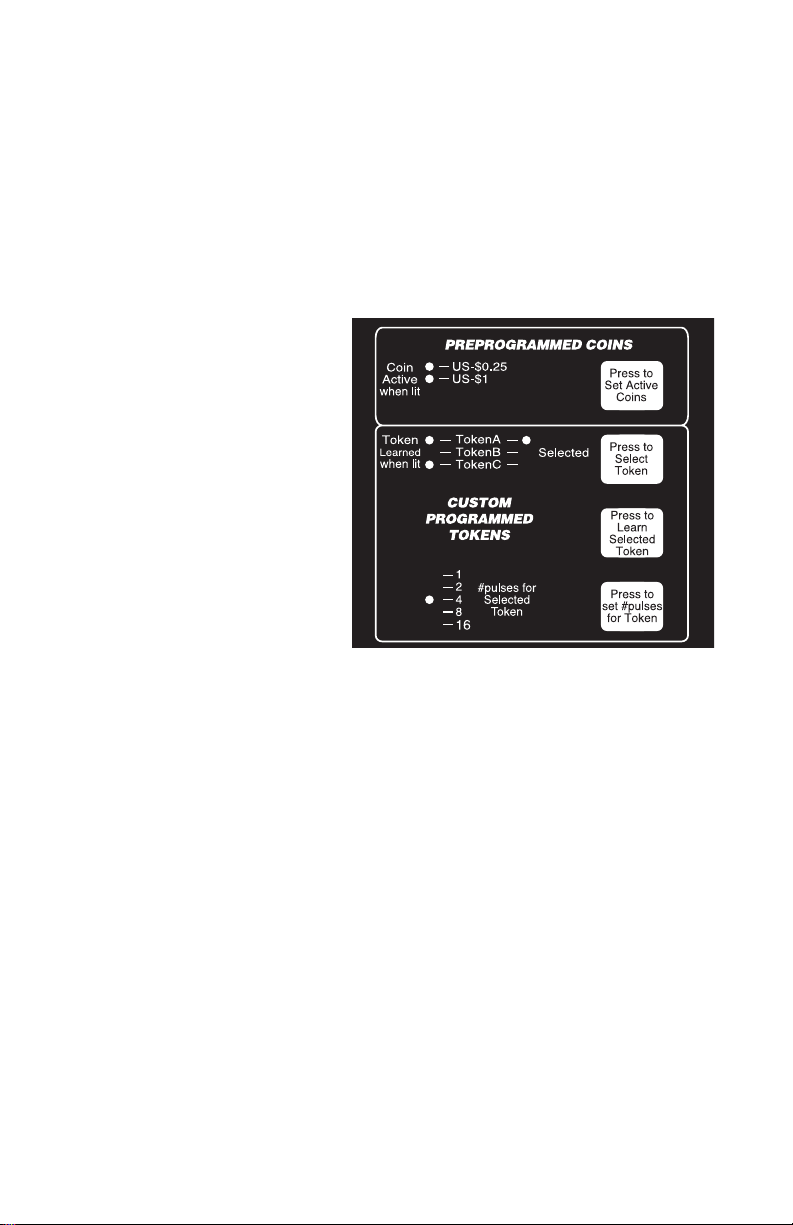
The indicator lights 1, 2, 4, 8,
and 16 for #pulses for Selected
Token show the total number of
pulses that will be sent when
the currently selected token is
accepted. The total number of
pulses that will be sent is the
sum of all the indicator lights 1,
2, 4, 8, and 16 for #pulses for
Selected Token that are lit. If all
indicator lights for #pulses for
Selected Token are offfor the
current learned token, then 32
pulses will be sent. If the
currently selected token is not
learned, then all the indicator
lights 1, 2, 4, 8, and 16 for
#pulses for Selected Token will
not be lit.!
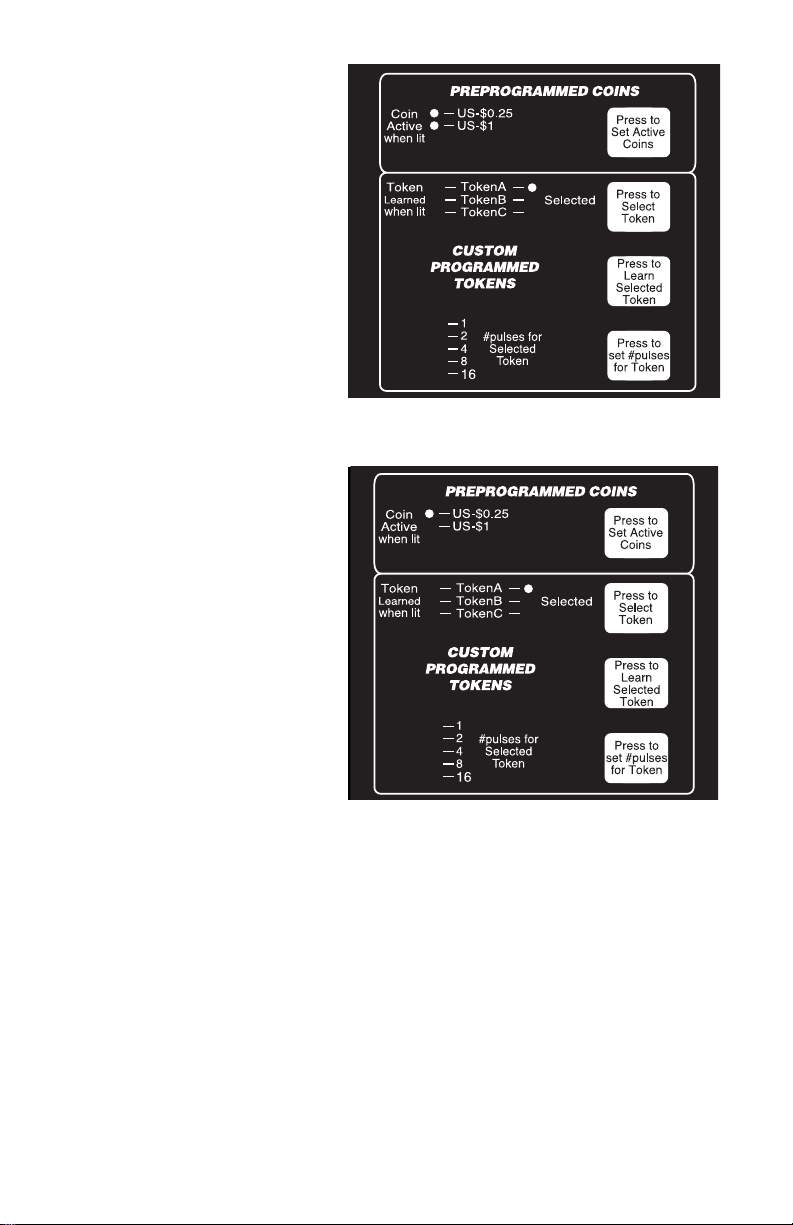
To learn a token, first decide whether the token is to be stored as TokenA, TokenB,
or TokenC. The indicator light for that token under the Selected column must then
be lit for that token to be the currently selected token. If necessary, press the Press
to Select Token button to sequence the indicator lights under the Selected column
until the indicator light next to your choice of TokenA, TokenB, or TokenC is lit.!
Press the pushbutton labeled Press to Learn Selected Token to start the learn
process. The indicator light under the Learned column next to the currently selected
token will begin to flash slowly. At this point you have 10 seconds to drop through
the iCoin TWO samples of the token you wish to program, one sample at a time. If
the sample is read correctly by the iCoin then it will accept it and make a noticeable
“click” of its kicker. After both samples have been accepted by the iCoin, the
indicator light under Learned next to the current selected token will be lit, indicating
that the token has been learned.!
At this time you will need to press the Press to set# pulses for Token pushbutton
until the panel display showing the #pulses for Selected Token is set so that your
token will give the correct number of pulses (and thus the correct value) to the timer
when the token is accepted.!
figure 6.1

You may at anytime "unlearn" a token. Make sure that the token you wish to erase
is the currently selected token. Then press the Press to Learn Selected Token
pushbutton. The indicator light under the Learned column next to the currently
selected token will begin to flash. Wait for 10 second without dropping any coins,
after which the learned indicator light for the selected token will turn offsignifying
that the token is now erased.!
7) TOKEN SENSITIVITY
The iCoin provides a means that allows you to adjust how fine it discriminates
tokens. For the first second after power up, the indicator lights 2, 4, and 8 for
#pulses for Selected Token show the current token sensitivity setting. Low
sensitivity, being the least discriminatory, is shown by the 2 indicator light, medium
by the 4 indicator light, and high by the 8 indicator light. The higher the sensitivity
the more strict the iCoin will be in accepting tokens.!
In normal use the sensitivity setting of the iCoin may be left at medium. However, if
you find that a particular token of yours has variations in its metallic content which
cause the iCoin to accept some tokens while rejecting others, you may wish to
adjust the sensitivity setting to low. Likewise, if the iCoin is accepting a token that is
it has not learned, you may wish to change the sensitivity setting to high (NOTE:
The high sensitivity setting may not enable the iCoin to differentiate between 2
tokens of the same metal content that vary only slightly in size).!
To change the sensitivity setting:!
i) Power down the iCoin.!
ii) Press and hold the appropriate pushbutton for the desired sensitivity
setting:!
#Low - Press to Select Token!
#Medium - Press to Learn Selected Token!
#High - Press to set# pulses for Token!
iii) Power up the iCoin while continuing to hold the pushbutton you have
chosen until the indicator lights come on. The new sensitivity setting will
be displayed on the indicator lights 2, 4, and 8 for #pulses for Selected
Token during this time.!
The sensitivity setting applies only to tokens and does not affect how the iCoin
evaluates the preprogrammed U.S. quarter or $1 coin.
8) PULSE SPEED
Some older timers may not be fast enough to correctly accept multiple pulses from
the iCoin. These timers require a slower pulse speed from the iCoin. The speed at
which the iCoin sends pulses to the timer can be easily set to either normal speed
or slow speed.!

For the first second after power up, the indicator light 1 for #pulses for Selected
Token shows the current pulse speed setting. If this light is on, pulse speed is
normal. Conversely, if this light is off, pulse speed is slow.!
To change the pulse speed setting of the iCoin from its current setting, first verify
what the current setting is by examining the indicator light 1 for #pulses for
Selected Token at power up. Then if you wish to change the current setting:!
i) Power down the iCoin.!
ii) Press and hold the Press to Set Active Coins pushbutton. !
iii) Power up the iCoin while continuing to hold the pushbutton until the
indicator lights come on. The new pulse speed setting will be displayed on
the indicator light 1 for #pulses for Selected Token during this time.!
9) PREPROGRAMMED COINS NUMBER OF PULSES
Because the U.S. quarter or the U.S. $1 coin have different values, different number
of pulses will be sent to the timer depending on which coin is accepted. Normally
the number of pulses sent is fixed: 1 pulse is sent to the timer when a U.S. quarter
is accepted, and 4 pulses when the U.S. $1 coin is accepted. This setting is
regardless of whether only one or both coins are enabled. This setting can be
changed such that it is dependent on which coins are enabled. In the dependent
setting, only 1 pulse will be sent to the timer when the U.S. $1 coin is accepted if
the U.S. quarter is disabled. If the U.S. quarter is enabled then the dependent
setting operates the same as the fixed setting.!
For the first second after power up, the indicator light 16 for #pulses for Selected
Token shows the current preprogrammed coins number of pulses setting. If this
light is on, the preprogrammed coins number of pulses is fixed. Conversely, if this
light is off, the preprogrammed coins number of pulses is dependent.!
To change the preprogrammed coins number of pulses setting:!
i) Power down the iCoin.!
ii) Press and hold both the Press to Set Active Coins pushbutton and Press
to Select Token pushbutton.!
iii) Power up the iCoin while continuing to hold the pushbutton until the
indicator lights come on. The new preprogrammed coins number of pulses
setting will be displayed on the indicator light 16 for #pulses for Selected
Token during this time.!
Ensure that your timer is setup correctly based on the number of pulses that the
iCoin will send for the coins that you have enabled it to accept.!
10) HINGED DOOR ACCESS
Should a bent or damaged coin become stuck in the coin acceptor, the iCoin
CP900U features full access to the internal coin path. By gently pulling back on the

right side of the display panel as shown in figure 10.1, the hinged door will pull back
to allow cleaning and removal of damaged coins.
figure 10.1

A. APPENDIX
For future reference, write down the serial# located on the bottom of the black box
of the coin acceptor. In addition, when learning tokens, record the details of each
token on the following lines:!
SERIAL# ___________________________________ !
TokenA Description ____________________________________________ !
TokenB Description ____________________________________________ !
TokenC Description ____________________________________________
This manual suits for next models
1
Table of contents