Magliner NEO Installation manual

Date of Purchase: ________________________
NEO Powered Stair
Climbing Hand Truck
Read the Owners Manual thoroughly before first use.
Important Startup Instructions
MAGLINE® INC.
1205 West Cedar Street
Standish, Michigan 48658
1-800-MAGLINE (624-5463)
Email: customerservice@magliner.com
www.magliner.com

1-800-MAGLINE (624-5463) www.magliner.com
2
INTRODUCTION. . . . . . . . . . . . . . . . . . . . . . . . . . . . . . . . . . . . . . . . . . . . . . . . . . . . . . . . . . . . . . . . . 3
1.SAFETY GUIDELINES /TECHNICAL DATA . . . . . . . . . . . . . . . . . . . . . . . . . . . . . . . . . . . . . . . . . . 3
1.1.GENERAL SAFETY GUIDELINES. . . . . . . . . . . . . . . . . . . . . . . . . . . . . . . . . . . . . . . . . . . . . . . . . . . . . . . . . . . . . . . 3
1.2.TECHNICAL DATA OFTHE STAIR CLIMBER . . . . . . . . . . . . . . . . . . . . . . . . . . . . . . . . . . . . . . . . . . . . . . . . . . . . . . 4
1.3.TECHNICAL DATA FOR LITHIUM QUICK-CHANGE BATTERY PACK . . . . . . . . . . . . . . . . . . . . . . . . . . . . . . . . . . 4
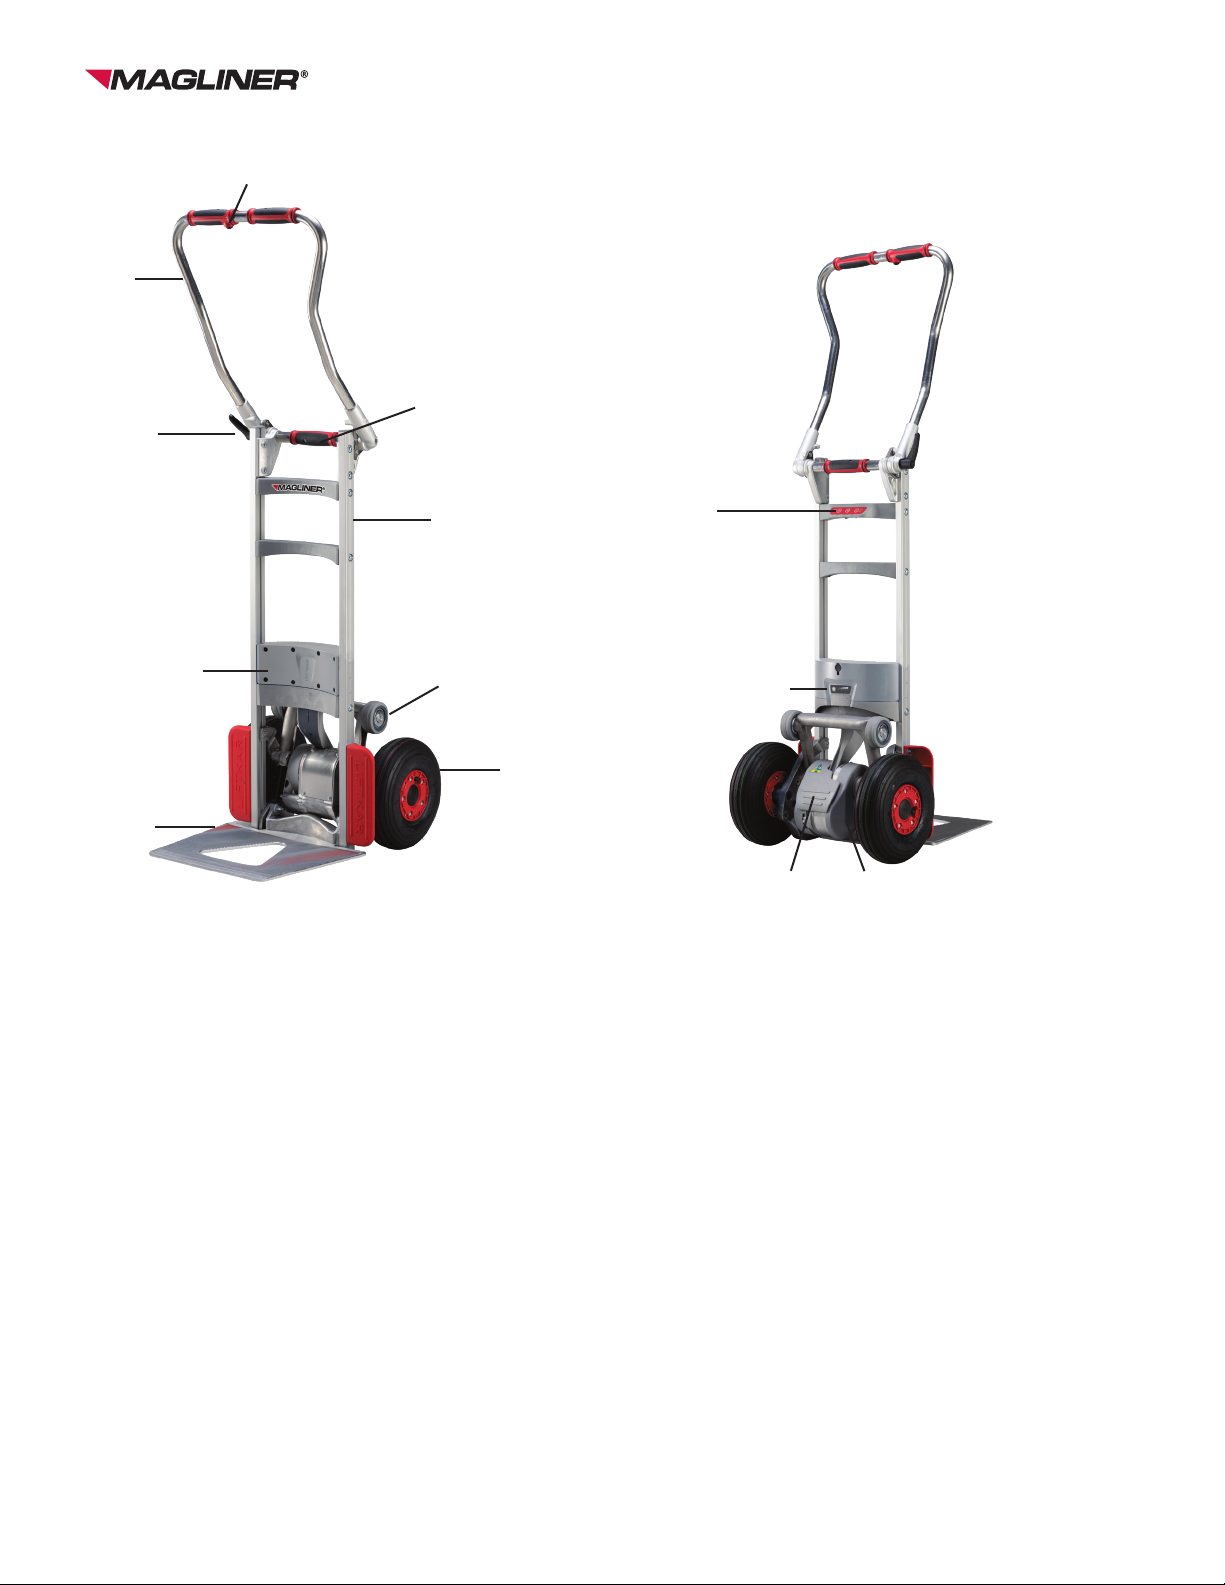
2.CONTROLS . . . . . . . . . . . . . . . . . . . . . . . . . . . . . . . . . . . . . . . . . . . . . . . . . . . . . . . . . . . . . . . . . . . 5
2.1.MODEL ERGO. . . . . . . . . . . . . . . . . . . . . . . . . . . . . . . . . . . . . . . . . . . . . . . . . . . . . . . . . . . . . . . . . . . . . . . . . . . . . . 5
2.2.MODEL UNI . . . . . . . . . . . . . . . . . . . . . . . . . . . . . . . . . . . . . . . . . . . . . . . . . . . . . . . . . . . . . . . . . . . . . . . . . . . . . . . 6
2.3.MODEL FOLD . . . . . . . . . . . . . . . . . . . . . . . . . . . . . . . . . . . . . . . . . . . . . . . . . . . . . . . . . . . . . . . . . . . . . . . . . . . . . . 7
2.4.THE SWIVEL JOINT (FOLD MODEL) . . . . . . . . . . . . . . . . . . . . . . . . . . . . . . . . . . . . . . . . . . . . . . . . . . . . . . . . . . . 8
2.5.CONTROL UNIT . . . . . . . . . . . . . . . . . . . . . . . . . . . . . . . . . . . . . . . . . . . . . . . . . . . . . . . . . . . . . . . . . . . . . . . . . . . . 8
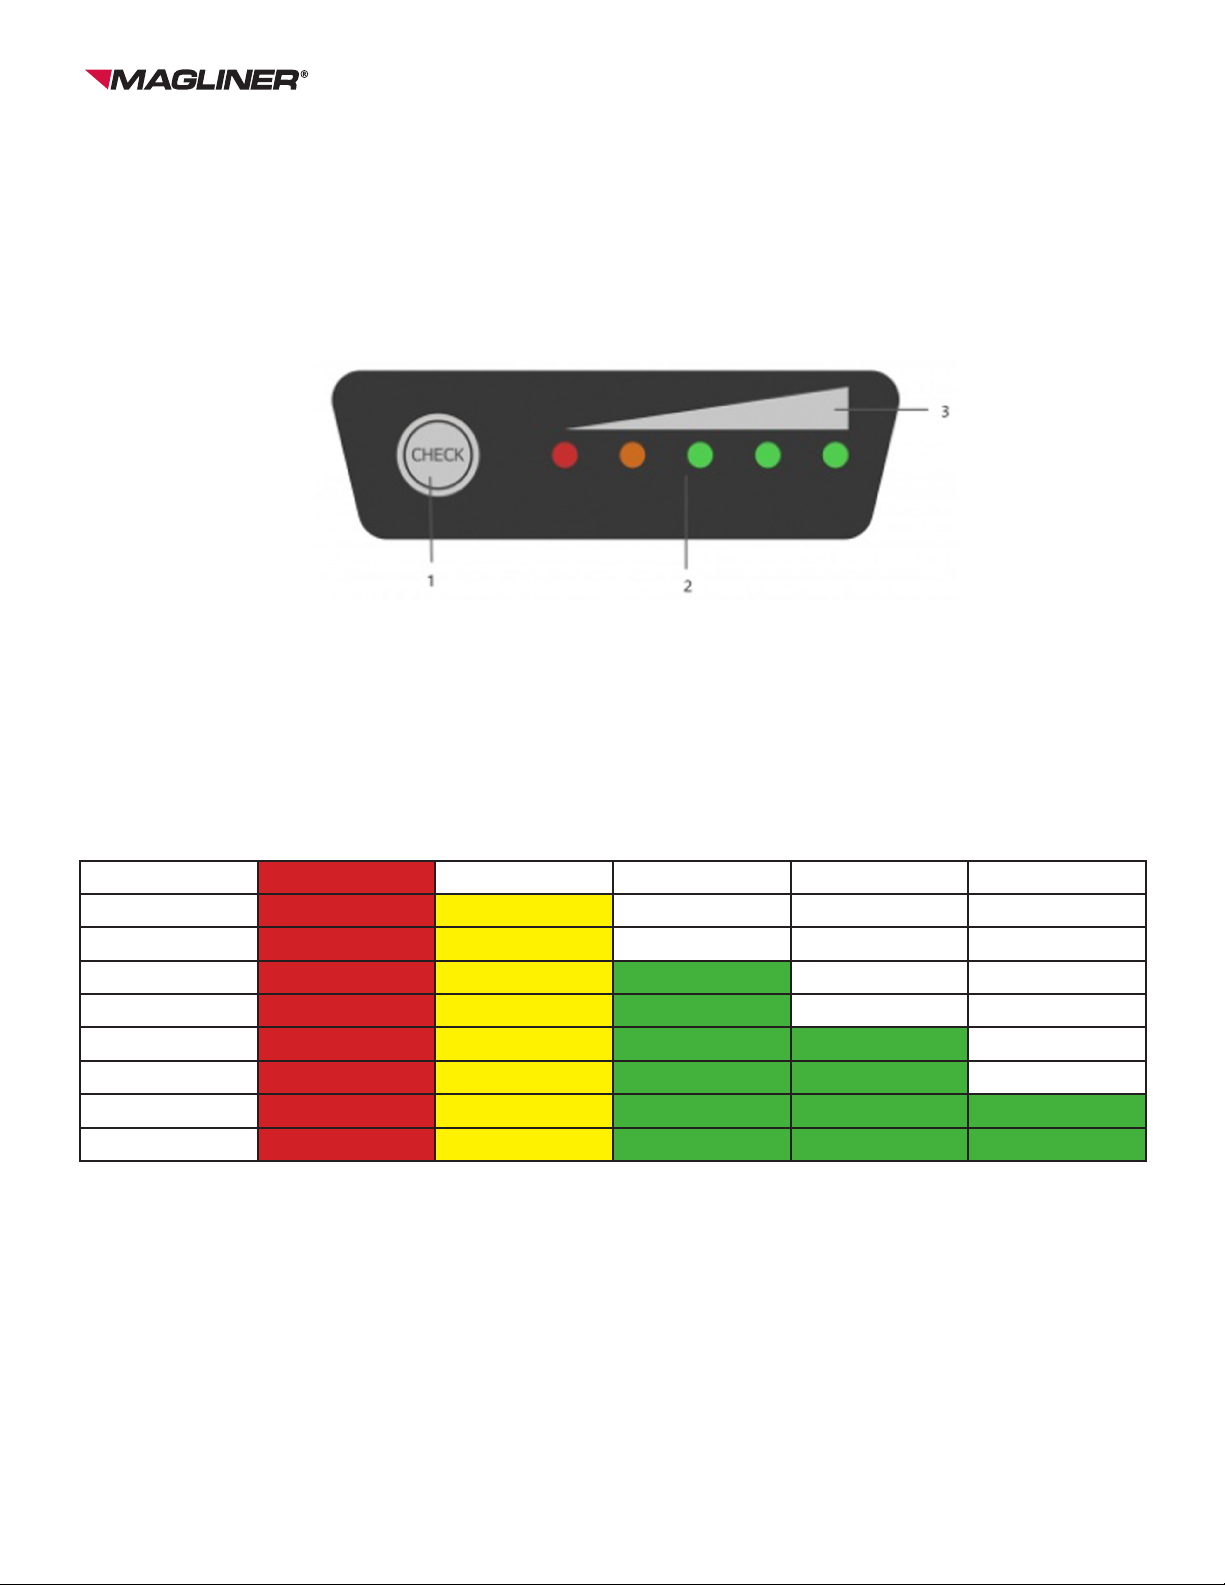
2.6.CHARGING STATUS INDICATOR . . . . . . . . . . . . . . . . . . . . . . . . . . . . . . . . . . . . . . . . . . . . . . . . . . . . . . . . . . . . . 10
2.7.ASCEND BUTTON IN UPPER HANDLE. . . . . . . . . . . . . . . . . . . . . . . . . . . . . . . . . . . . . . . . . . . . . . . . . . . . . . . . . 10
2.8.SAFETY FLAP. . . . . . . . . . . . . . . . . . . . . . . . . . . . . . . . . . . . . . . . . . . . . . . . . . . . . . . . . . . . . . . . . . . . . . . . . . . . . 11
2.9. SWITCHING OFF. . . . . . . . . . . . . . . . . . . . . . . . . . . . . . . . . . . . . . . . . . . . . . . . . . . . . . . . . . . . . . . . . . . . . . . . . . 11
3.FITTING AND REMOVINGTHE BATTERY . . . . . . . . . . . . . . . . . . . . . . . . . . . . . . . . . . . . . . . . . . 11
3.1.FITTINGTHE BATTERY. . . . . . . . . . . . . . . . . . . . . . . . . . . . . . . . . . . . . . . . . . . . . . . . . . . . . . . . . . . . . . . . . . . . . . 11
3.2.REMOVINGTHE BATTERY . . . . . . . . . . . . . . . . . . . . . . . . . . . . . . . . . . . . . . . . . . . . . . . . . . . . . . . . . . . . . . . . . . 12
4.OPERATION. . . . . . . . . . . . . . . . . . . . . . . . . . . . . . . . . . . . . . . . . . . . . . . . . . . . . . . . . . . . . . . . . . 12
4.1.ASCENDING STAIRS . . . . . . . . . . . . . . . . . . . . . . . . . . . . . . . . . . . . . . . . . . . . . . . . . . . . . . . . . . . . . . . . . . . . . . . 12
4.2.DESCENDING STAIRS . . . . . . . . . . . . . . . . . . . . . . . . . . . . . . . . . . . . . . . . . . . . . . . . . . . . . . . . . . . . . . . . . . . . . . 13
4.3.PLEASE PAY ATTENTIONTO . . . . . . . . . . . . . . . . . . . . . . . . . . . . . . . . . . . . . . . . . . . . . . . . . . . . . . . . . . . . . . . . . 14
5.CHARGINGTHE BATTERY . . . . . . . . . . . . . . . . . . . . . . . . . . . . . . . . . . . . . . . . . . . . . . . . . . . . . . 16
5.1.BATTERY CHARGER . . . . . . . . . . . . . . . . . . . . . . . . . . . . . . . . . . . . . . . . . . . . . . . . . . . . . . . . . . . . . . . . . . . . . . . 17
6.ACCESSORIES AND OPTIONS . . . . . . . . . . . . . . . . . . . . . . . . . . . . . . . . . . . . . . . . . . . . . . . . . . 18
7. WARRANTY AND LIABILITY . . . . . . . . . . . . . . . . . . . . . . . . . . . . . . . . . . . . . . . . . . . . . . . . . . . . . 19
7. 1. WARRANTY. . . . . . . . . . . . . . . . . . . . . . . . . . . . . . . . . . . . . . . . . . . . . . . . . . . . . . . . . . . . . . . . . . . . . . . . . . . . . . . 19
7.2.LIABILITY. . . . . . . . . . . . . . . . . . . . . . . . . . . . . . . . . . . . . . . . . . . . . . . . . . . . . . . . . . . . . . . . . . . . . . . . . . . . . . . . . 19
8.CE DECLARATION OF CONFORMITY . . . . . . . . . . . . . . . . . . . . . . . . . . . . . . . . . . . . . . . . . . . . . 20
8.1.CE DECLARATION OF CONFORMITY . . . . . . . . . . . . . . . . . . . . . . . . . . . . . . . . . . . . . . . . . . . . . . . . . . . . . . . . . . 20

1-800-MAGLINE (624-5463) www.magliner.com
3
Introduction
Installation of Nose
To install the nose, place the Powered Stair Climber on its back-side. Locate the three bolts included in
packaging and secure the nose to the fixed nose plate mounting bracket with aT-40Torx wrench.The
longer bolt goes in the middle.
General Information
Weighing only 38 pounds, the Powered Stair Climber efficiently climbs at a rate of up to 48 steps per
minute. With capacities up to 375 pounds, we promise the Powered Stair Climber will be faster than
you are!The heavy duty battery handles 2000 steps at full load on a single charge.The Powered Stair
Climber is able to go up and down stairs depending on your delivery demands. Many options are
available to customize your Powered Stair Climber to meet your specific needs. Several noses, various
handles, and puncture proof tires are a few of the options offered.
The Powered Stair Climber has a mechanical clutch that prevents damage if the unit is used to de-
scend stairs with the controls in the ascend position.The Powered Stair Climber features electronic
overload protection preventing operation with a load over the weight limit.The Powered Stair Climber
has a slow and fast ascending speed and one descending speed.
1. SAFETY GUIDELINES / TECHNICAL DATA
• Always make sure no one is beneath the Powered Stair Climber on the stairs
• Always secure the load with the appropriate accessories
• Always wear skid-proof, steel-toed shoes
• Never reach anything into the lifting mechanism when the battery is inserted
• Always remove the battery when unit is not in use, during transit, and prior to any maintenance
procedures to prevent accidental operation.
• Always use the Magliner Powered Stair Climber Battery Charger to charge the battery
Before Using Your Powered Stair Climber
• Read the entire Operator’s Manual
• Fully charge battery
• Install nose following directions above
• Familiarize yourself with Powered Stair Climber controls and buttons
• Install fully charged battery
• Practice using the stair climber on a stairway with no load at first, then with approximately 60
pounds

1-800-MAGLINE (624-5463) www.magliner.com
4
1.2. TECHNICAL DATA OF THE POWERED STAIR CLIMBER
110 Fold 140 Uni 170 Ergo
Load capacity 240 lbs. 300 lbs. 375 lbs.
Maximum climbing speed 48 steps/min 35 steps/min 29 steps/min
Weight with battery 38 lbs. 37 lbs. 38 lbs.
Maximum step height 8“ 8“ 8“
Maximum steps up and down approx. 2000
steps
approx. 2000
steps
approx. 2000
steps
Overall height 38 ½ “ folded
60” unfolded 58“ 62“
Overall width 19“ 19“ 19“
Overall depth 18”- 24”
Folded
18” to 24”
Depends on nose
18” to 24”
Depends on nose
1.3. TECHNICAL DATA FOR LITHIUM QUICK-CHANGE BATTERY PACK
Weight: 3.5 lbs.
Capacity: 7.2 Ah
Voltage: 29 VDC
Battery type: Lithium ion

1-800-MAGLINE (624-5463) www.magliner.com
5
2. CONTROLS
2.1. MODEL ERGO
1: Up button 8: Nose
2: Upper handle 9: Control unit
3: Lower handle 10: Frame
4: Crossbar 11: Charging status indicator
5: Quick-change battery pack 12: Safety flap
6: Swing arm 13: Climber unit
7: Main wheels
Individual characteristics of the stair climber with ergo handle:
• Upright posture and maximum control
• Ideal for beer kegs, stacks of tires, etc.
• Weight: 38 lbs.
1
2
3
4
5
6
7
8
9
10
11
12
13

1-800-MAGLINE (624-5463) www.magliner.com
6
1
2
4
5
6
7
8
9
3
11
12 13
10
2.2. MODEL UNI
1: Up button 8: Nose
2: Upper handle 9: Control unit
3: Lower handle 10: Frame
4: Cross bar 11: Charging status indicator
5: Quick-change battery pack 12: Safety flap
6: Swing arm 13: Climber unit
7: Main wheels
Individual characteristics of the stair climber with uni handle:
• Lightweight multi-purpose stair climber
• Water canisters, drinks crates or copier paper
• Weight: 37 lbs

1-800-MAGLINE (624-5463) www.magliner.com
7
2.3. MODEL FOLD
1: Up button 8: Main wheels
2: Upper handle 9: Nose
3: Cross tube handle 10: Control unit
4: Frame 11: Charging status indicator
5: Locking lever 12: Safety flap
6: Quick-change battery pack 13: Climber unit
7: Swing arm
Individual characteristics of the stair climber with folding:
• Foldable model variant, fits in every trunk
• Washing machine, floor sanding machines or oxygen cylinders
• Weight: 38 lbs.
1
2
5
67
8
9
10
3
11
12 13
4

1-800-MAGLINE (624-5463) www.magliner.com
8
2.4. THE SWIVEL JOINT (FOLD)
The necessary friction for the rotary joint is obtained through multiple friction disks, which are
compressed simultaneously on the left and right sides.The lock must be tightened sufficiently
to avoid movement in use.
As a rule:The lock will be sufficiently tightened if a single operator can tilt back the load from
the upright position without any handle movement.
SAFETY INSTRUCTION
With heavy loads (over 220 lbs.) ensure the lock is tightened especially firmly.
2.5. CONTROL UNIT
1: Up indicator
2: Down indicator
3 Up/Down button
4:ON/OFF button/ Status indicator
5:Speed button / Stair light
6:Speed indicator fast
7: Speed indicator slow
!

1-800-MAGLINE (624-5463) www.magliner.com
9
2.5.1. BUTTON FOR ASCENDING / DESCENDING
Briefly press the push button to switch the Stair climber SAL to ascent mode or descent
mode.
2.5.2. ON/OFF BUTTON / STATUS INDICATOR
• Green light on:The stair climber is switched on. In Ascend Mode, the button in the
handlebar is active.The climber mechanism switches on when the button is pressed and
stops when it is released (see also chapter Operation 4.1).
• Constantly red:The stair climber is in Descend Mode and the support wheels move (fast) to
the descend position (takes a max. of 0.5 seconds – refer also to chapter 4.2).
• Flashing red:The stair climber is overloaded. Flashes for 3 seconds and goes out (see also
chapter 4.3.3).
• Alternating red and green:The battery pack is running low and urgently needs to be
recharged. It is recommended that you move down stairs and either change the battery
pack or recharge it with the quick charger supplied.
2.5.3. BEEP FEATURE
This is a people warning feature for transports in public areas.
Activating the beeper function: Switch on the stair climber and press and hold the On/Off but-
ton for about 30 seconds until a beep signal sounds. Now, the beep signal remains on while
the stair climber is moving.
Deactivating the beeper function: Switch on the stair climber and press and hold the On/
Off button for about 30 seconds until a beep signal sounds. Now, the stair climber will move
without the recurring beep sound.
2.5.4. SPEED SWITCH
Use the speed switch to select either high or low speed – this can only be used in ascent
mode. (In descent mode the descending speed is permanently set so that optimum braking
will always be secured – refer also chapter 4.2)

1-800-MAGLINE (624-5463) www.magliner.com
10
Low speed is advisable for: training, heavy loads and in awkward locations.
Press the speed button for approximately 10 seconds to activate the stair light.
2.6. CHARGING STATUS INDICATOR
1: Activation button for charging status
2: LED indicator
3: Visualization
Pressing the activation button switches on the LED charge level indicator; if all five LEDs light
up, the quick change battery is 100% charged.
0 ~ 10 % BLINKING OFF OFF OFF OFF
10 ~ 23 % LIGHT BLINKING OFF OFF OFF
23 ~ 35 % LIGHT LIGHT OFF OFF OFF
35 ~ 48 % LIGHT LIGHT BLINKING OFF OFF
48 ~ 60 % LIGHT LIGHT LIGHT OFF OFF
60 ~ 70 % LIGHT LIGHT LIGHT BLINKING OFF
70 ~ 80 % LIGHT LIGHT LIGHT LIGHT OFF
80 ~ 90 % LIGHT LIGHT LIGHT LIGHT BLINKING
90 ~ 100 % LIGHT LIGHT LIGHT LIGHT LIGHT
2.7. ASCEND BUTTON IN UPPER HANDLE
This button is only active in the ascent mode and switches the lifting mechanism on and off.

1-800-MAGLINE (624-5463) www.magliner.com
11
2.8. SAFETY FLAP
2.9. To start tilting a load, it may be necessary to use your foot to assist in tilting.The axle of
the conventional sack truck is normally used for this purpose. With the stair climber, the swing
arm with the support wheels, a wheel, or the drive unit may be used to assist in tilting.The
safety flap is installed to prevent your foot getting jammed in by the swing arm. If you press
onto the lower part of the flap with your foot all functions will be stopped.
SAFETY INSTRUCTIONS
You avoid all risk if you switch on only after tilting the load.
2.10. SWITCHING OFF
Battery power is removed:
• By removing the battery
• Pressing the ON/OFF switch for longer than 3 seconds
• Automatically after 10 minutes
The removal of the battery provides a higher degree of safety than switching off
with the timer cut-out, as the ON / OFF button may be touched inadvertently.
3. FITTING AND REMOVING THE BATTERY
3.1. FITTING THE BATTERY
• Align the battery pack between the guides on the frame.
• Gently press the battery pack downwards. The battery pack clicks
into place.
• Your stair climber is ready for use.
!
!

1-800-MAGLINE (624-5463) www.magliner.com
12
3.2. REMOVING THE BATTERY
• Pull battery safety lever
• Pull the battery upwards out of the guides.
4. OPERATION
4.1. ASCENDING STAIRS
Insert the battery and press the ON/OFF button until it is constantly green.
The stair climber is now in the ASCEND MODE.
Pressing the Up button in the upper handle will operate the support wheels and will lift the
stair climber over the step.This motion will continue until the button is released.
IMPORTANT
On each cycle, immediately rest the main wheels on the tread, pull the stair climber
back to touch the rise of the next step up.
Holding the stair climber too flat on stairs with open risers can also result in
the support wheels being partially trapped under the tread.This may result in
excessive pressure on the drive unit, causing it to go into overload mode, and
shutting down. Reset by pressing the ON/OFF button.
!
!

1-800-MAGLINE (624-5463) www.magliner.com
13
4.2. DESCENDING STAIRS
With the battery inserted, press the ON/OFF button. Use the Up/Down button to switch to
DESCEND MODE.The support wheels will move to the descend position automatically (see
drawing).
The ascending button is now out of function.
A: Descend position
With the support wheels in the descend position the stair climber can be rolled over the step
margin and the support wheels will, under controlled conditions, lower the machine onto the
next step down.
When the main wheels land on the lower step, the support wheels automatically rotate to the
descend position for the descent onto the next step down. During this short time, the status
indicator lights up red and the swing arm accelerates to maximum speed.
IMPORTANT
Hold the main wheels back against the step until the status indicator is flashing
green again.The descend position is then reached and you can drive again.
If only a lightweight load is being transported, or if the operator holds the stair
climber back too much, the swing arm will move very slowly to the down position.
!
!

1-800-MAGLINE (624-5463) www.magliner.com
14
Just before the suspension arm reaches the descending position, the support
wheels reach the upper edge of the stair and lift the stair climber approximately
3/8 inch.This is normal and is used as an advance signal by experienced drivers.
As a matter of fact, you may already advance while the support wheels are in
contact with the floor.This results in smooth continuous down-the-stairs motion.
In the case of closed stairs with short step, for instance on the inside of narrow
circular staircases, the support wheels may touch the stair step and the stair
climber can move approximately 3 to 3-½ inches forward.This also is normal since
the stair climber will then be ready for advancing again anyway.
Unlike all other stair climbing hand trucks, the operator does not need to control the moving
parts to descend, as the support wheels operate automatically.
4.3. PLEASE PAY ATTENTION TO:
4.3.1. SHIFT OF BALANCE
When ascending the balance of the load changes as soon the sup-
port wheels start lifting the load. Operators quickly become accus-
tomed to this and compensate by tilting the handle. Initially, before
this operation becomes automatic, care should be taken at the point
where the support wheels take the load when ascending.There is a
forward movement of the machine which is easily compensated for
by tilting the handle backwards. Lowering backwards by 10° to 20°
before the support wheels start to lift eliminates any major forward
movement.
4.3.2. HOOKING IN UNDERNEATH THE STEP
Under normal operating conditions, with the load in a well-
balanced position, the moving support arm is always clear of the
underside of the upper step (see chapter 4.2). If the Stair climber
is laid back too far, the support arm will be tripped by touching
the tread it is on, causing it to rotate under the upper tread.The
electronics will go into overload mode and will need to be reset.
!
!

1-800-MAGLINE (624-5463) www.magliner.com
15
4.3.3. OVERLOAD
If the unit is overloaded the drive motor stops and the status indicator flashes red for 3
seconds before switching off.The unit has to be switched on again.
Once the battery has been discharged the unit will go into overload even with
loads below the specified capacity.
4.3.4. STAIR CLIMBER IS NOT A RUBBER PAD
In the beverage industry kegs are sometimes directly thrown from the truck onto the hand
truck instead of a rubber pad or old tire.
This is not possible with the Stair climber when the support wheels are in the descending
position. The impact will be transmitted to the connecting bar via the drive unit, which may
result in fracture. With the support wheels raised between the main wheels, throwing kegs on
the unit is possible in principle since the pneumatic tires would absorb part of the impact, it is
nevertheless not recommended as it detrimental to service life.
4.3.5. FAILURE TO NEGOTIATE STEPS “SQUARE-ON“
Failure to negotiate steps “square-on“ will result in damage to the underside of the drive unit.
!

1-800-MAGLINE (624-5463) www.magliner.com
16
4.3.6. DRIVING ON A WINDING STAIRCASE
Please observe the following points when operating the stair climber on spiral staircases:
The Stair climber moves inwards when climbing up, so:
For climbing UP start on the outside of the staircase.
The Stair climber moves outwards when going down, so:
For climbing DOWN start on the inside.
If you do start moving too close to the banisters/wall then shift the unit to the side by
reversing (on a landing or wider step if possible) and start again at a tighter angle.
5. CHARGING THE BATTERY (BEST PRACTICES)
• The charger automatically switches to trickle charging so overcharging is not possible.
• Do not leave the battery discharged or half discharged. Always charge immediately after
use.
• The battery must be charged within 3 months of storage to prevent self-discharge. If the
battery is not charged within 3 months of storage, permanent loss of capacity may occur.
If the stair climber will be used regularly, it is recommended that the unit be kept on a
charger whenever it is not in use; the batteries will not overcharge. If the stair climber is
going to be stored and/or not in regular use, the batteries must go through a full charge
cycle every 2 weeks to ensure battery life and duty cycle.
• The optimum temperature for charging is 68 – 86 °F.Too cold or too warm has a negative
effect on the capacity.
If the battery has not been fully charged or tends to lose charge too rapidly, this
will not only reduce the speed of the stair climber but also reduce the capacity.
It may move into the overload mode as a result, even with light loads. See
Operation 4.3.3.
Charging time: approx. 4-½ h depending on charge level
!

1-800-MAGLINE (624-5463) www.magliner.com
17
5.1. BATTERY CHARGER
The battery charger supplied is extremely powerful. An LED display
gives a clear indication of charging status.The charge indicator shows
whether the battery pack is fully charged or not. It is worth checking
that the battery pack is fully charged before using the stair climber.
The charge status is displayed as follows by a LED:
• If the LED is lit continuous red the battery pack is being charged.
• If the LED is lit continuous green the battery pack is fully charged.The charger can be left
connected to the batteries after full charge (green light), without harming the batteries.
The charger uses minimum power in this stand-by mode, (after battery is fully charged),
maintains the batteries at full charge and extends battery life.This is accomplished with
electronic circuitry that controls and regulates the amount of charging current that is sent
from the charger to the battery being charged.
5.1.1. TECHNICAL DATA
Main voltage supply (50/60 Hz, 1.8 A (max)): 100-240 V AC
Nominal rating (input): 24 W
Charging voltage: 29.4 V
Theoretical charging current: 2.0 A
Safety approval: cUL, CE
SAFETY GUIDELINES
Please note the following:
• Never use the charger unit if it has a damaged cable or plug, replace it immediately.
• The device should be connected directly to a power supply, never use an extension cord.
• The device is intended for indoor use only, it should never be exposed to rain.
• If the performance of the battery decreases signicantly, it is time to replace the battery.
• Store the charger in a cool and dry place when not in use.
• Disconnect the device from the mains before inserting or removing the battery from the stair
climber.
• Warning: explosive gases. Protect from re and sparks.

1-800-MAGLINE (624-5463) www.magliner.com
18
• During charging, the battery must be in a well-ventilated room.
• The device is not intended for use by children, inrm persons, or persons with insucient
knowledge, unless they are supervised or given sucient training. Make sure that children do not
play with the device.
• The device may only charge batteries that comply with EN directives (and show a CE or GS
mark).
5.1.2. USE ONLY FOR THE PURPOSE INTENDED
The charger is designed exclusively for charging the original lithium ion rechargeable
batteries.
5.1.3. CE MARK FOR CHARGER UNITS
The charger units fulfill the criteria found in the low-voltage and electromagnetic compatibility
directive and are therefore designated with the CE sign.
6. ACCESSORIES AND OPTIONS
There are multiple accessories and options available. Different nose sizes, containment
straps, in-transit charger, and fixed or hinged toe plate options are available.

1-800-MAGLINE (624-5463) www.magliner.com
19
WARRANTY AND LIABILITY
6.1. WARRANTY
The warranty period for the stair climber is 12 months from the date of purchase and covers
defective material and production faults
Not included in the warranty are:
• Normal wear and tear on parts
• Damage resulting from abnormal load
• Damage due to the exertion of force
• Inadmissible modifications to the unit or accessory parts
6.2. LIABILITY
SANOTransportgeraete GmbH as manufacturer and Magline, Inc. as the distributor is not re-
sponsible for the safety of the stair climber if:
• The stair climber is used other than is intended,
• Repairs, installation or other work have been carried out by unauthorized persons.
• The instructions in this Owners Manual are not observed
• Non-original parts are installed or connected with the stair climber.
• Original parts are removed.
7. CE DECLARATION OF CONFORMITY CE DECLARATION

1-800-MAGLINE (624-5463) www.magliner.com
20
OF CONFORMITY
SANOTransportgeraete GmbH declares that the stair climber corresponds
to the applicable basic safety and health requirements of the EC
guidelines for machines 2006/42/EEC, appendix IIA.This declaration
will lose its validity if changes are performed on the unit without our
approval.
Jochum Bierma (Ing.), Managing Director
©2023 Magline, Inc.
B9626
This manual suits for next models
3
Table of contents
Popular Fitness Equipment manuals by other brands

Skandika Fitness
Skandika Fitness MULTIBENCH PRO Assembly instructions and user guide

Ludus Alliance
Ludus Alliance CS-System user manual

COMPOUND
COMPOUND PLATINUM CPL-PLC-6018 Assembly instructions

Wahoo
Wahoo KICKR QUICK START GUIDE AND INSTRUCTIONS

alatech
alatech AP1000 User quick guide

Domyos
Domyos PA 250 operating instructions