Magnimage LED-540 User manual

LED Video processor
User manual
△
!
MAGNIMAGE
Before using this LED Video processor,
please read this manual carefully and
preserved for reference in the future.
LED-540

Statements
Without the written permission, any unit or individual could not copy,
reproduction or translate the book or part of it. Also could not transmit it in
any form or any way(electronic, mechanical, photocopying, record or other
way) for any business and profitable purpose.
The product specifications and information mentioned in this manual is just
for reference, will not give prior notice if there is any updated. Unless there is a
special agreement, it is just used as guidelines. All the statements or
information in this manual shall not constitute any form of guarantee.

1
BRIEFS ·················································································································3
TRADEMARK CREDIT ·································································································· 3
ABOUT SOFTWARE ···································································································· 3
FEATURES················································································································ 4
USING DIRECTIONS ·····························································································5
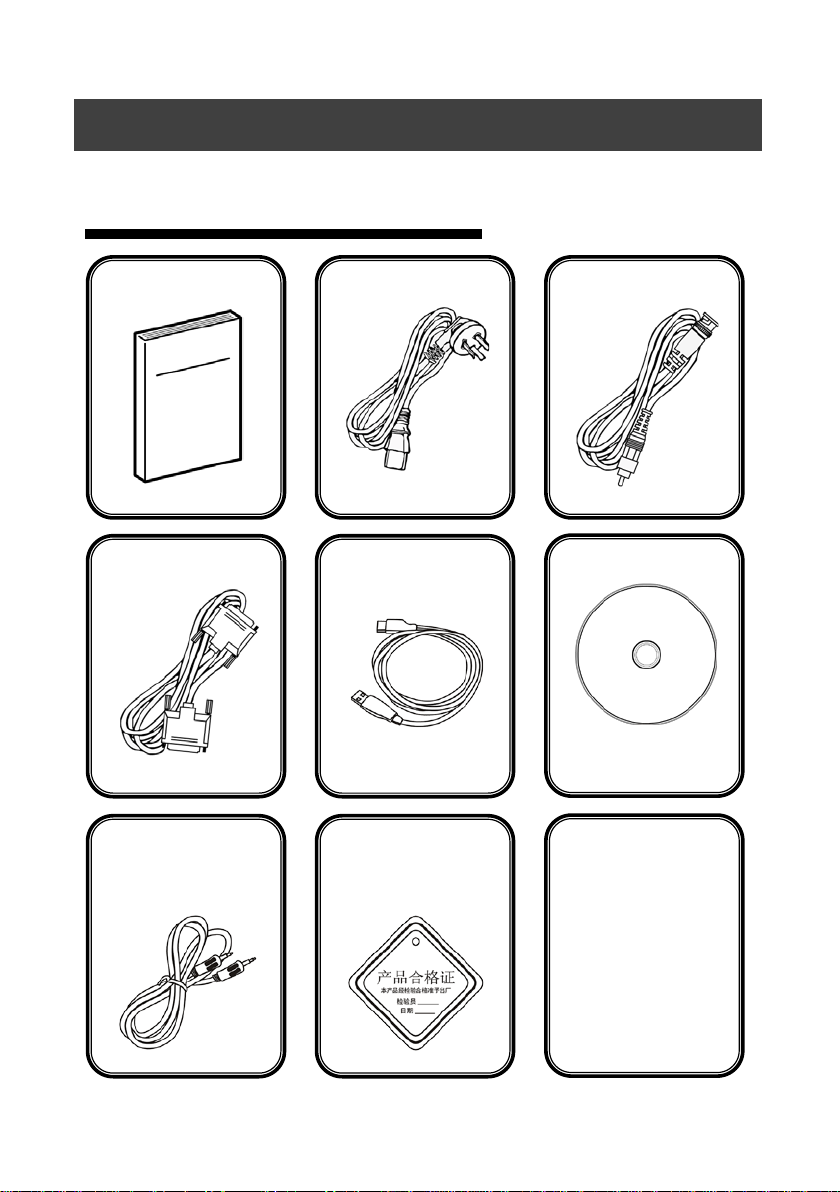
INCLUDED ACCESSORIES ····························································································· 5
EXTENDED PORT ······································································································· 6
SAFETY INSTRUCTIONS ······························································································· 6
FUNCTION INTRODUCTION ·················································································8
BRIEF ····················································································································· 8
REAR PANEL GRAPHICAL REPRESENTATION ······································································ 9
FRONT PANEL GRAPHICAL REPRESENTATION ·································································· 10
TECHNICAL SPECIFICATION ························································································ 11
USING THE MENUS ···························································································12
NON-MENU STATE INTRODUCTION·············································································· 12
MAIN MENU INTRODUCTION····················································································· 15
Main menu ····································································································· 16
Picture sub menu···························································································· 17
Output setting sub menu················································································ 18
Function sub menu ························································································· 20
Video Crop sub Menu ····················································································· 22
Zoom sub Menu······························································································ 24
Dual Pictures sub Menu·················································································· 25
Mosaic sub Menu ··························································································· 30
Shortcuts menu ······························································································ 31
USING MOSAIC ·································································································36
MOSAIC SUMMARIZE······························································································· 36
EQUAL MOSAIC ······································································································ 37
UNEQUAL MOSAIC·································································································· 38
MULTI MACHINE CONNECTION ·········································································40
SUMMARIZE ·········································································································· 40
CONNECTION TYPE ·································································································· 41
Directory

2
MULTI MACHINE LOAD TEMP LATE ··············································································· 41
MULTI -MACHINE FADE IN FADE OUT············································································ 42
INPUT SIGNAL HOT BACKUP··············································································43
FAQ ···················································································································45
MODEL INTRODUCTION ····················································································47
WARRANTY ·······································································································47
GRAPHIC CATALOGUE:
FORM1:STATE ICONS AND MEANINGS................................................................ 14
FORM2:DUAL PICTURES INPUT SOURCE CONFLICT LIST...................................... 26

3
Thanks for your purchasing our LED Video processor. Do hope you can enjoy
the experience of the product performance. The design of the LED video
processor conforms to international and industry standards. but if with
improper operation, there will be a personal injury and property damage . In
order to avoid the dangerous, please obey the relevant instructions when you
install and operate the product.
Trademark credit
VGA and XGA are the trademarks of IBM.
VESA is a Video Electronics Standards Association's trademark.
HDMI、HDMI mark and High-Definition Multimedia Interface are all from
HDMI Licensing LLC.
Even if not specified company or product trademarks, trademark has been
fully recognized.
About software
Do not change, decompile, disassemble, decrypt or reverse engineer the
software installed in the product, these acts are illegal.
Briefs

4
Features
Support ultra-high output resolution and ultra-high horizontal frequency
resolution.
To switch the Stand-alone signal input channel rapidly.
Many machines' connection to achieve the function of switch and the
prompt switch between multiple signals input channel.
Picture and text overlay, cutout composite function, convenience to
achieve the effect of the captions superposed and image compound.
The multi-machine prompt restore function of working mould is
convenience for you to switch rapidly in a variety of applications.
Input hot backup function, allows you to be no longer embarrassed in
case of sudden loss of the input signal.

5
Included Accessories
Using directions
Using manual
Power line
CVBS cable ╳2
DVI signal cable
USB cable
Disk
3.5 mm Stereo
headphone line
Certificate of
quality
M3 screws ╳4
Sending card
stud bolts
4pin2.54 sending
card power cable

6
Extended Port
Port Model Explanation
Extended DVI Port LED-540CD Add another DVI input port
Extended HDMI Port LED-540CH Add another HDMI input port
Extended SDI Port LED-540CS Add another SDI input/loop port
Extended VGA Port LED-540CV Add another VGA input port
Safety instructions
Please use the correct power supply according that the power input
voltage for this product range is 100~240V AC, 50/60Hz.
When you need connect or pull out any signal or bound guideline. Please
confirm that all the power supply cords have been pulled out ahead.
When you need to add hardware device for the LED video processor,
make sure all of the signals and power cables have been pulled out
ahead.
Before you operate any hardware, please turn off the LED video
processor's power, and to set you on the electrostatic by touching the
ground surfaces.
Please use the processor in clean, dry and ventilated environment, not
use it in the high temperature, humidity environment.

7
The product is the electronic product; please stay away from the fire,
water and of which is inflammable and blast, dangerous.
This product is with high pressure components, please don't open the
case or maintain it by your own.
As there is exceptional condition with smoke, ill-smelling, please turn off
the switch at once and contact with the dealers.

8
Brief
LED-540 series products are the video processor developed for the large
screen display system, adopted the top image processing chips , internal 12
bits processing, with clearer images and richer colors.
Advanced alternate motion picture processing technology, to remove video
motion tail or jagged, for the normal PAL/NTSC video, output image will be
clearer, for the HD 1080i signal, output image details will be rich, full color and
image quality is in the leading level.
Advanced image scaling technology, can support tens of the resolution, single
machine can maximum output 2304×1152, 2560×816, 1920×1200, 1536×
1536 resolution and maximum refresh frequency rate 120Hz, and can scale
the input picture point by point according to the screen size.
Intellectualized large size LED screen seamless splicing technique, the user
just needs to have simple setting, they could realize that to send card picture
splicing, can support 24576×24576 lattice LED screen; Unique synchronized
moving technology, ensure high speed motion picture fluently without tail or
derangements.
Perfect video image input port, including 2×VGA , 1×DVI (can be extended for
two input in unison) , 1×HDMI 、1×YUV (optional) and 4×video (PAL/NTSC) ,
1×SDI (optional), support all HD signal input, can be connected with various
audio and video equipment.
Support the seamless switch between different input signal sources and
picture in picture function.
The whole unit is with pure hardware framework, steady and reliable.
Function introduction

9
Rear panel graphical representation
E.M.
HDMI
DVI
VGA1~VGA2
AV1~AV4
video input ports
Expand input port
HDMI input port
DVI input port (DVI-D)
2 way VGA input ports
4 way CVBS input ports
Audio output port
SDI Audio input port
HDMI Audio input port
Audio input/output port
SDI Out
DVI Loop
VGA
DVI1~DVI2
Video output ports
Optional
SDI digital audio input port
HDMI digital audio input port
Expand output port
DVI loop from input DVI port
VGA output port
2 way DVI output ports (DVI-D)

10
Front panel graphical representation
RIGHT
DOWN
UP
LEFT
MENU
MODE
AUTO
OK
PART
CROP
PIP
Buttons introduction
Menu select/operational key, the right key
Menu select/operational key, the down key
Menu select/operational key, the up key
Menu select/operational key, the left key
Main menu key, or return key in the menu
Exhale template loading shortcut menu
Auto adjust display position of input image
Confirm key
LED part or full screen switch hotkey
Input intercepting function hotkey
Picture in picture function hotkey
10 / E.M.
9 / HDMI
8 / DVI
7 / VGA2
6 / VGA1
5 / FADE
4 / AV4
3 / AV3
2 / AV2
1 / AV1
Numeric key 10,Expand select button
Numeric key 9,HDMI select button
Numeric key 8,DVI select button
Numeric key 7,VGA2 select button
Numeric key 6,VGA1 select button
Numeric key5, fad in & out hotkey
Numeric key4, CVBS4 select button
Numeric key3, CVBS3 select button
Numeric key2, CVBS2 select button
Numeric key1, CVBS1 select button

11
Technical Specification
Input indicators
Port
Number
Resolution
AV
4
PAL/NTSC
VGA
2
VESA standard
DVI
1+1
(inherent 1 way,scalable 1way)
VESA standard (support 1080i)
HDMI
1
EIA/CEA-861,HDMI-1.3
SDI
1 (E.M.)
480i、576i、720p、1080i/p (3G SDI)
Output indicators
Port
Number
Resolution
DVI input looping out
1
in accordance with DVI input, not to support HDCP looping out
VGA
1
1024×768/60Hz/75Hz/85Hz/100Hz/120Hz
1280×1024/60Hz
1440×900/60Hz
1600×1200/60Hz
1600×1200/60Hz – Reduced
1680×1050/60Hz
1920×1080/60Hz/50Hz
2560×816/60Hz
2048×640/60Hz
1920×1200/60Hz
2304×1152/60Hz
2048×1152/60Hz
1024×1280/60Hz
1536×1536/60Hz
DVI 2
SDI input looping out
1
480i、576i、720p、1080i/p (3G SDI)
Complete machine specification
Input power supply
100~240VAC,50/60Hz
Power consumption
20W
Working temperature
0~45℃
Overall dimensions
(21 + 441 + 21)mm ╳(282 + 16)mm ╳(45 + 6)mm
Weight
3.7 Kg

12
Using the menu system can set to this machine convenient and intuitive to
meet the demands of user.
LED-540 using a highlight and high contrast LCD screen to display the whole
user menu. When the user does not operate or operate in overtime, the LCD
screen will display a non-menu state. If you use the buttons on the front panel
to set the machine, the LCD screen will display the menu according to user
actions for the user to have prompt and better, more straightforward
operations.
We will introduce the LED-540 menu system combing the LCD display and the
front panel buttons.
Non-menu state introduction
Turn on the power supply of LED-540, in the process of the system startup, the
LCD front panel would display the start interface on the left screen, when the
start completed, there will show the machine’s current state on the screen as
the following figure shows:
Using the Menus

13
Above the figure, there are 4 lines content, explanation as the following:
Lines Details
The first line Channel 1
(main channel, is also default channel) port name and current
input signal resolution.
The second line Channel 2 (vice-channel) port name and current input signal resolution.
The third line
State prompt area, by several icons to show the machine current working
state.
There are 6 icons areas from left to right:
1、Synchronism follow-
up state area(valid in the condition of splicing
function opening state) Splicing state area
2、Mosaic status area
3、PIP state area
4、Picture intercepting state area
5、PART(part or full screen)state area
6、Brightness grade status area
Check details in next page.
The fourth line Output resolution, check details in “Output indicators”[ 11]
In the non-menu state, the third line area of LCD screen is status prompt
area, by several icons to show the machine current working status. Please see
the table below:

14
Form1:State icons and meanings
Icons Area Name Hint(shortcut key in the bracket)
1
Synchronism
follow-
up state
area
When the splicing function is in opening state,
Synchronism follow-up is also started successfully
2 E
qual splicing
state Equal splicing function is Enable
2 Unequal splicing
state Unequal splicing function is open
3 PIP off PIP function off(PIP)
3 PIP on [1] PIP function on,channel 1 is on the top(PIP)
3 PIP on [2] PIP function on,channel 2 is on the top(PIP)
4 Image
intercepting off Image intercepting function turnoff(CROP)
4 Image
intercepting on Image intercepting function on(CROP)
5 PART function off PART function off,cutdown image shown on the
monitor(PA RT)
5 PART function on PART function on,full screen image shown on the
monitor(PA RT)
6 Brightness grade
icon
Digital presents current brightness grade, range
from 0~100(UP、DOWN)

15
Main menu introduction
The main menu will show the symbols listed in the table below, please check
its specific meaning in the table below:
Symbols Explanation
>> Press“RIGHT”or“OK”
to enter the detail setting page, or operate that directly.
▼The next page is after this page, press“DOWN”button in the last item of this
page to enter the next page
▲Before this page is the previous page, press the first project“UP”to enter the
previous page.
In the main MENU, the user can use the "MENU", "UP", "DOWN", "LEFT",
"RIGHT", "OK" the six buttons to select and adjust the each item. Its operation
is fixed pattern, please check the following table:
Operation Button
Open the main menu Press“MENU” in the un-menu state
Select the each item Press“UP”or“DOWN”,When there is“▼”or“▲”symbol on the right of the
item ,there will be paging action.
Adjust the parameters When there is digital parameter or option on the right of the item, please press
“LEFT” or“RIGHT”.
Enter the next level
menu
When there is“>>”on the right of item, press“RIGHT”or“OK”
Performs some specific
functions
When there is“>>”on the right of item, press“RIGHT”or“OK”
Back to the higher level
menu
Press“MENU”
Confirm operation
When the reset operation, to avoid the incorrect operation, need to use
the ”OK” button to confirm operation

16
Main menu
In the MENU state, press“MENU”button, the MENU system will enter the
main MENU state, the LCD screen will show the details as below:
Picture >>
Output Setting >>
Function >>
Video Crop >> ▼
Zoom >> ▲
Dual Pictures >>
Mosaic >>
The main menu has seven sub menu items divided into two pages and display
separately. Press the“UP”or“DOWN”keys to choose the above listed seven
sub MENU headings, after selected, to press“OK”or“RIGHT”button to enter
the selected item, and press“MENU”button to return.

17
Picture sub menu
Picture Mode Normal
Brightness 50
Contrast 50
Color 50 ▼
Sharpness 12 ▲
3DNR /VGA Flicker Off
Scheme Normal
DVI Enhance Off ▼
Black Stretch Off ▲
Color Temperature >>
Gamma Off
Picture MOde Divided into “Normal”、“Soft”、“Vivid”、“User”
the four options.
Brightness Range 0~100.
Contrast Range 0~100.
Color Range 0~100.
Sharpness Range 0~24.
3DNR This function is valid when channel 1 is not VGA, divided into“Off”、“Adaptive”、“Low”、
“Medium”、“High”these five kinds of denoise mode.
VGA Flicker This function is valid when channel 1 port is VGA1 or VGA2, divided into“Off”、
“Level0”、“Level1”、“Level2”、“Level3”、“Level4”、“Adaptive”the six modes.
Scheme Divided into“Normal”、“Vivid”、“Theatre”、“Game”、“Sport”the five modes.
DVI Enhance In the state of DVI input, the function can greatly improve the output image color and
clarity
Black Stretch Valid in the Picture mode to“Vivid”、“Theatre”、“Game”、“Sport”, increases the black
areas of the image to strengthen contrast.
Color
Temperature
Divided into “Normal”、“ Warm”、“ Cool”、“ User”the four options.
Only when select“User”, “Red” 、“ Green” 、“ Blue”the three regulations is effect and
the range is 0 to 100.
Red Range 0~100,Valid in the color temperature is“user”.
Green Range 0~100,Valid in the color temperature is“user”.
Blue Range 0~100,Valid in the color temperature is“user”.
Gamma Control the output Gamma value of video processor, divided into“Off” 、“ 2.0” 、“ 2.2”、
“2.8” 、“ - 1.1” 、“ - 1.2”and“MIG”seven options, including“MIG”for our company’s
Gamma curve values.
Color Tempture Normal
Red 50
Green 50
Blue 50

18
Output setting sub menu
Output Resolution >>
H Window 1024
V Window 768
Step 16 ▼
H Position 0 ▲
V Position 0
Part Or Full Full
Output
Resolution
LED-540 support 19 kinds of output Resolution, maximum width 2560, and
maximum height 1536. details in“output indicators”[ 11]。
H Window Minimum is 64, maximum is“the width of the current output resolution”(for
example: 1024 of 1024×768 60Hz).
V Window Minimum is 48, maximum is“the height of the current output resolution”
(for example: 768 of 1024×768 60Hz).
Step The default value is 16, also can set to be 128 or 1.
H Position Minimum value is -16; the biggest can be set to the differentials between“the
width of the current output resolution”and“H Window”.
V Position Minimum value is -16; the biggest can be set to the differentials between“the
height of the current output resolution”and“V Window”.
Part Or Full Full:namely PART function shut.
Now the complete image will be shown on the LED screen, and the monitor
will display shrunken image,“H Window”,“V Window”, “H Position”and “V
Position”four parameters take effect automatically.
Part:namely PART function open,
At this time the LED screen will show a part of the image , and the monitor will
display full screen image, “H Window”,“V Window”, “H Position”and “V
Position”four parameters will to be void.
Please set the output resolution, H Window and V Window based on the
physical resolution of LED screen. If do not have suitable output resolution,
please select the options with bigger resolution than the screen’s.
For example, there is a LED screen whose physical resolution is 1152╳960, you
cannot find the resolution in the output resolution lists of LED-540, and larger
Output To
1024×768 60Hz
Press L&R To Sel
Press OK To Conf
Table of contents
Other Magnimage Media Converter manuals

Magnimage
Magnimage LED-W4000 User manual

Magnimage
Magnimage LED -500B User manual

Magnimage
Magnimage LED-570EV User manual

Magnimage
Magnimage LED-510 User manual

Magnimage
Magnimage MIG-CL9004-B User manual

Magnimage
Magnimage LED-W2000 User manual

Magnimage
Magnimage LED-750H User manual

Magnimage
Magnimage LED-780HD User manual

Magnimage
Magnimage LED-500CD User manual

Magnimage
Magnimage LED-580F Series User manual