Magnimage LED-580F Series User manual

LED Video Processor
User Manual V1.3
△
!
Before using this LED Video processor,please read
this manual carefully and preserved for reference in
the future.
LED-580F series

Statements
Without the written permission, any unit or individual could not copy,
reproduction or translate the book or part of it. Also could not transmit it in
any form or any way(electronic, mechanical, photocopying, record or other
way) for any business and profitable purpose.
The product specifications and information mentioned in this manual is just
for reference, will not give prior notice if there is any updated. Unless there is a
special agreement, it is just used as guidelines. All the statements or
information in this manual shall not constitute any form of guarantee.

1
Directory
Briefs ................................................................................................................3
Trademark Credit.............................................................................................. 3
About Software ................................................................................................ 3
Features............................................................................................................ 3
Using Directions ............................................................................................5
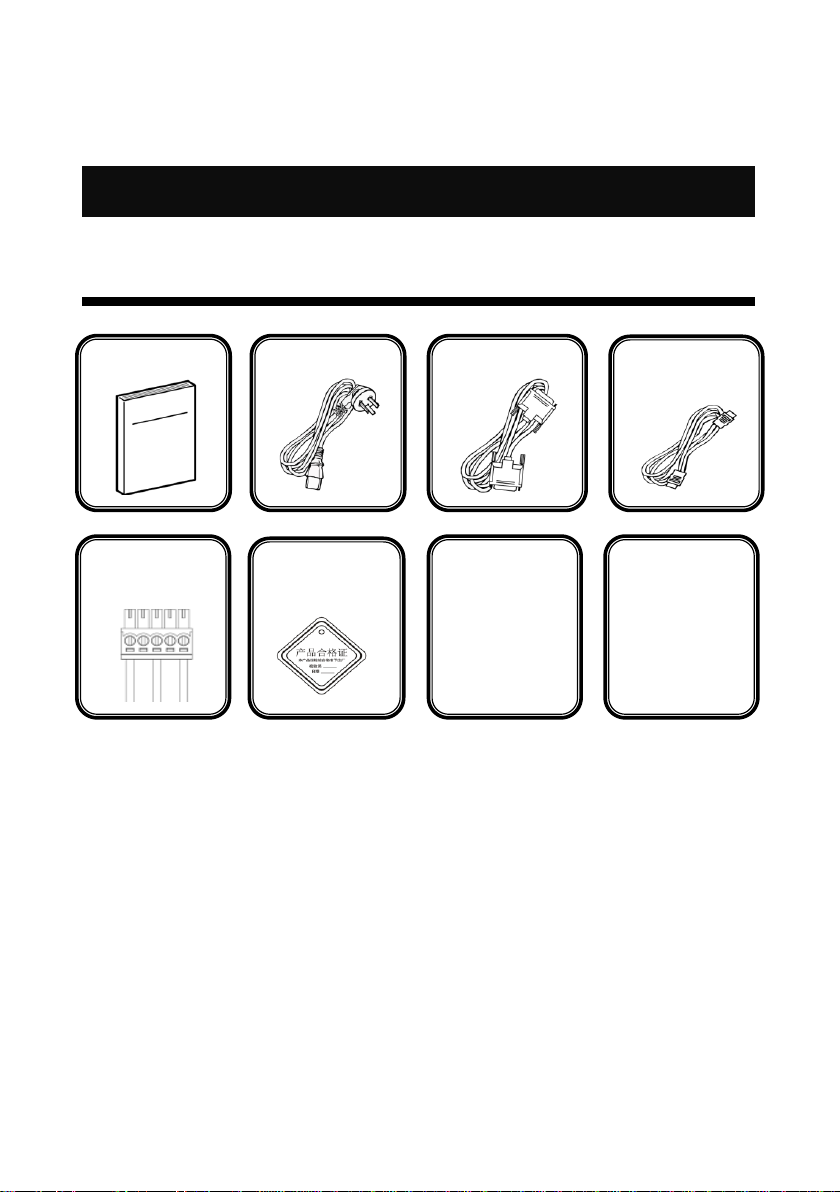
Including Accessories ....................................................................................... 5
Extended Port................................................................................................... 6
Safety Instructions............................................................................................ 6
Function Introduction..................................................................................7
Brief.................................................................................................................. 7
Front Panel Graphical Representation ............................................................. 8
RearPanel Graphical Representation................................................................ 9
Technical Specification ................................................................................... 11
Using Menu ..................................................................................................14
How to use the keys ....................................................................................... 14
INPUTS area:...................................................................................................................................................14
MENU area:.....................................................................................................................................................14
FUNCTION area:.............................................................................................................................................15
Default state introduction .............................................................................. 16
Main menu introduction ................................................................................ 19
Main menu ..........................................................................................................................................................20
Picture setting sub menu......................................................................................................................................21
Output setting sub menu ......................................................................................................................................22
Video crop sub menu...........................................................................................................................................24
Image Switching sub menu..................................................................................................................................25
Mosaic sub menu.................................................................................................................................................26
Audio setting sub menu .......................................................................................................................................27
Communication sub menu ...................................................................................................................................28
Task manager sub menu.......................................................................................................................................29
Misc sub menu ....................................................................................................................................................30
Dual image setting sub menu...............................................................................................................................31
Test pattern sub menu..........................................................................................................................................33
Language sub menu.............................................................................................................................................34
Input signal hot backup ............................................................................35
Summarize...................................................................................................... 35
How to use hot backup?................................................................................. 35
Setting EDID .................................................................................................37
EDID Summarize............................................................................................. 37

2
How to set EDID ............................................................................................. 37
Setting DVI EDID:...........................................................................................................................................37
Setting DP EDID:.............................................................................................................................................37
iDP& DP Loop ..............................................................................................38
iDP & DP Loop Summarize ............................................................................. 38
How to use iDP & DP Loop? ........................................................................... 38
Preview Mode ..............................................................................................40
Preview Summarize........................................................................................ 40
How to use preview?...................................................................................... 40
Multi machine connection........................................................................42
Connect type .................................................................................................. 42
Multi machine load template......................................................................... 43
Single machine support mosaic within 4K...........................................45
DVI output port introduction ......................................................................... 45
Single machine suport zoom mosaic within 4K.............................................. 45
Single machine support pixel-to-pixel mosaic within 4K................................ 46
Solutions........................................................................................................48
Solution 1:Support pixel-to-pixel mosaic within 4K*2K .............................. 48
Solution 2:1920×2160( pixel-to-pixel mosaic)............................................. 50
FAQ..................................................................................................................52
Warranty........................................................................................................54
The whole unit warranty ................................................................................ 54
The warrnty provisions................................................................................... 54
Graphic Catalogue:
Form 1:State Icons And Meanings............................................................... 17
From 2:Dual Images Input Source Conflict List............................................ 32

3
Briefs
Thanks for your purchasing our LED Video processor. Do hope you can enjoy
the experience of the product performance. The design of the LED video
processor conforms to international and industry standards. But if with
improper operation, there will be a personal injury and property damage. In
order to avoid the dangerous, please obey the relevant instructions when you
install and operate the product.
Trademark Credit
VGA and XGA are the trademarks of IBM.
VESA is a Video Electronics Standards Association's trademark.
HDMI、HDMI mark and High-Definition Multimedia Interface are all from
HDMI Licensing LLC
Even if not specified company or product trademarks, trademark has
been fully recognized
About Software
Do not change, decompile, disassemble, decrypt or reverse engineer the
software installed in the product, these acts are illegal
Features
Support ultra-high input/output resolution, it achieves pixel to pixel
display more conveniently
Support input signal single machine and multi-machines hot backup,
allows you to be no longer embarrassed in case of sudden loss of the
input signal
Support preview image function, it switches the images more
conveniently

4
Support DP signal input, output, loop out,support DP 1.1 and DP 1.2
versions
Support multi template operation, it can save 8 templates for call
Support 32 offline tasks, it can load templates and switch channels as
presetting
Support customized input resolution, maximum 3840 pixels at horizontal
or by vertical, maximum refresh rate 121Hz
Support network function, the principal computer can control LED-580F
series processors by network.
4 channel audio input(include 1 HDMI audio input), 1 channel audio
output

5
Using Directions
Including Accessories
Using manual
Power line
Certification of
quality
DVI signal cable
M3 screws x 4
Sending card
stud bolts x 4
HDMI cable x 1
VGA cable x 1
USB cable x 1
Big port DP
cable
Audio
interface×4

6
Extended Port
Port
Model
Explanation
Input
port
Extended VGA port
LED-580FV
Add another VGA input port
Extended DVI port
LED-580FD
Add another DVI input port
Extended SDI port
LED-580FS
Add another SDI input port/loop port
Output
port
Extended DVI port
LED-582F
Add another DVI 3 and DVI 4 output port
Extended VGA port
LED-583F
Add another VGA and DVI output port
Extended SDI port
LED-585F
Add another SDI output port
Safety Instructions
Please use the correct power supply according that the power input
voltage for this product range is 100~240V AC, 50/60Hz.
When you need connect or pull out any signal or bound guideline. Please
confirm that all the power supply cords have been pulled out ahead.
When you need to add hardware device for the LED video processor,
make sure all of the signals and power cables have been pulled out
ahead.
Before you operate any hardware, please turn off the LED video
processor's power, and to set you on the electrostatic by touching the
ground surfaces.
Please use the processor in clean, dry and ventilated environment, not
use it in the high temperature, humidity environment.
The product is the electronic product; please stay away from the fire,
water and of which is inflammable and blast, dangerous.
This product is with high pressure components, please don't open the
case or maintain it by your own.
As there is exceptional condition with smoke, ill-smelling, please turn off
the switch at once and contact with the dealers.

7
Function Introduction
Brief
LED-580F series products are the video processor developed for the large
screen display system, adopted the top image processing chips, internal 12
bits processing, with clearer images and richer colors. The display bandwidth
and processed bandwidth are several times of previous processors, it supports
DP input.
Advanced alternate motion picture processing technology, to remove video
motion tail or jagged, for the normal PAL/NTSC video, output image will be
clearer, for the HD 1080i signal, output image details will be rich, full color and
image quality is in the leading level.
Advanced image scaling technology, support user-defined output resolution,
single machine support horizontal resolution 3840 at maximum, vertical
resolution 3840 at maximum, refresh frequency rate 121Hz,can upgrade the
output signal bandwidth utilization greatly; furthermore, also can use the
traditional standard output resolution, then scaling the output image by pixel
to pixel according to the real size of the LED screen.
Accurate dual pictures crop function, can achieve pixel to pixel display and
material fusion easily.
Perfect video image input port, including 1×VGA(can be extended for two
input in unison)、1×DVI(can be extended for two input in unison)、1×DP、1
×HDMI、2×Video(PAL/NTSC)、 1×SDI(optional),support all HD signal input,
can be connected with various audio and video equipment.
Support seamless switching of multi input signals and PIP function.

8
Front Panel Graphical Representation
Press Knob
OK
E.M.
DP
HDMI
DVI
VGA
AV2
AV1
Buttons Introduction
Same as the confirmed key
Return
Confirm,or switch browse/setting mode
Expand input port
DP input port
HDMI input port
DVI input port
VGA input port
CVBS2 input port
CVBS1 input port
TAKE/8
BRIGHT/7
PRESETS/6
FREEZE/5
EFFECT/4
ASPECT/3
PIP/2
AUTO/1
Hold Knob
Numeric Key 8, image 1 and image 2 switching shortcut
Numeric Key 7, brightness menu opening shortcut
Numeric Key 6, modes saving and loading shortcut
Numeric Key 5, image freeze key
Numeric Key 4, the cycle of fade in /fade out adjusting shortcut
Numeric Key 3, the aspect ratio for output window adjusting shortcut
Numeric Key 2, dual pictures function shortcut
Numeric Key 1, auto adjust VGA input image position,
Choose menu items and adjust parameters

9
RearPanel Graphical Representation
LED-582F Rear Panel
LED-583F RearPanel
LED-585F RearPanel

10
Video Input Ports
AV1-AV2
2 way video Input Ports
VGA
VGA Input Port
DVI
DVI Input Port
HDMI
HDMI Input Port
DP
DP Input Port
E.M.
Expand Input Port, check details in the “Extended Port”list
Video Output Ports
VGA
VGA Output Port
DVI1~DVI2
2 way DVI Output Ports
DP
DP Output Port(Support DP Loop Out)
DVI3~DVI4
2 way expand DVI Output Port, model LED-582F(DVI1=DVI3,DVI2=DVI4)
MONITOR VGA
1 way expand preview VGA Output Port, model LED-583F
MONITOR DVI
1 way expend preview DVI Output Port, model LED-583F
SDI
1 way expand SDI Output Port,model LED-585F
Sending card plugs
Qty.
2 sending card plugs

11
Technical Specification
Input Indicators
Port
Number
Resolution
CVBS
2
PAL/NTSC/SECAM
VGA
1+1 (inhere 1 way,
scalable 1 way)
1024×768/60Hz、1280×1024/60Hz etc VESA Standard
DVI
1+1 (inhere 1 way,
scalable 1 way)
1024×768/60Hz、1920×1080/60Hz etc VESA Standard,
also support customized resolution
HDMI
1
EIA/CEA-861, HDMI-1.3
DP
1
Display Port 1.1、1.2 (3840×1080@60Hz、customized)
SDI
1(E.M.)
480i/60Hz 、586i/50Hz 、720p/60HZ 、1080i/50Hz 、
1080i/60Hz、1080p/60Hz(3G SDI)

12
※VGA support 2K×1K Standard only
Output Indicators
Port
Number
Resolution
VGA※
1
2K×1K Resolution:
1024×768/60Hz
1280×1024/60Hz
1280×720/50Hz/60Hz
1440×900/60Hz
1600×1200/60Hz
1600×1200/60Hz-Reduced
1680×1050/60Hz
1920×1080/60Hz
1920×1200/60Hz
2048×1152/60Hz
1536×1536/60Hz
2K×2K Resolution:
2560×1024/60Hz
2560×1440/60Hz
3840×1080/60Hz
1920×1080/100Hz
1920×1080/50Hz
2560×816/60Hz
2304×1152/60Hz
1024×1280/60Hz
2560×1600/60Hz
1080×3840/60Hz
1920×1080/120Hz
DVI
2+2(inhere 2
way, scalable 2
way)
Customized output resolution (Bandwidth
optimized):
Horizontal resolution 3840 at maximum
DP
1
Vertical resolution 3840 at maximum
DP Input
Looping Out
1
In accordance with DP input
SDI Input
Looping Out
1
In accordance with SDI input
SDI
1 way extensible
480i/59.94Hz 480i/60Hz
586i/50Hz 720p/50Hz
720p/60Hz 1080i/50Hz
1080i/59.94Hz 1080i/60Hz
1080p/23.94Hz 1080p/24Hz
1080p/25Hz 1080p/29.97Hz
1080p/30Hz 1080p/50Hz
1080p/59.94Hz 1080p/60Hz

13
Complete Machine Specification
Input Power Supply
100-240V AC~50/60Hz 0.8A
Working Temperature
0-45℃
Overall Dimensions
482.0×354.3×66.8 mm (L ×W ×H)
Net Weight
4.5Kg

14
Using Menu
Using the menu system can set to this machine convenient and intuitive to
meet the demands of user.
LED-580F series products using a full color LCD screen to display the whole
user menu. If the user does not have operation or operation timeout, the LCD
screen will show the default state. Operate the menu system by using the
knob and keys. The user can check and set its function and states convenient
and intuitive to meet the demands.
We will combine the keys function and LCD screen display, detailed introduces
you to LED-580F series products menu system.
How to use the keys
The front panel keys of LED-58X series products are divided into three areas:
INPUTS, MENU and FUNCTION.
INPUTS area:
This area contains seven keys:AV1, AV2, VGA, DVI, HDMI, DP and E.M.
In the menu system default state, press the keys in this area can switch the
input signal source 1 to the corresponding input port.
MENU area:
This area contains 2 press buttons: a confirmation key(OK), a return key( )
and a knob which can be pressed. Press the "knob", its function is same as the
confirmation key; long press the "knob", can make the menu system return to
the default state immediately; when to press return key, the menu system may
be back to the higher level menu in turn until returning to the default state. In
the main menu, OK key is also used in the switching between the two modes
below:

15
Browse mode
Setting mode
Picture mode
Normal
Picture mode
Normal
Brightness
50
Brightness
50
Contrast
50
Contrast
50
Color
50
Color
50
↖OK key, press the knob, can switch the two modes ↗
In the browse mode, anti-clockwise "knob", the cursor moved to the above or
the left. Clockwise "knob", the cursor moved to below or right. Put the cursor
to the item need to adjust, press the "knob", or confirm key, namely into set
mode, then anti-clockwise "knob", can reduce the current parameter value.
Clockwise "knob", it can increase the current parameter values. If you want to
continue to set this page other item, please switch back to browse mode. If
you need to return to the higher level menu, please use the return key. If finish
the adjustment, can long press "knob" to back to the default state directly, or
wait for system overtime, automatic return the default state (in some special
interface, the system will not be back to the default state, for example, image
switch fast interface, user mode fast interface, test picture interface, etc.).
FUNCTION area:
There are 8 keys in this area: AUTO, PIP, ASPECT, EFFECT, FREEZE, PRESETS,
BRIGHT and TAKE.
Key
Default Menu State
AUTO
Automatically rectify the image display position when the current input source is
VGA.
PIP
Open or close the function of PIP
ASPECT
Open the interface of aspect ratio, it can adjust the aspect ratio for output window
EFFECT
Open the image switching menu, it can adjust the cycle of fade in/fade out

16
Default state introduction
Turn on the power supply of LED-580F series processors, in the process of the
system startup, the LCD front panel would display the start interface on the
left screen, when the start completed, there will show the machine’s current
state on the screen as the following figure 1 shows:
Figure 1 default state interface after startup
The explanation for above figures are as below:
The last line in above figure 1 is status prompt area, by several icons to show
the machine current working status. Pls see the below form 1:
FREEZE
Freeze the current image
PRESETS
Open the mode interface, it can save and load modes
BRIGHT
Open the brightness interface
TAKE
When PIP function is on, it can switch image 1 and image 2
Items
Explanation
CH.1
Image 1 (main image, is also default image) port name and current
input signal resolution.
CH.2
Image 2 (vice image) port name and current input signal resolution
DVI1
Output port DVI1 output resolution
DVI2
Output port DVI2 output resolution
WINDOW 1
size of image 1 output window
WINDOW 2
size of image 2 output window

17
Form 1: State icons and meanings
Icons
Area
Name
Hint(shortcut key in the bracket)
1
Synchronism
follow-up state area
When the Mosaic function is in opening state,
Synchronism follow-up is also started successfully
2
Mosaic state
mosaic function is on
3
Image 1 Crop Off
Image 1 Crop function is off
3
Image 1 Crop On
Image 1 Crop function is on
4
Image 2 Crop off
Image 2 Crop function is off
4
Image 2 Crop On
Image 1 Crop function is on
5
Lock to Screen
The aspect ratio of output image is locked by aspect
ratio of output resolution
5
Full screen
The output image is displayed in full screen
5
16:9
The aspect ratio of output image is 16:9
5
5:4
The aspect ratio of output image is 5:4
5
4:3
The aspect ratio of output image is 4:3
5
3:2
The aspect ratio of output image is 3:2
5
1:1
The aspect ratio of output image is 1:1
5
Custom
User can customise the size for output image
6
EDID
The DVI input resolution is customized resolution
7
Image freeze state
Image is frozen
8
Brightness grade
icon
Digital presents current brightness grade, range
from 0-16 or OFF(BRIGHT)
9
PIP Off
PIP function off (PIP)
9
PIP On[1]
PIP function on,picture 1 is on the top (PIP)
9
PIP On[2]
PIP function on,picture 2 is on the top (PIP)

18
9
multi-screen display
for image 1
Image 1 display on multi-screens
9
multi-screen display
for image 2
Image 2 display on multi-screens
This manual suits for next models
6
Table of contents
Other Magnimage Media Converter manuals

Magnimage
Magnimage LED-750H User manual

Magnimage
Magnimage LED-W4000 User manual

Magnimage
Magnimage LED-510 User manual

Magnimage
Magnimage LED-500CD User manual

Magnimage
Magnimage LED-570EV User manual

Magnimage
Magnimage LED-780HD User manual

Magnimage
Magnimage LED-W2000 User manual

Magnimage
Magnimage LED-540 User manual

Magnimage
Magnimage LED -500B User manual

Magnimage
Magnimage MIG-CL9004-B User manual