maimin SABRE 3000 Parts list manual

BOOK NO.22118
Edition 1.4
\l
3000x
2000r
1000r
lnstruction
Parts
and List
v
Straigffi lhife Cutting Machine
with Flexi-band Sharpener
(Modet A)
SABRE
SABRE
SABRE
MACHINE
SERIAL NO. .
O 1993 H. MAIMIN CO., INC
IMPORTANT SAFETY INSTRUCTIONS
When using your cutting machine, basic safety instructions should always be followed including
the follo-wing:
This cutting machine isfor commercial use only. Read all instntctions beforc using.
DANGER--"reduce the risk of electric shock;
1. Do not install or store this machine in a wet location.
WARN I NG-* reduce the risk of burns, fire, electric shock, or injury to persons:
1. Use machine only for its intended use as a portable cutting machine.
2. Turn machine to *OFF' (O) before connecting or disconnecting power cord.
3. Connect this machine to a properly grounded outlet only. See Grounding Instructions.
4. Always disconnect electrical connector from machine when not using it, before servicing it, or
changing blade.
5. Do not leave machine unattended while it is connected to power outlet.
6. Do not operate machine with a damaged cord or if machine has been dropped. Do not disassemble
take to a qualified serviceman for repairs. Incorrect assembly can cause electric shock when the
machine is used.
7. Keep hands and fingers away from blade and moving parts.
8. Keep guards in place and in working order.
9. The knife key and other wrenches must be removed from machine before starting motor.
10. Keep ventilation openings of machine free from dust and lint.
11. Keep machine clean and blade sharp for best and safest performance.
' Save These lnstructions
H. MAIMIN CO., lNC., P.O. Box 549 - Route 341, Kent, Gonnecticut 06757, U.S.A.
U

GROUNDING INSTRUCTIONS
This machine must be grounded. In the event of malfunction or breakdown, grounding provides a path of least resistance
for elebtric current to reduce the risk of electric shock. This machine is equipped v/ith a Ground Shield surrounding the
TerminalPins;this Ground Shield isdesigrredto beusedwith aMaimin Grounded Connector,partnumber4584'or458B.
See wiring instructions supplied with the C.onnector. v
DAN GER-t-oroper connection of the Maimin C-onnector can result in a risk of electric shock. Check with a
qualified electrician or serviceman if the grounding instructions are not completely understood or if in doubt as to whether
the machine is properly grounded.
Do not modrfy the Ground Shield provided with this machine.
Use correct wire sizes with the Maimin Grounded Connector.
U.S.A. ONLY: 1 phase: Use AWG16/3 SJ, SJT or SIE
3 phase: Use AWG 16/4 SJ, SJT or SIE
INTERNATIONAL; 1P+N+ : Use 3 x 1,0 rrn CEE (2) 61
3P+ : Use 4 x 1,0 mm CEE (2) 61
1
I. DESCRIPTION
1.1 GENERAL
Your new Maimin Sabre straight knife machine is delivered
ready for operation. It is merely necessary to connect it to an
electrical outlet of the correct voltage, oil it, and then begin
cutting. The straight knife machine can be used for cutting
various types of materials from a few ply to the full capacity
of the machine. However. for best results. it is recommended
thatthe minimum height of the laybe no lowerthan the bottom
ofthe cutting blade at its highest position. The Presserfoot Leg
(KeyNo. ,4'403) acts as aprotective guardforthe operatorsothat
it should be down at all times. The Presserfoot should lie lightly
on top of the lay w[en cutting in order to prevent the material
from vibrating.
1 .2 FLEXIBANDS AVAILABLE
Three different grits of "FlexiBands" are available for sharp-
ening the blade:
Coarse - For hard or coarse materials
(Part 1450 - Box of 100)
(Part 1457 -Box of 500)
Medium - For.fine woolens, synthetics and cottons
(Part 1451 - Box of 100)
(Part 1458 - Box of 500)
Fine For sheer fabrics, very soft materials
(Part1452 -Box of 100)
(Part 1459 - Box of 500)
1.3 BIADES AVAILABLE
The blades come in three grades and in different shapes for
cutting unusual or difficult materials. The three grades available
atei
Z,K-}l.igtr Speed Steel...Most popular blade as it wears well
retaining its cutting edge for a long time.
BK- Carbon Alloy Steel... A qualityblade less durablethanthe
ZKblade but less costly.
TK-Treated HighSpeed Steel...Retains cutting edge verywell.
Used only for hard or abrasive materials such as fiberglass or
heavy denim as it is very expensive.
See back cover for complete list of part numbers of blades
according to size, grade, shape, and quantity.
II. OPERATION
2.1 UNPACKING A NEW MACHINE
During shipment oil may have flowed onto Pulley ,{303 which
can cause sharpener to traverse slowly. Sharpener cycle time
is 1.5 seconds. If longer, oil is causing Pulley to slip. To remove
oil, disconnect power, removeBrake 4342, wipe oil from Pulley
and Crank 4505. Replace Brake.
2.2 TO START
Fill oil cups. Attach Connector A525 to Terminal Pins 4523.
Move switch 4,550 from "off'to "on" (USA) or *O" to "I"
(International).
Caution: 3 phase motor must turn counter-clockwise when
viewed from rear. (FtexiBand against Blade must rotate from
back to front).
2.3 TO SHARPEN BLADE (Figure 1)
Machine should be clear of lay and Presserfoot *A' should be
down on Baseplate *B'. With motor running, move Tripper
Handle "C" to right (facing sharpener) until it latches. Release
it. Sharpener will automatically sharpen entire blade. Repeat if
necessary.
V
o

v
2.4 TO CUT
Raise Presserfoot 4402 above top of lay by pressing down on
Presserfoot Handle ,4'323 and lift ingPresserfoot Lift . For Squeeze
Trigger, pull Handle 23308 towards machine Handle 4549.
Enter lay, and lower Presserfoot to top of lay by releasing
Presserfoot Trigger. When making turns in lay, it is sometimes
advisable to let Presserfoot ride freely on top of lay by pushing
down onPresserfootHandle. When machine is not in use, always
lower Presserfoot to Baseplate. The Presserfoot Leg acts as a
safety guard for the blade.
2.5 TO CHANGE FLD(BANDS (Figures 2 and 3)
a) Disconnect power.
b) Figure 2: Push Block *A" to release right (upper) FlexiBand
"B". Remove FlexiBand from Block and then from Drive
Rrlley "Cl'
c) Figure 3: Slip new FlexiBand "B" over Drive Pulley "C "and
between Band Plate "D" and Blade "E." Push Block "A"
forward and slide FlexiBand over it. Release Block *A."
d) Remove left (lower) FlexiBand, and install new one in
same manner.
2.6 TO CHANGE BLADE (Figure 4)
a) Disconnect power and lower Presserfoot Leg.
b) Lay machine on left side.
c) Press and turn Thumbwheel "A" to move Blade to its lowest
position.
d) With Knife Key "B" turn Nut "C" counter clockwise to
unlock blade.
e) Raise Presserfoot Leg and slide Blade "D" downwards
and out.
f) Clean Inserts "E." with.slot cleaning tool or bottom corner
ofblade.
g) Slide new Blade up against Knife Locking Bolt.
h) Holding lower part of Blade behind edge, push it firmly up
against Bolt and back against Inserts.
i) Tighten Nut "C."
Note: IJse only genuine Maimin Blades,with "Cut-Out" and
T-shaped slot in shank for optimum performance and
safe operation.
Always tighten Knife Locking Boh and Nut beforc nmning
machine to prevent damage to Crosshead A510 and Gibbs
A513. Do not run sharyrener withoat blade in machine or
sharTrener wiII jan
2.7 TO CHANGE BEVELWIDTH ON BLADE
(Figure 5)
a) Run sharpener to lowest position, turn offmotor, discon-
nect power.
b) Loosen Screw "A."
c) Insert Bevel Adjusting Tool "B" into Washer "C" and rotate
Washer to increase or decrease blade bevel width. Note
arrow on washer and edse width indicator on Band Plate
Carrier (4374).
d) Tighten Screw "A."
e) Bevel on opposite side is adjusted in same manner.
2.8 MAINTENANCE SCHEDULE
a) Daily: Fill oil cups (A547). Use either Maimin 01122109 or
quality "30 weight" oil (I.S.O. viscosity grade 220).
b) Weekly:
(1) Sharpener-run to lowestposition, turn off motor, and
blow out lint and dust with compressed air.
(2) Motor - run motor, and point stream of compressed
air into back of motor and side of front housing by fan to
eject lint and dust.
c) Every500hours of operation:
(1) Sharpener- Remove Cap Screw (4'367A) from top of
Gear Case (A367 ) and squeeze in a small amount of Grease
22174 to coat gears.
(2) Motor - Remove motor cover and, with compressed air,
blow lint and dust from motor coils and armature.
v

2.9 TO REMOVE SHARPENER FROM MACHINE
(Figure 6)
a) Run sharpener to lowest position, turn off motor and
disconnect power.
b) Figure 6: Disengage Tripper Handle "A" by inserting handle
of Knife Key "B" through hole in lower cover and pressing
upwards until Tripper Handle snaps back to its "off ' position.
c) RemoveScrew.4'390holdingClampPlate,4'394 against
Band Plate Guide ,4393 and remove Guide and Plate.
d) With 3/8" wrench remove 2 Nuts ,4.344 and 2 Washers ,4'343
holding Brake 4342, andremove Brake.
e) RemoveScrew ,{316 holding Shafts Cover 4315, and lift
offCover.
f) Remove 3 Nuts 4'328 and 1 Nut 5 10B (at lower left rear corner
of sharpener) which hold Drive Housing 4327.
g) Pull sharpener forward gently to remove.
2.10 TO ATTACH SHARPENER TO MACHINE
a) Disconnect power.
b) Wipe oil from outer diameter of CrankA5O5 andPulleyA303.
c) Place sharpener onto 3 mounting Screws ,4'521 on,Front
Housing. I
d) Add and tighten 3 Nuts ,{328 and Nut 5108 on back of Sarpener.
III. TROUBLE SHOOTING GUIDE
3.1 MACHINE TROUBLE SHOOTING
Symptom Possible Cause
e) Add Band Plate Guide A393 and Clamp Plate 4'394.
f) Hold Guide against Standard ,4.564 and tighten Screw 4390.
g) Lower Presserfoot Leg to Baseplate, connect power, and run
sharpener to its top position. Disconnect power.
h) Add Shafts Cover 4315.
i) Add Brake A342.
2.11 TO SET POSITION OF BAND PLATE
CARRIER 4374 (Figure 7)
a) Run sharpener to highest position, turn off motor, and
disconnect power.
b) Figure7: Measure distance between Cover "A" (A361) and
top of Gear Case "B" (4367). Maximum distance is25132"
(2 cm) when Screw 4'363 is adjusted properly.
c) If distance is greater, loosen Nut .4'366 and lower Screw A363
a few turns. Tighten Nut, run sharpener, and measure again.
d) FlexiBands ,4'386 must not touch blade ,4'574 when sharpener
is at top position.
2.12TO REMOVE MOTOR COVER A579
(Figure 8)
Disconnect Power. Loosen the 3 Screws A,580, and slide Motor
Cover off.
v
v
1. Bottom comer of blade breaks.
2. Motor slow in reaching ftrll speed.
3. Motor binds at one spot.
4. Motor becomes hot.
5. Motor rotates wrong way.
6. Motor does not start.
7. Terminal Block and/or Connector
becomes very hot.
8. Machine does not roll freely on table.
a) Inserts (,4'558) badly worn.
b) Ifuife strikes throat plate. If cutting hard materials, use
wide slot throat plate.
a) Low voltage or wrong voltage.
b) Three phase:
(1) Fuse out on one phase.
(2) Ground wire incorrectly connected to machine.
a) Crosshead (4'510) and Gibbs (A513) tight.
b) Standard (4'564) not in alignment with Crosshead (,{510).
c) Standard (,4'564) bent.
a) Lint and dust inside Motor Cover (A579).
b) Three phase: one phase not working.
a) Three phase: Wiring incorrect. Change any two wires in
Terminal Block (A522) or Connector (A525).
a) Connector (4.525) not firmly attached to Terminal Pins
(4523\.
b) Switch (,4,550) defective.
c) Starting Switch or Relay (4'540) and/or Capacitor (4'543)
defective.
d) Broken Jumper Wire. (Capacitor to Starting Switch or Relay)
a) Inserts in Connector (A525) worn. Change Connector.
b) Terminal Pins (4523) wom.
a) Surface of cutting table not smooth.
b) Cushions (4'561) in Roller Carriers compressed causing
Baseplate (4'560) to drag on table.
4
I

3.2 SHARPENER TROUBLE SHOOTING
Symptom Possible Gause
v
v
1. No bevel on one side of blade.
2. Sharpener runs but bands do not rotate.
3. Sharpener does not run but bands rotate.
4. Sharpener does not run, bands do not rotate.
i
5. Band cut offby blade.
6. Block (A397) falls off during band changing.
7. Block (A397) pivots, twisting band.
8. Sharpener runs slowly.
9. Sharpener overruns top position.
10. Sharpener runs continuously.
11. Sharpener runs only when Tripper Handle is held.
12. Sharpener jams.
13. Presserfoot Leg (,{403) does not move freely.
1.4. Presserfoot Lee does not hold.
15. Safety not working.
'16. Bands touch bladp in top position.
17. Bevel very wide on both sides of blade.
a) Broken Torsion Spring (4'382, ,4'388).
b) Band Plates (,4'381, 4387) do not pivot freely.
c) Bands do not cross due to interference of Band Plates
(4381, 4387).
a) Square Shaft Gear (,{336) broken.
b) Retaining Ring (,4.338) missing.
c) Clamp (A 364) out of position.
a) Keeper Plate (4'334) loose.
b) Boat (,4'333) worn.
c) Diamond Shaft (4356) worn.
a) Presserfoot Leg (Aa03) not down completely.
b) Oil on Crank (,4505) and/or Pulley (.4.303).
c) Retaining Ring (,4320) missing.
d) Cluster Gear (A332) broken.
a) Band Plate (4387) defective.
a) Retaining Ring (,4398) missing.
a) Stud (,4'383) broken.
a) Oil on Crank (,4'505) and/or Pulley (4.303).
b) Band Plate Guide (4393) too tight against Standard (A56a).
c) Worn Pulley (4303).
d) Dirt in Cartridge (.4.318).
e) Bent Link (A346).
f) Worn Push Rod Cam (,4'314) and/or Tripper (4.350).
g) Add Grease 22174 to Band Plate Carrier Gears (4374).
a) Screw (4363) too low.
a) Soew (,4'363) too low-les than l"above Gear Case (A367).
a) Pin (,{348) broken.
b) Worn Push Rod Cam (4.314) and/or Tripper (,4.350).
a) Sharpener run without knife in machine.
b) Boat (,4'333) broken.
c) Diamond Shaft (,4.356) bent.
d) Standard (,4.564) bent.
e) Nylon Washer (,4'3604') broken.
a) Sharpener not at top position.
b) Dirt in Leg Guide (,4'354).
c) Brake (A342) too close to Pulley.
d) Presserfoot Leg (,4.403) bent.
a) Lock (,4'330) loose on Shaft (,4.325).
b) Presserfoot Handle Spring (4322) broken.
c) Teeth worn on Lock (,4330).
d) Screw (4324) loose.
a) Leg Guide (,4.354) broken.
b) Link (,4.346) bent.
a) Screw (,4.363) too high.
b) Cams (,4'515, ,4516) too high, broken or bent.
a) Worn Band Plates (,4'387, ,4'381).
b) Band Plate Guide (4'393) too tight.
.\/

v
v
A34l-+
A3t5C
A3t7.
43274
1
A39IA
4,356 Diamond Shaft Assembly
Part No.
23O93D DiamondShaft 6H
23093E DiamondShaft 6M
23093F DiamondShaft 6L
23093K Diamond Shaft 8H
23093L Diamond Shaft 8M
23@3M Diamond Shaft 8L
23093R DiamondShaft 11H
230935 DiamondShaft 11M
23W3'I Diamond Shaft 11L
23W3V Diamond Shaft 14H
23093V DiamondShaft 14M
23O93w DiamondShaft 14L
23093X DiamondShaft 10H
23W3Y Diamond Shaft 10M
""@ v

KEY PART
NO. NO. DESCRIPTION
Nut, 1/4-20 Hex
Washer .250 X 1.500 X .06 (2)
Pulley Wheel (1)
Pulley only
Pulley Wheel Assembly
Worm Shaft
Washer, .32X1/2X1/32
Retaining Ring, 51 00-31
Spring Pin,7/64X1/2
Worm
Push Rod
Spring Pin, 1/16X3/8
Cam
Tapered Plug #181
Tapered Shafts Cover, 6", 8"
ShaftsCover,10',11"
Shafts Cover, 14"
Tapered Plug #181
Tapered Plug #10 (tor 23229fl
Tapered Plug#241
Tapered Plug #16 (tor 23229Q
Shafts Cover Gasket 1 0", 11',14'
Screw, 1/4 X 1/2 Socket Cap
Screw, 1/4 X 2314 Socket Cap (for
23229E)
Lockwasher, .263 X .365 X.078 (for
23229F.
Screw, 1/4 X 3/8 Shoulder (2)
Cartridge wAVorm & Pulley
Spring
Retaining Ring, 5555-23
Trigger Spring
Presserfoot Handle
Screw, 5/'16 X 3/8 Set
Shaft
Tripper Handle
Drive Housing with Bushings
Screw, 1 0 X 1/2 Socket Set Cup
Nut, 10-32 Hex
Nut, 10-32 Socket (3)
Screw, 8 X 5/8 Socket Hd. Cap
Lock
Cluster Gear
Boat w/ Keeoer Plate 23120
Keeper Plate
Screw, 6 X1/4 (2)
Square Shaft Gear
Gear Block with Bushings
Retaining Ring, 5108-50
Spacer
Screw, 10 X 3/4 Slot Set Flat Pt.
Screw, 6 X 5/8 Socket Cap (2)
Spring
Brake
Washer, 13/64 X 7/16 X 1 /32 (2\
Nut, 10-32 Hex (2)
Retaining Ring, 5144-25
Link Assembly
Washer, .257 X 9/16 X 1/32
Tripper Pin w/840D
Tripper Pin Only
Retaining Ring, 5555-12
Spring Pin, 3/32X5/16
Tripper
Screw, 6 X 1/8 Socket Set Cup
Screw, 4 X 3/8
Leg Guide w/Leg Keeper
l-eg Guide Assy, Squeeze Trigger orily
Screw, 6 X 1/4 Loc-Wel Button Hd.
Socket Cap (4)
. Diamond Shaft Assy.(seeOhatt Pg.6)
Screw, 10 X 1/2 Button Hd. Soc. Cap
14" Machines Only
Washer, Nylon, 14" Machines Only
Spring
Washer, 13/64 X 7/16X 1132
Spring Pin, 1116X3/8
PARTS UST
A360
PART
NO.
KEY
NO.
v
v
A300
A301
A302
A303
A3O3A
A305
A308
4309
A310
A31 1
^.312
A3't3
A314
A314A
4315
A315A
A3158
A315C
A316
4317
4318
4319
A320
4322
A323
4324
A325
A326
4327
A.3274
A328
4329
4330
A332
A333
A334
A335
A336
A337
4338
A339
A340
A341
4342
4343
4344
A345
A346
A346A
A348
4355
A356-
A3564
A356B
A357
A358
A359
838N
23298
23299
1 498
23300
231 96
839W
23234
23066
23067
23036
23267
23005
4O2BL
23229E
23229C
232290
4O2BL
4O2BQ
4O2BJ
4028W
23302
23056
23332
23334
481F
23192
23017
23219
492
23047
490
23049
23053
23274
51 0A
510B
23252
23271
23050
231897
231 1 9A
23120
23259
23203
23273
1277
23330
23251
23019
23031
23200
23007
5108
2301 6
23284
23289
23328
2301 1A
840D
2301 3
231 90
23054
23258
23217
23325
23122
23093D.Y
23286
23287
23008
23007
23267
A36OA
A361
A362
A363
A364
A365
A366
4367
A367A
A368
A369
A369A
4370
A371
4372
4373
4374
A375
A376
A377
A378
4379
A380
A381
A382
4383
A384
A385
A386
4387
A388
A389
A390
A391
A3914
A392
A393
A401
4402
A403
23212
23263
8247
836N
23275
436S
23086
23091
230914
23210
23276
23261
23084
23098
23099
23097
23227
231 65
23110
23115
23116
23117
1450
1451
1452
1457
1458
1459
23164
231 09
23223
23019
802S
4O2BJ
23225
23250
23272
23282
23249
23114
23293
23111
23280
23281
23288
23112
23316
23318
2331 I
2301 3
DESCRIPTION
23211A. Square Shaft , 6", 8"
223211C SquareShaft. 10".11"
23211D Square Shaft, 14"
23320 Washer, Nylon, Square Shaft
23321 Screw. 6 X 3/8 Button Hd. Socket Cao
23244 Cover
23303 Cover, Squeeze Trigger Only
23226 Screw, 6 X1l4 Socket Hd. Cap (2)
23290 Screw. 10 X1-1/2 Fillister Hd.
Clamo w/23263
Screw, 10 X 1/2 Slot Set Flat Pt.
Screw, 6 X 3/8 Socket Cap (4)
Kepnut, 10-32 Hex
Gear Case with Bushings
Gear Case Grease Screw
Bearing, flanged .252X .377 X1/4
Bearing, flanged .252X .377 X1/2
Bearing, Left Driven Gear
Drive Gear
23086 Bearing, flanged .252X .377 X1/4
23208 Driven Gear, left
23209 Driven Gear, right
A394
A395
A396
A397
A398
A399
A400
Band Plate Canier WBushings & Studs
Washer, 3/'16 X 1/2 X 3/64
Screw, 10 X 1/2 Socket Hd. Cap
Rubber Tire (2)
Drive Pulley (2)
Screw, 4 X 1/8 Soc. Set Flat Pt. (2)
Retaining Rlng 5100-25 (2)
Band Plate, right
Spring, Torsion, right
Stud, 1/8 X 1 -1l8 (4)
Spring Pin, 3/32 X 1 /4 (2)
Spring (2)
FlexiBand, Goarse - 100/box
FlexiBand, Medium -'l 00/box
FlexiBand, Fine - 100/box
FlexiBand. Coarse - 500/box
FlexiBand, Medium - 500/lcox
FlexiBand, Fine - 500/box
Band Plate, left
Spring, Torsion, left
Eccentric Stud (2)
Screw, 6 X 5/8 Socket Cap
Screw,6 X 3/16 Pan Hd. (2)
Tapered Plug #241
Washer (2)
Band Plate Guide, 6",8"
Band Plate Guide, 10", 't 1"
Band Plate Guide, 14"
Clamp Plate
Stud, ldler Pulley (2)
Pulley, ldler, w/Bushing (2)
Block (2)
Block w/ldler Pulley, left
Block w/ldler Pulley, right
Retaining Rlng, 51 44-1 2 (2)
Screw, 8 X 1/2 Button Hd. (2)
Lockwasher, #4 Split
Screw, #4 X 3/8 Socket Head Cap
Lock Nut, #4-40 Hex
Spring Pin, 3/32X5/16
A349
4350
A351
A353
A354
23040 Presserfoot, 6', 8", 1 0", 1',| ", 14"
230428 Presserfoot Leg wAift 824A - 6'
23042D Presserfoot Leg wAift 824A-8"
23042H Presserfoot Leg wAift 824A - 10'
23O42F Presserfoot Leg wAift 824A- 11'
23O42G Presserfoot Leg wAift 8244- 14"
23013 Spring Pin, 3/32X5/16
SQUEEZE TRTGGER ASSEMBLY (23309)
23122
23303
23307
23308
23323
309G
481 F
Screw, 6 X 1/4 Button Hd.
Cover, Squeeze Trigger Only
Spring
Squeeze Trigger Handle Assembly
Locknut 10-24
Brass Washer
Screw. 1/4 X 3/8 Shoulder
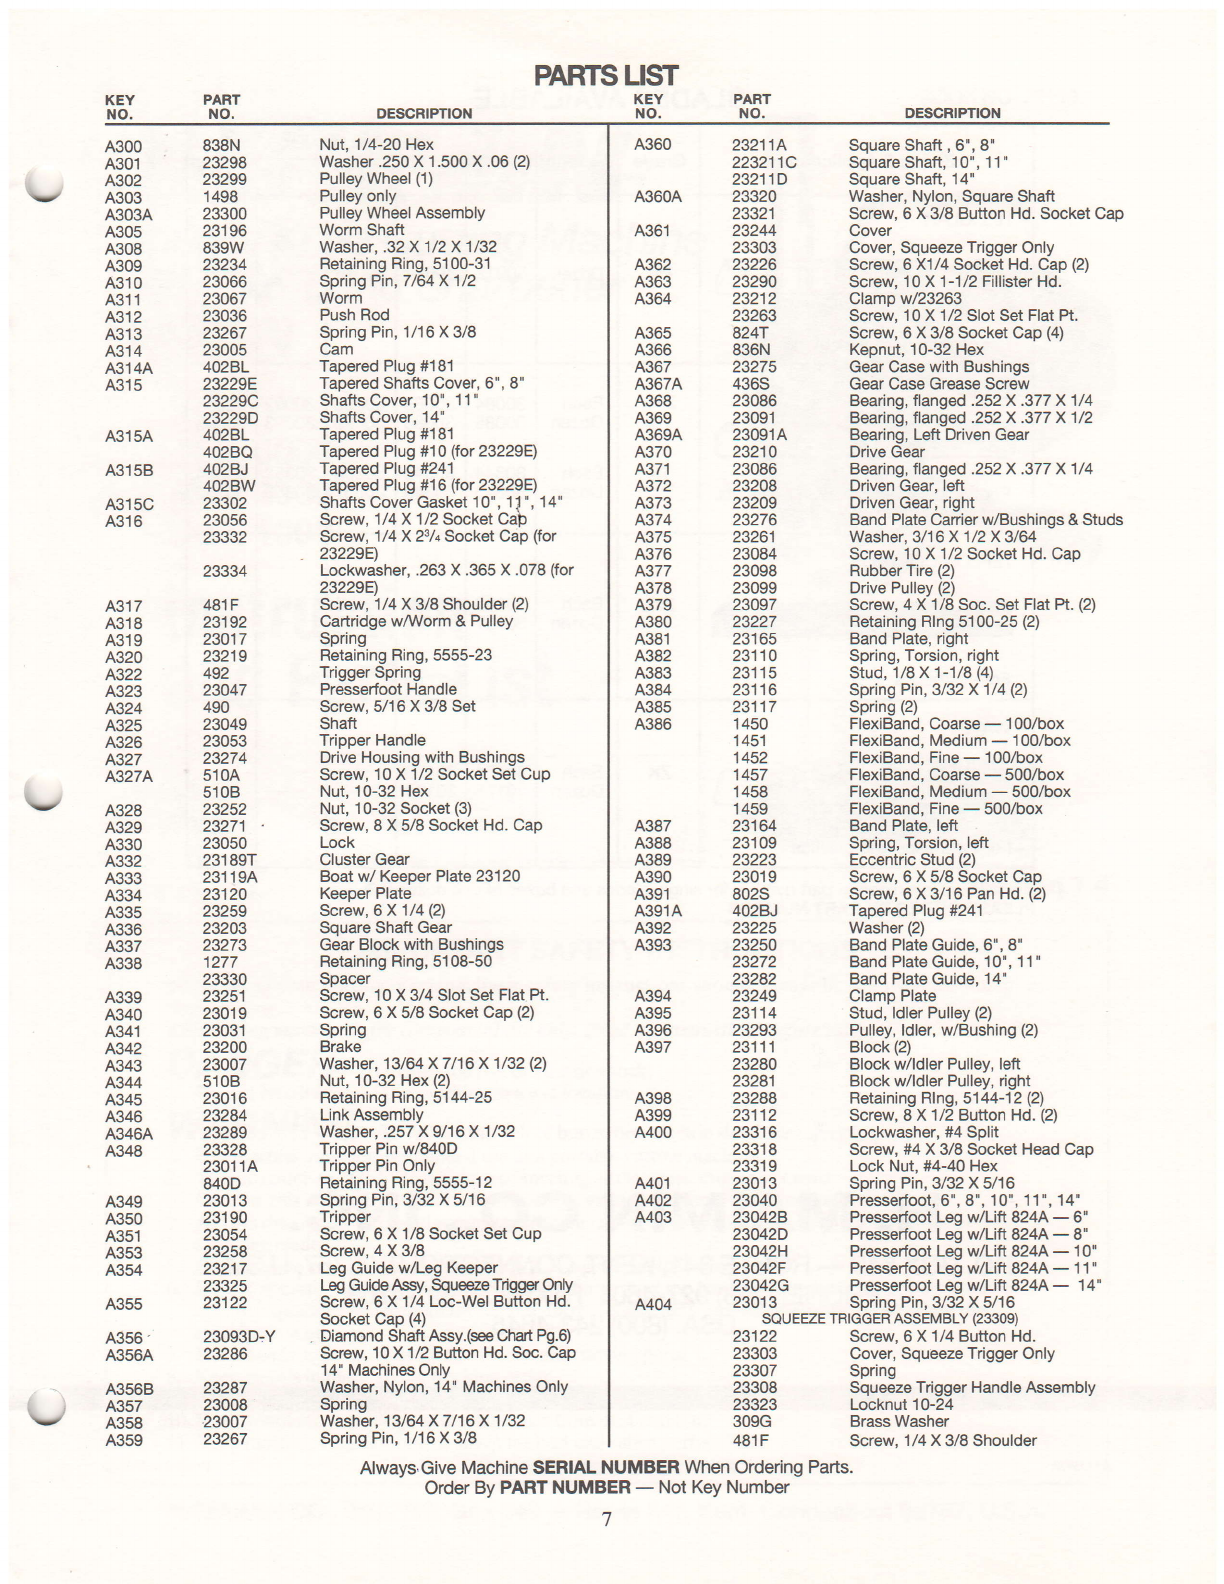
Always'Give Machine SERIAL NUMBER When Ordering Parts.
Order By PART NUMBER - Not Key Number

BLADES AVAILABLE
Shape &Application Grade Quantity Size & Part Number
6n 8tr 10u 11u 14"
REGULAR
o
For general purpose cutting
BK Dozen 30012 30014 30016
LONG
o
For hard or loosely woven materials,,
and general purpose cutting 1
ZKL
TK
Each
Dozen
Each
Dozen
30084
30085
30344
30345
30088
30089
30348
30349
30098
30099
30356
30357
30092
30093
30352
30353
30094
30095
30354
30355
TEFLON COATED
For synthetics
ZKL Each
Dozen 30100
30101 30102
30103 30106
30107
WAVE
For synthetics and plastics
ZK Each
Dozen 30174
30175 30178
30179
v
v
Note: There is a different part number for single blades and boxes of one dozen (12).
PLEASE ORDER BY PART NUMBER
H. MAIMIN GO.n INC.
p.o. Box 549 - ROUTE 341, KENI, CONNECTICUT 06757, U.S.A.
PHONE: (203) 927-4601 FA)G (203) 927-4709
USA: (800) 243-46/;5
,I
Printed in U.S.A.

nT]E CUTTER'g EDGE
VANSPEED
STRAIGHT K]\TITE
MACHINE SERIAL NO.
DATE OF PURCHASE I/
INSTRUCTIONS & PARTS LIST
120v: Model vsl-8 (From December 1995, serial No, AF13- A6L-27825 up)
220Y: Model VS2-8 (From August 1995, Serial No. AF43-A6M-27469 up)
EDITION 2.8
NOTE: These pages are a supplement to Maimin Straight Knife Instructions and Parts Lists (Model A)
Refer to those lists for all information not included in this supplement. In particular, read SAFETY
INSTRUCTIONS carefullv.
Book #22155
H. MAIMIN CO., INC., P.O.BOX 549, ROUTE 34I,KENT, CT 06757 USA
TEL : 860-927 -4600. U SA: 8 0 0 -243- 4 64 5. FAX : 860- 927 - 47 03
PRINTEDIN USA

When using your cutting machine, basic safety instructions should always be followed
including the following:
This cutting machine is for commercial use only. Read all instructions before using.
DANGER--to reduce the risk of electric shock:
1. Do not install or store this machine in a wet location.
WARNING--Io reduce the risk of btrns, fire, electric shock, or injury to persons:
use machine only for its intended use as a portable cutting machine.
Turn machine to "oFF"(o) before connecting or disconnecting power cord.
Connect this machine to a properly grounded outlet only. See Grounding Instructions.
Always disconnect electrical connector from machine when not using it, before servicing it, or
changing blade.
Do not leave machine unattended while it is connected to power outlet.
Do not operate machine with a damaged cord or if machine has been dropped. Do not disassemble --
take to a qualified serviceman for refairs. Incorrect assembly can cause electric shock when the
machine is used.
Keep hands and fingers away from blade and moving parts.
Keep guards in place and in working order,
The knife key and other wrenches must be removed from machine before starting the motor.
Keep ventilation openings of machine free from dust and lint.
Keep machine clean and blade sharp for best and safest performance.
5.
6.
l.
2.
3.
4.
7.
8.
9.
10.
11.
SAVE THESE INSTRUCTIONS
GROUNDING INSTRUCTIONS
This machine must be grounded. In the event of malfunction or breakdown, grounding provides a path of
least resistance for electric current to reduce the risk of electric shock. This machine ii equipped with a
Ground Shield surrounding the Terminal Pins; this Ground Shield is designed to be used with a Maimin
Grounded Connector, part #4584 or 4588. See Wiring instructions supplied with the Connector.
D {NGER -- Improper connection of the Maimin Connector can result in a risk of electric shock.
Check with a qualified electrician or service man if the grounding instructions are not completely
understood or if in doubt as to whether the machine is properly grounded.
Do not modifu the Ground Shield provided with this machine.
Use correct wire sizes with the Maimin Grounded Connector.
U.S.A. only: I Phase: Use AWG 1613 SJ, SJT or SJE
3 Phase: Use AWG 16/4 SJ, SJT or SJE
International: I P+N+: Use 3Xl, Omm CEE (2) 6l
' 3 F+: Use 4X1, Omm CEE (2) 61
lI. Maimin Co.,Inc. P.O. Box 549 Route 341 Kent, CT 06757 U.S.A. Printed in U.S.A

A.
TO START
l. Oil crosshead at oil cup.
2. Attach connector to terminal pins.
3. Move switch from "O" to "1".
TO SHARPf,N BLADE
I2OVMOTOR:
B: 22OV MOTOR:
Remove machine from material.
Lower presserfoot leg to baseplate.
Move switch from position ulu to u2u and hold in
this position.
Pull sharpener trigger and release it.
When sharpening cycle is complete, release switch.
It will return to position rl".
l
,
J.
4.
5.
l.
a
a.
J.
4.
Remove machine from material.
Lower presserfoot leg to baseplate.
Push pushbutton gently and hold in this position.
When sharpening cycle is complete, release pushbutton
l. DESCRIPTION
The MAIMIN VARISPEED is designed to operate on AC current. It has a direct current motor
with a permanent magnet field, controlled by an adjustable speed scR drive.
VOLTAGE CONNECTION
Connect only to voltage shown on nameplate.
NAMEPLATE RATINGS
Values are for full load conditions.
Do not use motor for prolonged periods at line currents greater than shown on nameplate.
OVERLOAD PROTECTION
The control box is fused with a time-delay ceramic-tube fuse; S AMP for 120V, 5 AMp for 220V.
Do not use a larger fuse without consulting Maimin.
MOTOR ROTATION
Remove button plug (Part 446Q) from back of housing (part 15235).
Correct rotation is counter-clockwise looking at end of armature. (Bands must rotate away from
blade.) If motor rotates in wrong direction, change by reversing black and white wires on iontrol.
SLOW START
Your control is equipped with a circuit for slow starting and controlled acceleration. The short
delay between the time you turn on the machine and it reaches set speed is normal.
MAGNETS
Avoid dropping or sharp blows to motor. Demagnetizing occurs only with severe overvoltage.
(About 150% normal). Magnets can only be purchased as part of a magnet and shell assembly.
a
3.
4.
5.
6.
7.

8. BRUSHES
Brushes (ParI 15237) should be inspected periodically to insure unintem,rpted service. Length of
nerv brush is 1.250" (31.75 mm). Minimum operating length is 0.500" (12.7 mm). Life depends on
speed and load. We suggest inspection brushes every 1000 hours.
TO INSPECT BRUSHES:
Remove brush cover (Part 15238) and insulator (Part 15239). Depress brush clip (Part 15241). so
as to disengage tabs of clip and remove. Remove roll spring (Part 15240). Loosen Phillips pan
head screw, remove lug and withdraw brush (Part 15237).
MOTORBEARINGS
Bearings are lubricated for life. Rear motor bearing (Part 403) can be replaced by removing four 8-
32 keep-nuts (Part 857N) and back housing (Part 15235). Using bearing puller, pull bearing off
armature shaft. To remove front bearing, motor must be disassembled. See Motor Disassembly.
After motor is separated from frondhousing, pull bearing offarmature shaft using bearing puller.
MOTOR DISASSEMBLY
In order to disassemble motor, the crank must be removed. Remove sharpener and connecting rod.
Insert handle ofknife key into hole in face ofcrank and tap clockwise until crank loosens on
armature. Disconnect two armature leads (A+ & A-) from control on box (part 4472\.
Remove nut for strain relief (Part 465K) and remove cable with quick disconnects. To remove
back housing (Part 15235) from shell and magnet assembly remove four 8-32 kep-nuts (Part
8s7N),
Pull brushes (Pafi 15237) out and away from commutator so as not to damage them when pulling
armature from shell and magnet assembly (Part 15354).
Wilh rubber or plastic headed hammer tap end of armature until complete motor separates
from front housing
CAUTION; Do not lose wave washer (Part 15f95) at back housirrg.
MOTOR ASSEMBLY
cAUTroN: Avoid pinching your fingers and scarring commutator or wires. slide
commutator-end of armature through magnets by using the edge of the ball bearing to guide
start of insertion.
10.
ll.

Symptom Possible Cause Actions to Correct
Motor does not run,
Lamp off
Motor does not run,
Lamp on
Motor top speed is too
slow or too fast
Motor stalls when cutting
Motor runs at set speed but
does not speed up with push
button or on position "2"
for l20V only
Motor "Cogs" (pulsing or
irregular rotation)
"Sparking" at rear of motor.
Repeated fuse blowing
1. Blown fuse
2. Defective switch
3. Wrong voltage
l. Worn brushes
2. Loose connection
3. Defective control
l. Under voltage or over voltage
2. Wrong setting of control
l. Worn brushes
2. Loose connections
3. Overload
l. Defective pushbutton 443J
(for 220V only)
2. Defective switch 443H
(for l20V only)
l. Too much IR compensation
2. Dust from carbon brushes
l. Dust from carbon brushes
l. Low voltage
2. Loose connections
3. Worn brushes
l. Replace fuse.
2. Replace switch.
3. Connect only to voltage shown
on nameplate.
l. Replace.
2. Remove cover with control
attached. Check all 7 connections
on control.
3. Using a DC Volt meter; volts
from-A to +A should be 90V or
l8OVwhen speed control is at
" 10"; Adjust trim pot to desired
speed.
l.& 2. Remove cover
with control from box. Set knob
at "100"; Adjust MAX trim pot at
desired speed. Set knob at "10";
Adjust trim pot to desired speed.
1. Replace.
2. Check all connections
3. Current limit has been set at
factory. Limit can be raised by
adjusting CL clockwise.
l. &2. Replace.
l. Adjust IR counter clock-wise 30
at a time until cogging stops.
2. Remove dust from rear housing
with compressed air.
l. Remove dust from rear housing
with compressed air.
1. Check input-should be at least
l00V or 218V AC.
2. Check all connections.
3. Replace
4. Defective electronic components 4. Replace control

(For parts not shown refer to Straight Knife Parts & Instructions Book)
PARTNO. DESCRIPTION
120V
VSI.8 220V
vs2-8
402AD
403
443}t
4448
446P
446Q
468A
468S
4838
497P
15195
15345
15354
I 5355
15235
15236
r5237
rs238
15239
15240
15241
t5242
t5243
I 5357
4O2AD
403
4434
4431
4448
446P
446Q
468A
468S
483E
497P
15195
t5346
15354
I 5356
15235
15236
15237
I 5238
15239
15240
r5241
15242
15243
15357
Front Housing Only VS-8
Bearing, Front & Rear
Switch
Pushbutton Switch
Cable Clamp (3)
Screw 8-32 X l/4 Button Hd. Soc (3)
Hole Plug
Thumbwheel Assembly
Screw 6-32 X 7/8 Soc Hd Cap (2)
Grommet
Support Washer
Wave Washer
Motor
Shell & Magnet Assembly
Armature
Back Housing
Brush Terminal Assemblv
Brush (Ea)
Brush Cover (2)
Brush Cover Insulator (2)
Roll Spring (2)
Brush Clip (2)
Screw 8-32 X 3/8 PhillipsPan Hd (4)
Screw 10-32 X l/2 PhillipsPan HD (4)
8-32lx1 15116 Threaded Rod (a)
(Part numbers refer to drawing 15345-15346 on next page)

OO
(\l c{
Fi sl
rn \c)
S-t
(a (n
rnrn
F{ F{
7,
r\
rn
oo
(fl
$
N
rn
r-l
N
.$
N
rn
F
._)
r\
rn
cfl
tt')
r-i
B3B
q\t rt! c\l
r-l F{ (\l
!n
rn
(f!
rn
F-l
F{
f-
Or
.if
6
ft
GI
rn
Fl
H$" R.
FFI N
v v

PARTS r rST - CONTROL SFCTION FOR VARISPFF'II
\-- pARTNo DEscRrprIoN
l20v 220v
vsl-8 vs2-8
405VA 405VA
405D 405D
4285 4285
444C 444M
444SA 44458
444V 444V
444W 444W
444X 444X
446F 446F
688A 6888
447G 447G
447N 447N
447Y 447Y
4472 4472
465K 465K
Terminal Block only
Terminal Block Assembly
Screw #3 X 5/32 Type BFillister Hd.
Control
Fuse (8 AMP for l20V;5 AMP for 22OV]-
Knob & DidKit
Bracket
' Bracket Cover
Potentiometer
I Pilot Light
I Fuse Holder
O-Ring
Cover
Box
Strain Relief

$
rn
(f)
rn
E
R"
zfi
oi
E5
F<
olD
do
(h
I
o
r.t
,HH
:<
at
a.
gt
E
jlI
ll
qH
J
E
E
-
o
(\l
t
J
o
E.
F
z
o
u
o
{'
$
+
t.
I
I
F
E
bJ
I
o
r4
ld
=
z
E
A
U
=
o
U
=
=
=
:tr d
HH
++
\g
(l)
n
.;
N
E
F
ct
,ir'h +

Fls
Ol rn
rl -r
O
o
g
6
\9
z
o
ffo
ZG
o
trY
s?
ocl
d,
'$
F
F!:
a,
ir
:tI
ll
lxl
t<l
lz I
t-'
N
O{
O!
o
$g
o
N
N
I
J
o
t
F.
z
o
o
f
$
\r
t
c(
P
U
tr
E
UJ
I
U
v)
td
=
z
F
E
o.
U
=
o
U
=
=
=
:tr
++
h

HI
NI
l-{tl
VI
H
$l
8l
$l
$;l
HI
9,.
l'rl
O
-
(.)
a)
q
a
$<
Cg
t-{
rY.
c)
C)
(t)
v)
t-{
CB
P
C)
(-1
c.)
g
q
')
a
\-. )
--* ,.; ,..-.:-'* ",.-::-a*- r:=:If. :f;--
Other manuals for SABRE 3000
1
This manual suits for next models
2
Table of contents
Other maimin Cutter manuals
Popular Cutter manuals by other brands

Alpha Professional Tools
Alpha Professional Tools Ecocutter ECC-125 Technical notes

Hitachi Koki
Hitachi Koki CM 4SB2 Handling instructions

Woods
Woods BW240X Operator's manual

Ilsco
Ilsco TaskMaster TR-CUT45 instruction manual

Makita
Makita 3803A instruction manual

Wolfcraft
Wolfcraft VLC 1000 Translation of the original operating instruction