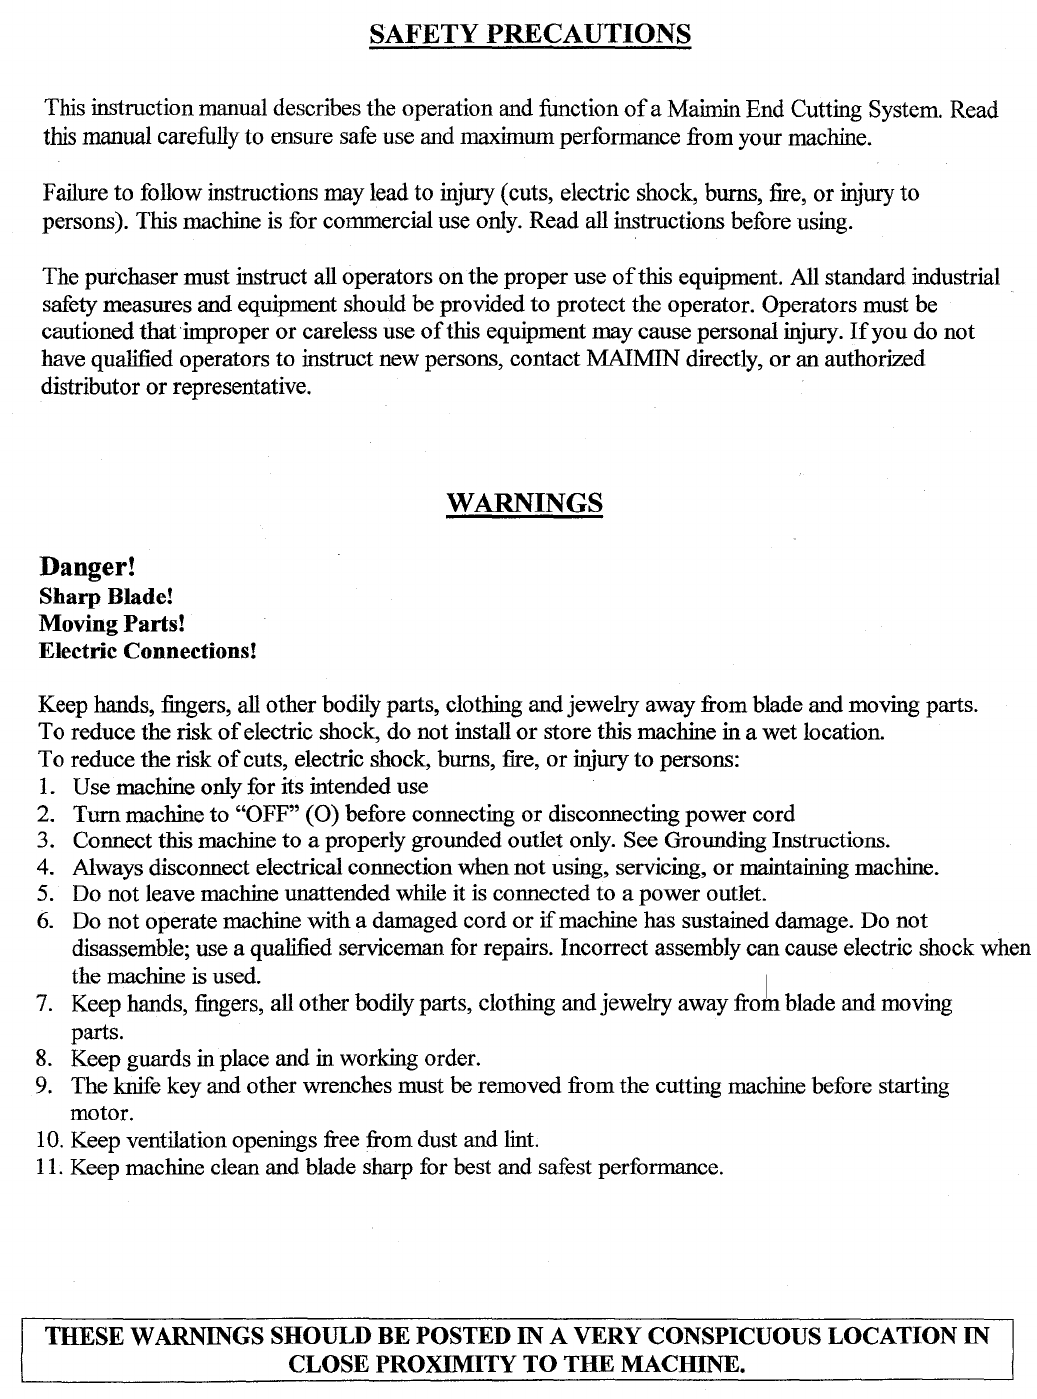
maimin K-105 User manual

THS
aJTI'SR'S
SDt:S
Maimin
Technology
Group,
Inc.
70
Kin~treet
1
Elk
Grove
Villager
Illinois
60007
USA
¥847-709-2500 ·
~
847-709-2599 ·
~
www.maimin.com · email: [email protected]
MODEL
K-105
MANUAL END CUTTING SYSTEM
PARTS AND INSTRUCTIONS BOOK
SERIAL
NUMBER
SfARTING
WITH
EC15-
OR
fC25-
EFFECTIVE
12/02
From the library of: Superior Sewing Machine & Supply LLC

SAFETY PRECAUTIONS
This instruction manual describes the operation and function
of
a Maimin End Cutting System. Read
this manual carefully to ensure safe use and maximum performance from your machine.
Failure to follow instructions may lead to injury (cuts, electric shock, burns, fire,
or
injury
to
persons). This machine is for commercial use only. Read all instructions before using.
The purchaser must instruct all operators
on
the proper use
of
this equipment. All standard industrial
safety measures and equipment should be provided
to
protect the operator. Operators must be
cautioned that·improper
or
careless use
of
this equipment may cause personal injury.
If
you do not
have qualified operators to instruct new persons, contact MAIMIN directly,
or
an authorized
distributor
or
representative.
Danger!
Sharp Blade!
Moving Parts!
Electric Connections!
WARNINGS
Keep hands, fingers, all other bodily parts, clothing andjewelry away from blade and moving parts.
To reduce the risk
of
electric shock, do not install
or
store this machine in a wet location.
To reduce the risk
of
cuts, electric shock, burns, fire,
or
injury
to
persons:
1.
Use machine onlyfor its intended use
2. Turnmachine to "OFF"
(0)
before connecting
or
disconnecting power cord
3. Connect this machine to a properly grounded outlet only. See Grounding Instructions.
4. Always disconnect electrical connectionwhennot using, servicing,
or
maintaining machine.
5. Do not leave machine unattended while it is connected to a power outlet.
6.
Do
not
operate machine with a damaged cord
or
if
machine has sustained damage. Do
not
disassemble; use a qualified serviceman for repairs. Incorrect assembly can cause electric shock when
the machine
is
used. 1
7.
Keep hands, fingers, all other bodily parts, clothing andjewelry away from blade and moving
parts.
8.
Keep guards in place and in working order.
9.
The knife key and other wrenches must be removed from the cutting machine before starting
motor.
10.
Keep ventilation openings free from dust and lint.
11.
Keep machine clean and blade sharp for best and safest performance.
THESE WARNINGS SHOULD BE POSTED
IN
A VERY CONSPICUOUS LOCATION IN
CLOSE PROXIMITY
TO
THE
MACHINE.
From the library of: Superior Sewing Machine & Supply LLC

Grounding Instructions
This machine must be grounded.
In
the event
of
malfunction
or
breakdown, grounding provides a
path
of
least resistance for electric current to reduce the risk
of
electric shock.
Danger!
Improper connection to electric source can result in a risk
of
electric shock. Check with a
qualified electrician or serviceman who
is
familiar with applicable codes and regulations
if
the
grounding instructions are not completely understood
or
if
in doubt as
to
whether this machine
is
properly grounded. Disconnect this equipment from electrical power source before proceeding with
any disassembly for adjustment
or
repair.
Use correct wire sizes with this machine.
USA ONLY: 1 phase: Use A
WG
16/3 SJ, SJT
or
SJE
3 phase: Use AWG 16/4 SJ,
SIT
or
SJE
INTERNATIONAL: 1P+N+: Use 3 x 1,0
mm
CEE (2)
61
3P+: Use 4 x 1,0
mm
CEE (2)
61
General Precautions
• This machine is equipped with a very sharp blade and other moving parts. Leave all guards in
their proper position.
• Always wear safety glasses when operating or servicing this equipment.
• Do
not
operate until all instructions for this machine have beenread.
• This equipment includes a cutting machine that is designed
to
run
at high speed across the
track. Equipment should be set up with a minimum
of3
feet
(1
meter) clear path at front and
rear.
• All personnel should be instructed to stand well clear
of
this equipment when in operation.
•
At
startup and during operation, be sure
to
monitor the functions and performance
of
the
machine and all components.
• We recommend that you take substantial safety measures to avoid any damage in the event a
problem occurs.
• Do not open
or
modify the machine
or
any
of
its components
or
use these in any way other
than described in the specifications.
• Do not use the machine
or
any
of
its components for the purpose
of
protecting the human
body.
From the library of: Superior Sewing Machine & Supply LLC

General Maintenance
• ADJUSTING THE SHARPENER: When the blade
is
worn out, adjust the sharpening
stone position by unscrewing the screw for the sharpener arm so as to ensure a correct
distance betweenthe sharpener and the blade edge. After finishing adjustment, tighten the
screw.
• REPLACING THE SHARPENING STONE: Take
offthe
Sharpening Stone (EC2626) by
unscrewing it. Mount the new Sharpening Stone and tighten it.
• REPLACING THE BLADE:
1.
Remove the Sharpener Assembly (F)
2.
Unscrew the lock nut (G) for the blade.
3.
Remove the blade.
4. Install a new blade, making sure the printed side is face out.
5. Tighten the lock nut (G) for the blade.
6.
After replacing blade, replace the Sharpener Assembly and adjust correctly.
• REPLACING THE
LOWER
BLADE
1.
Remove the lower blade armby unscrewing the screw (H) for the lower blade arm.
2. Replace the lower blade by unscrewing the fixed screw, ensuring that the flat surface
of
the lower blade
is
adjacent to the blade edge.
• REPLACING THE CARBON BRUSH
1.
Carbon Brush Cap
(I)
is replaced by turning it left with wrench.
2.
Always replace right and left Carbon Brushes at the same time.
3.
Be sure to hold metallic part
of
the Brush. Keep fingers away from Carbon.
• CLEANING THE TRACK AND THE MACHINE
1.
Clean the Track with a brushthoroughly after each 10 to 20 hours
of
use.
2. Take the machine out
of
the Track and thoroughly cleanthe L-shaped track witha
brush after each 30 days
of
use.
From the library of: Superior Sewing Machine & Supply LLC

Operating Instructions
1.
Before operating machine, READ ALL SAFETY INSTRUCTIONS.
2.
Make sure Track is clean and clear
of
obstacles.
3.
Connect the machine to a power source by plugging the Connector (458B) into the
Terminal Block Assembly (405VX). Connector must first be attached to a power
cord.
4.
Sharpenthe Blade (30331) 2-3 times by pushing
on
the Plunger (EC2623) to engage
Stone (EC2626) against Blade.
5.
To use the Counter (EC2635), reset it to 000 and turn Switch (EC2636) to On.
6. Pull material across the Track (EC265359) and pull to length.
7. Push ButtoninEC3601 Handle to activate Blade. Blade
will
stop when Button is
released. Pull the cutter toward you to cut the material, and then return it to the far
end
of
the Track.
8.
Lift the Side Lift Assembly to allow material to fall underneath, and set it back down
on
top
of
the material.
9.
Repeat process for eachply
of
material.
1-1
1-3
1-2 1-4
From the library of: Superior Sewing Machine & Supply LLC

c----
-,...--
I r
I
'-r' I
I
I I
I I
I I
I I
I I
I I
I I
I I ,
..
-
......
I I
I I I ,.
__
J
I I I I
I I I I
I I I I
I I I I
'M'
I I I
II
I I I
II
I I I
II
I I
:~~
I I
I I ...
J.L...,
I I
rTr-..J
I I
I I :
c~
I '
-'
I 1
1 I
' I
' 1
I
I
I
'
'
.,
I
'
I
I l)M0615
-"'r'
'
SWM6
2650
1
2662
Optional End Rail
(Cloth AlignmentBar)
c-_::',
I
I
I
'M'I
Ill
II
I
Ill
II:
rJJ..
...
L.~T"""
c~:
I
'-.J
-:::;::1
r, I
:...)
I I
I I
I I
' I
I I
I '
I I
I I
I I
I I
I I
I I
I I
I I
I I
I I
I I
I I
I I
I I
I I
I I
I I
I I
I 'I '
I '
I I
I I
I I
I I
I I
I I
I 'I I
1 '
I I
I I
I I
I I
' '
' I
' '
I '
,_,
From the library of: Superior Sewing Machine & Supply LLC

~
\
u
("'f')
("'f')
\0
N
From the library of: Superior Sewing Machine & Supply LLC

r
I
I
I
I
I
I
l
lI
L
3601 I
..-
1
3621N I .
-~
/
3601-DN )_......
~
//
2619N
//
.
..._..,..-/
< ,
......
.,
P~0416.,.....
2 /
......
61922N
"-
......
/
PWM5
/SWM5
_......~
,
/
~
266?
"
260IIO~
""'-
J§33C
V-2620
30331
J
/
)~~0306
2633
From the library of: Superior Sewing Machine & Supply LLC

/
~~
2661-7'
~
-9'
"'-._
I-
-8'
"Z
-10'
~
~
~~
PRM051~
'l
1/
I
2662-8'
-10'
.
-----,
r -
2648
'-649
t~<-
HM0825 .........
~
'-
NTMS
'-
264750N
I
->..;~WM
I
I SWMB
'·
.. ..
• I 263946N-L
I / . . t (
I
f'·,
,..
_,.._
2639N
12647-A I!
'RM;3?-f
J·
.....
I
~~~
I
I
..
2640
®:..
I I
sMoslo.-~r
"~'
7
./ll...
I
',.,~
_?f
'i
I
....
~---·.
I / J j i
oM(
.,
'•
I 2647-BL 26j50/
-1!
l
I
~
II
''
I
v
r
~
2149 ' i
~~~,i
viJJ2v/ I
NTM508,
,,,
I
.,._
RM0615
/"'-..
'
I ,
;Y
·--..._]
/
- 9 -
I
....
I -
/~
,G
__.
f---'
1,_
2645 '
2647-Bl·
t
From the library of: Superior Sewing Machine & Supply LLC

Diagrams do not show the letters "EC" which preceed most part numbers.
HNO.
DESCRIPTION
30331
BLADE -ENDCUTTER -EA
405NX TERMINAL BLOCK ASSEMBLY
458B CONNECTOR 1
PH
EC
2001
STANDARD FOR K-405
EC
2001-A LINK FOR TIMING BELT
EC
2002 MAGNET FOR SENSOR
EC
2003 LIFTER
EC
2004 MAGNET BASE
EC
2005 CHAIN PENDANT
EC
2006 CHAIN
EC
2006-A CHAIN SCREW
EC
2007 GEAR LATCH
EC
200725-110 TRANSMISSION MOTOR 110V
EC
200725-220 TRANSMISSION MOTOR 220V
EC
2008 CHAIN GEAR
EC
2009
F.R.
MOTOR PLATE
EC
2010 REDUCTION GEAR
EC
2010N REDUCTipN GEAR FOR LIFTING
EC
2011
F
.R.
MOTOR
EC2011N-110
F.R.
MOTOR 110V
EC2011N-220
F.R.
MOTOR220V
EC2012 MOTOR PLUG
012-5 CABLE 5-HOLE
1:.
....
.d012-7
CABLE 7-HOLE
EC2013 SENSOR SWITCH
EC
2015 LIFTING FIXED CLAMP
EC
2015-B LIFTING MOTOR TERMINAL BLOCK
EC
2016 CONTROL BOX STANDARD
EC
2017-1
START SWITCH
~C
2017-10 FUSE BASE
i:C 2017-11 PLUG 2-HOLES
~C
2017-110 CONTROL BOX ASSEMBLY
11
OV
~C
2017-12 PLUG S-HOLES
:::c
2017-13 PLUG ?-HOLES
:::c
2017-133 PLUG 3-HOLES
::c
2017-134 PLUG 4-HOLES
::C2017-14-110
PC
BOARD 110V
::c
2017-14-220
PC
BOARD 220V
::c
2017-15 CONTROL BOX CASE
:c2017-16 CONTROL BOX COVER
:c2017-2 DOWN SWITCH
:c2017-220 CONTROL BOX ASSEMBLY 220V
:c
2017-3
UP
SWITCH
:c
2017-4 EMERGENCY STOP SWITCH
:c2017-5 SHARPEN SWITCH
:c
2017-8 POWER SWITCH
:r
'"'017-9
LENGTH SETTING TUNER CAP
PART NO. DESCRIPTION
EC
2017-9R LENGTH SETTING TUNER
EC
2018 TRANSMISSION
BASE
COVER
EC
2019 SPRING FOR EC2656
EC
2020 RAIL PLUG SOCKET
EC
2021
TRANSMISSION GEAR
EC
2021-A SCREW FOR TRANSMISSION GEAR
EC
2022
F.R.
MOTOR
BASE
EC
2022A F.R. MOTOR TERMINAL BOX
EC
2023N REDUCTION GEAR
EC
2024 TRANSMISSION PULLEY BASE
EC
202427 TRANSMISSION PULLEY SET
EC
2025-3 3-HOLE CABLE
EC
2025-4 4-HOLE CABLE
EC
2026 TRANSMISSION PULLEY
EC
202641 GUIDE ROLLER
EC
2027 PULLEY FIXED BLADE
EC2028 RAIL
EC
202830 K205 RAIL ASSEMBLY
EC
2029 MICRO SWITCH
EC 2030 RAIL PLUG SOCKET
EC
2031
SUSTAINING FRAME
EC203136 SUSTAINING FRAME UNIT
EC
2032 ROCKER
EC
2032-B ROCKER STOP SCREW
EC
2032-C ROCKER STOP SCREW COVER
EC
2033 ROCKER SCREW
EC
2034 ROCKER BAR
EC
2037 CABLE 2-HOLES
EC
203741 WIRE FRAME ASSEMBLY
EC
2038 WIRE SUPPORT
BASE
EC
2039 WIRE SUPPORT LEVER
EC2040 WIRE BRACKET
ARM
EC
2041
SPRING FOR WIRE STAND
EC
2042 TIMING BELT
EC
2043 2 PIN
PLUG
EC
2044 ELECTRIC BOX
EC
2044-1
UP
SWITCH
EC
2061
CLOTH PRESS TRACK SET
EC
2063 LIFT SET COVER
EC
260110-110 110V MOTOR ASSEMBLY
EC
260110-220 220V MOTOR ASSEMBLY
EC
2601-110 110V STATOR
EC
2601-220 220V STATOR
EC
2602-110 110VARMATURE
EC
2602-220 220V ARMATURE
EC
2606 0 RING
EC
2607 MOTOR COVER
From the library of: Superior Sewing Machine & Supply LLC

PART NO.
EC 2608
EC 2609
EC 2611-B
EC 2611-C
EC 2611N
EC 2613
EC2614
EC 2614-3
EC
261416
EC 2615
EC 2616
EC 2617
EC 2617-3
EC 2618
EC
261922N
EC 2619N
EC 2620
EC
2623
EC262327
EC
2624
EC
2625
EC2626
EC
2627
EC2630N
EC2633
EC
2633C
EC2634
EC 2635-110
EC
2635-220
EC 2636
EC2638
EC
263946N-L
EC 263946N-R
EC2639N
EC
2640
EC2641
EC2642
EC2644A
EC2645
EC2646
EC264749N
EC264750N
EC
2647-A
EC2647-BL
EC
2647-BR
EC2648
EC2648N
THIE
t:Ur'IIER'S
liDGii
Diagrams do not show the letters "EC" which preceed most part numbers.
DESCRIPTION
SCREW FOR STATOR
MOTOR PLATE
ROLLER
ROLLER SHAFT
STANDARD
SCREW FOR PRESSURE SPRING
LOWER BLADE ARM
LOWER BLADE #3
LOWER BLADE SET
LOWER BLADE
SCREW FOR LOWER BLADE
SCREW FOR LOWER BLADE ARM
SCREW FOR LOWER BLADE #3
BALANCE IRON
DRIVE HANDLE SET
HANDLE COVER
SWITCH
SHARPENER COLLAR
SHARPENER ASSEMBLY
SPRING FOR SHARPENER COLLAR
STONE ARM (TOP)
STONE COMPLETE
SHARPENER ARM
LOCK NUT FOR KNIFE
KNIFE GUARD
KNIFE COVER
TERMINAL BOX
COUNTER 110V
COUNTER 220V
COUNTER SWITCH
COVER FOR TERMINAL BOX
LIFT ASSEMBLY LEFT
LIFT ASSEMBLY RIGHT
A CLAMP
LIFT BELT CATCH
BAR LIFTER ROLLER
WHEEL RING
SPRING FOR LIFT
SCREW
WASHER FOR SCREW
RIGHT BAR LIFTER
LEFT BAR LIFTER
BAR LIFTER PLATE
LEFT BAR
RIGHT BAR
ROLLER
ROLLER FOR LIFT BELT
PART NO.
EC
2649
EC
2650
EC
2653
EC265359
EC
2654
EC
2655
EC2655N
EC2656
EC
2657
EC2658
EC
2660
EC2662
EC
2663C1
EC2663C2
EC
3601
EC 3601-DS
EC
3601-DN
EC3621N
EC
S104
EC S105
ECS169
EC S178
EC NTM508
EC NTM610
EC
NTM8
EC PM0416
EC PRM0305
EC PRM0306
EC
PRM0510
ECPWM5
ECPWM6
ECPWM8
EC
RM0408
EC
RM0508
EC
RM0535
EC
RM0615
EC
RM0630
EC
SM0520
EC
SM0620
EC
SM0630
DESCRIPTION
ROLLER SHAFT
ROLLER SET
TRACK ONLY
TRACK ASSEMBLY
SQUARE NUT
RAIL GUARD
RAIL GUARD
IMPACT-RESISTANTRUBBER
STEEL BELT
RUBBER BELT
SCREW FOR RAIL
LIFT BELT
CABLE SET 110V
CABLE
SET
220V
HANDLE
SPRING
REAR ARM
FRONT ARM
CARBON BRUSH
CAP FOR CARBON BRUSH
OILER
PRESSURE
SPRING
FOR
LOWER
BLADE
NUT M5-0.8
NUT M6-1.0
NUT MB-1.25
SCREWM4
SCREWM3X5
SCREWM3X6
SCREW M5X10
WASHER 5.3X10
WASHER 6.4X11.5
WASHER 8.4X15.5
SCREWM4X8
SCREWM5X8
SCREW M5X35
SCREW M6X15
SCREW M6X30
SCREW M5X20
SCREW M6X20
SCREW M6X30
From the library of: Superior Sewing Machine & Supply LLC
Other manuals for K-105
1
Table of contents
Other maimin Cutter manuals