Major M580 User manual

INSTRUCTION MANUAL

GENERAL DESCRIPTION
This transceiver is an advanced AM/FM
-way radio designed primarily for mobile
operation. It employs the very latest
technology to provide 80 channels of
operation by means of digital frequency
synthesis with Phase Lock Loop (PLL)
circuitry. The use of PLL circuitry as
sures a précisé on-frequency operation on
every channel in both AM and FM modes
that is unmatched by conventional crystal
frequency synthesis.
This transceiver also includes many fea-
tures which will provide greater operating
convenience and assure optimum com
munications under a wide range of
conditions. Other features are:
• 80 channels operation
• AM — FM mode switch for easy sélec
tion of operating mode.
• Illuminated meter indicates “S” units
and RF power output.
• LED digital channel read-out.
• Switchable Noise Blanker + ANL for
effective réduction of noise.
• Transmit (Tx) indicator lights.
• Variable Squelch control.
• RF Gain control/push-pull band
switch (Hi-Lo).
• Built-in ceramic filter helps prevent
adjacent channel interférence.
• Built-in automatic modulation control
circuit.
• Provision for PA operation with
volume control.
• External speaker jack.
• Convenient Sélective Call input jack.
• Floating chassis for either negative or
positive ground mobile operation.
• Push-to-Talk dynamie mic with coiled
cord.
TECHNICAL SPECIFICATIONS
GENERAL
Circuitry: Digital Phase Lock
Loop Synthesizer.
Channels: 80 channels.
Mode of Operation: AM, FM.
Power Source: 13,8V DC [nega
tive or positive
ground] .
RECEIVER SECTION
Circuit Type: Dual conversion
superheterodyne
with RF stage and
455 kHz ceramic-
filter.
Sensitivity: 0.7 juV for 10 dB
S/N.
Selectivity: 45 dB down at
±10 kHz.
Image Rejection: 40 dB.
Spurious Rejection: 50 dB.
AGC Range [for 10 dB
level change] : 70 dB.
Squelch Range: 0.7 mV to 500 mV.
IF Frequency: Ist IF: 10.695 MHz
nd IF: 455 kHz
Audio Output Power: 3 watts into “EXT.
SP” jack [at 8
ohms] .
Current Drain: 300 mA on stand-
by [no signal] .
TRANSMITTER SECTION
RF Power Output: Up to 4 watts at
13.8V DC.
Emission: 6A 3/6F3
Harmonie and purious
uppression: 40 dB.

AM Modulation:
FM Deviation:
Antenna Input
Impédance:
Current Drain:
90% typical.
±1.5 kHz with
1 50 Hz, 0 mV
audio.
Nominal 50 ohms.
1.6A or less at
13.8V DC.
MISCELLANEOUS
Dimensions
[Overall] :
Net Weight:
6-1/4 "W x 8"D x
-1/8 "H.
156mmW x 00mm
D x 5 mmH.
1.5 kilograms/
3.5 lbs.
FRONT PANEL
[1] MICROPHONE JACK
4-Pin socket for push-to-talk micro
phone [supplied] .
[ ] RF GAIN/HI-LO BAND SWITCH
RF Gain: This control should
normally be set to maximum [fully
clockwise] . If a storong station blast
in, and sound distorted, rotate
counterclockwise for clearer récep
tion. This control does not affect
the transmitting output.
Hi-Lo: In this transceiver, 80 chan-
nels are devided in two band, high 40
and low 40 frequencies. By pushing
this knob in, you can select channels
1 through 40; pulling this out, you
3

сап select channels 41 through 80.
Each channel sélection is made with
the channel selector (5).
[3] VOLUME/ON-OFF
Varies the Sound output from the
speaker. Also incorporâtes an “on-
off” power switch at the extreme
counter-clockwise position.
[4] SQUELCH CONTROL/РА SWITCH
This control is used to eliminate any
annoying background noise when no
signais are present. The degree of
sensitivity to incoming signais is ad-
justable. When the Squelch control
is rotated to the fully clockwise
position, it provides maximum squ
elch; in the fully counter-clockwise
position, it provides minimum squ
elch. In fully counter-clockwise
position past click, the transceiver is
converted into PA [Public Address]
mode.
[5] CHANNEL SELECTOR SWITCH
Rotary switch selects one of 40
channels for both the high band and
low band. Channels 1 through 40
are obtained with the Hi-Lo Band
switch in Lo (depressed) position,
then channels 41 through 80 are
obtained with the switch in Hi
(released) position.
[6] TX INDICATOR
Lights up in the transmit mode.
[7] AM-FM SWITCH
Permits you to select the mode of
operation, AM or FM.
[8] NB + ANL SWITCH
Selects standard ANL and special RF
noise silencing circuit to combat
ignition noise simultaneously.
[9] S-PRF METER
-function meter indicates relative
incoming signal strength in “S” units
on upper scale when receiving, lower
scalę marked POWER indicates the
relative RF power output when
transmitting.
REAR PANEL
4

[1] DC POWER OCKET
13,8V DC power for the transceiver
is fed through this socket using
DC power cable suppiied,
[2] PA JACK
For connection of 8 ohm speaker for
PA operation,
[3] EXTERNAL PEAKER JACK
The impédance of earphones or
speakers connected to this jack
should be 8 to 16 ohms. Insertion
of a plug into this jack automatically
silences the internal speaker.
[4] ELECTIVE CALL JACK
Optional sélective call unit plugs into
this jack. Consult your dealer for
definite information. Do not remove
the plug covering this jack unless you
are using the sélective call unit.
[5] ANTENNA RECEPTACLE
For antenna lead-in cable [RG-58/U]
or [RG-8/U] with matching PL-259
type coaxial connector.
MOBILE INSTALLATION
TRAN CEIVER MOUNTING
Before installing the transceiver in a car,
truck, boat, etc., be sure to choose a
location which is convenient to the oper-
ating Controls and will not interfère with
the normal functions of the driver. The
transceiver may be mounted to the under-
side of the instrument panel of dashboard
of a car, truck, etc., by means of the
special bracket that is suppiied with the
transceiver.
Attach the bracket to the underside of
the instrument panel or dashboard of the
vehicle using the self-tapping screws
suppiied. Then attach the transceiver to
the bracket by means of the two knurled
securing screws at the sides.
Tilt the unit upward or downward to the
desired angle before tightening the secur
ing screws.
5

DC POWER CONNECTION
The transceiver is designed to operate
from a battery source of 13.8 volts DC,
in vehicles [or boats] employing either
negative or positive ground electrical
system. The fused DC power cable sup-
plied is used to make the necessary power
connection to the transceiver. The red
[fused] lead is connected to the positive
[+] side of the electrical system in the
vehicle, and the black lead is connected
to the negative [—] side of the system.
In a negative ground vehicle: Connect
the red lead to the “hot” point in the
electrical system [battery positive] , and
the black lead to the metal firewall or
any other point that is connected to the
vehicle chassis [battery negative] .
In a positive ground vehicle: Connect the
black lead to the “hot” point in the
electrical system [battery negative] , and
the red lead to the metal firewall or any
other point that is connected to the
vehicle chassis [battery positive] .
A suitable point in the vehicle for con
nection to the “hot” battery side can
usually be found on the fuse block. Since
the transceiver draws a maximum of only
1.6 amperes of current, you can use a
terminal which supplies power to the
car radio or other accessory [use the un-
fused input side sińce the DC power cable
is equipped with its own fuse] . Tо sim-
plify connection to this terminal, attach
an alligator [spring] clip to the power
CB ANTENNAS
The results obtained with your trans
ceiver will be greatly determined by the
efficiency of the antenna system used.
Due to the complexity of the subject, it is
not with in the scope of this manuał to
OPERATION INSTRUCTIONS
Make sure the transceiver is properly
lead first and then clamp it onto the
terminal selected. Note that the con
nection to this point will ensure that DC
power to the transceiver is automatically
eut off when the vehicle ignition is turned
off.
ANTENNA CONNECTION
The lead-in cable from the CB antenna
should be terminated with a PL- 59 type
male connector. Attach to the matching
antenna input connector at the rear of
the transceiver.
RG-58/U cable is generally used to con
nect the CB antenna to the transceiver.
The cable should be terminated with a
PL- 59 connector for connection to the
antenna input on the transceiver.
In a base station installation, an excep-
tionally long lead-in cable may be re-
quired. When lengths of over 50 feet [15
meters] are necessary, RG-8/U coaxial
cable is more suitable than RG-58/U
since it offers lower loss.
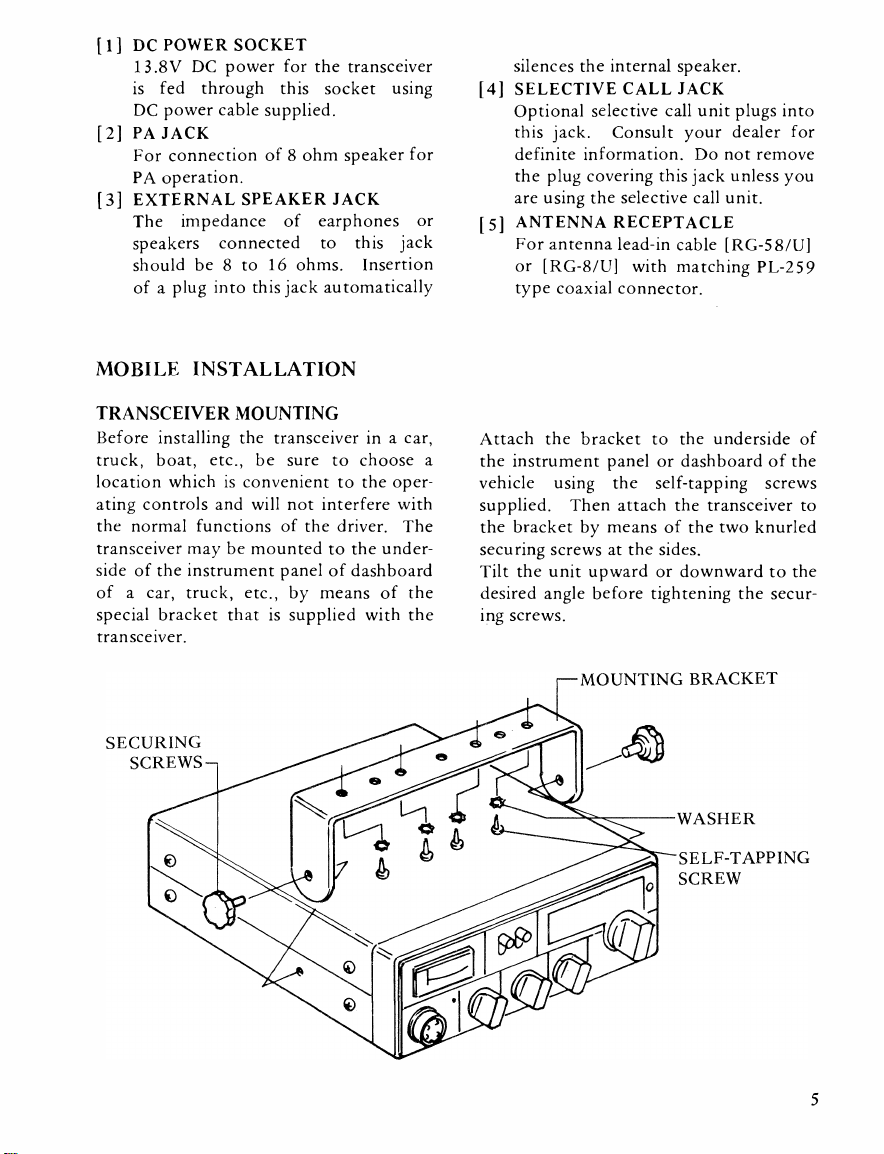
MICROPHONE BRACKET
This small size of the transceiver prohibits
mounting a microphone bracket directly
to the chassis. We recommend, therefore,
that the microphone bracket be attached
to the dashboard of the vehicle or in any
other convenient location. If one desires
to do this with ou t drilling holes, a magne-
tic mounting plate may be used and the
microphone bracket attached to it.
provide detailed information on antenna
Systems. We suggest that you purchase
one of the numerous books available
which covers this subject in greater detail.
installed as indicated proviously, and that
6

the antenna and power source are con
nected. If y ou hâve not already done so,
plug in the microphone.
RECEIVING
1. Rotate the Squelch control 4) to
about 9 o’clock position initially.
. Select the AM or FM mode by the
AM-FM switch 7), as y ou desire.
3. Select desired chnnel by both the Hi-
Lo Band switch ) and the Channel
selector switch 5) as indicated by the
LED digital readout.
4. Set the NB + ANL Switch 8) to the
OFF position initially.
5. Rotate the RF Gain control ) to
maximum [fully clockwise].
6. Rotate the Volume/On-Off control 3)
clockwise to apply power to the trans-
ceiver.
Since the transceiver is fully transistor-
ized, operation will be instantaneous.
Continue rotating the Volume/On-Off
control clockwise to provide a com-
fortable listening level.
TRANSMITTING
WARNING: NEVER ATTEMPT TO
TRANSMIT WITHOUT AN ANTENNA
OR LO AD.
Tо transmit, simply depress the push-to-
talk bar on the microphone. The TX In-
dicator Light 6) will corne on as y ou
depress the push-to-talk bar. Hold the
microphone 3 to 4 inches from the
mouth and slightly to one side so that the
voice does not project directly into the
microphone. Speak at a normal level —
there is no need to shout. A designed
feature of this transceiver is that high
average modulation can be achieved
easily at normal voice levels.
PA [PUBLIC ADDRESS]
OPERATION
For PA operation, y ou should use an ex-
ternal 8 to 16 ohm speaker connected to
the “PA” jack [located at the rear of the
transceiver] . The recommended plug for
the “PA” jack is a subminiature phone
plug. To set the transceiver to the PA
mode, set the Squelch control to the füll
counter-clockwise position (past click),
then press the push-to-talk bar on the
microphone and talk into it — your voice
will be hear through the PA speaker.
Tо reduce acoustic feedback when the PA
speaker is mounted on a car or truck, y ou
may hâve to close the vehicle Windows, or
reduce the volume as necessary to stop
any feedback that may occur.
7

FREQUENCIES
Your transceiver is capable of operation on ail frequencies as listed below:
Channel Channel
Frequency
in MHz Channel Channel
Frequency
in MHz Channel Channel
Frequency
in MHz Channel Channel
Frequency
in MHz
126.965 21 27.215 41 27.415 61 27.665
226.975 22 27.225 42 27.425 62 27.675
326.985 23 27.255 43 27.435 63 27.705
427.005 24 27.235 44 27.455 64 27.685
527.015 25 27.245 45 27.465 65 27.695
627.025 26 27.265 46 27.475 66 27.715
727.035 27 27.275 47 27.485 67 27.725
827.055 28 27.285 48 27.505 68 27.735
927.065 29 27.295 49 27.515 69 27.745
10 27.075 30 27.305 50 27.525 70 27.755
11 27.085 31 27.315 51 27.535 71 27.765
12 27.105 32 27.325 52 27.555 72 27.775
13 27.115 33 27.335 53 27.565 73 27.785
14 27.125 34 27.345 54 27.575 74 27.795
15 27.135 35 27.355 55 27.585 75 27.805
16 27.155 36 27.365 56 27.605 76 27.815
17 27.165 37 27.375 57 27.615 77 27.825
18 27.175 38 27.385 58 27.625 78 27.835
19 27.185 39 27.395 59 27.635 79 27.845
20 27.205 40 27.405 60 27.655 80 27.855
Courtesy ЯС5ХФ

SCHEMATIC
FRONT PANEL[

MAJOR ACOUSTICS CORPORATION
XX4A1
Table of contents
Other Major Transceiver manuals