manuals.online logo
Brands
  1. Home
  2. •
  3. Brands
  4. •
  5. Makita
  6. •
  7. Rotary Hammer
  8. •
  9. Makita HR2010 Manual

Makita HR2010 Manual

HR2010
20mm Rotary Hammer
HR2010 is designed to belooked stronger structure,
with traditional "D" handle and some aluminium parts.
In overhead horizontal operations, HR2010 has
great performance in drilling 6mm-12mm holes.
Dimension 287mmx214mmx91mm (11 4/1"x8 3/8"x3 5/8")
Weight 3.1Kgs (6.8lbs)
Power Supple Cord 5m(16.4ft) (Note:4m=12ft for China and European Countries)
Insulation Double Insulation
Motor AC universal motor (72mm)
Motor Features
Voltage (V) Amperage (A) Frequency
(Hertz)
Rated
Input(W)
Rated
Out-put(W) Max. Output(W)
100 6.3 50/60 600 310 480
110 5.5 50/60 600 310 480
115 5.5 50/60 600 310 480
220 2.9 50/60 600 310 480
230 2.7 50/60 600 310 480
240 2.6 50/60 600 310 480
No load speed 0-900rpm
Blows per minute 0-4000
Bit size 10mm(3/8") SDS-Plus only
Concrete 20mm(13/16")
Steel 13mm(1/2")
Max.Capacities
Wood 24mm(15/16")
Depth Rod, Side Grip, Plastic Carrying Case
Drill Chuck Assembly, Chuck Key S13, Holder Driver, Dust Cup 5, Blow-out Bulb, Lock Nut Wrench 28, Dust
Collector Set
The standard equipment for the tools shown may differ from country to country.
287mm (11-1/4")
214mm (8-3/8")
91mm (3-5/8")
Specifications
Standard equipment
Optional accessories
CONCEPTION AND MAIN APPLICATIONS
Models No.
Product
TECHNICAL INFORMATION
Description
HR2010
Shorter overall length makes weight
Center closer to handle, and this
makes handling easier,
with torque-limiter
rotato change ring to
put on or off bits
stronger handle design
grip can be fixed at any position;
turn clockwise to fasten
360 degree adjustable grip/
counter-clockwise to loosen
electrical variable switch makes
centering job easier
(1) Disassembling and assembling
1-1. Disassembling of chuck
Use the minus screw driver just like pushing up to disconnect
the cap 37 as shown on the right figure.
Pull out the change ring cover.
Strongly pull out the change ring to disconnect it. If hard to
disconnect, place the minus screw driver between clearance
of leaf spring, expand the leaf spring just like twisting the
driver, and then pull out it. It is fixed by steel ball and leaf
spring.
Disconnect the roller 7(2 pieces).
1-2. Assembling of chuck
Grease the MAKITA grease R No. 1 on the roller 7 and then assemble it.
O ring 10
Change ring cover
Leaf spring
Cap 37
Change ring
Roller 7
Repair
2-1. Disassembling of barrel
Remove the hexagon socket bolt M5x20 and then remove
the barrel.
Use the arbor press to press the top of tool holder to
remove it.
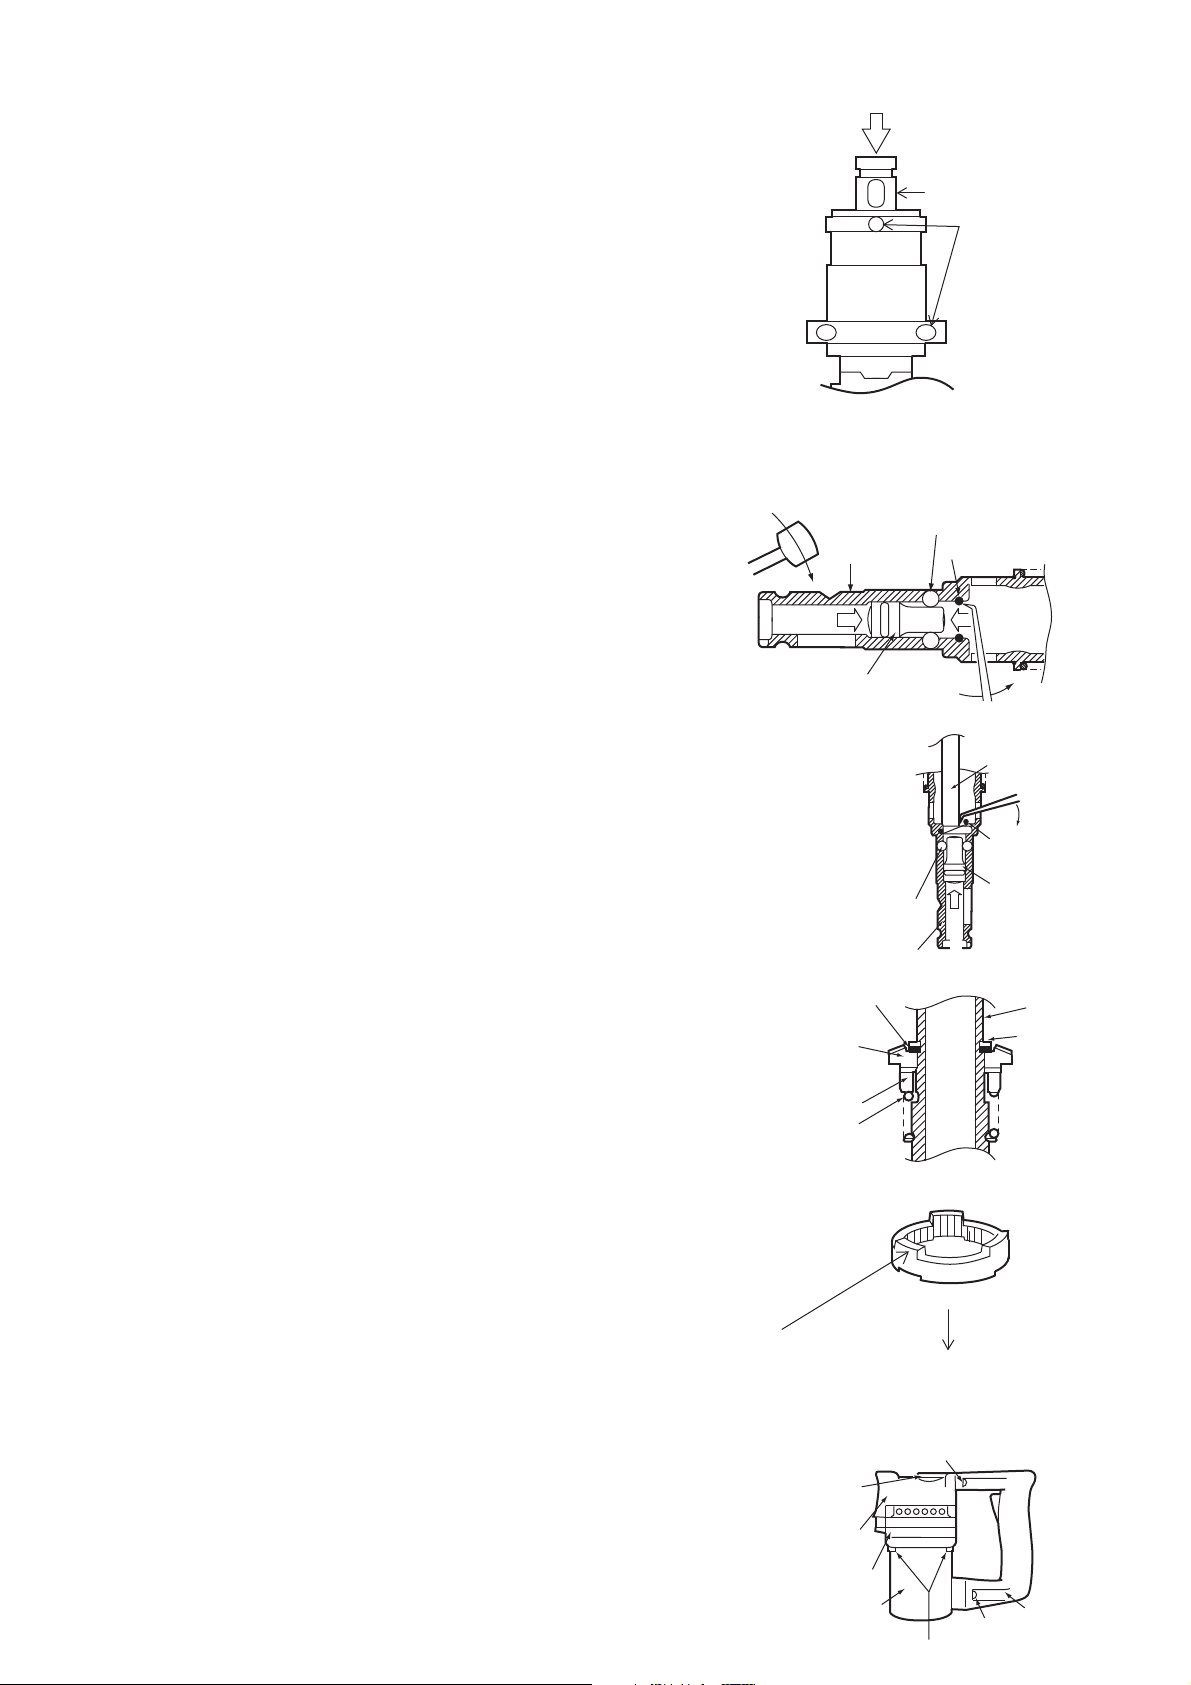
2-2. Assembling of barrel
Assemble in a way that the trace of pusher pin shown on
the right figure comes at name plate side.
3-1. Disassembling of impact bolt
Use the screw driver to shift the impact bolt in the direction of tool holder edge as shown on the bottom-
right figure.(in the direction of arrow 1)
Use the resin hammer to slightly hammer the tool holder as shown on the bottom-right figure to remove
the four points of steel ball 5 and 6.
Use the sharpened-edge tool like an eyeleteer to pull out
the O ring 11 as shown on the bottom-right figure. For
easy disconnection, use the eyeleteer while 5 mm around
of sharpened-edge tool edge is being bent by 90"around.
Use the driver edge to disconnect(push) the impact
bolt.(in the direction of arrow 2
3-2. Assembling of impact bolt
Use the screw driver to insert the impact bolt into the tool
holder.
Use the sharpened-edge tool to insert the O ring 11 into the
groove of the tool holder. Move the impact bolt in the direction
of arrow to check if O ring 11 cannot be disconnected.
Before placing the steel ball 5 and 6 in the tool holder, grease
into the hole so that the steel ball cannot drop and the tool
holder can be easily set.
4-1. Disassembling of torque limiter
Use the circle clip plyer to disconnect the circle clip(shaft)S-
26 and then remove the spiral bevel gear 33, clutch cam and
compression spring 31.
If hard to disconnect the parts, shift the flat washer 26 away
from the circle clip groove since it is housed in said groove.
4-2. Assembling of torque limiter
Use care of direction of clutch cam when assembling the
torque limiter.
Engage the protruded portion with the spiral bevel gear 33
while supporting the compression spring 31 by holding the
dent face.
5-1. Disassembling of crank
To disassemble the handle set, disconnect the two points of pan head screw M5X25 connected on the
crank housing complete and then disconnect the tapping
screw PT5x25 connected on the motor housing complete.
To disassemble the motor housing complete, disconnect the
hexagon holed bolt M5x45 connected on the gear housing
complete and crank housing complete.
Separate the crank housing from the gear housing.
Use the lock nut wrench 28 to disconnect the crank cap.
Press
Tool holder
Trace of pusher pin
Steel ball 5 and 6
Tool holder O ring 11
Impact bolt
Press
O ring 11
Impact bolt
Steel ball 5 and 6
Tool holder
Flat washer 26 Tool holder
Circle clip
(shaft)S-26
Spiral bevel
gear 33
Clutch cam
Compression
spring 31
(Spiral bevel gear 33 side)
(Compression spring 31 side)
This protruded face is almost
the same in size as the one of
cam of spiral bevel gear 33. Direction of tool holder edge.
Arrow
Pan head screw M5x25
Crank cap
Crank housing
complete
Gear housing complete
Motor housing complete Handle set
Tapping screw PT5x25
Hexagon holed bolt M5x45
Push the crank shaft from the crank cap side to pull out it
as shown on the bottom-right figure.
Since the ball bearing 6001, ball bearing 6002, helical gear
43 and helical gear 29 are inserted by pressing, use the arbor
press to pull out them.
At this time use care not to miss the flat washer 8.
5-2. Assembling of crank
For assembling, follow in the reverse order against
disassembling.
6-1. Replacing of armature
Disconnect the holder cap from the motor housing complete
to pull out the carbon brush.
Use the resin hammer to disconnect the one body of armature
complete and gear housing complete from the motor housing
complete.
Pull out the armature complete while holding the gear
housing complete.
6-2. Assembling of armature
Assemble the ball bearing 6000 and oil seal 12 on the gear
housing complete before inserting the armature.
Note) If one body assembled with ball bearing and oil seal is
inserted into the armature, the oil seal cannot be
completely inserted and it may cause oil leaking.
(2) Lubricating points
To avoid abrasion at earlier stage and heating damage, apply the MAKITA oil XLD on the points shown
below.
1) O ring on the impact bolt
2) Outer circumference of the striker and O ring
3) Outer circumference of piston and O ring
Crank cap
O ring 36
Crank housing
complete
Spiral bevel gear 29
Ball bearing 6001
Flat washer 12
Crank shaft
Ball bearing 6002
Circle clip
(shaft)S-15
Helical gear 29
Flat washer 8
Gear housing complete
Motor housing complete
Brush holder
Press
Oil seal 12
Armature complete
O ring and groove
O ring and groove
O ring and groove
Outer circumference
Outer circumference
Ball bearing 6000
Flat washer 8
Helical gear 43
To avoid abrasion at earlier stage and heating damage, use the MAKITA grease R No. 00 to grease on the
points shown below.
1) Outer circumference of pin5
2) Each teeth face of Helical gear 43, Helical gear 29, spiral
bevel gear 9 and spiral bevel gear 33
3) Cam of spiral bevel gear 33 and cam of clutch cam
4) Flat washer 8 Both edges on flat washer 23
5) Lip face of oil seal 20
6) Needle bearing 810
(3) Necessary tools
1) + screw driver
2) - screw driver
3) Arbor press
4) Resin hammer or wooden hammer
5) Radio cutting plyer
6) Sharpened-edge tool like an eyeleteer
7) O ring inserting jig
Outer circumference
Teeth face
Teeth face
Teeth face
Cam
Both edges
Lip face
Cam

Other manuals for HR2010

11

Other Makita Rotary Hammer manuals

Makita DHR280 User manual

Makita

Makita DHR280 User manual

Makita HR2450F Quick start guide

Makita

Makita HR2450F Quick start guide

Makita HR5001C User manual

Makita

Makita HR5001C User manual

Makita HR2430 User manual

Makita

Makita HR2430 User manual

Makita DHR400 User manual

Makita

Makita DHR400 User manual

Makita HR4001C User manual

Makita

Makita HR4001C User manual

Makita HR2445 User manual

Makita

Makita HR2445 User manual

Makita BHR200 User manual

Makita

Makita BHR200 User manual

Makita DHR165 Manual

Makita

Makita DHR165 Manual

Makita HR2800 User manual

Makita

Makita HR2800 User manual

Makita HR2800 User manual

Makita

Makita HR2800 User manual

Makita HR2000 Manual

Makita

Makita HR2000 Manual

Makita DHR171 User manual

Makita

Makita DHR171 User manual

Makita HR5201C User manual

Makita

Makita HR5201C User manual

Makita HR2800 User manual

Makita

Makita HR2800 User manual

Makita HR2450 Series User manual

Makita

Makita HR2450 Series User manual

Makita DHR183 User manual

Makita

Makita DHR183 User manual

Makita HR2800 User manual

Makita

Makita HR2800 User manual

Makita HR2452 Manual

Makita

Makita HR2452 Manual

Makita HR140DSMJ User manual

Makita

Makita HR140DSMJ User manual

Makita HR4041C Quick start guide

Makita

Makita HR4041C Quick start guide

Makita HR3520B User manual

Makita

Makita HR3520B User manual

Makita HK0500 User manual

Makita

Makita HK0500 User manual

Makita DHR183 User manual

Makita

Makita DHR183 User manual

Popular Rotary Hammer manuals by other brands

Bosch GBH 2-24 DS Repair instructions

Bosch

Bosch GBH 2-24 DS Repair instructions

Worx WX334 Original instructions

Worx

Worx WX334 Original instructions

Hilti TE 6-A36 Original operating instructions

Hilti

Hilti TE 6-A36 Original operating instructions

Milwaukee K500 S Original instructions

Milwaukee

Milwaukee K500 S Original instructions

Batavia MAXX Series operating instructions

Batavia

Batavia MAXX Series operating instructions

Alpha tools A-BH 920 Original operating instructions

Alpha tools

Alpha tools A-BH 920 Original operating instructions

Worx WX380.9 manual

Worx

Worx WX380.9 manual

Blaupunkt RH3010 Operating instructions manual

Blaupunkt

Blaupunkt RH3010 Operating instructions manual

Porter-Cable 7765 instruction manual

Porter-Cable

Porter-Cable 7765 instruction manual

Hilti TE15 operating instructions

Hilti

Hilti TE15 operating instructions

DeWalt DC212-XE instruction manual

DeWalt

DeWalt DC212-XE instruction manual

PRACTIXX PX-BH-7V manual

PRACTIXX

PRACTIXX PX-BH-7V manual

Bort BHD-18Li-BLZ manual

Bort

Bort BHD-18Li-BLZ manual

Worx WX390 manual

Worx

Worx WX390 manual

Bosch GBH 5-40 DCE Professional Original operating instructions

Bosch

Bosch GBH 5-40 DCE Professional Original operating instructions

Hilti TE 2-E operating instructions

Hilti

Hilti TE 2-E operating instructions

Hitachi Koki DH 24PD2 Handling instructions

Hitachi Koki

Hitachi Koki DH 24PD2 Handling instructions

Bosch GBH 5-40 DCE Professional Original instructions

Bosch

Bosch GBH 5-40 DCE Professional Original instructions

manuals.online logo
manuals.online logoBrands
  • About & Mission
  • Contact us
  • Privacy Policy
  • Terms and Conditions

Copyright 2025 Manuals.Online. All Rights Reserved.