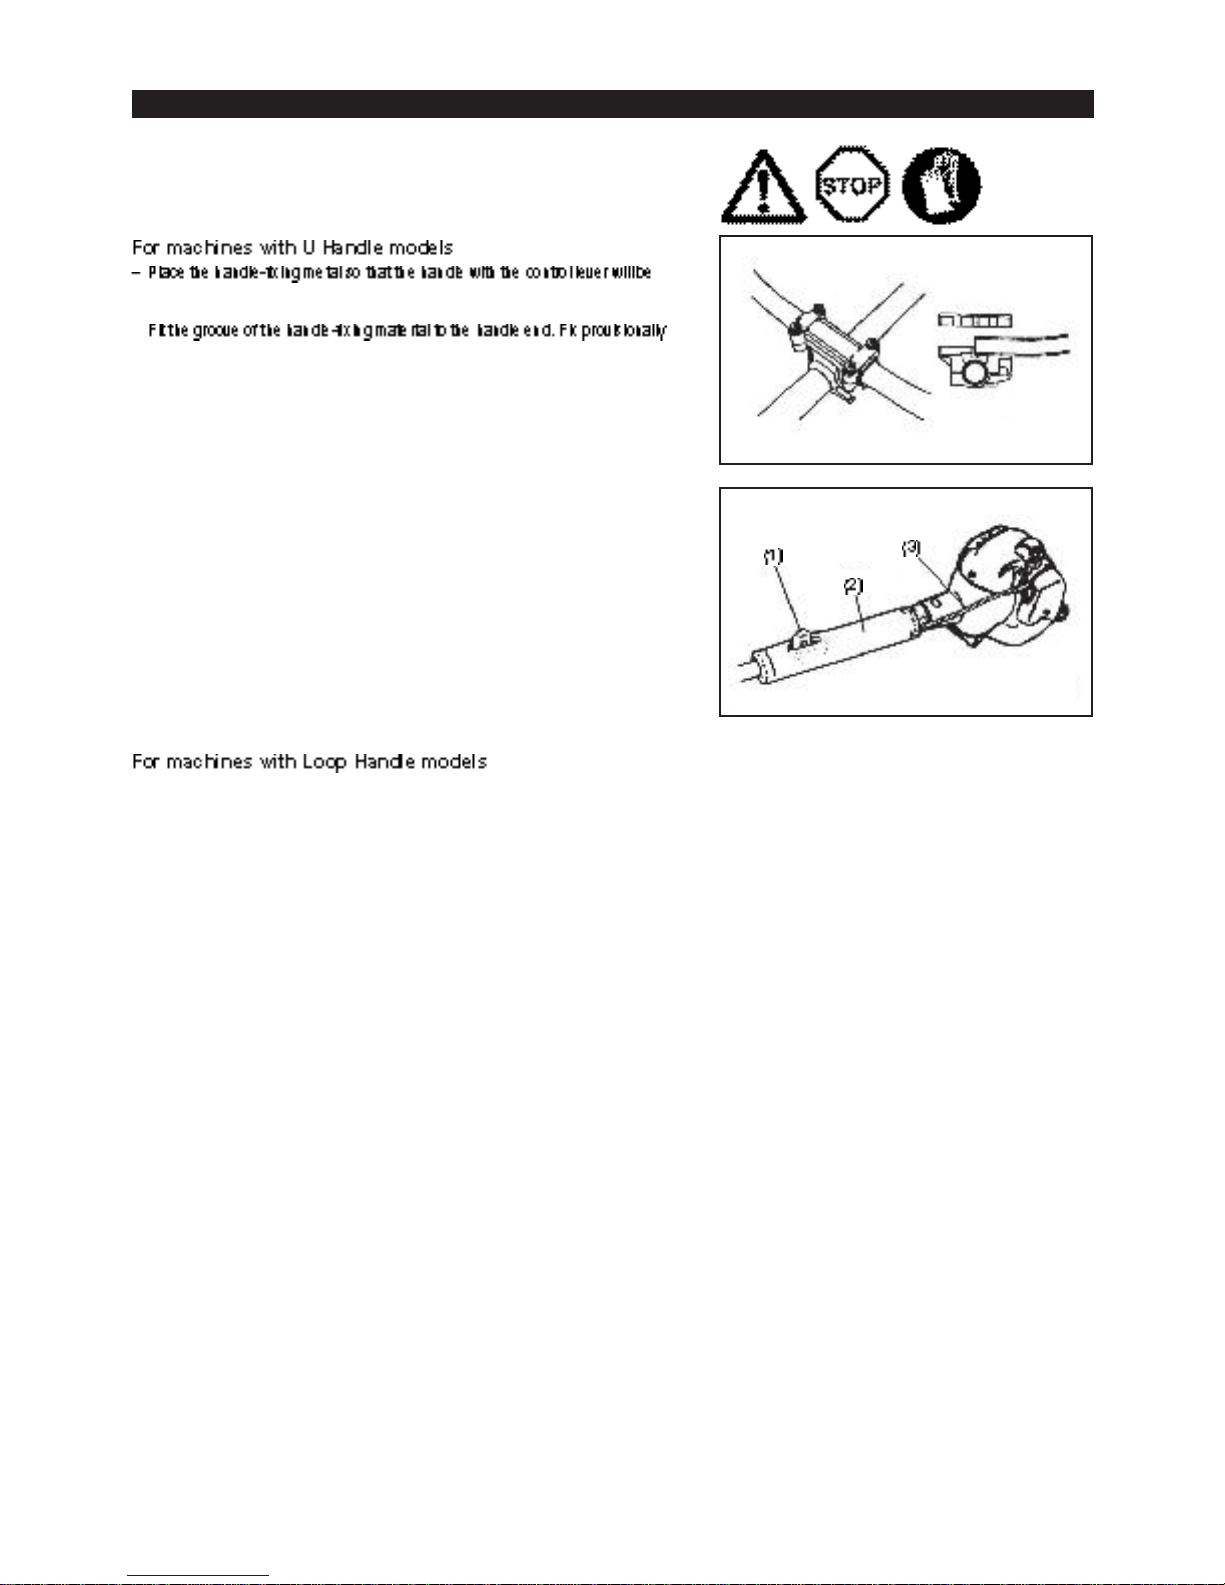
Makita EM2500U User manual

Instruction Manual
Petunjuk Penggunaan
Important:
Readthis instruction manual carefullybeforeputtingtheStringTrimmer into operationandstrictlyobserve the safety regulations!
Preserve instructionmanualcarefully!
Penting:
Bacalah petunjuk penggunaan ini denganteliti sebelum mengoperasikanMesin Pemangkas BermataSenar dan patuhilahdenganketat
peraturan keselamatanyang berlaku!
Simpanlahbuku petunjuk penggunaaninidenganbaik!
EM2500U

2
Thank youvery muchfor purchasing the MAKITA Stringtrimmer. We are
pleased to recommend toyouthe MAKITA String trimmerwhich is the result ofa
longdevelopmentprogram and many years of knowledge andexperience.
Pleaseread this booklet which refers indetail tothevariouspoints that will
demonstrate its outstanding performance. This will assist youto obtain the best
possible result fromyour MAKITAString trimmer.
TableofContents
Page
Youwillnotethe followingsymbols when readingtheinstructions manual.
SYMBOLS
English (Original instructions)
ReadinstructionManual Wear eyeand ear protection
Take Particular care andAttention Do not use metal blades
Forbidden Top permissibletool speed
Keep distance Fuel andoil mixture
Flyingobject hazard Engine-Manual start
No Smoking Emergency stop
FirstAid
Protective glovesmust beworn Recycling
Kickback ON/START
Keep theareaof operation clear of all
persons and pets OFF/STOP
Wear sturdy boots withnon-slip
soles. Steel toed safety bootsare
recommended.
Symbols
.........................................................................
2
Safetyinstructions
.........................................................
3
Technicaldata
................................................................
7
Designation of parts
.......................................................
8
Assembly of engine andshaft
.......................................
9
Mountingof handle......................................................1
0
Mountingof protector...................................................1
1
Mountingof cutterblade or nylon cutting head............1
2
Fuels/refueling.............................................................1
3
Correct handlingof machine........................................1
4
Points inoperationandhow tostop ............................1
4
Resharpening the cutting tool......................................1
6
Servicinginstructions...................................................1
7
Storage........................................................................1
9

3
General Instructions
– Toensure correct operation, user has toread this instructionmanual to make
informed will risk dangerto themselves as well as others due toimproper
handling.
– Itis recommendedonly tolend theStringtrimmerto people whohaveproven
tobe experienced withStringtrimmers.
Always hand overtheinstructionmanual.
– First users shouldask thedealer for basicinstructions tofamiliarizeoneself
with thehandling of anenginepoweredcutter.
– Children and young persons agedunder18 years must not be allowedto
operate the String trimmer. Persons over theage of 16 years mayhowever
usethe device for thepurposeof being trained only whilst undersupervision
– UseStringtrimmers withthe utmost careand attention.
– Operate the String trimmeronly if youare in good physical condition.
Perform allworkcalmly and carefully. Theuser has toaccept liability for
others.
– Never use the String trimmerafterconsumptionof alcoholordrugs, or if
feelingtiredor ill.
– National regulation canrestrict theuse of themachine.
– TheString trimmeris only intended for cutter grass, weeds, Bushes,
undergrowthit shouldnot beusedforany other purposesuchas Edging or
hedgecuttingas this maycause injury.
Personal protective equipment
– The clothingworn should befunctional and appropriate, i.e. it should betight-
couldbecomeentangledwith bushes or shrubs.
– Inorder toavoid eitherhead, eye, hand orfootinjuries as well as toprotect
beused during operationof the Stringtrimmer.
– Always weara helmet where there is a risk of falling objects. The protective
helmet (1) istobechecked at regularintervalsfordamage andis tobe
replaced at the latest after5years. Useonly approved protective helmets.
– The visor (2)of thehelmet (oralternativelygoggles)protects the face from
goggles, ora visor toprevent eyeinjuries.
muffs(3), ear plugs etc.).
recommendthat theuser wears work overalls.
and must always be wornduringoperationof the Stringtrimmer.
– When using the Stringtrimmer, alwayswear sturdyshoes (6) witha non-slip
sole. This protects againstinjuries and ensures agood footing.
– Please make sure that there are no childrenor otherpeople within aworking
rangeof 15meters (49ft), also pay attention toany animals intheworking
vicinity.
– Before usealways check thatthe Stringtrimmer issafe for operation:
Checkthe security of the cuttingtool, thecontrol lever for easy actionand
check for properfunctioningofthecontrol lever lock.
– Rotation of thecuttingtool during idlingspeed is not allowed. Check with your
dealer for adjustment if in doubt. Check for cleanand dry handles and test
the function of the start/stopswitch.
15 Meters
SAFETY INSTRUCTIONS

4
Start the Stringtrimmer only in accordance withthe instructions.
– Do notuseany other methods for starting theengine!
– Only start the String trimmerengine, afterthe entire assemblyis done.
Operationof the deviceisonly permitted after all theappropriateaccessories
are attached!
– Before starting make sure that thecutting tool has no contact withhard
objects suchas branches,stonesetc. as thecuttingtool will revolve when
starting.
– Theengine is to beswitchedoff immediately incaseof any engineproblems.
– Should the cuttingtool hit stones or other hard objects,immediately switchoff
the engine and inspect thecutting tool.
– Inspect the cuttingtoolat short regularintervals for damage (detection of
hairlinecracks by means of tapping-noise test).
– Operatethe String trimmeronly with the shoulder strap attached which is
tobe suitablyadjustedbeforeputtingthe Stringtrimmer intooperation. It is
essential toadjusttheshoulder strap accordingto theuser’s size toprevent
fatigue occurring during use. Neverhold thecutter withonehandduring use.
– Duringoperation always holdthe Stringtrimmer withbothhands.
Always ensure asafe footing.
– Operatethe String trimmerinsuchamanner as toavoid inhalation of
the exhaust gases. Neverrunthe engine in enclosed rooms (risk of gas
poisoning). Carbon monoxideis anodorless gas.
– Switchoff the engine when resting andwhenleavingtheString trimmer
unattended, andplace it in a safelocation toprevent danger to othersor
damageto the machine.
– Never put the hot String trimmerontodrygrass or ontoany combustible
materials.
Neverrunthe cutter without this guard!
– Allprotective installations and guards suppliedwiththe machinemust be
used duringoperation.
– Shut off the engine during transport.
– Duringtransport over longdistances the tool protection includedwith the
– Ensuresafepositionof theStringtrimmer during car transportationto avoid
fuel leakage.
– When transporting theString trimmer, ensure that thefuel tank is completely
empty.
– When unloadingtheStringtrimmerfrom the truck, neverdrop theEngine to
the groundor this may severely damagethefuel tank.
– Except in case of emergency, neverdroporcast the Stringtrimmer tothe
ground orthis mayseverely damagetheStringtrimmer.
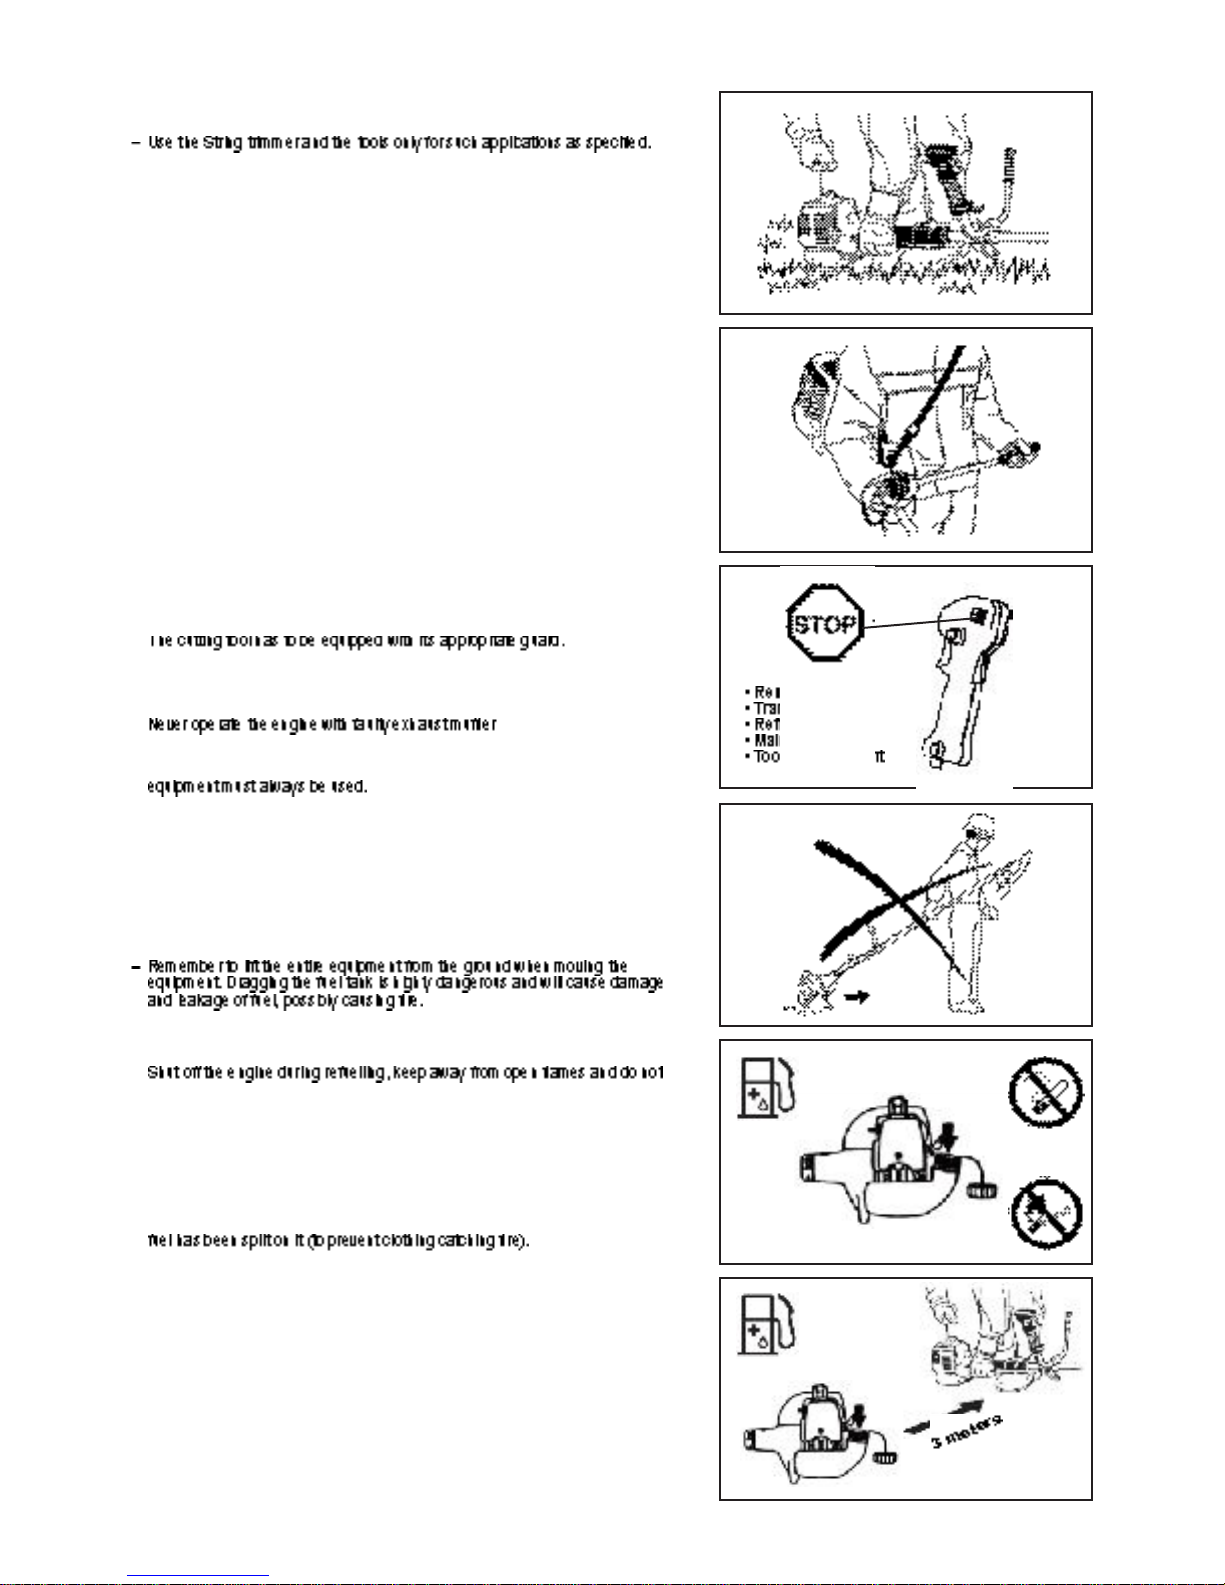
Refuelling
smoke.
– Avoid skincontact withmineral oilproducts. Do not inhalefuel vapor.Always
wearprotectivegloves duringrefuelling. Changeand clean protective clothing
at regular intervals.
– Takecare not to spill either fuel or oil inorder toprevent soil contamination
(environmental protection). CleantheString trimmerimmediatelyafter fuel
has beenspilt.
– Avoid any fuel contact withyour clothing.Change your clothinginstantly if
– Inspect the fuel capat regularintervals making surethat it canbe securely
fastenedand does not leak.
– Carefully tightenthefuel tank cap. Changelocationto start theengine (at
least 3 meters away fromthe place of refuelling).
– Never refuel in closed rooms. Fuel vaporsaccumulateat ground lever(risk of
explosions).
– Only transport and store fuel in approved containers. Makesure the fuel
stored is not accessible to children.

5
– Only use the Stringtrimmer in good light andvisibility. During the winter
seasonbeware of slippery orwet areas, ice andsnow(riskof slipping).
Always ensure asafe footing.
– Never cut abovewaist height.
– Neverstand ona ladderandrunthe Stringtrimmer.
– Neverclimbupintotrees to perform cuttingoperationwiththeStringtrimmer.
– Neverwork on unstablesurfaces.
– Remove sand, stones, nails etc. found within the working range.
Foreign particles may damagethecuttingtoolandcancausedangerous
kick-backs.
– Before commencing cutting, the cuttingtoolmust havereached full working
speed.
Maintenance instructions
– The condition of the cutter, in particular of the cutting tool of the protective
devices and also of theshoulder strap must be checked before commencing
work.
Particular attention isto be paid tothe cutting blades whichmustbecorrectly
sharpened.
– Turnoff theengine and remove spark plugconnector when replacingor
sharpeningcutting tools, andalso when cleaningthe cutter or cuttingtool.

6
– Operatethe String trimmerwith as littlenoise and contamination as possible.
Inparticularcheck the correct settingof thecarburetor.
– Clean theStringtrimmer atregular intervals and check that allscrews and
nuts arewelltightened.
– Always store theStringtrimmer in locked roomsandwith anemptied fuel
tank.
Packaging
TheMAKITAString trimmer will be deliveredintwoprotective cardboard boxes
toprevent transport damage. Cardboardis abasic rawmaterial and is therefore
Observe therelevant accident preventioninstructionsissued by the relevant tradeassociationsand by the insurance companies.
Theperformanceof maintenanceor repair work by the useris limited tothose activities as describedin theinstructionmanual.
Allother work is
tobe done by anAuthorized Service Agent.Useonly genuine spare partsandaccessories released and supplied by MAKITA.
Useof non-approvedaccessories andtools means increasedrisk ofaccidents. MAKITAwill not accept any liability for accidents ordamage
information:
– Placeof accident
– What happened
– Number of injured persons
– Kindof injuries
– Yourname

7
TECHNICAL DATA EM2500U
EM2500U
U handle
Dimensions: lengthx width xheight (without cutting blade) mm 1,770 * 620 * 410
Mass (without plastic guardandcuttingblade) kg 4.5
Volume(fuel tank) L 0.4
Engine displacement cm324.5
Maximum engineperformance kw 0.73 at 7,000min-1
Engine speedat recommended max. spindle speed min-1 8,800
Maximum spindle speed (corresponding) min-1 6,500
Maximum fuel consumption kg/h —
—
Idlingspeed min-1 3,000
Clutchengagement speed min-1 4,100
Carburetor type WALBRO WYJ
Ignitionsystem type Solidstateignition
Spark plug type NGKBPMR7A
Electrodegap mm 0.6 -0.7
Vibration per
ISO 22867
Right handle
(Rear grip) a m/s25.460
Uncertainty K m/s21.5
Left handle
(Front grip) a m/s25.687
Uncertainty K m/s21.5
Sound pressure level at the site
of the user L dBA 100.4
Uncertainty K dBA 3
Measured soundpower level L dBA 108.93
Uncertainty K dBA 0.47
Fuel Mixedgas
(gasoline: MAKITA Genuine Two-stroke Engine Oil = 50:1)
Gear ratio 14/19

8
EM2500U
U Handle Type
DESIGNATION OF PARTS
GB DESIGNATION OFPARTS
1 Fuel Tank
2 RewindStarter
3 AirCleaner
4 I-O Switch(on/off)
5 Spark Plug
6
7 ClutchCase
8 Waist Pad
9 Hanger
10 Handle
11 ControlLever
12 ControlCable
13 Shaft
14 Protector
15 Gear Case
16 HandleHolder
18 NylonCuttingHead
19 Fuel FillerCap
20 Starter Knob
21 Primmer Pump
22 ChokeLever
23 Exhaust Pipe

9
CAUTION: Beforedoingany work on the String trimmer, always switchoff the
motorandpull thespark plugconnectoroff the spark plug.
Always wearprotective gloves.
CAUTION: Start the Stringtrimmer only after havingassembled it completely.
– Loosen the twobolts (1)andinsert themain pipe(2)intothecaseclutch (3).
– Insert it upto the arrow-mark position. (Refer to thesketch on theright.)
– Tighten the twobolts (1) uniformly on the right and left byAllenwrench
supplied.
ASSEMBLY OF ENGINE AND SHAFT
– Removethe aircleaner cover.
– Put the control cable (5) into the adjustingcable (6). Shift the swivel (7) and
put thecable intotheswivel. At this time, be careful that theroundhole in the
hole.
– Mount the air cleaner cover.
– Connect the switch cords to thetwo cordsfrom theengine by insertingone
intotheother.
– Fix the cordconnector by clamp.
Round hole
Connector
Insert
Controlcable
Arrow-mark
Swivel

10
CAUTION: Beforedoingany work on the String trimmer, always stop the
engine andpull the spark plugconnector offthe spark plug.
Always wearprotective gloves!
CAUTION: Start the Stringtrimmer only after havingassembled it completely.
positioned on the right (theright-handgrip side)as viewed from the engine
side, and the otherhandle on theleft side.
the attached metal by hexagon socket bolt supplied.
– Adjust the handle to aneasy-to-operateposition, and tightensecurelythe
four hexagon socket bolts uniformlyon theright and left by Allenwrench.
MOUNTING OF HANDLE
– Wrap the waist padaround theshaft sothat the hanger (1) willprotrude
through theslit in the waist pad and thecontrol cable andthecords(3) will
also be wrappedunder the waist pad(2).
– Fix abarrierto the left sideof the machine togetherwiththe handlefor
operator’s protection.
– Do not adjust positionof theloop handle too close tothe control grip.
Keep not less than250mm distancebetween thehandle andthegrip. (a
distancecollaris provided for this purpose.)
EM2500U
EM2500U

11
Tomeet the applicable safety provisions, only thetool/ protector combinations
as indicatedinthe tablemust beused.
– If the nylon cuttingheadhits against astone during operation, stop the
engine andcheck the nylon cuttingheadimmediately.
Nyloncutting head Protector forcord cutter
MOUNTING OF PROTECTOR
CAUTION: Theappropriateprotector must alwaysbe installed, for yourown
safety andin ordertocomply withaccident-prevention regulations.
permitted.
– Fix the protector(1) tothe clamp (3)with two boltsM6x 30(2).
tighten them withtwo nuts (5)andtwo screws (4).

12
Turn the machineupside down, andyou canreplace thecutterblade orthe
nyloncuttingheadeasily.
– Insert the hex wrench through the hole in the gear case and rotatethe
receiver washer(3)untilit is locked withthe hex wrench.
– Loosen thenut (1)(left-handthread) withthesocket wrenchand remove the
nut (1), and clamp washer (2).
MOUNTING OF CUTTER BLADE OR NYLON CUTTING HEAD
– The clampwasher (2), and nut (1)arenot necessary formounting the nylon
cuttinghead. Thenylonheadshouldgo ontop of the receiver washer (3).
– Screw the nylon cutting head ontotheshaft.
Loosen
Tighten
Hexwrench

13
similar to solvents. Refuel either in a well ventilatedroom oroutdoors. Do not
inhale fuelvapors, avoid anycontact of fueloroil with your skin.
Mineral oilproducts degreaseyour skin. If yourskin comes in contact with these
substances repeatedlyandfor anextendedperiodof time, it will desiccate.
Various skin diseases may result.In addition, allergic reactions may occur.
Eyes canbe irritated by contact with oil. If oil comesinto youreyes, immediately
wash themwithclearwater. If your eyes arestillirritated, see adoctor
immediately.
FUELS/REFUELING
runwitha mixtureof fuel and two-stroke engineoil. The engine is designed for
unleadedregular fuel with a min. octane value of 91RON. In case nosuchfuel
is available, you can use fuelwitha higher octane value. This will not affect the
engine, but may cause poor operatingbehavior.
Asimilar situation will arise from the use ofleaded fuel. Toobtainoptimum
engine operationand toprotect your health and the environment, only unleaded
fuel should beused!
stroke engineoil at mixture ratio of 50:1 toprotect the environment. In addition,
along service lifeand areliable operationwitha minimumemissionof exhaust
gases is guaranteed.
engine oil), as otherwise reliable function of the String trimmercannot be
guaranteed.
Gasoline: Other manufacturer’s two-stroke engineoil = 25:1 recommended
This will only result ina higherproduction ofcombustion residues which
will pollute theenvironment and clogthe exhaust channel in thecylinder
performancewill decrease.
Refuelling
getting intothe fuel tank (1).
Storage of Fuel
Fuel cannot be stored for anunlimitedperiodof time.
approvedfuel storage containers.
Observe theSafety Instructions on page 4.
Gasoline
1,000cm3(1 liter)
5,000cm3(5 liter)
10,000cm3(10liter)
50:1
20cm3
100 cm3
200 cm3
40cm
3
200 cm
3
400 cm
3
25:1

14
– Adjust the straplengthso that thecutterblade will be kept parallelwith the
ground.
– First placethe machine on the ground.
– Give agentle pushontheprimerpump(2)repeatedly (7– 10times) until fuel
comes intotheprimerpump.
– Pushthechoke lever(3) tothe position “ ”.
– Firmly holdtheclutchcaseby your left hand,as illustrated.
– Slowly pull the starter gripuntil resistance is felt and continuewitha smart
pull.
– Do not pull out the starter rope to its fullextent and donot allow thestarter
handle tobe retracted without control, but ensure that it is retractedslowly.
– Repeat the starting operationuntil initialignitions are heard.
– When the enginestart, return thechoke lever to “ ”. Pleasenote that the
choke lever will return to“ ” position automatically when the throttlelever is
operated andthethrottle is opened.
CORRECT HANDLING OF MACHINE
Observe theapplicable accident preventionregulations.
Starting
Move at least 3 maway fromthe placeof refuelling. PlacetheStringtrimmer
ona clean pieceof ground taking care that the cuttingtooldoes not come into
contact withthe ground or any otherobjects.
– PushtheI-O switch(1) in thedirection shown by thearrow.
POINTS IN OPERATION AND HOW TO STOP

15
– Idlespeedshouldbe set to3,000min-1.
If necessary correct it by means of the idle screw (the bladeorthe nylon
cuttingheadmust not turn whenthe engineis on idle).
Screwinginthe screw(1) will causean increase inthe enginespeed,
whereas backing off the screwwill reducetheenginespeed.
STOPPING
– Release the throttle lever (6) fully, and whentheenginerpmhas lowered,
push the I-O switch (1) to“O”positionthe enginewill now stop.
– Be awarethat the cuttingheadmaynot stopimmediately and allowit to slow
downfully.
– Runtheenginefor approximately one minuteat a moderatespeedbeforeapplying full throttle.
Note: – If the starterhandle ispulled repeatedly when the choke lever remains at “
” position, the engine willnot start easily due to excessive
fuel intake.
– Incaseof excessive fuel intake, remove thespark plug and pullthe starterhandle slowly toremove excess fuel. Also, dry the
electrode section of the sparkplug.
Ifthe throttle leveris openedfully ina no-load operation, theengine rotation isincreasedto 10,000 min-1
or more. Never operatethe engine at a
-1.
– Same as above,except without movingthe choke lever(chokeleverremains inthe position “ ”).
ADJUSTMENT OF LOW-SPEED ROTATION (IDLING)
The cutter blade or the nylon cuttingheadshould not run when the control lever is fullyreleased. If necessary, adjust theidle rpmusingtheidle
adjustingscrew.
Slow High

16
NYLON CUTTING HEAD
The nyloncuttinghead is a dualstring trimmerhead capable of both automatic
and bump &feed mechanisms.
The nyloncuttinghead will automatically feed out the properlengthof nylon
cord by thechanges incentrifugal forcecaused by increasingor decreasing
against the groundtofeed out extra cord as indicated underoperation section.
Operation
– Increasethe nylon cuttinghead speed to approx. 6,000 min-1.
Low speed(under4, 800min-1) is not suitable, the nylon cord will not feed out
properly at low speed.
– Themosteffectivecutting area isshown by theshaded area.
Ifthe nylon cord does not feed outautomatically proceed as follows:
throttle leverfully. Repeat this procedure until thenyloncord feedsout to
the properlength.
2. Ifthe nylon cord is too short tofeed out automatically with the above
procedure, bump the knob of the nylon cuttingheadagainst the groundto
feed out the nylon cord.
3. If the nylon cord does not feed out with procedure2, rewind/replace the
nyloncordby followingthe procedures describedunder “Replacing the
nyloncord”.
Replacing the nylon cord
– First, stop the engine.
– Press on thehousing latches inward to lift off the cover, then remove the
spool.
– Hook thenewnyloncord intothe eachhale at the spool, withone endof the
cord extendingabout 80mm(3-1/8”)morethanthe other.
rotation(left-handdirection indicated by LH andright-hand direction by RH on
the side of the spool).
– Windall but about 150mm (6”) of the cords, leaving theends temporarily
hooked througha notchon thesideofthespool.
Idlespeed
Most effectivecutting area
Knob
Spool
Spool 80mm(3-1/8”)
Forleft handrotation
Full speed
Cover
Latches
Press Press
Notches
150 mm(6”)
RESHARPENING THE CUTTING TOOL

17
– Align the protrusion on the underside of thecoverwith the slots of the
eyelets.
CAUTION: Before doing any work ontheString trimmer, always switchoffthe
motorandpull theplug cap off the spark plug (see“Checkingthe
sparkplug”).
Always wearprotective gloves.
CAUTION: Never removethe recoil starterforyourself, which maycause an
accident. It should beaskedto the Authorized Service Agent.
Cleaning of air cleaner
– Unscrewscrew(1).
– Removethe aircleaner cover(3).
– Takeout the sponge element (2), wash it in lukewarmwateranddry it
completely.
– After cleaning,put back theair cleaner cover (3)andfasten it with screw (1).
NOTE: If there is excessivedust or dirt adheringto theair cleaner, cleanit
start the engineor increase the engine rotational speed.
intervals.
– Before operation, check themachine for loose screws or missingparts. Payparticular attentiontothetightness of the cutterblade or nylon
cuttinghead.
Clean them if necessary.
– Perform thefollowing work daily afteruse:
engine is idling (if necessary, reduceidling speed).
If under idlingconditions the tool should still continue torun, consult your nearest Authorized Service Agent.
– Checkthefunctioning of the I-O switch, the lock-off lever, the control lever, and the look button.
SERVICING INSTRUCTIONS
Cover
Protrusion
Slot of eyelet
– Mount the spool in thehousing so that thegrooves and protrusions onthe
spool match upwith thoseinthe housing.Keep the sidewith letters on
the spool visible on the top. Now, unhook theends of the cord from their
temporary positionand feed the cordsthroughthe eyelets tocome out of the
housing.
Eyelets

18
carburetor.
purposeopenthe tank cap, use awire hook and pull outthe suction head
through thetankopening. Filters found tohave hardened, been polluted or
cloggedup are tobe replaced.
ensuresatisfactory fuelsupply to the carburetor.
– If it is cloggedby carbondeposits, carefully scratchthedeposits out with a
suitabletool.
Any maintenance of adjustment workthat is not included anddescribed in thismanual is only tobeperformedby Authorized ServiceAgents.
0.6 mm–0.7mm
(0.024” –0.028”)
– Only usethe supplieduniversal wrench toremove orto install the spark plug.
– Thegap betweenthetwo electrodesof the spark plugshouldbe 0.6–
0.7 mm (0.024” – 0.028”). If the gap is toowideor too narrow, adjust it. If the
sparkplugis clogged withcarton or fouled, cleanit thoroughly or replaceit.
CAUTION: Nevertouchthespark plugconnectorwhile theengine is running
(danger of high voltage electric shock).
Grease hole
Supply of grease to gear case
greaseholeevery 30 hours.(GenuineMAKITA grease may bepurchased
fromyour MAKITA dealer.)

19
Fault location
– When the machine isinstorage fora longtime, drain fuelfrom thefuel
tank andcarburetor,as follows: Drainall fuel fromthefuel tank. Disposeof
properly andinaccordancewithall local laws.
– Removethe spark pluganda fewdrops ofoil intothe sparkplug hole.
Then, pull the starter gently, so that oil coversthe engine inside andtighten
the spark plug.
– Clear dirt ordust from the cutterblade and outside of engine, wipe themwith
aoil-immersedclothandkeepthemachine in a placeas dryaspossible.
Drainfuel Humidity
STORAGE
Fault System Observation Cause
Engine not starting or with Ignition system Ignitionspark O.K. Fault in fuel supply or compression system, mechanical
defect
No ignition spark I-O switch operated, wiringfault orshort circuit, spark
plugorconnectordefective, ignitionmodulefaulty
Fuel supply
Incorrect choke position, carburetor defective, fuel supply
line bent orblocked, fuel dirty
Compression No compression when
pulledover Cylinder bottom gasket defective, crankshaft seals
damaged, cylinder orpiston rings defective or improper
sealing of spark plug
Mechanical fault Starter not engaging Broken starterspring, brokenparts inside of the engine
Warmstart problems existing Carburetor contaminated, must becleaned
Engine starts but dies Fuel supply Incorrect idlingadjustment, carburetorcontaminated
Fuel tank vent defective, fuel supply line interrupted,
cable or I-O switchfaulty
Several systems may
simultaneously be
affected
Engine idlingpoor clogged, exhaust duct in the cylinder clogged
General Engine assembly, screwsandnuts Visualinspectionfordamage andtightness
Checkforgeneralcondition andsecurity
After eachrefuelling Controllever
I-O switch Functional check
Functional check
Daily Cooling air duct
Cutting tool
Idlingspeed
Tobe cleaned
Tobe cleaned
Checkfordamage andsharpness
Inspection (cutting toolmust not move)
Weekly Spark plug Inspection, replaceif necessary
Checkandif necessary cleanthe opening
Quarterly Suctionhead
Fuel tank Tobe replaced
Tobe cleaned
Shutting downprocedure Fuel tank
Carburetor Emptyfuel tank
Operateuntil engine runs out of fuel

20
Terima kasih telah membeli Mesinpemangkasbermatasenar MAKITA. Dengan
banggakami merekomendasikan bagi Anda Mesin pemangkas bermatasenar
MAKITA yang merupakanhasil programpengembangan yang panjang dan
akumulasi pengetahuandan pengalamanbertahun-tahun.
Bacalahbukletini yangsecaraterperinci mengungkapkanberbagaipoin
yang akan menunjukkan kinerjanya yangluarbiasa. Iniakan membantuAnda
mendapatkan hasil maksimal dari Mesin pemangkas bermata senar MAKITA
Anda.
Daftar Isi
Halaman
Anda akanmelihat simbol-simbol berikut ini saat membaca petunjuk penggunaan.
SIMBOL-SIMBOL
BacalahPetunjuk penggunaan Kenakan pelindung matadantelinga
Perhatikandan Berhati-hatilah Jangangunakan bilah logam
Dilarang Kecepatan tertinggi mesin yang
diperbolehkan
Jaga jarak Campuranbahan bakardanoli
Bahaya benda beterbangan Mesin-Penghidupansecara manual
DilarangMerokok Penghentiandarurat
Dilarangmenyalakan api Pertolongan Pertama
Sarungtanganpelindung harus dipakai Daurulang
Tendang-balik ON/START(HIDUP/MULAI)
Jagalaharea kerjaselalu bebas dari
orangdanhewanpeliharaan OFF/STOP(MATI/BERHENTI)
Kenakan sepatuyang kuat dengan sol
antiselip. Sepatu pengamandengan
pelindung ujung dari baja adalah yang
dianjurkan.
Simbol-simbol..............................................................2
0
Petunjukkeselamatan .................................................2
1
Datateknis...................................................................2
5
Penamaanbagian.......................................................2
6
Perakitan mesindan tangkai .......................................2
7
Pemasangangagang ..................................................2
8
Pemasanganpelindung...............................................2
9
Pemasanganbilahpemotongatau head
pemotongannilon........................................................3
0
Bahan bakar/pengisianbahanbakar...........................3
1
Penanganan-mesin yang benar ..................................3
2
Hal-hal tentangpengoperasiandan
cara menghentikan......................................................3
2
Menajamkan kembali alat pemotong...........................3
4
Petunjukpenyervisan..................................................3
5
Penyimpanan...............................................................3
7
Bahasa Indonesia (Petunjuk Asli)
Other manuals for EM2500U
1
Table of contents
Languages:
Other Makita Trimmer manuals

Makita
Makita UH550D User manual

Makita
Makita UH 6350 User manual

Makita
Makita BBC231U Manual

Makita
Makita EM4251 Quick start guide

Makita
Makita DUH501 User manual

Makita
Makita UH4570 User manual

Makita
Makita DUH604S User manual

Makita
Makita EY401MP User manual

Makita
Makita LXRU01 User manual

Makita
Makita DUH501 User manual

Makita
Makita BBC231U User manual

Makita
Makita UR3000 User manual

Makita
Makita XRU24 User manual

Makita
Makita DUH502 User manual

Makita
Makita RBC252 User manual

Makita
Makita UR017GZ User manual

Makita
Makita 3711 User manual

Makita
Makita DUR365U User manual

Makita
Makita UR012GZ04 User manual

Makita
Makita BUH550 User manual