IP67 Weatherproof Fixture
Uniform Lighting Distribution
Efficient Control System
72 Variable Lighting Modes
Better Induction Performance
APOLLO Series
Solar LED Baen Light
Big Battery Capacity Backup
MPPT controller is adopted for solar led baen light, Charging
faster by 30% than PWM controller. It ensures baery full charged
each day and every night without black even if sunshine intensity is
not stable all the year round.
Compact solar light system with lithium batery inside. More than 4
days autonomy in energy saving mode or 12 hrs working in
constant
lighng with 100% power. Never worry about out of power any
With 72 different lighng modes built-in, Seng a customized
lighng mode is prey by remote. Energy saving and constant
lighng modes are switchable freely. What’s more lighng
brightness and duraon can be set seperately.
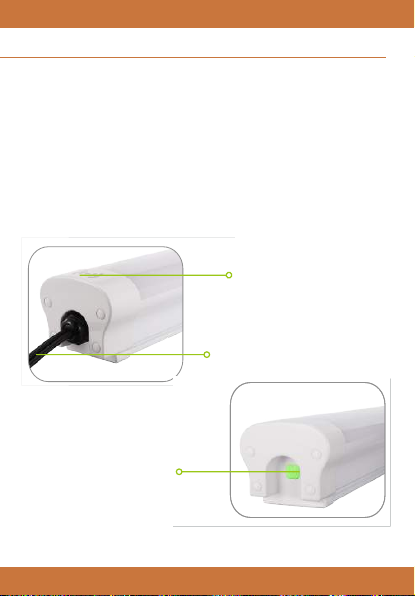
Microwave (radar) sensor is built-in. Comparing with PIR sensor, it
can be triggered in a wider angle and longer distance. Ensuring light
get ON or brighter immediately without any delay.
Complete plasc material external housing,with aluminium bar
inside for more efficent heat dissipaon, perfectly designed for
indoor or outdoor applicaons. Dust or moisture never goes inside.
Using 0.2W SMD led chips as 0.1W only, drived by lower current,
More than 130lm/wa pracally allows less power achieves higher
effciency than low market solar lights.
APOLLO solar baen light is adapted from our
most successful 4G Led Street Light built on the same
plaorm is an answer to a vast solar lighng applicaons
in urban and rural living. Auroras sunplus light has builn
Lithium baery and charge controller integrated with
high power led source makes the light a unique weather
proof lighng fixture with the advantage of solar. The
easy MC4 plug in set up makes the light extremely easy
for installaon and portability. Built with high quality
components, Auroras solar baen carport light can meet
project requirements as well in any challenging
environments. SUNPLUS baen light is able from 12
was to 48 was.
IP67 Weatherproof Fixture
Uniform Lighting Distribution
Efficient Control System
72 Variable Lighting Modes
Better Induction Performance
APOLLO Series
Solar LED Baen Light
Big Battery Capacity Backup
MPPT controller is adopted for solar led baen light, Charging
faster by 30% than PWM controller. It ensures baery full charged
each day and every night without black even if sunshine intensity is
not stable all the year round.
Compact solar light system with lithium batery inside. More than 4
days autonomy in energy saving mode or 12 hrs working in
constant
lighng with 100% power. Never worry about out of power any
With 72 different lighng modes built-in, Seng a customized
lighng mode is prey by remote. Energy saving and constant
lighng modes are switchable freely. What’s more lighng
brightness and duraon can be set seperately.
Microwave (radar) sensor is built-in. Comparing with PIR sensor, it
can be triggered in a wider angle and longer distance. Ensuring light
get ON or brighter immediately without any delay.
Complete plasc material external housing,with aluminium bar
inside for more efficent heat dissipaon, perfectly designed for
indoor or outdoor applicaons. Dust or moisture never goes inside.
Using 0.2W SMD led chips as 0.1W only, drived by lower current,
More than 130lm/wa pracally allows less power achieves higher
effciency than low market solar lights.
APOLLO solar baen light is adapted from our
most successful 4G Led Street Light built on the same
plaorm is an answer to a vast solar lighng applicaons
in urban and rural living. Auroras sunplus light has builn
Lithium baery and charge controller integrated with
high power led source makes the light a unique weather
proof lighng fixture with the advantage of solar. The
easy MC4 plug in set up makes the light extremely easy
for installaon and portability. Built with high quality
components, Auroras solar baen carport light can meet
project requirements as well in any challenging
environments. SUNPLUS baen light is able from 12
was to 48 was.
ATTENTION! The performance of the battery may drop below 0 Celsius,
and above 40 Celsius temperatures.
Content of the box:
1. Sunstone Traveller Pro 1500 light
2. Solar panel + 5 m cable
3. Solar panel console
4. Magic Remote Control unit
5. 4 Screws & anchors for xing the light consoles (the use of the supplied
items are dependent on the material of the chosen surface, please see
Chapter 2 for details).
6. 2 light consoles with 2 tightening screws + nuts + washers for xing the
light on the consoles
7. 10 screws + nuts + washers for assembling the solar panel console
Product structure:
Microwave motion sensor
ON/OFF button
Cable with plug for attaching it to
the solar panel’s cable
PRODUCT STRUCTURE, CONTENT OF THE BOX
4