Malmbergs TDH-55UM User manual

Instruction Manual – Dehumidifier
Model: TDH-55UM 87 460 35

2
SAFETY INSTRUCTIONS
Please read the instruction manual carefully before using the unit.
• Check that the unit has not been damaged during transportation.
Please contact your dealer if the dehumidifier is damaged.
• IMPORTANT: If the unit has been kept in a horizontal position, make
sure to place it upright for at least an hour for refrigerant to settle be-
fore use. Failure to do so may cause damage to your unit.
• Make sure to place the unit on a level and stable surface.
• DO NOT use extension cord.
• Make sure to protect all electric cables outside the unit from damage.
• DO NOT block or cover air intake and air outlet, particularly when the
unit is operating.
• DO NOT use the unit without the AIR FILTER. Keep the suction side
always free from dirt and loose objects.
• DO NOT unplug the unit if your hands are wet. Electrical shock could
occur.
• Never put objects on top of the unit or insert into the unit, particularly
when the unit is operating.
• Always switch off the unit with the power switch first, before you un-
plug the supply cable from the wall socket.
• DO NOT transport the unit during operation.
• Make sure to empty the water tank before transporting the unit.
• Make sure to transport the unit only in a vertical position.
• Damage on the compressor will be avoided by waiting at least 3 min-
utes before re-starting the unit.
• If the supply cord is damaged, it must be replaced by a qualified electri-
cian.

3
Air Outlet Grill
Control Panel
Supply Cable
Wheel
Transport Strap
Stand Strap
PRODUCT DESCRIPTION
Air Inlet Grill
Air Filter
Door Knob
Sight Plate
Stopper Mat
Hole for
water hose

4
CONTROL PANEL
1. Main Switch – If you switch on the unit on the main switch, it will run
in a fully automatically operation.
2. Power Lamp – If you switch on the main switch, a green control-lamp
“power” will illuminate.
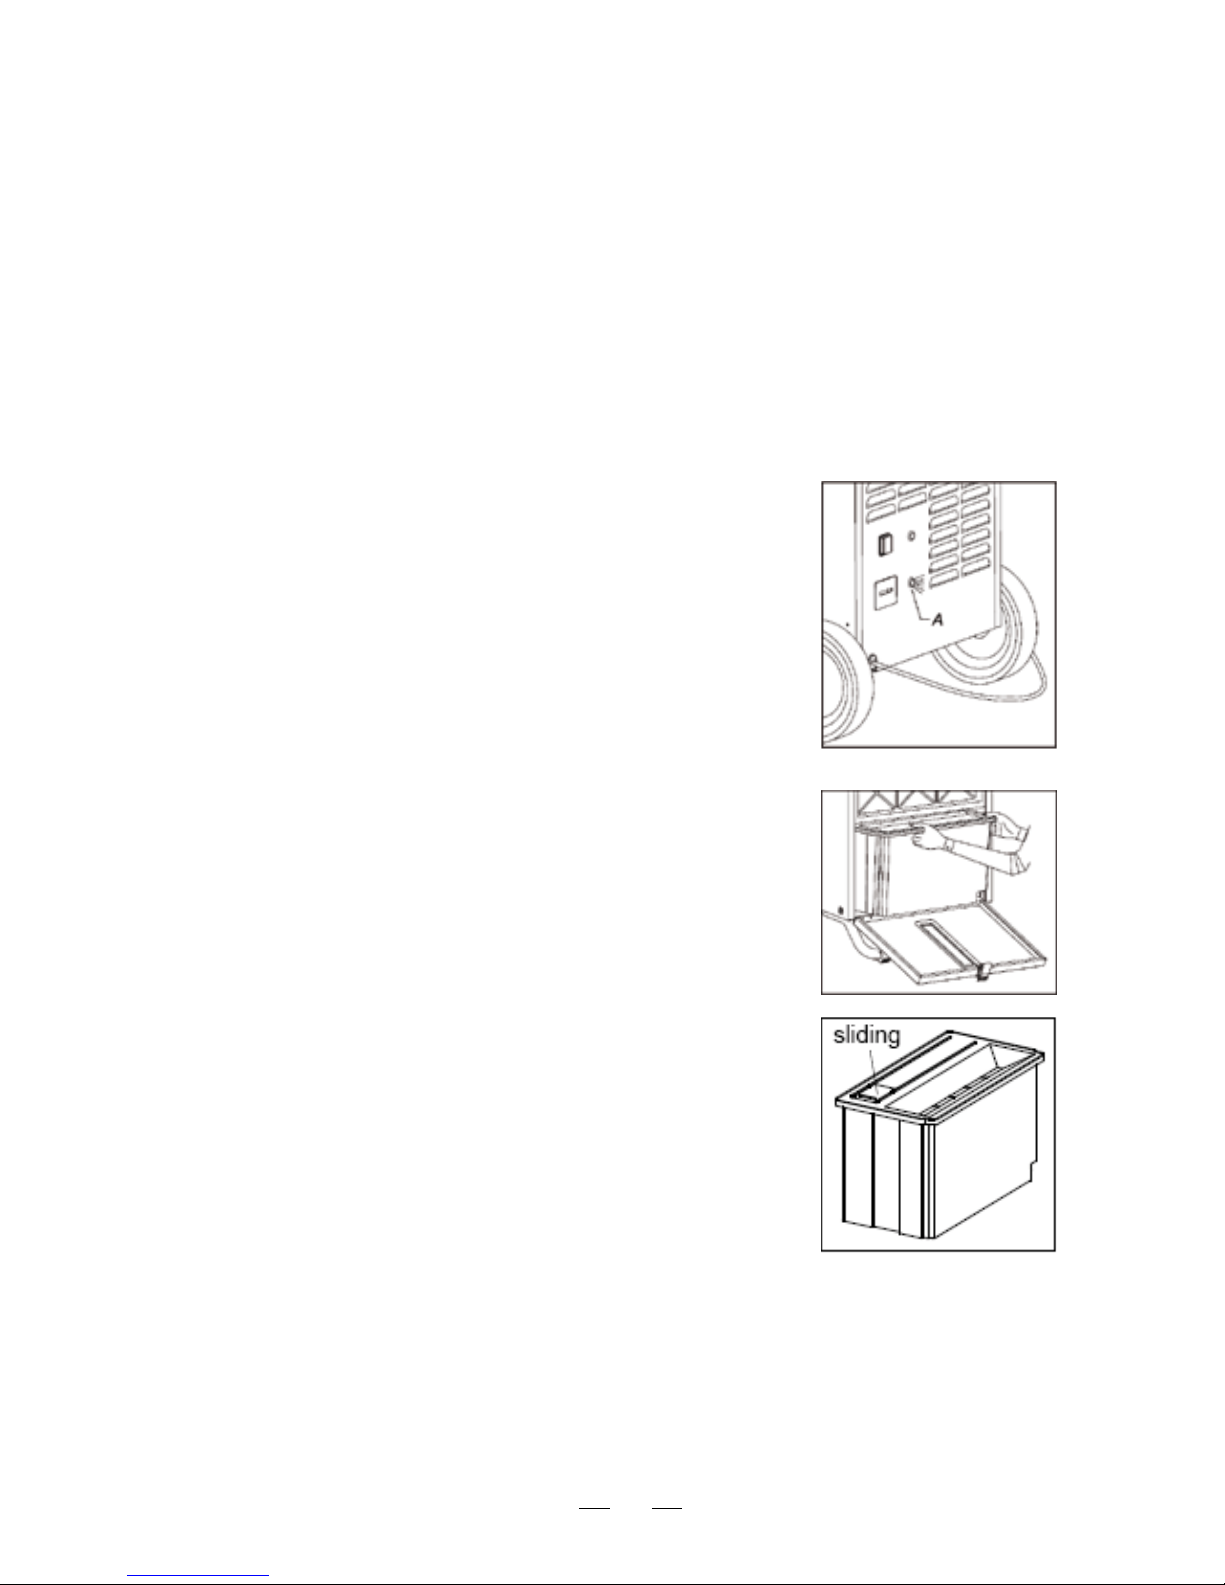
3. Full Water Lamp – When the water tank is full, this yellow control-
lamp “full water” will illuminate.
4. Hour Counter – The collect time of operation will be recorded by an
hour counter.
DESCRIPTION OF FUNCTIONS
Switch on the unit. The green pilot lamp illuminates. The ventilation fan
sucks in the moist ambient air via the air filter, the evaporator and the
condenser. Heat is extracted from the ambient air at the cold evaporator.
The air is cooled to below the dew point, and the water vapour contained
in the air is accumulated as condensate water on the evaporator fins and
then drops down into the water tank. As a low temperature of ambient
air is sucked, the water vapour becomes to hair-frost on the evaporator
fins. When the temperature sensor measures a specific low value of the
evaporator’s surface, a timer is activated with a delay of about 30 minutes.
If during this period the evaporator’s temperature does not rise again, the
refrigeration cycle will switch to hot gas defrost after the time reach. Dur-
ing the defrost cycle, the ventilation fan is off. As it has defrosted and the
OPERATING DESCRIPTION
This unit has been designed for automatic operation and problem-free air
dehumidification. This unit works according to the air condensation prin-
ciple and is equipped with a hermetically sealed refrigeration system, as
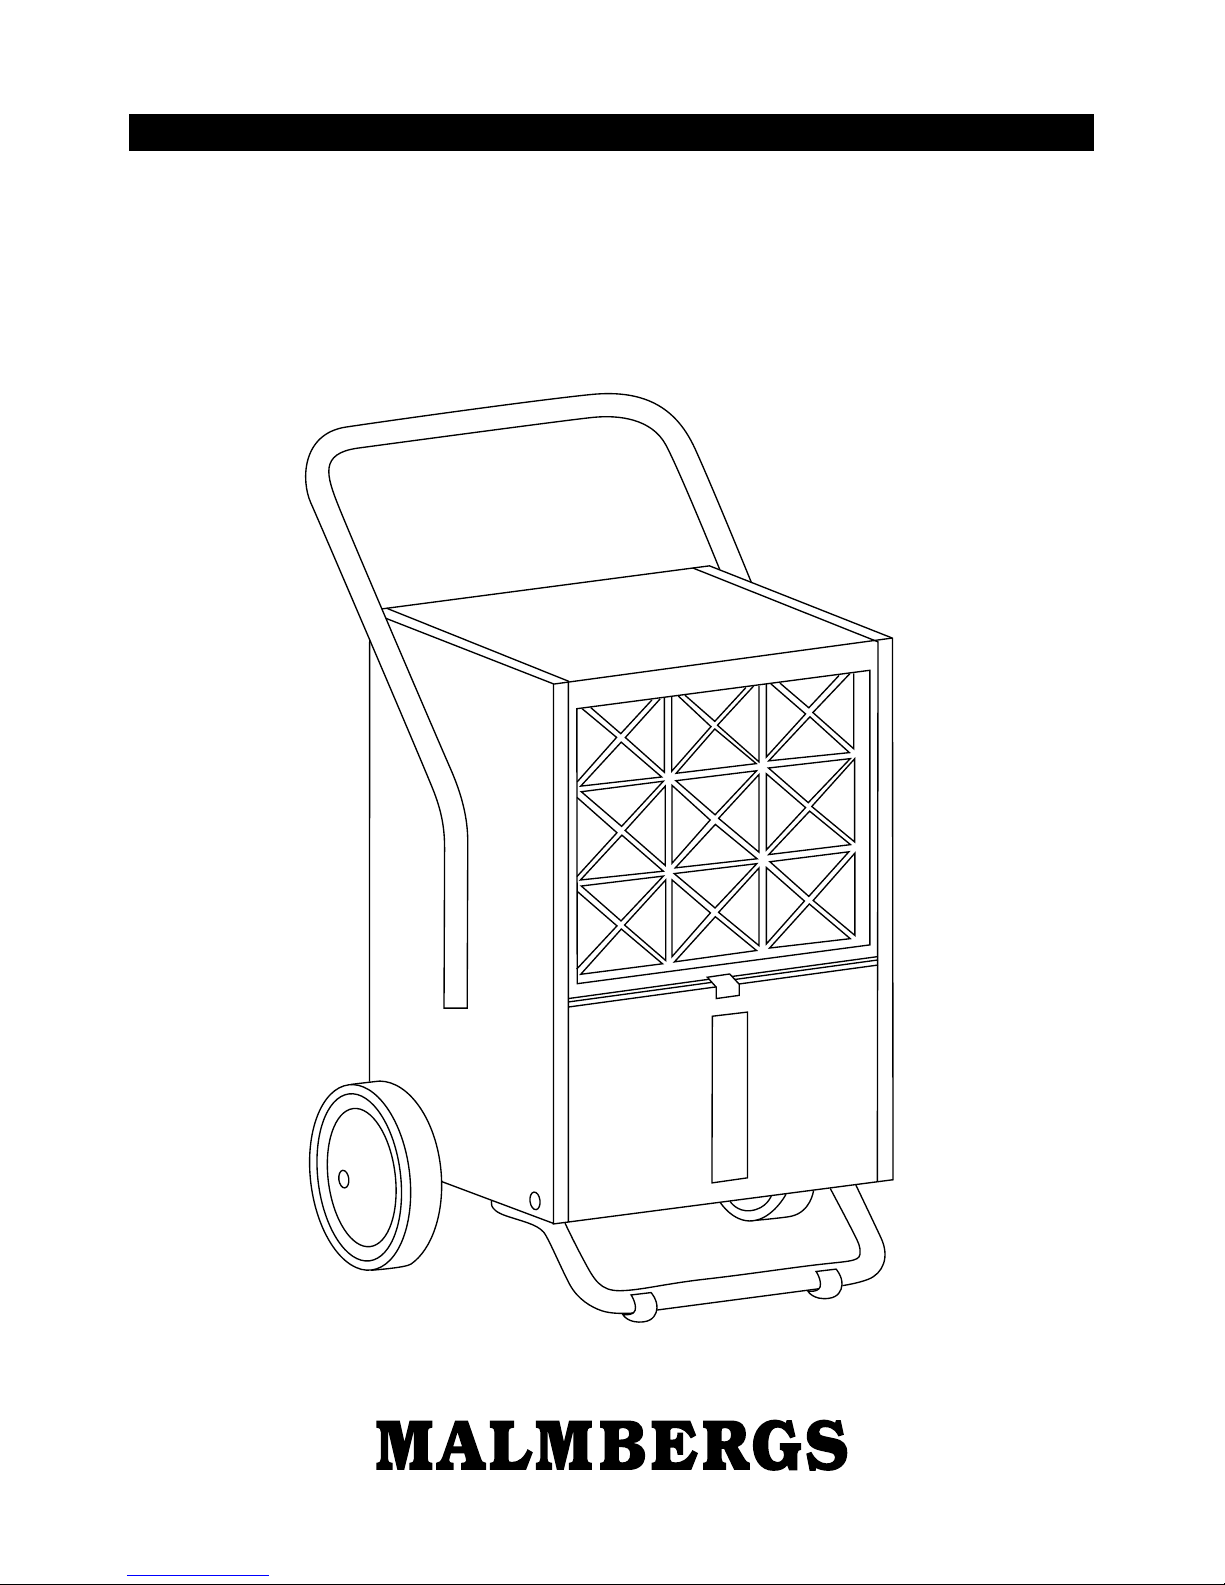
well as with a maintenance-free ventilator. The water container include an
overflow-protection equipped with a float-switching device and a drain-
age hose-nipple for continuous operation.

5
temperature at the
sensor rise again,
the unit will switch
back to normal
dehumidifying op-
eration. When the
room temperature
is high enough, the
evaporator surface
never becomes as
cold as to allow the
formation of hair-
frost; consequently
defrosting is not
necessary. The
dehumidified and
cooled down air is
reheated at the condenser (heat exchanger), and then it is blown out. The
conditioned dry air is mixed with the ambient air. Due to the continuous
circulation of the ambient air through the unit, the relative humidity of air
in the place of installation is continuously reduced.
INSTALLATION
Install the unit in a stable and horizontal position to ensure the trouble-
free drainage of condensate water.
• Install the unit in the middle of the room, if possible, to ensure optimal
air circulation.
• Make sure that the air can be freely sucked in at the front of the unit
and blown out from its rear part.
• Make sure to maintain a minimum distance of 60 cm to the wall.
• Do not install the unit directly near radiators or other heat sources.
• Do not install the unit in a dust-laden environment.
• Keep the room to be dehumidified closed, so that outside air cannot
penetrate into it.
• Frequently opening windows or doors, must be avoided as far as pos-
sible.
• The unit performance will vary depending on room temperature and
relative humidity.
ambient airdehumidified air
fan & motorcondenserevaporator
air filter
floater
water tank
compressor
Schematic diagram of function

6
Keep doors shut
Keep windows shut
Min. 60 cm
Min. 60 cm
WORKING RANGE
The dehumidification performance increases with the room temperature
and relative humidity.
For a reliable operation the following working-range is valid:
• Room temperature between 3ºC and 32ºC
• Relative humidity between 40% and 100% r. h.
The proper functioning of the unit cannot be guaranteed at temperatures
below 10ºC or a relative humidity of less than RH 40%.
USAGE
1. Make sure the filter of the unit is to be controlled and cleaned thor-
oughly before every use. If the air suction grill is dirty, please clean it.
2. Make sure that the door-cover in front of the water tank is closed
properly.
3. Plug the supply cable to a wall socket, 230V.
4. Put the main switch into "I" position. The green control lamp illumi-
nates.
5. Discard the unit by putting the main switch to "0" position.
Important! Damage on the compressor will be avoided by waiting at
least 3 minutes before re-starting the unit again.

7
HANDLING OF WATER TANK
Depending on the air temperature and the relative air humidity the con-
densed water drips either continuously or only during the defrosting phase
into the condensate tank.
The condensate water tank is located on the front behind a lock door-
cover.
In the water tank there is a floater, which interrupts the dehumidification
operation by means of a micro switch when the tank is full.
The unit stops working and the yellow control lamp A on the control panel
illuminates.
Please empty the water tank as follows:
1. Switch off the unit.
2. Open the lock door-cover and lift the container
slightly and then pull it carefully forward to
remove it.
3. Open the sliding (see sketch) and pour out the
water.
NOTE: When the unit has been switched off, the
evaporator can further defrost through the ambi-
ent temperature. Make sure that condensate water
does not continue dripping!
Installation of the water tank:
1. Wipe off the water tank with a clean cloth be-
fore you replace it.
2. Please install the cleaned tank carefully.
3. Make sure that the little filler bung is in the
hose nipple (as shown on the picture on next
page).
4. Close the door-cover. The unit will only re-start
if you close the lock cover correctly.

8
CONTINUOUSLY OPERATION WITH HOSE CONNECTION
The condensate water tank is equipped with a drain nipple. After you
have removed the filler bung you can connect a standard water hose (not
supplied).
A connection of a water hose allows you a continuously operation.
1. Open the door-cover and remove the filler bung from the tank.
2. Fit the water hose on the drain nipple.
3. Lead the water hose through the hole, which is located on the left side
of the side plate.
4. Close the lock door-cover with a little push.
5. Lead the condensate water into a drain hole.
Important! Make sure that the discharge hose is not warped upwards.
MAINTENANCE
Regular care and maintenance will ensure the dehumidifier’s long useful
life and trouble-free operation. The refrigeration system is hermetically
sealed and contains no user-serviceable parts. It may only be repaired by
authorized specialist facilities. The unit should be inspected and cleaned
thoroughly after each long period of operation, at a minimum once a year.
Note! Always remove the plug from the power socket before carrying out
any cleaning or maintenance operations.
• Keep the unit free of dust and other deposits.
• Clean the unit only with a soft dry or dampened cloth.
• Do not use a water jet.
drain nipple
11 mm
filler bung

9
• NEVER use harmful chemical cleansers or polish on the unit, as these
solvents may serious damage the surface.
• Regularly check the air filter and the exhaust grill for fouling and clean
them as required.
Air Filter Cleaning
Clean the air filter every two weeks. If dust and dirt are allowed to accu-
mulate in the filter, this will reduce the performance of the dehumidifier.
• Lightly lift the air suction guard grill and remove it pulling towards you
and downwards.
• Then remove the dusty air filter.
• If the filter is slightly dirty, it may be cleaned by blowing out or vacu-
um-cleaning the dust carefully.
• If the dust filter is very dirty, it may be washed with a mild detergent in
warm water (max. 40ºC).
• Make sure that the filter is completely dry and undamaged before you
replace it.
• Extreme clogged dust filter must be replaced with new one.
CAUTION: Never operate unit without filters, as this will cause the
evaporator and condenser coil to become dirty and reduce the efficiency
of the unit.
LONG-TERM STORAGE
When you plan not to use the unit for a longer period of time, the follow-
ing procedures are recommended:
1. Remove the power plug from the mains socket.
2. Empty the water tank and dry it with a clean cloth.
3. Clean the air filter and cabinet.
4. Cover unit with plastic bag to protect it from dust.
5. Store the unit in its upright position away from sunshine in a cool dry
place.

10
TROUBLE SHOOTING
The unit does not start:
• Check the operating switch. The green control lamp is illuminated
when the power is on.
• Check the plug to see whether it has been damaged and whether it has
been correctly plugged in.
• Check connection to the mains. 230V/50Hz.
• Check mains fuse at user.
• Check filling level of the condensate water tank and pour out the water
if necessary.
• Check that the water tank is in the correct position and that the door-
cover is locked properly.
• Check micro switch function.
Unit runs, but no condensate water formation:
• Control ambient temperature. Unit operates within a temperature
range from 3ºC – 32ºC.
• Control air humidity. Min. 40% relative humidity.
• Check whether air filter is dirty, if so, clean it.
• The evaporator is covered with ice. Check whether automatic defrost-
ing device operates correctly, or check ambient temperature.
Water leaks from the unit:
• Check that the unit is in a completely vertical position.
• Check if the black filler bung is in the nipple of the water tank.
If the unit does not work correctly, despite the controls and checks
above, please contact the manufacturer or an authorized service com-
pany.
This product has been manufactured to comply with EEC Directives
2006/95/EEC and 2004/108/EC.

11
TECHNICAL DATA
Model: TDH-55UM
Rated voltage: 230V~ /50Hz
Working range:
temperature 3ºC – 32ºC
humidity RH 40-100%
Dehumidifying capacity:
at 30ºC / 80% RH 55 litres/day
at 20ºC / 70% RH 31.5 litres/day
Power consumption: 700W
Rated power consumption: 3.1A
Power consumption:
at 20ºC / 70% RH 0.60kWh/litres
Capacity water tank: 6.5 litres
Air volume: 450 m³/h
Refrigerant: R-410A
Refrigerant quantity: 540 g
Sound level: 59dB (A)
Dims (incl. handle) HxWxD: 890x550x550 mm
Weight: 41 kg
Protection class: IPX1

Malmbergs Elektriska AB, PO Box 144, SE-692 23 Kumla, SWEDEN
Phone: +46 (0)19-58 77 00 Fax: +46 (0)19-57 11 77 info@malmbergs.com www.malmbergs.com
AF-JA-120216
Table of contents
Other Malmbergs Dehumidifier manuals