Malone Post Driver User manual


2
Table of Contents
1. EC DECLARATION OF CONFIRMITY················································ 3
2. GENERAL INFORMATION······························································· 4
3. TECHNICAL DATA ········································································· 5
4. DESCRIPTION ··············································································· 5
5. SAFETY INFORMATION·································································· 6
6. SAFETY DECALS············································································ 7
7. OPERATING THE MACHINE···························································· 8
8. MAINTEANCE AND LUBRICATION ·················································12
9. MALONE LIMITED WARRENTY······················································13
10. SPARE PARTS SECTION ·································································15
Version 5—15/03/2021

3
EC DECLARATION OF CONFORMITY
We,
Malone Farm Machinery
Ballyglass,
Claremorris,
Co.Mayo
F12 AP11
Republic of Ireland
Declare under our sole responsibility that:
The product (type): Post Driver.............................................................................................
Product code: Post Driver......................................................................................................
Serial No:...............................................................................................................................
Date: ..............................................................
Manufactured by the above company
Conforms to EU Engineering Regulations and other relevant EU guidelines.
Signed....................................................................................................................................
(on behalf of Malone Farm Machinery)
...............................................................................................................................................
(Status)

4
1. GENERAL INFORMATION
Thank you for purchasing a Malone product. You have purchased a strong, reliable and efficient Post
Driver. To fully utilize the qualities of the Post Driver, please ensure you read this manual, and this
ensures a longer working life, greater safety and optimal performance.
BEFORE OPERATING THIS MACHINE READ CARFULLY THE
INSTRUCTIONS GIVEN IN THIS MANUAL
USING YOUR OPERATOR’S MANUAL
Read, understand and follow the instructions in this manual, doing so will promote safe, productive and
reliable service.
This manual was prepared to help you use, and maintain your new machine safely. Reading your
operator’s manual will help you and others avoid injury or damage to the machine. This machine can
cause serious property damage, personal injury or even death if it is misused. For your safety, as well as
the safety of others, you must follow the safety precautions in this operator’s manual.
This manual is an important part of your machine. It should remain with the machine if and when it is
sold. If it is damaged or lost, you may contact your dealer, or Malone Farm Machinery company to get a
replacement.
Before delivering this machine, your dealer performed a pre-delivery inspection to ensure best
performance.
If you have any queries, please contact Malone Farm Machinery who will be able to give you the correct
assistance and advice.
Contact: Malone Farm Machinery LTD
Ballyglass,
Claremorris,
Co. Mayo
F12 AP11
Ireland
Tel: +353 (0) 94 93 60 500
Email: [email protected]
Website: www.malonefm.com
The contents of this manual can be modified only by the manufacturer and without
notice to the Client. Malone Farm Machinery shall not be liable for errors or faults in
this manual.
5
2. TECHNICAL DATA
Mass Circa 800kg
Hammer weight 350kg
Width 106cm
Height 300cm
Length 80cm
Height with hammer raised 410cm
Attachment to tractor 3 point linkage
Hydraulic connections 1/2'' male quick release
Grease points 8 + slider
Post size Max 11' x Ø12''
3. DESCRIPTION
The Malone Post Driver is an attachment for tractors. The weight is raised hydraulically and then released
in a free fall. Do not risk injury or death by ignoring good safety practices. All accidents can be avoided.
The Malone Farm Machinery Side-Tilt Post Driver can quickly drive the biggest of strainers and gate posts
in the toughest of ground conditions. It is engineered to eliminate ground digging & drilling. The frame is
made of H-iron beam to provide strength, durability and a long working life.
Features include; Heaviest hammer weight available on the market as standard at 350kgs, steel-wire rope,
side tilt adjustment and hydraulic top-link.
It’s an ideal machine for cost-conscious farmers and contractors who need the strength and hammer weight
of a larger machine to drive larger posts & straining posts, while having the simplicity and cost-
effectiveness of a smaller machine.

6
SAFETY INFORMATION
In the interest of safety, it is important that great care is adopted at all times during the attachment,
transportation, operation and maintenance of this machine. Both the owner and the operator of the
machine should read and understand the following section to ensure the safety of themselves and all other
persons who enter into the close proximity of these machines. Never operate the machine if unauthorized
persons are in the area. Stop operation of the machine if unauthorized persons approach. Explain to them
the potential hazards so they understand why you will not continue until they have left the area. You are
responsible for safe operation of the Post Driver. The most important safety device on the equipment is a
safe operator.
In addition to the instructions stated here always abide by general safety and accident regulations.
• Never put hands or fingers between hammer and hat or post.
• Never stand directly in front of Post Driver while operating. Stand at 45 degrees in case the post is
pushed forward during operation.
• The operator should be wearing hearing protection, eye protection, a hard hat, steel-toed boots and
gloves. Any other persons, who will be working nearby, must also wear hearing protection.
• Safety and warning decals placed on the machine give important instructions for safe work, take
them into consideration for your safety and the safety of others.
• While driving on public roads always abide traffic signs and road regulations.
• Familiarise yourself with the controls and functions of the machine and practice them in a safe
location before attempting to work.
• Never approach this machine whilst it is working or running. Always switch off the machine and
wait until it has stopped fully before approaching.
• Do not wear loose fitting clothing in the vicinity of this machine.
• Check no one is near, or on, the machine before attempting to start or transport it. Ensure your
visibility is kept clear at all times.
• Implements should always be attached according to the manufacturer’s instructions and fastened
correctly to the prescribed devices using the correct components.
• When disconnecting the machine from the tractor, select a firm level site and use the supports legs.
• Take care when disconnecting the machine from the tractor.
• Ensure controls for the machine are positioned such that the machine cannot accidentally be started
during transport.
• For transportation on the road, prepare and secure the machine according to the manufacturer’s
instructions.
• Never attempt to operate a machine without its safety devices fitted.
• Always place the machine in a safe position before leaving the tractor. Lower the implement
completely, switch off the engine and remove the ignition key.
7
• Never permit anyone between the machine and the tractor whilst either is working or when the
machine is in a raised position.
• Be aware at all times of the width, height and length of any machinery you are operating, especially
when transporting on the public highway or near obstructions.
• Ensure the work area is clear of obstructions before starting work (clear stones, wires, glass or any
other dangerous objects from the work site before attempting to start work).
• Do not operate the machine without safety guards or if the guards are damaged.
Transportation safety
• Make sure you are in compliance with all local regulations regarding transporting equipment on
public roads and highways.
• Ensure the weight is at the lowest point when transporting.
• Ensure that the machine is securely attached to the tractor.
• Be aware of any height restrictions on route i.e.: overhead wires, bridges, etc. It may be necessary lie
the Post Driver down on a trailer for transportation.
Please Note: The manufacturer does not guarantee the post driver compliance with the
applicable laws, in particular those relating to accidents prevention and pollution, of non-EU
countries. The adjustment of the post driver to these regulations will be entirely under the
Client’s own responsibility. The manufacturer is not liable for any kind of damage that could
arise from the non-compliance of those rules.
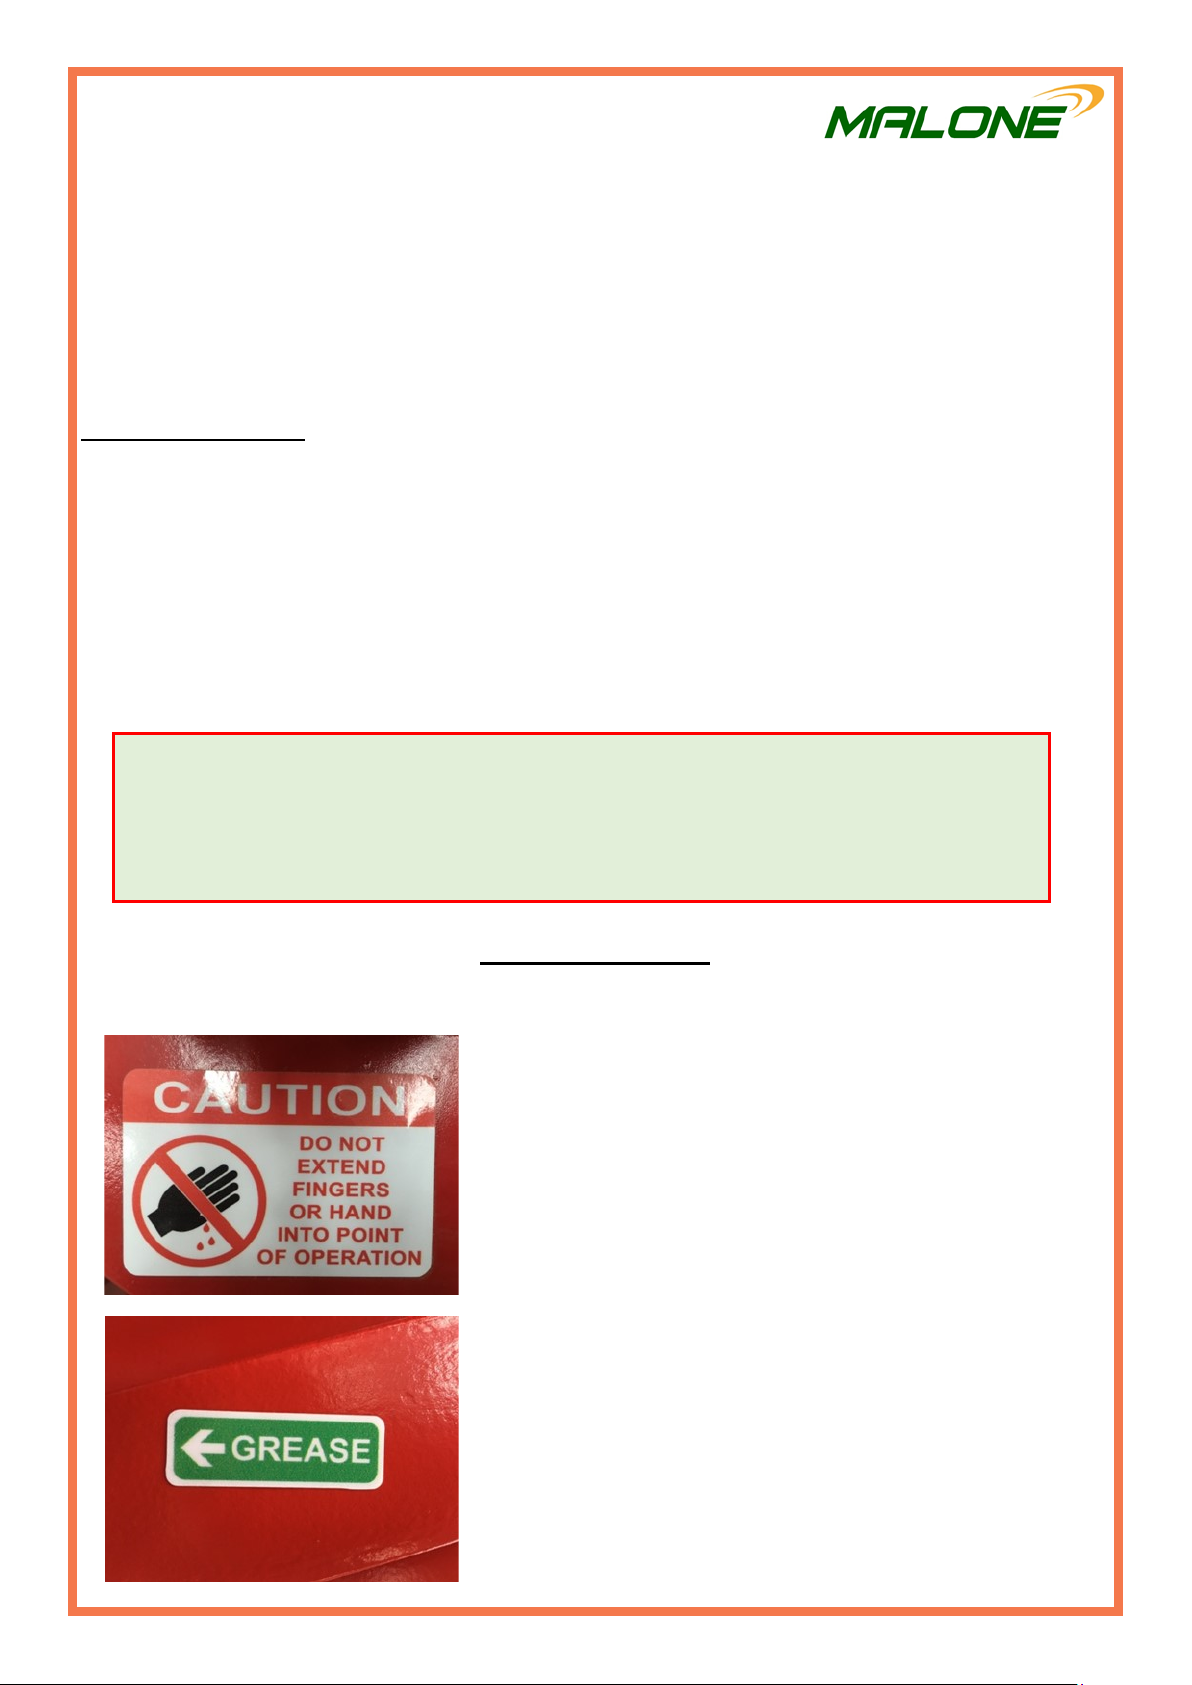
SAFETY DECALS
Read the operator’s manual carefully before you operate the machine.
Keep hands and fingers away from point of operation.
Decal is located on top of weight and should be
replaced if decal is illegible or missing.
This decal shows the grease points on the machine.
Greasing is important for personal safety and
maintaining a good mechanical condition of the
machine
8
OPERATING THE MACHINE
PRE-OPERATION CHECKLIST
It is important for both personal safety and maintaining the good mechanical condition of the Post Driver
that this checklist is followed.
• Grease every 10 hour of operation and pre/post season.
• Ensure tractor is of sufficient weight to be stable with the Post Driver attached.
• Ensure that the Post Driver is properly attached to the tractor's 3 point linkage and that mechanical
retainers such as lynch pins are installed.
• Check that all hydraulic fittings & connections are tight and in good condition.
• Check for damaged, worn or missing parts and replace if necessary.
• Check safety decals are in place on beam and hammer, and that they are clean and legible. Replace
missing or illegible safety decals.
• The spool valve must be moved outwards into the operating position before operation.
• First time use cards are supplied with the machine and should be read before operating the machine.
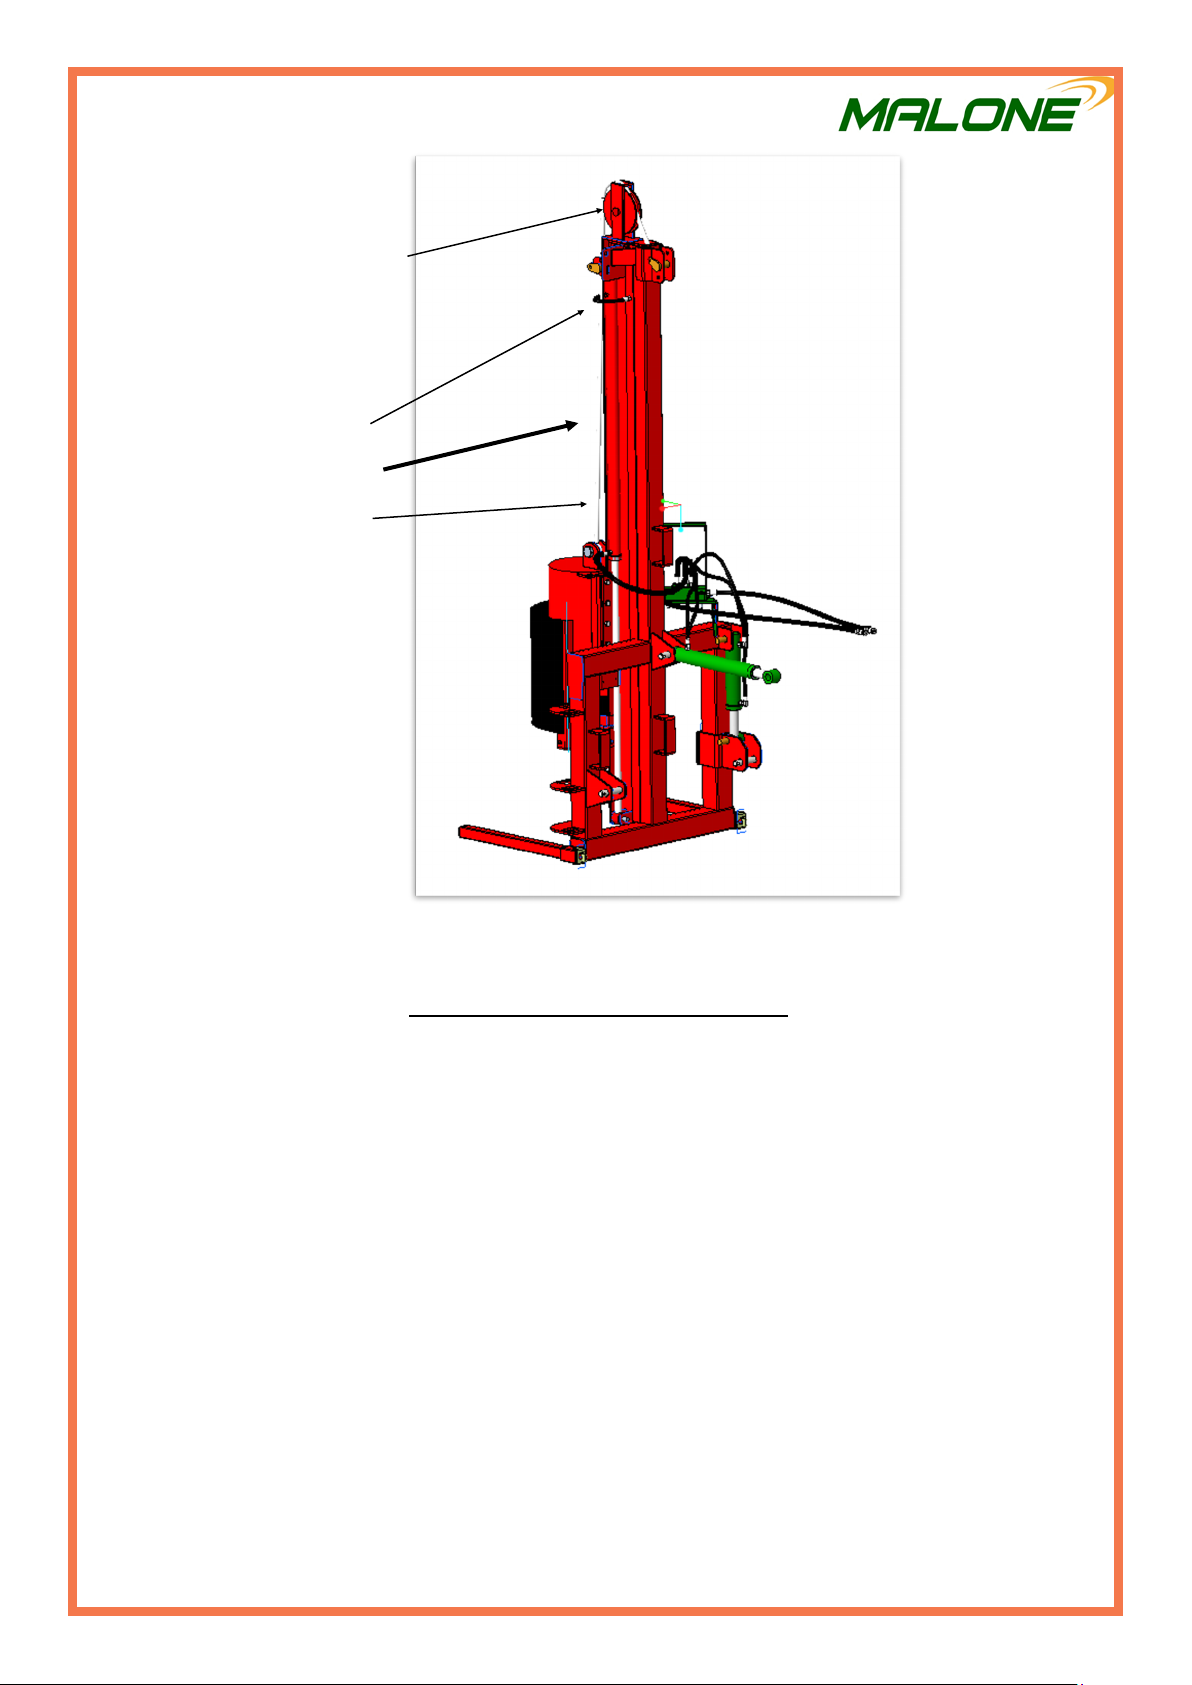
Grease pulley axle
Grease weight slide

9
Ensure the hoses are connected correctly. The rod
side of the top link should be on the tractor side. The
pipes should be on the post driver side. There is a
sticker on the top link that states the way the ram
should be mounted.
The valve chest must be extended out to the
operational position as shown in the picture before
first operation. 2 bolts are to be removed and the
bracket extended out and bolts replaced.
OPERATING THE MACHINE
To connect the machine to the tractor
Make sure the front axle weight of the tractor is sufficient (use front weights if necessary) to lift the Post
Driver. Make sure the tractor is aligned with the Post Driver. Check that the three-point linkage arms of
the tractor are at an equal height. Fit the lower arms to the linkage pins (CAT 2) of the three-point hitch.
Attach the top link of the tractor to the machine with a pin (CAT2 top link). Once the Post Driver has
been attached to the three-point linkage of the tractor, raise the lift and remove the stands. Remove dust
cup from the hydraulic hoses. Connect the hydraulic hoses to the tractor. Permitted maximum oil
pressure is 210 bar (21 MPa).

10
Operating instructions
• Position the tractor with the Post Driver at the location where the post is to be driven.
• Apply the hand brake securely and put transmission into park / neutral.
• Lower Post Driver to the ground with tractor link arms. (Side-tilt: On uneven ground adjust tilt ram
such that the Post Driver sits firmly on the ground.)
• Be aware of height restrictions e.g. overhanging trees, overhead cables, etc.
• Operate main ram to lift hammer and hat above height of post.
• Position the post, if the posts are not square on top of the hammer hat, please make sure that the
highest point of the post is centred and up against the beam, and in the centre of it.
• Lower hammer and hat onto post and unhook the chains off the weight.
• Lift hammer a short distance, then drop by pushing lever to max lower position. Repeat short strokes
to start post. Note: Stand at 45 degrees to the weight; NOT IN FRONT. Monitor every strike and
observe the condition of the post. Stop driving if post encounters an impassable object, or if it begins
to crack, or top begins to mushroom. Consider a pilot hole if ground conditions create the post
driving conditions mentioned.
• Once the post has started, the hammer should be raised no more than two feet and dropped. Repeat
until post is at required height. NOTE: For posts of small cross-section it may be necessary to limit
the height the hammer is dropped from to prevent the post breaking up under impact load.
• Hook on the chain to the weight and lift off the post.
• Lift the Post Driver off ground with tractor link arms and move away from post such that the
hammer can be lowered before moving to the next location. NOTE: The hammer weighs 350 kg and
must be kept near the bottom of the beam at all times while the tractor is in motion. If this is not
done the beam can be bent and the tractor can overturn.
11
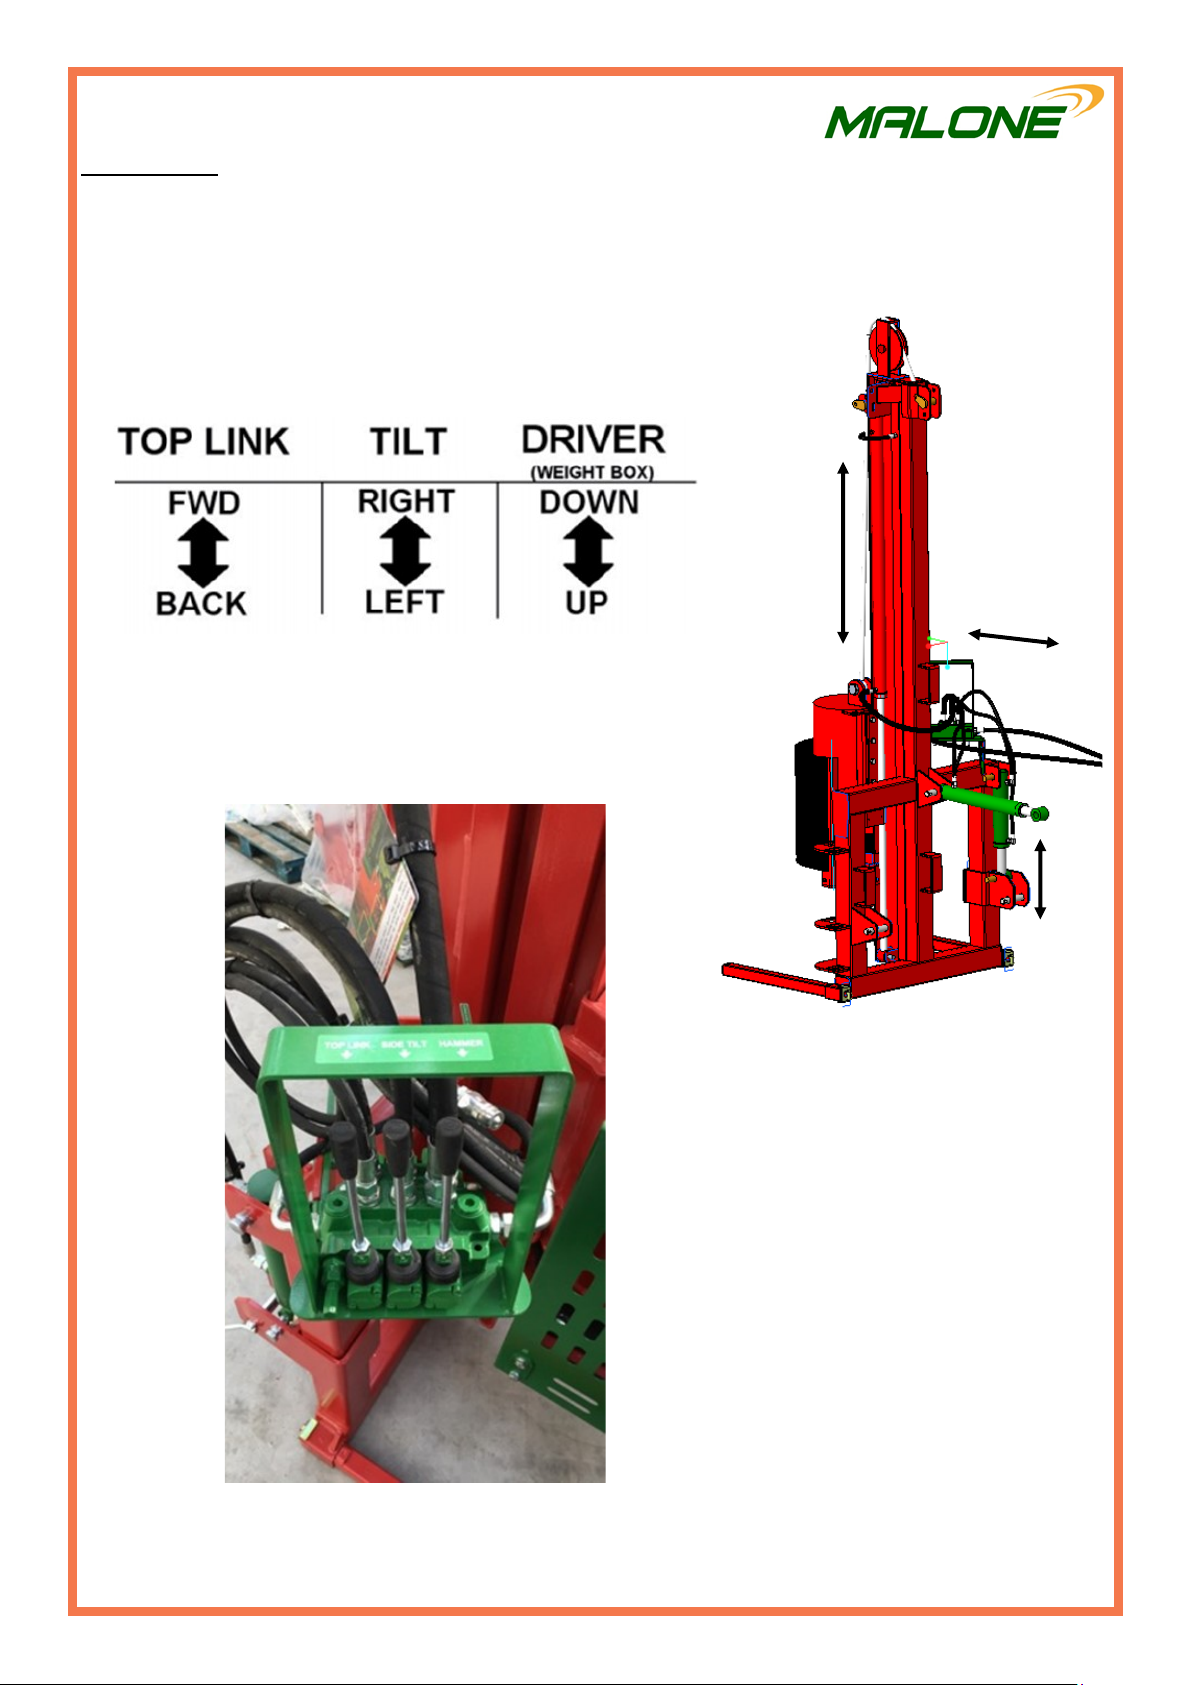
Spool control
Spool controls should be used smoothly, the weight can fall quickly with only a small movement of the
spool. The operator must be aware of the fast movement of the hydraulic top link as well as the weight.
Ensure that the top link is fitted with flow restrictors to reduce the speed of the top link.
A
This diagram shows the controls of the spools.
A, B and C show the different movements of the levers.
AB C
C
B

12
MAINTENANCE AND LUBRICATION
Check, and tighten (if required), all nuts, bolts and fixing after the first few hours of work and at
regular intervals thereafter. Grease every 10 hours of operation and pre / post season. Good
maintenance of a machine will ensure a safe working environment and long service life of the
machine.
Periodic attention
An inspection and maintenance check is necessary for the Post Driver every year. The Post Driver should
be overhauled from time to time during the year to see if lubrication or maintenance is needed.
Maintenance overhaul consists of:
• Examination of the safety mechanism for transport.
• Examination of nuts & bolts – tighten them if required.
• Lubrication according to the instructions for maintenance and lubrication.
Storage
The machine should be stored on a firm level site and cannot tip over, in a safe, clean and dry location
where it is protected from the elements. It is advisable that prior to storage of the Post Driver at the end of
the season that the machine be lubricated thoroughly and the opportunity taken to check the machine for
worn or damaged parts - replacements can then be ordered and fitted so that the machine is ready for the
next seasons work.

13
MALONE LIMITED WARRANTY
Malone Ballyglass, Claremorris, Co. Mayo, Ireland (hereinafter called “the company”) warrants to the
original retail purchaser that new products sold and registered with the company, shall be, at the time of
delivery, free from defects in material and workmanship, and that such equipment is covered under
Limited Warranty providing the machine is used and serviced in accordance with the recommendations
in the Operator’s manual. This Limited Warranty covers the equipment for a period of one year starting
from the date the equipment is commissioned.
The email or post submission of the pre-delivery inspection (PDI) form by the dealer (importer) is taken
as evidence of the delivery of the machine to the original retail purchaser. This is compulsory, and is
required to record the machine in the Malone warranty system.
These conditions are subject to the following exceptions:
• Parts of the machine which are not of Malone manufacture, such as tyres, tines, PTO shafts, wire
rope, link pins, slip clutches, hydraulic cylinders, etc. are not covered by this Limited Warranty, but
are subject to the warranty of the original manufacturer. Warranty claims applying to these types of
parts must be submitted in the same way as if they were parts manufactured by Malone. However,
compensation will be paid in accordance with the warranty agreement of the manufacturer
concerned.
• This Limited Warranty does not apply to failure through normal wear and tear, to damage resulting
from negligence or from lack of inspection, from misuse, from lack of maintenance and/or if the
machine has been involved in an accident, lent out or used for purposes other than those for which it
was intended by the company.
• This Limited Warranty will not apply to any product that has been altered or modified in any way
without the express permission of the company, or if parts not approved by Malone are used in
repair.
• The company take no responsibility for any additional costs, including loss of oil and/ or
consumables incurred during the failure and repair of a product
• The company cannot be held responsible for any claims or injuries to the owner or to the third party,
nor to any resulting responsibility.
• Also, on no account can the company be held liable for incidental or consequential damages
(including loss of anticipated profits) or for any impairment due to failure, a latent defect or a
breakdown of a machine.
The customer will be responsible for the following costs:
• Normal maintenance such as greasing, maintenance of oil levels, minor adjustments, etc. as
specified in the Operator’s manual.
• Labour charges other than originally agreed, incurred in the removal and replacement of
components.
• Dealer’s travel time and travel costs to and from the machine.
• Parts defined as normal wear items such as, but not limited to PTO shafts, chains, wire rope, pins,
tyres, bearings, tines, slip clutches, etc. that are not covered under the Limited Warranty.

14
The importer will be responsible for the following costs:
• All warranty labour charges.
The warranty is dependent on the strict observance of the following:
• The machine has been put in service by the Malone dealer according to our instructions.
• The online pre-delivery inspection (PDI) form has been correctly completed by the dealer.
• A printed version of the PDI form has been signed and dated by the original retail purchaser. This
copy is to be stored by the dealer and made available to Malone when requested.
• The warranty claim is submitted using the Malone claims system.
• The warranty claim must be submitted by the original retailing Malone dealer only.
• The decision of the company in all cases is final.
• Damaged parts should be held by the dealer until credit has been given, or a returns request has been
issued.
• Parts must be returned to Malone, with the Malone claim number written clearly on each individual
part. These parts must be free from dirt and oil. If a part is returned in an unfit state, the claim will
be refused.
• If damaged parts have been returned to the company and warranty is refused, the dealer is allowed a
period of one month from the date of receiving our notification to request the return of the damaged
parts to the dealer site.
Further conditions - limits of application and responsibility:
• This Limited Warranty cannot be assigned or transferred to anyone without the prior written consent
of the company.
• Malone dealers have no right or authority to assume any obligation or take any decision on the
company's behalf, whether expressly or tacitly.
• Technical assistance given by the company or its agents for repairing or operating equipment does
not lead to any responsibility on the company's behalf and cannot under any circumstances bring
novation or derogation to the conditions of the present Limited Warranty.
• The company reserves the right to incorporate changes in its machines without prior notice and
without obligation to apply these changes to machines previously manufactured.
• The present Limited Warranty excludes any other responsibility, whether legal or conventional,
express or implied, and there are no warranties extending beyond those defined herein.
No part of this manual may be copied or published by means of printing, photocopying, microfilm
or any other process whatsoever without prior permission in writing by Malone Farm Machinery.
All instructions, pictures and specifications in this manual are based on the latest information that
was available at the time of publication. Your Post Driver may comprise improvements, features or
options that are not covered in this manual.

15
Blank Page

16
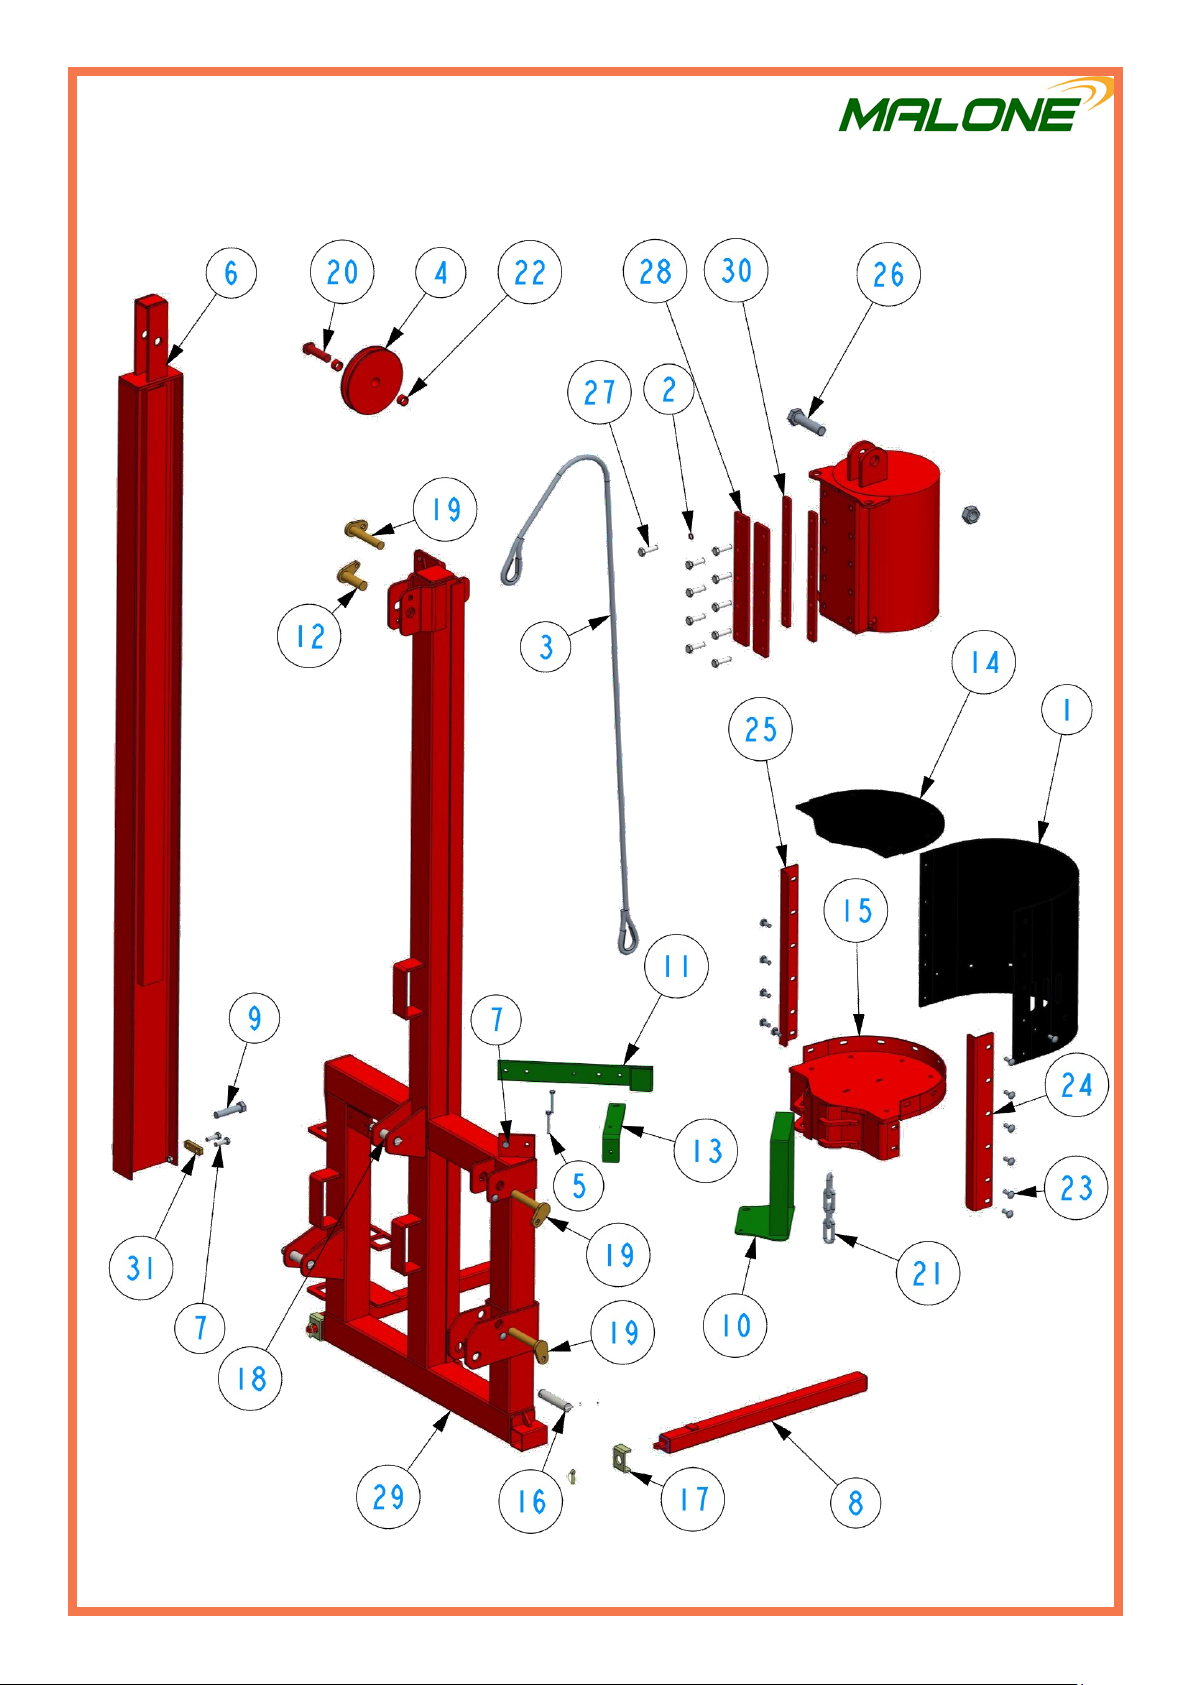
Spare Parts
Post Driver
17
SPARE PARTS SECTION
To be assured of the latest design improvements purchase your Genuine Replacements from
the Original Equipment Manufacturer through your local Dealer.
Always quote:
• Machine Type
• Year of manufacture
• Serial Number
• Part Code
• Part Position Number & Page Number
• Part Description
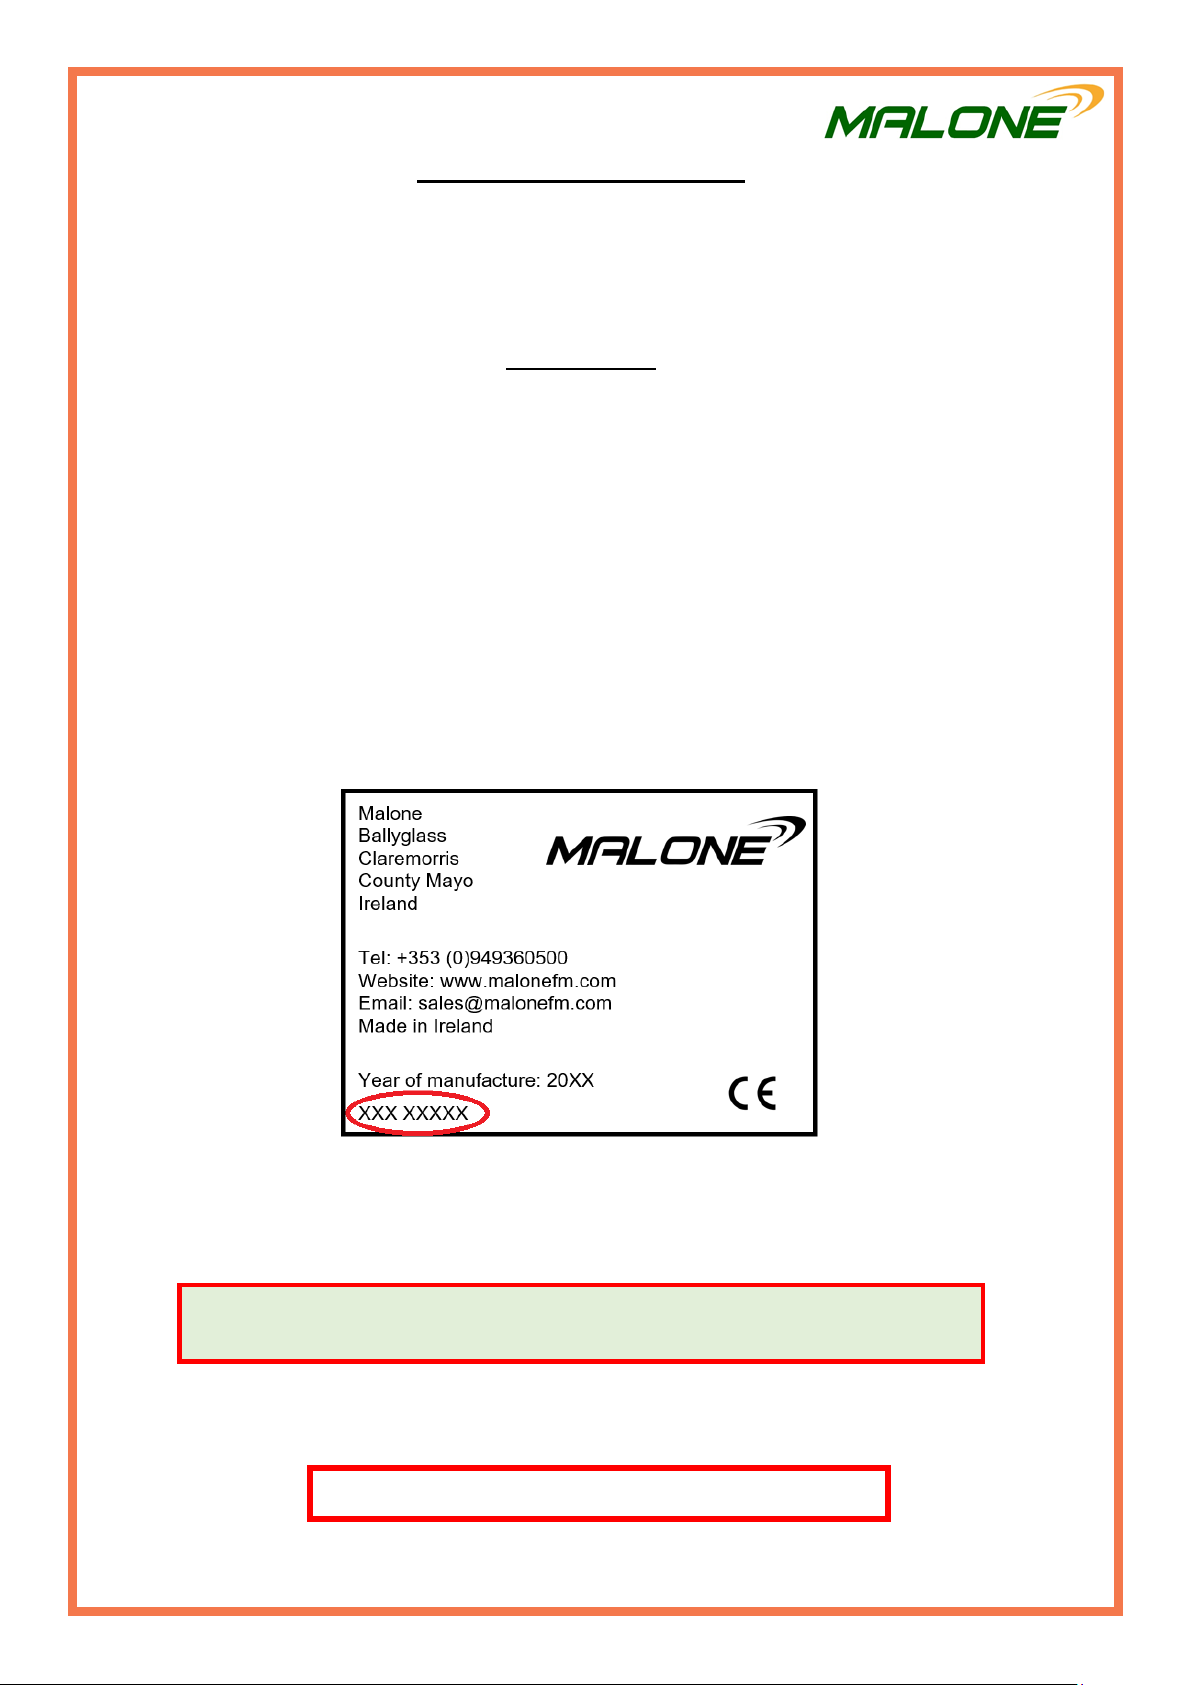
Serial Number
Note: The term “right” or “left” indicated in the description is to be
understood when looking at the implement from the rear.
USE ONLY GENUINE SERVICE PARTS
18

19
NO. PART NO. DESCRIPTION QT.
1MAP10290 RUBBER SAFETY GUARD 1
2MNLWM14 M14 NORLOCK WASHER 10
3MAP10101 WIRE ROPE 1
4MAP10240 PULLEY WHEEL 1
5M931865N M8 X 65 BOLT AND NUT 2
6MAP10288 MAIN BEAM 1
7M9331240N M12 X 40 BOLT AND NUT 2
8MAP10268 STAND 2
9M9312090N M20 X 90 BOLT AND NUT 1
10 MAP10282 VALVE SAFETY GUARD 1
11 MAP10281 VALVE BRACKET EXTENSION 1
12 MAP30100 WIRE ROPE PIN 1
13 MAP10280 VALVE BRACKET 1
14 MAP10273 RUBBER MAT 1
15 MAP10286 POST DRIVER HAT 1
16 MAP10236 LOWER LINK PIN 2
17 MAP10270 STAND BRACKET 2
18 MAP10237 TOP LINK PIN 1
19 MAP25140 RAM PIN 3
20 MAP10235 PULLEY WHEEL PIN AND NUT 1
21 MAP10278 POST HAT CHAIN 2
22 MAP10230 PULLEY BUSH 2
23 M6031240N M12 CUP BOLT AND NUT 20
24 MAP10274 HAT BRACKET LEFT 1
25 MAP10275 HAT BRACKET RIGHT 1
26 M1439930120N M30 BOLT AND NUT 1
27 M9331450109 M14 X 50 10.9 BOLT 10
28 MAP10304 BACK PLATE (WIDE) 2
29 MAP10307 MAIN CHASSIS 1
30 MAP10310 BACK PLATE (NARROW) 2
31 MAP10314 HAT STOPPER 1

20
Table of contents
Other Malone Farm Equipment manuals


Popular Farm Equipment manuals by other brands


AGRI-COVER
AGRI-COVER SRT-2 Operator's manual & installation instructions

Kencove
Kencove PD80 Operator's manual

Harvest TEC
Harvest TEC 300RBC Operation manual

AgLand
AgLand Macerator 6600 Operator's manual

BVL
BVL V-MIX DRIVE Maximus Plus 11-1S operating manual

Textron
Textron Greenlee 916 instruction manual


