mamibot EXVAC880 Wisor User manual


EXVAC880 Wisor
LASER SLAM
ROBOT VACUUM CLEANER
USER MANUAL
Please read all instructions before using this product, and keep it properly for future reference.
Thanks for purchasing Mamibot Laser Slam robot
vacuum cleaner EXVAC880 Wisor.
We hope Wisor will bring you a smarter and more
convenient lifestyle.
If you encounter any problem not mentioned herein,
For more details, please visit our ofcial website:
http://www.mamibot.com.

1
Table of Contents
2Safety Instructions
5To know Wisor
5Features of Wisor
6Specication
7What’s in the package
8Wisor Components
11 Remote Control
14 Wisor Working Mode
To use Wisor
16 Notice before use
18 Start/Stop/Pause/Sleeping
19 Charging your Wisor
21 Wi-Fi Setup and APP Connecting
25 How to Set the Clock/Sechdule
27 How to use Water Tank
Cleaning and Maintenance
28 Clean the Side Brushes
28 Clean the Dust box
30 Clean the Water Tank
31 Clean the Rolling Brush
31 Clean other Parts
32 Cleaning/Replacement Frequency Recommended
33 Troubleshooting
35 Wisor Anatomy
36 Name and Content of Hazardous Substances
37 Recycling of Wisor

2
Safety Instructions
Please read all instructions carefully, and keep it at hand for setting up,
using and maintaining Wisor. Any operation that against the following
instructions may damage Wisor or cause injury.
Notes for Main Unit and Components
Warning
01. Do not disassemble,repair or ret Wisor without authorization;
otherwise it may damage Wisor or pose a hazard.
02. Do not use the product in an environment with risk of re or explosion.
03. Only the original power adapter can be used for Wisor; otherwise
Wisor may be damaged or catch on re.
04. Do not stand or sit on Wisor; doing so could damage Wisor or
cause it to fall over.
05. When the metal part of the power plug is dusty, please wipe it with
a dry cloth.
06. The power adapter is applied to a 100 - 240V AC voltage. Please
plug into the socket properly and keep away from children.
07. Do not wash or soak the main body and electronic accessories in
water; otherwise Wisor may be damaged by a short circuit.
08. Do not damage, load weight on, heat, pull, or bend Wisor.
09. During cleaning, please pay attention to the safety of toddlers and
elders at home to avoid injury(Please pay special attention to toddlers).
10. This product is for home use. Please do not use it outdoors.
11. Do not allow metal and conductive materials to contact the battery;
doing so may cause a short circuit.
12. Do not allow to be used a toy. Close attention is necessary when
used by or near children.
Attentions
01. Do not touch Wisor with wet hands; doing so may cause an electric
shock.
02. Please do not place Wisor in places where it could easily fall,
such as tables, chairs, high platforms in room, etc.
03. The product has a sophisticated design and should be protected
from long-term exposure to sunlight.
04. Please do not use Wisor in humid environments, such as bath-rooms.
05. Please do not place Wisor near cigarette butts, lighters or other
open res.
06. Please clean Wisor after charging nished.
07. Please turn off the power switch on the side of Wisor when Wisor
is out of service for a long time.
08. Please check carefully to see if the power adapter is connected to
the socket prior to use, to avoid damage to the robot.

3
09. Before using Wisor, please remove all vulnerable items on the
oor, such as glass, lamps, and items such as wires and curtains that
may entangle with the side brush and suction passages.
10. When the dust box is full, please empty it before using again.
11. Please do not use Wisor to clean the construction waste.
12. The operating temperature of the product ranges from 0°C-40°C;
please do not use it in a high temperature environment.
13. Be aware that Wisor just moves around on its own, please take
care when walking in the area where Wisor is cleaning.
14. Before Wisor is scrapped, please remove the battery from
the robot. When you remove the battery, please ensure that Wisor
is not connected to a power supply. Please recycle the battery safely
for environmental protection.
Notes for Battery
Danger
01. Always use a dedicated battery adapter to avoid leakage,
heating or explosion.
02. Do not short-circuit the battery or remove the battery; doing so
may cause leakage, heating or explosion.
03. Do not transport or preserve with necklaces, hairpins, and other
metal objects; doing so may lead to short circuit, resulting in leakage,
heating or explosion.
04. Do not burn or heat the battery; doing so may cause leakage,
heating or explosion.
Attention
01. If abnormal overheating is discovered during charging,stop using
it immediately to avoid leakage, heating or explosion.
02. To prolong the service life of the battery,please remove the battery
and place it in a cool, dry environment if it is out of service for a long
time; this will avoid leakage, heating or explosion.
03. Do not soak in water or let it come into contact with any liquid;
otherwise it may cause leakage, heating and explosion.
04. Be sure to stop using it immediately in case of any exception
(e.g.discoloration or deformation), to avoid leakage, heating and
explosion.
05. Always use tape to insulate the battery’s electrode when recycling
or disposing of it.
06. If the battery leaks, wipe it clean with a dry cloth, recycle it in time,
or discard it.

4
07. Put the recycled batteries in the recycling bins set up by the
community, hotels, schools, large shopping malls, supermarkets, etc
or the hazardous trash can collected by professional recycling agen-
cies. Discarded product batteries must be removed and discarded
in accordance with local laws and regulations.
Warning
01. When skin or clothing is exposed to the battery electrolyte, immedi-
ately wash with clean water to avoid inammation of skin, etc.
02. Do not use the rechargeable battery on other devices. This battery
is only suitable for Wisor.
03. If the battery’s outer box is found to be deformed and expanded,
or leakage of electrolytes is found, do not charge or continue to use
to avoid danger.
04. Do not throw or inict a strong impact on the battery; doing so
may cause leakage,heating and explosion.
05. Do not disassemble the battery pack; doing so may cause battery
explosion and electrolyte outow, leading to re,explosion and
other dangers.
How to remove the battery
01. The battery must be removed from Wisor before Wisor is scrapped,
and the battery must be put into the designated places or institutions
according to the local regulations.
02. Before removing the battery, please turn the main power switch off.
03. Take out two screws on the battery cover with a screw driver.
04. Take out the battery cover.
05. Take out the battery and unplug the electric wires to remove the
battery.
5
To know Wisor
Features of Wisor
Laser & Gyroscope Navigation
Wisor works under the navigation of Laser localization. It can greatly
lower the rates of repeat cleaning or missing cleaning, enhance the
cleaning coverage & efciency.
Visualable Working Map
Users can see how Wisor plan the cleaning path via APP, and get to
know the cleaned areas or to be cleaned areas. It makes the cleaning
work more intuitive and clearer.
OTA (Over-the Air) Updates
The software of Wisor can be updated via OTA technology which
showes in the SETTING of APP. Users can get the latest software version
easily.
Washable Dust Box
The pre-lter and the dust box are washable with cleaning water
directly(Please do not wash the HEPA with water).
Multiple Opeartion Mode
Wisor can be operated via APP, Remote control or Physical switch
on the top button. Wisor can be shared with your families or friends
through APP.
Not-to-go Area Setting
Users can set Not-to-go area via APP to forbid Wisor to clean specic
areas that you don’t want to let it to.
6
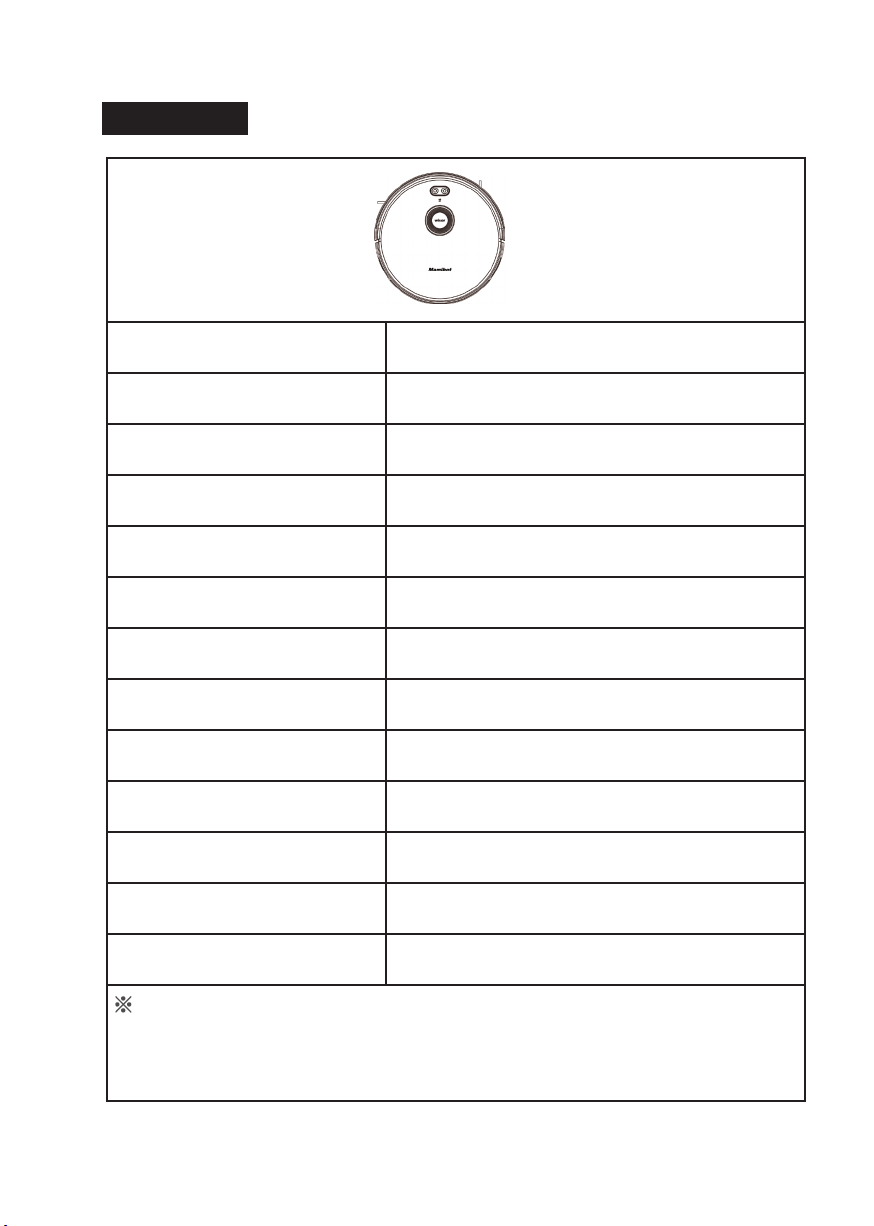
Specications
Product Model EXVAC880
Size of Main Unit 330*98 mm
Net Weight 3.0KG
Input 19V 0.6A
Power Consumption 25W
Battery Type Li-ion Battery
Battery Capacity 2600mAh
Battery Voltage 14.8V
Dust Box Capacity 600 ml
Water Tank Capacity 370 ml
Working Time 55 - 110 min
Charging Time 240 - 360 min
Control APP & Remote Control & Physical Press
The data come from the lab of Mamibot Manufacturing USA Inc.It may be
slightly different with the users data, please subject to the actual products.For
continous products improvment, we reserve the right to any technical and
design change without prior notice.
7
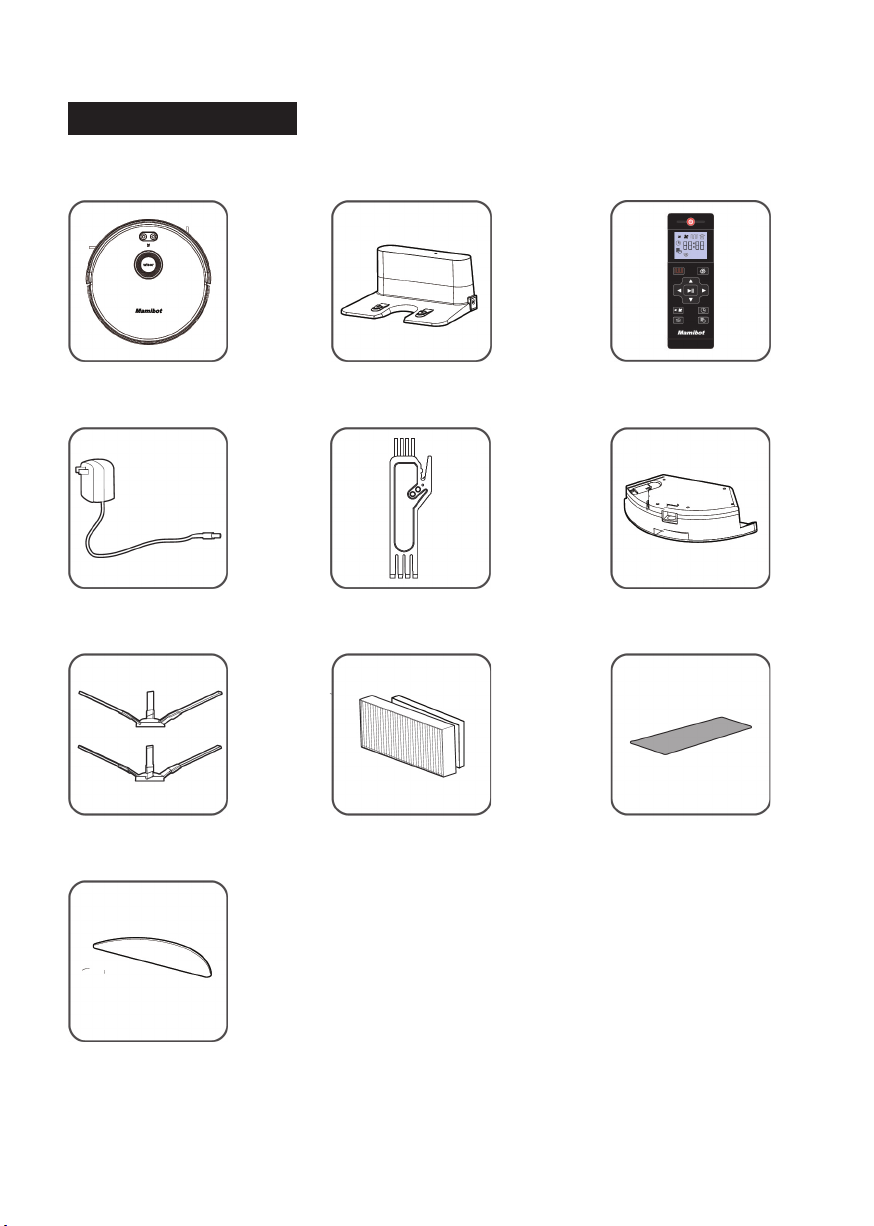
What‘s in the package
Wisor Charging Base Remote Control
Power Adapter
Side Brushehs (4) Additional
High-effecient Filter
(HEPA)
Additinal
Foam Filter
Cleaning Tool Water Tank
Mopping Cloth
Accessories of some models may be slightly different and they
are subject to the actual received products.
8
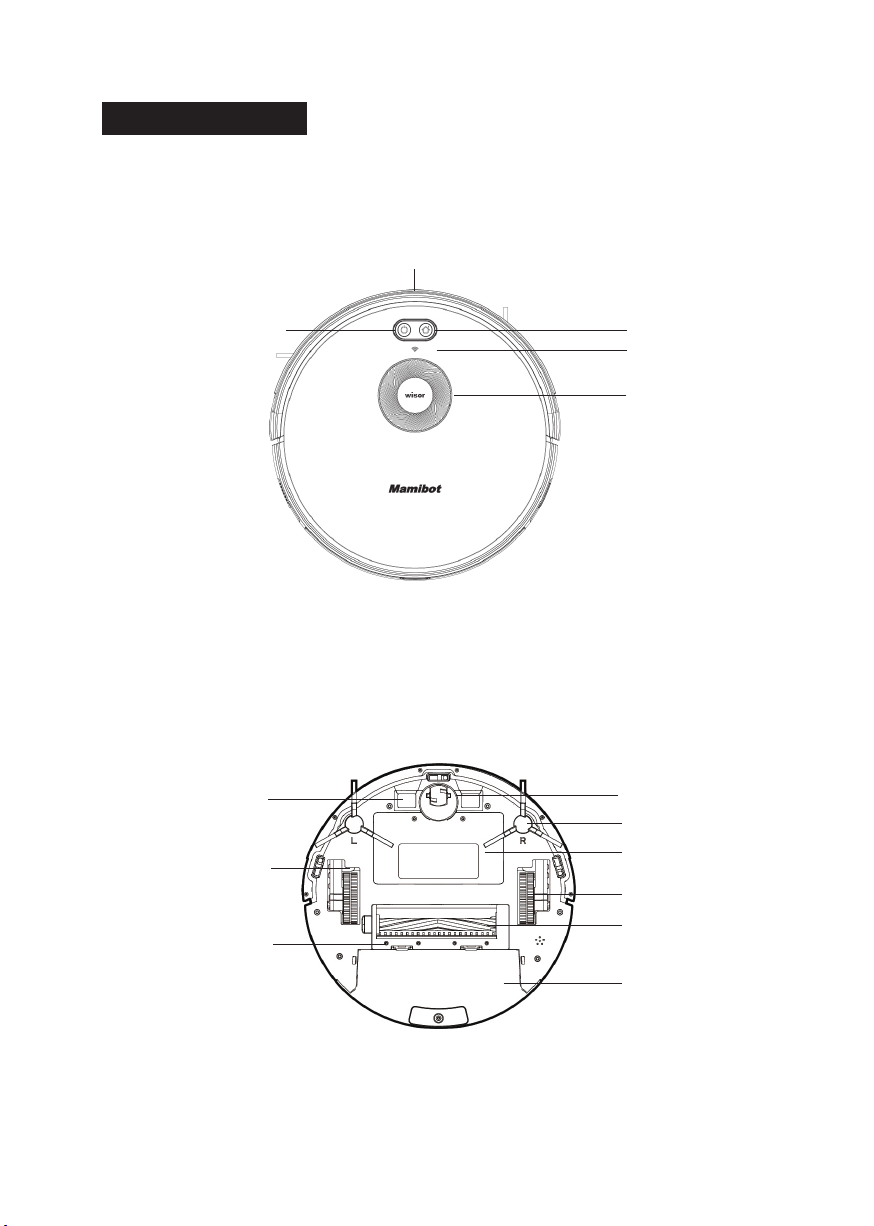
Wisor COMPONENTS
Recharge Button
Wi-Fi Indicator
Lidar
Bumper
Auto Cleaning Start/
Stop Button
TOP
Universal Wheel
Side Brush
Battery Cover
Side Wheel
Rolling Brush
Dust Box
Charging Pole
Anti-falling Sensor
Brush Guard
BOTTOM
9
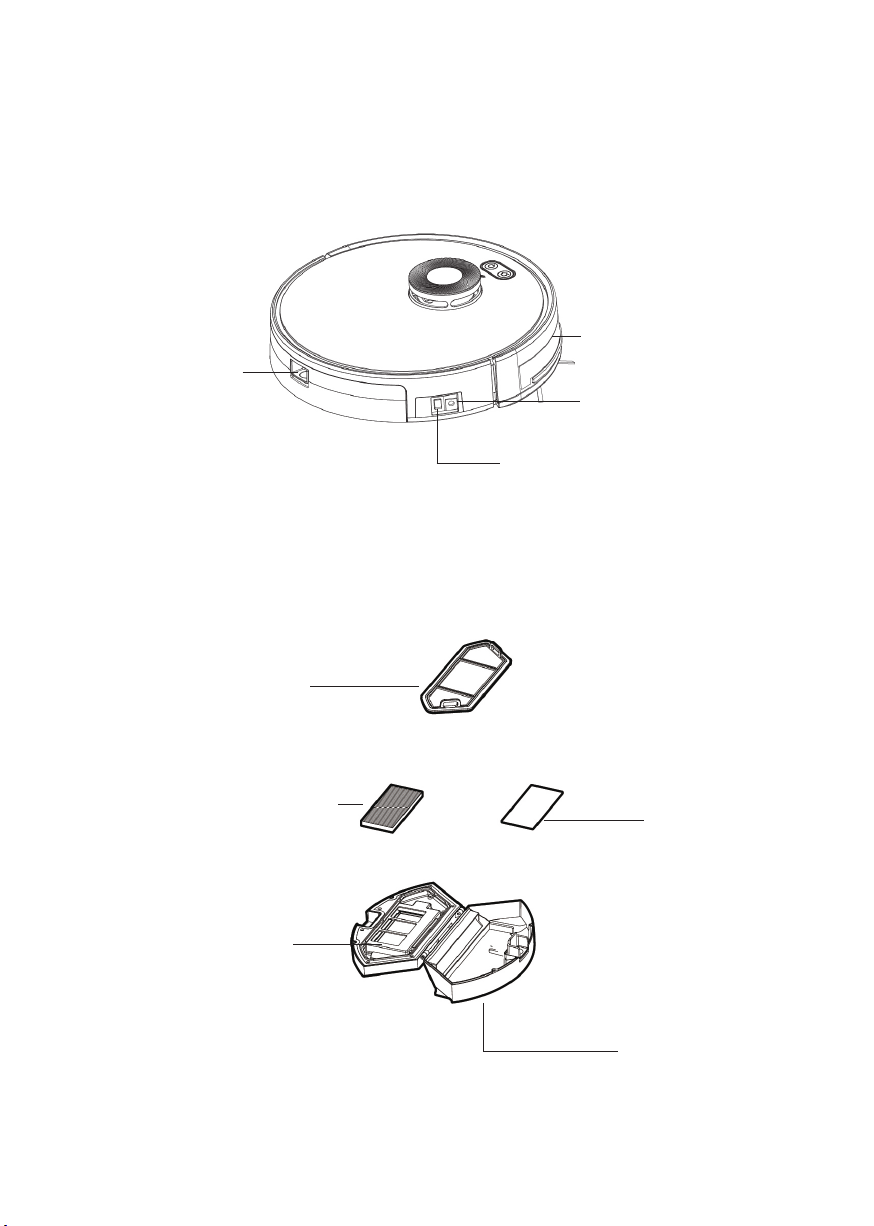
Dust Box/Water tank
Release Button
Main Power Switch (On/Off)
(Turn on it before any
operation is excuted)
DC Power Socket
Infrared Sensor
SIDE
Pre-Filter
(washable)
Foam Filter
(washable)
High-Perfomance Filter (HEPA)
(Can not be washed)
Dust Box Cover
(washable)
Dust Box
(washable)
DUST BOX
10
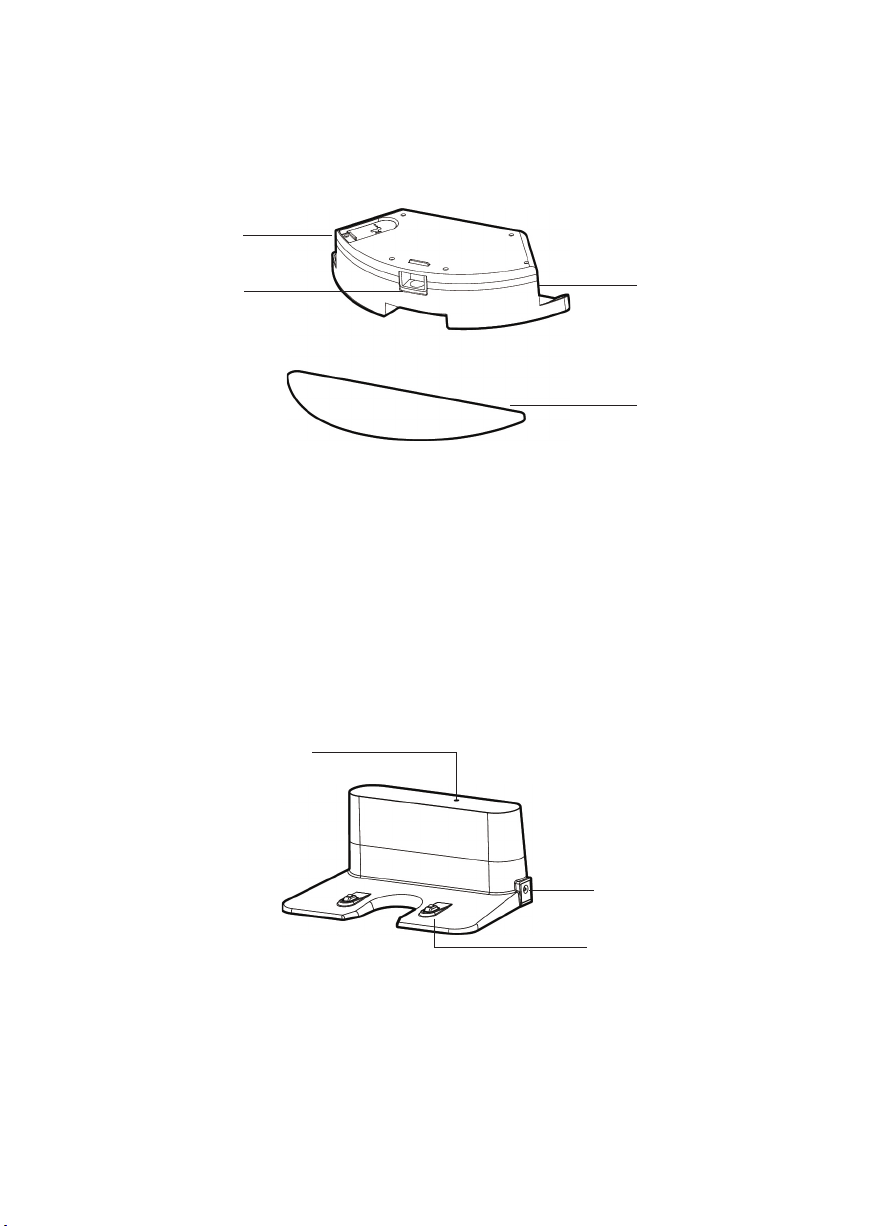
Sealing Cap
Release Button Water Tank
Mopping Cloth
WATER TANK
Status Indicator
DC Power Socket
Charging Pole
CHARGING BASE/DOCK
11
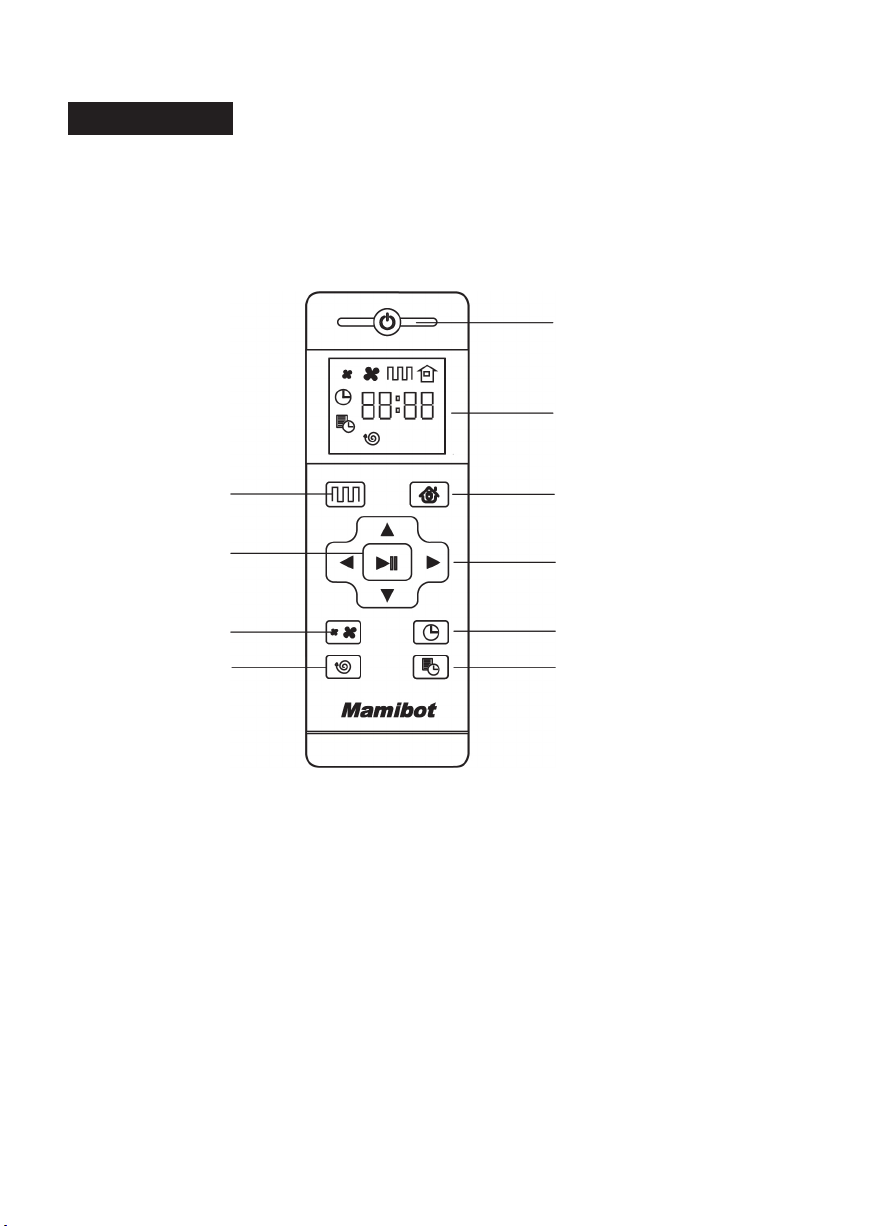
Remote Control
Power On/Off
Schedule Setting
Display Screen
Auto Charging
Direction Button
Clock Setting
Auto Cleaning
Conrmation
Turbo Cleaning
Spot Cleaning
• Install 2xAAA batteries before using the remote control for the rst
time. Please remove the battery if users don’t use the remote control
for a long time.
• The commander from the remote control may not be able to be
recoganized by Wisor if it is in the vicinity of the charginig base or
physical vitual wall.

12
Power on/Off
Press this button to power the Wisor On or Off.
Auto Cleaning Button
Press this button to enter the Auto Cleaning mode.
Auto Charging
Press this button to enter the Auto Charging mode, and the screen
displays on remote control.
Forward /+
Press this button to continue moving forwards at standby model, release
it to return to standby mode. Press this button to increase the number
at the Schedule setting mode,
Back /-
Press this button, robot will rotate 180 degrees. Press this button to
decrease the number at the Schedule setting mode,
Left Arrow
Press this button to continue turning left when in standby mode, release
it to return to standby mode. Press this button to set the hour at the
Schedule setting mode.
Right Arrow
Press this button to continue turning right when in standby mode, release
it to return to standby mode. Press this button to set the minute at the
Schedule setting mode.
Conrmation/Pauze
It is for conrmation in Schedule or Clock setting mode. It is the Pause
or Start button. It is also the button for waking up if Wisor powered off
by the remote.
Turbo Mode
Press this button to adjust the suction power at any working model.
There are Normal suction and Turbo Suction for your option. Users can
also adjust the suction mode on APP.
Clock Setting
Press this button to set the clock and the Conrmation button to exit.

13
Schedule Setting
Press this button to set the schedule when in standy mode, the icon
will ash, and press this button or Conrmation button to save the data
and exit, then the icon will always display on the screen. Press this
button for 3S to cancel the Schedule, and the icon will disappear.
Spot Cleaning
Press this button to enter the Spot Cleaning mode.

14
Wisor Working Mode
Auto Cleaning
The Laser of Wisor will detect a part of the room rst, then plan and
clean the detected room in ”Zigzag” path. After the detected area
cleaning nished, Wisor will detect another new areas for next plan
until the whole room cleaning is nished. Wisor can work under Auto
cleaning mode through the Start/Stop button on Wisor, or the Auto
cleaning button on the remote control, or the Start button on the App.
Turbo Mode
Press the button at the Auto Cleaning mode to enter the Turbo
Cleaning mode. Users can also adjust the suction power via APP, there
are three levels including: Silence, Standard and Strong suction.
Mopping Mode
To enter the Mopping mode with water tank attached to the robot,
Wisor will work as the path in Auto Cleaning mode. There are three
levels of water dripping speed: low,medium and high.
Not-to go Area Setting
To set the area which users’do not want Wisor to enter by the
APP, it is similar to the function of a virtual wall.
Spot Cleaning
Press this button to enter Spot cleaning mode.
Positon
Press the Position button on the APP, Wisor will say “I am here”, it would
be useful for nding Wisor if it is stuck.
Notice:
The main power switch of Wisor should be kept on.
The remaining battery of Wisor is more than 5%.
The voice of the WIOSR is switched on.
15
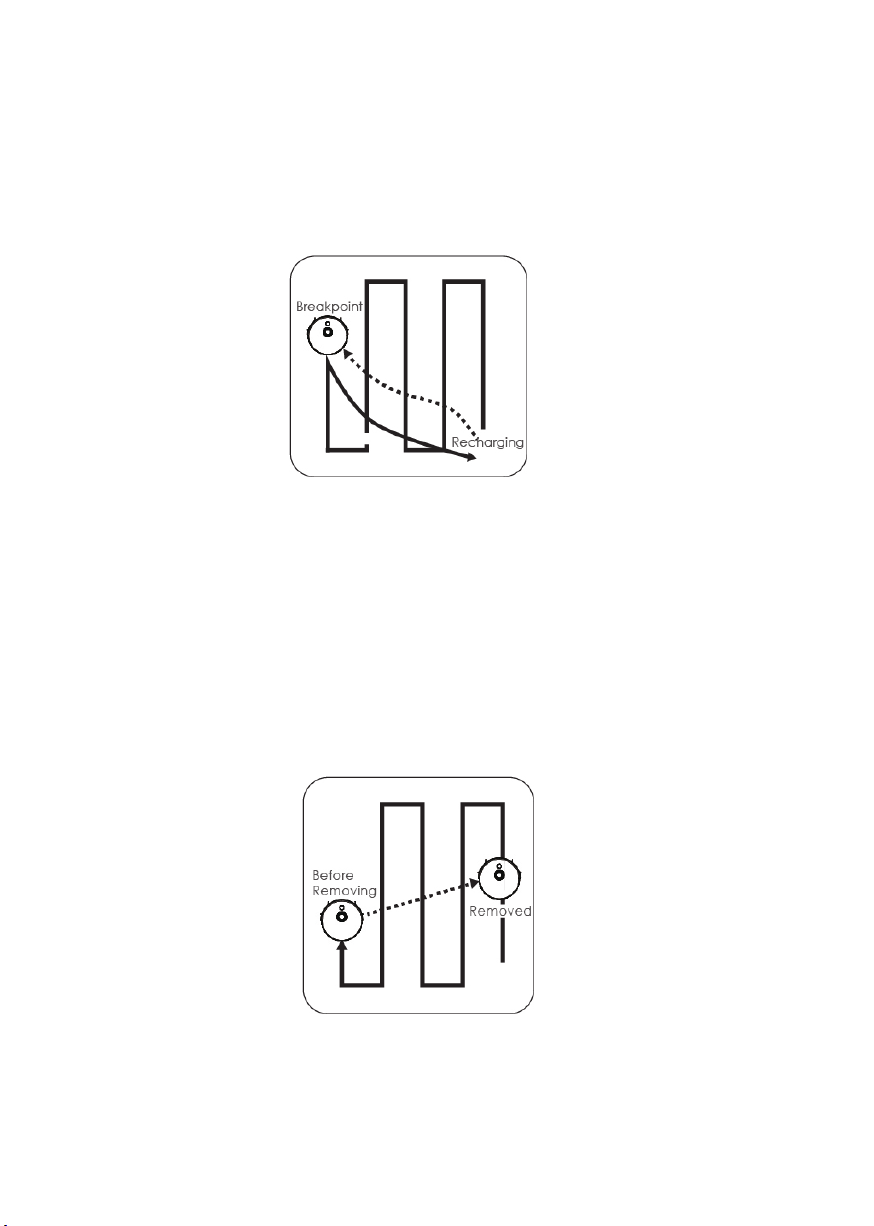
Resume from Breakpoint
Wisor will go to the charging base for recharging when the battery
power is lower than 20%. Wisor will go back to the Breakpoint where it
was stopped earlier to continue the cleaning after fully charged.
Reposition
Wisor will set up a map of its path when cleaning. If users suspend Wisor
and move it to other areas, then press the Start/Stop button, Wisor will
reposition.
If the repostion is successful, there will be a promopt voice from Wisor,
then resume the cleaning and mapping. If failed, Wisor will clean up all
the previous records and detect new area, then re-start cleaning.
All the functions of Wisor, please subject to the actual products.
In order to improve the product, we reserve the right to upgrade
the APP or the products without prior notice or obligation.

16
To use Wisor
Notice Before Use
• Please make sure all furnitures are properly organized to prevent
Wisor from getting stuck.
• Please set the forbidden area or fences at the stairway or similar
areas. Anti-falling sensors may work less effectively if it works on the
dark-colored oors or it is dirty.

17
• Do not stand around at the narrow spaces, such as thresholds or
aisles, or it will lower the coverage rate of cleaning.
• Wisor may climb on top of objects less than 1.8cm/0.70in in height,
please remove the similar objects if possible.
Please remove the power cords, wires, toy or shoes that may
entangle Wisor from the oor.
Do not clean the carpet with mopping function. Please roll up the
carpet before cleaning, or set the not-to-go area to avoid it.
Table of contents
Other mamibot Vacuum Cleaner manuals

mamibot
mamibot iGLASSBOT W120-T User manual

mamibot
mamibot PETVAC280 User manual

mamibot
mamibot EXVAC660 Platinum User manual

mamibot
mamibot V8 User manual

mamibot
mamibot EXVAC660 Platinum User manual

mamibot
mamibot ProVac Plus2 User manual

mamibot
mamibot iGlassbot W110-F User manual

mamibot
mamibot iGlassbot W110-F User manual

mamibot
mamibot V6 User manual

mamibot
mamibot ProVac Plus2 User manual


