mamibot EXVAC660 Platinum User manual

Robotický vysavač
Robotický vysávač
Odkurzacz automatyczny
Robotporszívó
Robots putekļsūcējs
Robotic Vacuum Cleaner
Staubsauger-Roboter
Aspirateur robot
Robot aspirapolvere
Aspiradora robótica
CZ SK PL HU LV EN DE FR IT ES

CZ
SK
PL
HU
LV
EN
DE
FR
IT
ES

EN
83
ACKNOWLEDGMENT
Thank you for purchasing a Mamibot product.We wish you much joy with your new appliance every day you use it.
Please read the instruction manual carefully before initial use. To refer to this manual any time you need to, we
recommend you to keep it in a safe place. And please pass it to any future owner of the appliance.
Technical specications
Voltage 220–240 V ~ 50/60 Hz
Input 28 W
Sound level <55 dB
IMPORTANT
Before connecting to the mains, make a visual check to ensure that the unit is intact and
that no damage occurred during transport.
IMPORTANT SAFETY PRECAUTIONS
• Do not use the appliance in any other way than as described in this manual.
• Remove all the packaging and marketing materials before first use.
• Remove all items from the floor from the floor that could disrupt the eective a trouble-
free cleaning (cables, papers, clothes, table cloths and curtains touching the ground)
• If there are stairs in the cleaning area, place a magnetic strip (virtual wall) at a minimum
distance of 15 cm from the top edge. This distance should ensure the highest protection
against falling from the stairs.
• Use only original accessories and spare parts for this model
• Do not sit on the vacuum robot or place other objects on it
• The appliance should only be used in households at temperatures between 0 °C and 40 °C.
• Make sure that the dust bin and mopping cloth are properly attached before use.
• Do not put your hair, clothes, fingers or other body parts near the main brush. Keep the
main brush and the suction part of the vacuum robot clean, remove all hair and dust that
can lower the suction properties of the vacuum robot and the cleaning quality.
• Do not use the appliance on wet or damp floors.
• Do not vacuum liquids, burning cigarettes, splinters and sharp objects, matches and
other flammable substances, larger pieces of paper, plastic bags or other items that can
damage the vacuum robot.
• Do not allow the vacuum robot to pass over loose cables when vacuuming.
• When servicing and cleaning the appliance, turn the power switch to the OFF position.

EN
84
• Direct sunlight may cause a reduced sensitivity of the infra-red sensors of the vacuum
robot, please avoid direct sunlight.
• Black furniture may not be properly detected due to physical laws of the infra-red sensors.
Therefore, there may be a slight impact that will be attenuated by the front bumper.
• A carpet must be secured so that the robot does not enter on it during cleaning. If a mopping
cloth with a water tank is installed on the vacuum robot, cleaning can be interrupted or
unwanted soaking of the carpet can occur.
• Do not place the appliance in a place where it could easily fall on the floor (table, chairs)
• Before charging the appliance, make sure the charging station is properly connected
• Extreme thermal conditions or inappropriate use may result in leakage of the battery. If
the fluid gets on your skin, wash immediately under running water. In case of contact with
eyes, rinse immediately under running water for at least 10 minutes. Get medical help.
• In case you want to dispose of the product, first disconnect the battery from the appliance.
• If the appliance is being transported or it is not used for a long time, switch it to the OFF
position. This extends the battery life.
• Make sure the mains voltage corresponds to the values on the rating plate of the product.
Do not connect the appliance into the sockets and extension cords.
• When disconnecting the unit from the wall outlet, never pull the power cord, grasp the
plug end and disconnect it by removing it from the receptacle.
• Do not use the appliance as a toy.
• Do not use coarse and chemically aggressive substances to clean the appliance.
• The appliance is only suitable for home use and is not intended for commercial use.
• Do not immerse the power cord, plug or appliance in water or any other liquid.
• Do not repair the appliance yourself. Please contact an authorized service centre to prevent
injury from improper handling.
• This appliance can be used by children aged from 8 years and above and persons with
reduced physical, sensory or mental capabilities or lack of experience and knowledge
if they have been given supervision or instruction concerning the use of the appliance
in a safe way and understand the hazards involved. Children aged under 8 years of age
shall not carry out cleaning and user maintenance of the appliance without supervision.
Children aged under 8 years of age must be kept away from the appliance and its power
cord. Children shall not play with the appliance.
• Children aged under 3 years of age must be prevented from accessing the appliance unless
they are permanently supervised.

EN
85
• The manufacturer and importer to the European Union has no liability for damage caused
by the operation of the appliance, i.e. wounds, scalding, fire, injuries, damage to other
things, etc.
Damages from failure to follow the manufacturer’s instructions are not covered by the warranty.
Carefully check that you have unpacked all the accessories that are supplied. During the warranty period,
we recommend to keep the original paper box, user manual and the packaging material.
PRODUCT DESCRIPTION
TOP VIEW
1. Bumper
2. Control button
BOTTTOM VIEW
1. Swivel caster
2. Charging pole
3. Side brush
4. Battery cover
5. Wheel
6. Combined dust roller brush
7. Dust bin
1
2
2
6
7
4
3
1
5

EN
86
SIDE VIEW
1. Power socket
2. ON/OFF button
3. Dust bin button
DUST BIN
1. Primary filter
2. HEPA filter
3. Foam filter
4. Dust bin
5. Dust bin Cover
Warning:Neverwashthedustbinwithwater,
the suction motor is inside the container.
1
2
3
1
2
3
4
5
DOCKING STATION
1. Signal light
2. Power supply socket
3. Charge connecting points
1
2
3

EN
87
BEFORE FIRST USE
1. Insert the batteries into the remote control.
2. Apply the cleaning brushes as indicated by R and L.
3. Connect the charging base to an electrical outlet using the AC adapter. Place the charging base against the
wall and remove obstacles about 1 meter at two sides and 2 meters forward. The indicator light must light
up when connecting to a mains power supply. It is recommended to fix the charging base to the floor, e.g.
by double-side mounting tape. Place the power supply cable so to avoid tangling of the vacuum cleaner.
4. Place the vacuum robot onto the charging base.
5. The vacuum robot battery will start charging automatically. Allow the battery to charge for more than
12 hours before first use. The charging status flashes on the display during charging,it stops flashing after
the battery is fully charged. If the battery is near the discharge point, the vacuum cleaner will automatically
search for the charging base.
6. Before using the vacuum robot, please remove any objects from the floor that can prevent the vacuum
robot from operating (cables, chairs, small items, inappropriately placed carpet, etc.)
1 m
1 m
2 m
Remote control
1. ON/OFF button
2. Display screen
3. Home
4. Automatic mode
5. ON/STOP button
6. Directional buttons
7. Suction power button (TURBO)
8. TIME SETTING
9. 30 minutes mode / single room
10. Mopping mode
11. Plan button
12. Edge cleaning path mode
1
2
34
5 6
11
7
8
9
10
12
Warning:
If the vacuum robot is near the docking station and a virtual safety wall, it is possible that it will not recognise the
instructions issued by the remote control If you do not use the remote control for a long time, remove the batteries.

EN
88
Cleaning mode – the ON/OFF button is in the ON position, the vacuum robot operates.
Stand-by mode – the ON/OFF button is in the ON position, the vacuum robot does not operate. To activate it,
press any cleaning mode button.
Sleep mode – the ON/OFF button is in the ON position, the display panel is ON. The vacuum robot enters this
mode automatically after 3 seconds of inactivity.
TIME SETTING
Make sure that the vacuum robot is ON and not charging.
To set the time, press the button on the remote control. First two
digits begin to ash to set the time. To set the values, use the ˄˅buttons.
Press the >button and set the minutes as described above.
CLEANING PLANNING
To set the cleaning mode, press the button on the remote control. At first, two digits begin to flash to set the
time.To set the values, use the ˄˅buttons. Press the >button and set the minutes as described above. Confirm
the time by pressing the (ON/STOP button).The vacuum robot will vacuum each day at the time you have set.
To cancel the scheduled cleaning, press the scheduling button for 3s.
Warning: If you switch the ON/OFF button on the side of the vacuum robot to the OFF position, the scheduling
will be cancelled.
CLEANING MODES
Automatic mode
The vacuum robot uses advanced navigation to calculate the best way to achieve eective cleaning. To activate
this mode, press the button on the vacuum robot body or on the remote control.
Edge cleaning path mode
To activate this mode, press the button on the remote control. The vacuum robot will vacuum along the
walls where the dust is most often. If you want to cancel this mode, press PAUSE.

EN
89
Circular mode
Place the vacuum robot in places where you want to perform a targeted cleaning (approx. area of 1 m2). Can
only be controlled by a mobile application.
Single room / Automatic short mode
To activate this mode, press the button on the remote control.The vacuum robot will vacuum for 30 minutes
or if it finishes cleaning in the room. If you want to cancel this mode, press PAUSE.
MOPPING THE FLOOR
If you have a water tank and the mopping cloth installed, activate the mopping mode with the button .
Water spontaneously passes through the mopping cloth. The water tank is washable. Always pour the water
only after removing the water tank from the body of the vacuum robot.
BOTTTOM SIDE OF THE WATER TANK
1. Mopping cloth
2. Velcro fastener
3. Water inlets
1
2
3
Open the sealing cap and fill
with water, close the sealing
cap after filling

EN
90
CLEANING AND MAINTENANCE
Battery
• Allow the battery to charge for more than 6 hours before first use.
• In case of low battery detection during cleaning, the vacuum robot automatically searches for the charging
base and starts to charge.
• If the appliance is being transported or it is not used for a long time, switch it OFF with the main switch.
• If you do not use the robotic vacuum robot for more than 3 months, allow it to charge for 12 hours, then turn
it OFF with the main switch and place it in a dry and cool place.
• It is highly recommended to use the charging base for charging.
• Remove the batteries from the remote control if you do not use the vacuum robot for a longer time.
• The vacuum robot is equipped with a special shield that stops supplying power and prevents overcharging.
This ensures its long service life and at the same time the vacuum robot is ready to start cleaning again.
Side brush
You can easily check the side brush condition and if necessary, remove the dirt.
• Turn the vacuum robot upside down.
• By pulling up from the robot's body, release the brush.
• Use scissors to remove hair and other dirt.
Side brush bristles can be damaged (frayed) during transport or by while
in unsuitable conditions. Inserting the bristles in hot water will straighten
them to their original state.
In case of damage to the side brushes, they can be replaced with a new one.
• Turn the vacuum robot upside down.
• By pulling up from the robot's body, release the brush.
• Remove the damaged brush and replace it with a new one.
Warning: Make sure the brush is placed on the right side of the vacuum
robot.
Replacement of side brushes may be performed by an authorized service
centre.
OK renewable replacement
necessary

EN
91
The main brush
To remove the brush from the cover, push the brush cover release lever as shown in the figure. Then clean the
brush from hair and other dirt.
Dust bin and cloth lter
In order to extend the service life of the vacuum robot, clean the dust bin and the cloth filter each time you use it.
The content of the dust bin greatly aects the suction power of the vacuum robot and the quality of the cleaning.
Clean the dust bin and empty the trash into the waste bin.
Take out the primary filter (fig. 2), open the cover and take out the remaining filters. Do not rinse the filter with
water. Clean the primary filter after 15 days of use.The lifetime of the HEPA filter is 3 months when vacuuming daily.
The dust bin can be washed under running water.

EN
92
Allow the container and the filters to dry
Sensors and charging poles of the vacuum robot
To ensure proper operation, clean the sensors and charging poles once a week, both on the vacuum robot and
the docking station.
Caution!
Before each cleaning of the appliance, unplug the power cord from the electrical outlet!
To clean the surface of the appliance, use only a damp cloth, no detergents or hard objects, as they can damage
the surface of the appliance!
Clean and inspect the input and output grids of the appliance frequently to ensure good operation of the
appliance and to prevent overheating.
The dust in the appliance can be blown or vacuumed.
Never clean the appliance under running water, do not rinse it or immerse it in water!
CAUTION for cleaning: Do not use gasoline, benzene, thinner, aggressive detergents, etc., as this may damage
the appliance. Never use alcohol or solvents.
EN
93
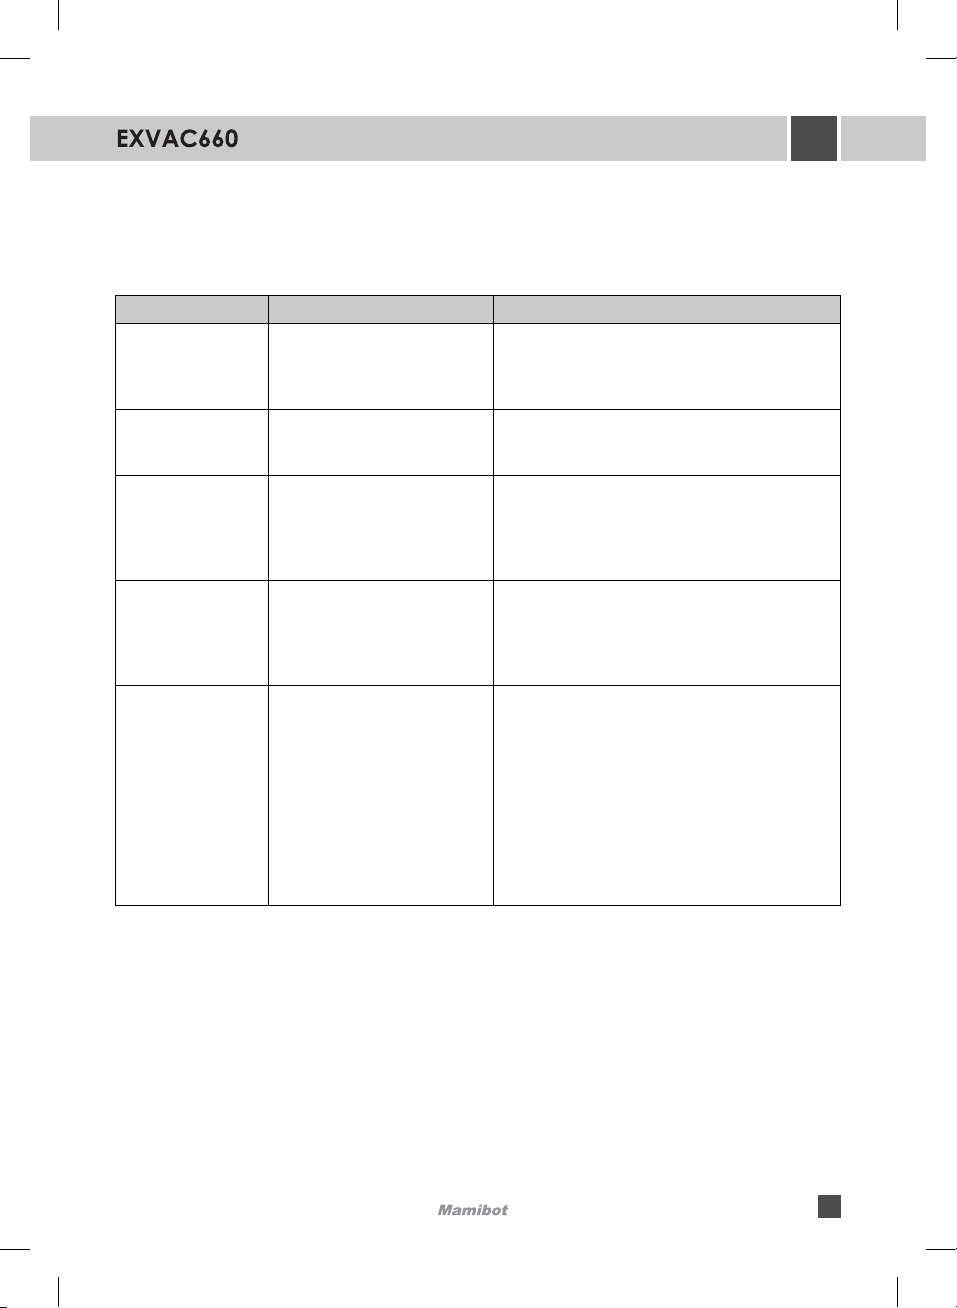
TROUBLESHOOTING
Problems associated with the function of the appliance, which sometimes may seem serious, can often be solved
easily. Some you can solve yourself with the help of the following troubleshooter. Any further maintenance
should be done at an authorized service centre.
Error Possible cause Remedy
The robot is
charging
1. Contacts on the vacuum
robot and docking station are
not connected.
2. Docking station if OFF
1. Make sure the contacts between the vacuum robot
and the docking station are connected correctly.
2. Allow the robot to charge when it does not work,
to be ready for the next cleaning.
The robot is stuck The robot has problems with
loose cables or carpet fringing.
The robot attempts to free itself automatically. If
this is not successful, you have to help the robot
manually.
The robot returns to
the docking station
before completing
the job.
1. The robot detected a low
power level and automatically
returns to be recharged.
2. The robot works differently on
different surfaces.
The operating time varies depending on the
complexity of the environment, the amount of
waste and the cleaning mode.
The robot does not
perform cleaning
work as planned.
1. The robot was not ON
2. The robot had a low energy
level.
3. The robot was stuck in some
obstruction.
1. Turn the robot ON
2. Allow the robot to charge when it does not work,
to be ready for the next cleaning.
3. Turn the robot OFF and clean the dust bin.
Make sure the wheels, brushes and sensors are clean.
The remote control
is not working.
(distance up to 5 m)
1. The distance is too large.
2. The robot or the remote control
is out of energy.
3. The infra-red beam of the
remote control is blocked by
something.
Obstacle or dirty sensor on the
robot’s body.
4. The beam may be affected
by another device operating on
a similar principle.
1. Replace the batteries. Make sure they are in the
right position.
2. Make sure, the robot is ON and has sufficient
energy to operate.
3. Clean the signal transmitter on the remote control
and the receiver on the robot.
4. Avoid using the remote control near other sources
of using infra-red signals.
Note: If none of the above recommended solutions help, try the following:
Turn the main power switch on the vacuum robot ON and OFF again.
Should the problems persist, please contact the service centre.

EN
94
OPERATING USING THE APP
Recommended distance: less than 4 meters
Make sure your vacuum robot, router, and your mobile phone are close together so that you can pair your phone
with the vacuum robot with no problems.
Before you can control your device through an application, you must press and hold the ON/OFF button
on the vacuum cleaner for at least 3 seconds until the Wi-Fi icon flashes .
Download and installation of the app
1. Scan the QR code below (Fig. 1) or find and download the Weback application on Google Play or App Store
(Fig. 2).
2. If you already have a Weback ID, open the application, log in and click ADD DEVICE (Fig. 3).
3. If you are a new user, start by registering your Weback ID (Fig. 4). Follow the instructions for successful
registration and click on ADD DEVICE.
Fig. 1 Fig. 2 Fig. 3 Fig. 4

EN
95
4. Scan the QR code below or on the bottom of the vacuum robot (Figs. 5–6). Follow the instructions until the
devices are successfully paired.
Warning: At the beginning of pairing, you need to be connected to your Wi-Fi network.
5. After successful pairing, click on the symbol (Fig. 7). Here you can change the device's name (Fig. 8).
6. Click SCHEDULE and set the desired cleaning plan (Fig. 9).
Fig. 5 Fig. 6 Fig. 7 Fig. 8 Fig. 9
7. Select the device (Fig. 10) to go to the main control panel.You can choose between the SMART (Automatic
/ ZIGZAG), SPOT (Circle), Edge (EDGE), Charge (search for the docking station (Fig.11).
8. Select DIRECTION KEY (Fig. 12) for manual control (Fig. 13).
Fig. 10 Fig. 11 Fig. 12 Fig. 13

EN
96
Sharing between household members
Only one user ID can control the device. If you want to add another
user, click on the MANAGE DEVICE (Fig. 14), enter the telephone
number / email of another user and follow the instructions (Fig. 15).
Note: Other users must be registered before sharing.
VOICE ASSISTANTS
Voice assistant Alexa and Google Home
1. Click on the Me icon and select Third-party connection (Fig. 16).
2. In the menu, select the desired assistant (Fig. 17).
3. Follow the detailed instructions.
Fig. 14 Fig. 15
Fig. 16 Fig. 17

EN
97
SERVICE CENTRE
Extensive maintenance or repair, which requires access to internal parts of the product, has to be performed
by a qualified service centre.
ENVIRONMENTAL CONCERNS
• Packaging materials and old appliances should be recycled.
• Packaging materials may be disposed of as sorted waste.
• Dispose of the plastic bags made of polyethylene (PE) as sorted waste.
Recycling of the appliance at the end of its lifespan:
The symbol on the product or on its packaging indicates that this product may not be treated
as household waste. Instead it should be taken to the appropriate collection point for the
recycling of electrical and electronic equipment. By ensuring this product is disposed of
correctly, you will help prevent potential negative consequences for the environment and
human health, which could otherwise be caused by inappropriate waste handling of this
product. For more detailed information about recycling of this product, please contact your
local council, your household waste disposal service or the shop where you purchased the
product.
The product meets all the necessary requirements of the EU directives applicable to the specific
product.
We reserve the right to changes in text, design, and technical specifications which are subject to change without
prior notice.


DE
99
DANKSAGUNG
Vielen Dank, dass Sie ein Produkt der Marke Mamibot eingekauft haben. Wir wünschen Ihnen, dass Sie mit
unserem Produkt über seine gesamte Gebrauchsdauer zufrieden sein werden.
Lesen Sie sich vor dem ersten Gebrauch die ganze Bedienungsanleitung sorgfältig durch und bewahren Sie
diese dann auf. Stellen Sie sicher, dass auch andere Personen, die dieses Produkt behandelnd werden, sich mit
dieser Gebrauchsanweisung vertraut machen.
Technische Parameter
Spannung 220–240 V ~ 50/60 Hz
Leistungsbedarf 28 W
Lautstärke <55 dB
WICHTIG
Vor dem Anschluss an das Stromnetz sichern Sie durch eine Sichtkontrolle, ob die Einheit
unversehrt ist und ob es während des Transports zu irgendwelcher Beschädigung nicht
gekommen ist.
WICHTIGE SICHERHEITSHINWEISE
• Das Gerät nicht anders benutzen, als es in dieser Anleitung beschrieben ist.
• Vor dem ersten Einsatz vom Gerät alleVerpackungen und Marketingunterlagen entfernen.
• Vor der Nutzung beseitigen Sie vom Fußboden alle Sachen (Kabel, Papiere, Bekleidung,
Tischtücher und Gardinen, die den Fußboden berühren), welche die eektive und
problemlose Reinigung stören könnten.
• Wenn sich im Raum der Reinigung Treppen befinden, bringen Sie das magnetische Band
(virtuelle Wand) in dem Mindestabstand von 15 cm von dem Rand der oberenTreppe an.
Dieser Abstand sollte den höchsten Schutz gegen den eventuellen Sturz von der Treppe
absichern.
• Benutzen Sie nur das Originalzubehör und die Ersatzteile, die zu diesem Modell bestimmt
sind.
• Setzen Sie sich nicht auf den Staubsauger und legen Sie darauf auch keine Gegenstände.
• Das Elektrogerät sollte nur in den Haushalten bei den Temperaturen von 0 °C bis 40 °C
genutzt werden.
• Vergewissern Sie sich vor der Nutzung, dass der Staubbehälter und das Moppgewebe
richtig eingesetzt sind.
• Legen Sie keine Haare, Bekleidung, Finger oder andere Körperteile in die Nähe der
Hauptbürste ein. Halten Sie die Hauptbürste und den Ansaugteil des Staubsaugers sauber,

DE
100
beseitigen Sie Haare und den Staub, welche die Staubeigenschaften des Staubsaugers
und die Qualität der Reinigung herabsetzen können.
• Benutzen Sie das Gerät auf dem nassen oder feuchten Fußboden nicht.
• Saugen Sie keine Flüssigkeiten, brennenden Zigaretten, Scherben und scharfen Gegenstände,
Streichhölzer und anderen brennbaren Stoffe, keine größeren Papierstücke, keine Papiertüten
oder anderen Gegenstände, die den Staubsauger beschädigen können.
• Beim Staubsaugen lassen Sie den Staubsauger über frei verlegte Kabel nicht überfahren.
• Bei der Instandhaltung und bei der Reinigung des Elektrogeräts schalten Sie den Ausschalter
in die Position Ausgeschaltet um.
• Das direkte Sonnenlicht kann die herabgesetzte Sensibilität der infraroten Sensoren des
Staubsaugers verursachen, verhindern Sie bitte seine direkte Strahlung.
• Die schwarzen Möbel müssen mit Bezug auf die physikalischen Prinzipien der infraroten
Sensoren nicht richtig detektiert werden. Es kann deshalb zum milden Anstoß kommen,
der durch den vorderen Stoßfänger gedämpft wird.
• Der Teppich ist beim Abwischen so abzusichern, dass der Roboter darauf während des
Saubermachens nicht auffährt. Wenn auf dem Staubsauger das Moppgewebe mit dem
Wasserbehälter installiert ist, könnte es zur Unterbrechung der Reinigung, eventuell zum
unerwünschten Durchnässen des Teppichs kommen.
• Legen Sie das Elektrogerät nicht auf die Plätze, von denen es auf den Boden leicht fallen
kann (Tisch, Stühle).
• Vergewissern Sie sich vor der Ladung des Elektrogeräts, dass die Ladestation richtig
eingeschaltet ist.
• Bei den extremen Temperaturbedingungen oder bei der ungeeigneten Nutzung kann es
zur Freisetzung der Flüssigkeit aus der Batterie kommen. Wenn die Flüssigkeit die Haut
betrifft, waschen Sie sie unverzüglich unter dem fließendenWasser. Im Falle des Kontakts
mit den Augen spülen Sie die Augen sofort unter dem fließenden Wasser mindestens für
die Dauer von 10 Minuten. Suchen Sie die ärztliche Hilfe aus.
• Im Falle, wenn Sie das Produkt entsorgen wollen, schalten Sie zuerst die Batterie vom
Elektrogerät ab.
• Im Falle, wenn Sie das Elektrogerät transportieren oder wenn Sie es lange nicht nutzen
werden, schalten Sie den Schalter in die Position Ausgeschaltet um. Sie verlängern so die
Lebensdauer der Batterie.
• Überprüfen Sie, ob die Anschlussspannung den Werten auf dem Typenschild des
Produkts entspricht. Schalten Sie das Elektrogerät in die Abzweigsteckdosen und
Verlängerungsleitungen nicht ein.
Other manuals for EXVAC660 Platinum
1
Table of contents
Languages:
Other mamibot Vacuum Cleaner manuals

mamibot
mamibot PETVAC280 User manual

mamibot
mamibot V8 User manual

mamibot
mamibot V6 User manual

mamibot
mamibot ProVac Plus2 User manual

mamibot
mamibot EXVAC880 Wisor User manual

mamibot
mamibot ProVac Plus2 User manual

mamibot
mamibot iGlassbot W110-F User manual

mamibot
mamibot EXVAC660 Platinum User manual

mamibot
mamibot iGLASSBOT W120-T User manual

mamibot
mamibot iGlassbot W110-F User manual


