mamibot ProVac Plus2 User manual


ProVac Plus2
Robot Hoover
USER MANUAL
Thanks for purchasing Mamibot robot hoover.
Please read this user manual carefully before using and keep it
properly for future use.
EN

2
About your ProVac Plus2
1. Top View
2. Bottom View
3. Water Tank
Start/Stop
On/Off
Bumper
Battery Box
Water Tank Cap Mounting Pole
Water
Leaking Area
Cleaning Cloth
Water Tank
Suction Port
Front
Wheel
Side Brush
Anti-falling
Sensor
Dust box cover
Drive wheel
Side Brush
3
Maintenance of ProVac Plus2
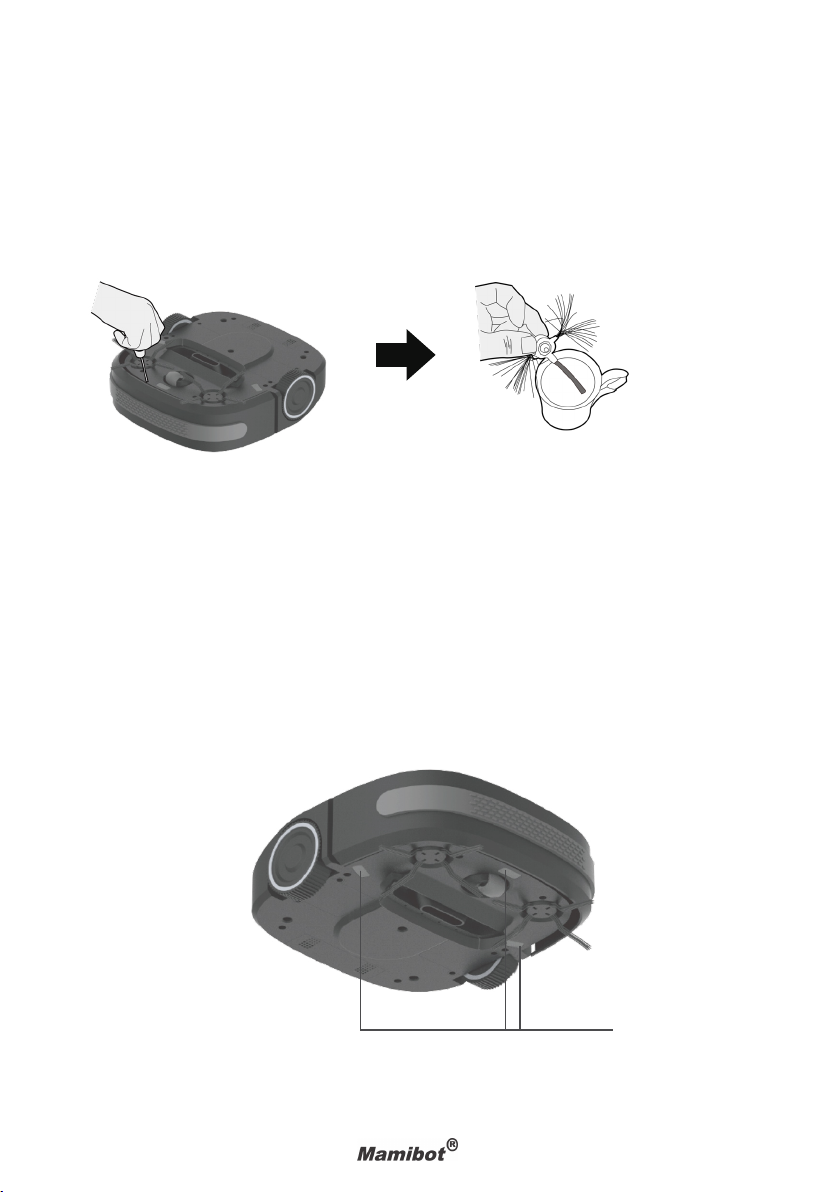
1. Clean or Replace the Side Brush
2. Clean Anti-falling Sensors
Anti-falling Sensors
Remove side brush screw.
Wipe the three anti-falling sensors with a clean, dry cloth.
Take off side brush.
Drive wheel
The side brushes can sometimes be deformed during transportation or when the product is used
under particular conditions. If this happens, it is possible to return to the original shape by putting
bristles in hot water.

4
Maintenance of ProVac Plus2
3. Clean the Dust Bin and Filter
4. Remove or Install Battery
A: Pull out the cover and clean lter. B: Clean or replace lter.
2
Remove and empty the dust bin after each use.
Clean the dust bin

5
Use of ProVac Plus2
1. Water Tank Use and Mopping
4. General Dry Vacuuming & Sweeping
Frequently Asked Questions
For wet mopping, please mount the water tank and the mopping cloth before use. When it’s not
in use, please take off the water tank and the mopping cloth. Pour out left water and dry it for next
use.
Full cleaning mode: Press the switch On/Off button one (1 time) to start, it cleans for 80-100 minutes
and stops automatically when battery is low.
Single room cleaning mode: Press the switch On/Off button twice (2 times) to start, it cleans 45
minutes and stops automatically.
1Attach cleaning cloth to
water tank;
2Fill clean water into
water tank;
3Attach the water tank to
the bottom of the robot, x
the mounting pole properly.
Mounting
Pole
Q: Why does the side brush occasionally spin backwards?
A: When caught on items such as carpet tassels or wires, the side brush may spin slowly or briey spin
backwards to free itself. This may also occur on thick or high-pile carpets. If this behavior should occur
on hard oor surfaces or when on tassels or wires are presented, the side brush should be cleaned.
Use a small screwdriver, to move the screw from the center of the side brush rst, then remove the
side brush and clean any hair or debris wrapped around the shaft thoroughly. Re-install the side brush
properly after cleaning it.
Q: Why does ProVac Plus2 stop occasionally?
A: It might be stopped because of low power, or stuck by obstacles, or by carpet with long rugs, or
moves onto carpet when cleaning with water tank and mop attached. ProVac Plus2 is not supposed
to clean carpets with long rugs, or when with water tank attached. Please be sure that there are no
cables, clothes, curtain belts, or any other materials scattered in its cleaning area, to avoid tangling
or trapping your robot hoover during cleaning.
Q: Why doesn’t ProVac Plus2 slow down as it approaches certain obstacles?
A: The ProVac Plus2 uses its light touch bumper technology to identify walls and other obstacles,
allowing it to slow down and gently touch the obstacles with its bumper before changing the
direction. It may be less effective at sensing and slowing down an extremly dark or black surfaces, or
for objects that are less than two inches wide.

6
Cleans Multiple Floors
Anti-Tangle System
The ProVac Plus2 works on wood, carpet, tile, vinyl, and linoleum, and adjusts automatically to different
oor types. It mops hard oors with water tank, but doesn’t mop carpets with long rugs.
The ProVac Plus2 automatically senses stairs and other cliffs. It might stall when confronting rounded
edges and might slide over particularly slippery surfaces.
The ProVac Plus2 won’t get stuck on cords, carpet fringe or tassels. When it detects that it had picked up
a cord or tassel, it will automatically stop its side brushes and try to escape. It may make a clicking noise
when anti-tangle is activated.
Important Safety Insructions
This robot hoover should only be used for domestic cleaning, as described in this user guide.
Always switch off and remove the charger from the socket before cleaning the robot hoover or any
maintenance task.
This robot hoover can be used by children aged from 16 years and above and persons with reduced
physical, sensory or mental capabilities or lack of experience and knowledge if they have been
given supervision or instruction concerning use of the robot hoover in a safe way and understand the
hazards involved. Children shall not play with the robot hoover.
If the power cord is damaged, stop using the robot hoover immediately. To avoid a safety hazard,
an authorized service engineer must replace the power cord.
If the area to be cleaned containers a balcony, a physical barrier should be used to prevent access
to the balcony and ensure safe operation.
Small children and pets must be supervised while the robot hoover is cleaning.
Use only the original charger supplied with the robot hoover. Check that your supply voltage is the
same as that stated on the charger.
Leaks from battery cells can occure under extreme usage or temperature conditions. If the liquid
gets on skin, wash quickly with water. If the liquid gets into eyes, ush them immediately with clean
water for a minimium 10 minutes. See medical attention.
It is normal for the charger to become warm to the touch when charging.
Don’t pick up hard or sharp objects, matches, hot ashes, cigarette ends or other similar items.
Don’t spray with or pick up ammable liquids, cleaning uids, aerosols or their vapours.
Don’t continue to use your robot hoover or charger if it appears faulty.
To ensure the continued safe and efcient operation of this appliance we recommend that any
servicing or repairs are only carried out by an authourised service engineers.
Don’t replace the batteries with non-rechargeable batteries.
End of life battery removal: If the robot hoover is to be disposed, the batteries must rstly be re-
moved. It must be disconnected from the supply mains when removing the battery.

7
Specication
Model No.: ProVac Plus2 Cleaning Modes: 3 modes (edge, spiral, random)
Battery: 7.4V 2.200/2.600mAh Lithium Charging time: 3-4 hours
Working time: 80-100min Dimension: 25.5 x 24.3 x 8.1cm
Adapter: AC100-240V 50/60Hz Dust box: 0.30 l
Noise Level: <60dB Cleaning surface: multiple (wooden, marble, ceramic)
Quality
Factories have been independently assessed by an authorized party for quality and production
management.
The Environment
The symbol on this appliance indicates that this appliance may not be treated as household waste.
Instead it must be handed over to the applicable collection point for the recycling of electrical and
electronic equipment. Disposal must be carried out in accordance with local environmental
regulations for waste disposal. For more detailed information about treatment, recovery and recycling
of this appliance, please contact your local city ofce, your household and waste disposal service or the
shop where you purchased the appliance.
This appliance complies with the European Directives 2014/30/EU, 2014/35/EU, and 2014/53/EU.
Your Guarantee
The guarantee conditions for this appliance are as dened by our representative in the country in which it
is sold. Details regarding these conditions can be obtained from the dealer from whom the appliance was
purchased. The bill of sale or receipt must be produced when making any claim under the terms of this
guarantee. Subject to change without notice.
Mamibot Manufacturing USA Inc.
Orange Street #600, New Castle, Wilmington, Delaware, USA 19899
www.mamibot.com, [email protected]

8
6. Troubleshooting
Problems Causes and Solutions
The robot hoover doesn’t work Check if the robot hoover is switched on.
Check if the dust container, lter and motor are
clean or not.
Check if the robot hoover needs to be charged.
Cleaning power is weak Turn power off and:
Empty dust container.
Check and clean the lter and motor.
Check and clean the sensors.
Check and clean the drive wheels.
The robot hoover is very noisy while cleaning Clean the dust bin and lter.
Check the brushes and drive wheels for dirt and
debris.
The robot hoover stops working/cleans intermit-
tenly
Check the cleaning mode setting.
No power, charge the robot hoover and use it
again.
The robot hoover fails to detect stairs Check and clean the sensors.
The robot hoover is trapped The robot hoover will attempt to free itself but in
some cases assist the robot hoover manually.
The robot hoover can’t be charged Check if the adapter is connected to power supply.
Light and Sound Indication
Flickering red light with beeps from buzzer: Lower battery/stuck by obstacles
Flickering red without beeps: charging
Solid blue light: Fully charged
***Remarks***:
Please be aware of that the robot hoover is not supposed to clean on carpets when the water tank and
mop are attached.
Please empty and clean the dust bin in time, dirty dust bin will reduce the cleaning power and
efciency.
Other manuals for ProVac Plus2
1
Table of contents
Other mamibot Vacuum Cleaner manuals

mamibot
mamibot V6 User manual

mamibot
mamibot EXVAC660 Platinum User manual

mamibot
mamibot iGlassbot W110-F User manual

mamibot
mamibot iGlassbot W110-F User manual

mamibot
mamibot ProVac Plus2 User manual

mamibot
mamibot EXVAC880 Wisor User manual

mamibot
mamibot V8 User manual

mamibot
mamibot iGLASSBOT W120-T User manual

mamibot
mamibot EXVAC660 Platinum User manual

mamibot
mamibot PETVAC280 User manual


