mamibot V8 User manual
Mamibot
Cordless Stick Vacuum Cleaner V8
User Manual
20201230 Ver.
Please read this manual carefully before use and keep this manual for future use.

1
Table of Contents
2-4 Important Safety Instructions and Warnings
5-7 Product Description
8-10 Assembling
10-13 Operation
14-15 Trouble Shooting
16 Name and Content of Hazardous Substances
17 Recycling of V8

2
Important Safety Instructions and Warnings
Read all documents before using
The appliance is not to be used by children. Persons with reduced
physical, sensory or mental capabilities, or lack of experience and
knowledge may only use this appliance if they are supervised or have
been given instruction about how to use it safely and understand what
risks are involved. Children should be supervised to ensure they do not
play with the device.
Storage
●Please take it gently and carefully to avoid breaking the device.
●Please don’t use it close to fire source or in any location of high
temperature.
●Don’t use or keep the cleaner in extreme climate conditions, e.g.
cooling rooms, high temperature environment, suggested
temperature of using and storage is 0-40℃of indoor areas;
●Please charge your cleaner at least every three months if you are
not using it regularly.
Before Use
●Check the adapter cable and confirm it is in good condition.
●Fully charge the cleaner before using if it’s not used for long time.
●Please make sure the Hepa filter and sponge filter are installed
properly.
In Use
●Do not use outdoors or on wet surfaces.
●Do not allow to be used as a toy. Close attention is necessary when
used by or near children.
●Use only as described in this manual. Use only manufacturer’s
recommended attachments.
●Do not use vacuum if it has been dropped, damaged, left outdoors,
or dropped in water. Return it to an authorized service center.
●Do not handle plug or appliance with wet hands.
●Do not put any object into openings. Do not use with any opening
blocked; keep free of dust, lint, hair and anything that may reduce
air flow.
●Keep hair, loose clothing, fingers, and all parts of body away from
openings and moving parts.

3
●Do not pick up anything that is burning or smoking, such as
cigarettes, matches, or got ashes.
●Use extra care when cleaning on stairs.
●Do not use to pick up flammable or combustible liquids such as
gasoline or use in areas where they may be present.
●Look on your vacuum and follow all label and marking instructions.
●Keep end of hose, wands and other openings away from your face
and body.
●Do not use the vacuum cleaner without dust cup filter in place.
●Always unplug this appliance before connecting or disconnecting
vacuum hose.
●Store the vacuum indoors. Put the vacuum away after us to prevent
tripping accidents.
●Use the incorrect battery will damage motor and users. Please use
the recommended batteries.
●Use only on dry, indoor surfaces.
●Do not use for any purpose other than described in this user’s guide.
●If the supply cord is damaged, it must be replaced by the
manufacturer, its service agent or similarly qualified persons in order
to avoid a hazard.
●Don’t use the cleaner in or near flammable or explosive conditions.
●Don’t use your cleaner to suck glass particles, needle, dirty water,
ashes, or any other liquid.
●Don’t use your cleaner to suck cement, land plaster, wall plaster or
toys, which may cause defects to the device.
●Don’t block your suction inlet or tube, clear the suction inlet and
tube in time to retain good performance of cleaning and avoid
motor defects.
●If the cleaner can’t start working even when the battery is full,
please go to service agent or Mamibot distributors for inspection,
don’t disassemble it on your own.
●Don’t use the cleaner if dust bin is not in position.
In Maintenance
●Dry cloth is suggested to clean the cleaner, no gas/alcohol or other
chemical solution is allowed to clean the device.
●Turn off the cleaner first before proceeding with any cleaning task or
maintenance.
●Please clean the dust box, suction inlet and tube in time to avoid air
channel being blocked, air channel blockage would reduce
suction power and cause motor heating.
●Hepa filter is suggested to be replaced in three month, or even in
shorter period if the device is frequently used.

4
Application of Power Adapter and Batteries
●Use only the power adapter supplied with this device. Use of other
type of power adapter will result in malfunction and/or danger.
●Please use the proper electric outlet and make sure no heavy
objects are placed on the power adapter or power cord.
●Allow adequate ventilation around the adapter when using it to
operate the device. Do not cover the power adapter with objects
that will reduce cooling.
●Do not use the adapter in a high moisture environment. Never
handle the adapter with wet hands.
●Connect the adapter to a proper power source. The voltage
requirements are found on the adapter.
●Do not use broken adapter, power cord or plug. The plug must be
removed from the receptacle before cleaning or maintaining the
Appliance. Do not unplug the Power Adapter by pulling on the
power cord.
●Do not attempt to service the adapter. There are no service parts
inside. Replace the whole unit if it is damaged or exposed to high
moisture. Consult your Mamibot dealer for help and maintenance.
●The battery used in this device may present a risk of fire or chemical
burn if mistreated. Do not disassemble, short contact, heat above
60℃(140℉), or incinerate.
●If you have to dispose of this old equipment, please take it to the
local recycling center for recycling electrical and electronic parts.
●Retain the safety and operating instructions for future reference.
●Do not expose your device to rain or excess humidity, and keep it
away from liquids (such as beverages, faucets, and so on).
●Avoid exposing your device to direct sunlight or intense light source,
and keep it away from heat source (such as radiators, space
heaters, stoves, and so on).
●On waxed floors the movement of the cleaner head may create an
uneven lustre. If this happens, wipe with a damp cloth, polish the
area with wax, and wait for it to dry.
●The Appliance must be disconnected from the receptacle before
removing the battery for disposal of the Appliance.
●The Appliance must be used in accordance with the directions in
this Instruction Manual.
●Product manufacturer cannot be held liable or responsible for any
damages or injuries caused by improper use.

5
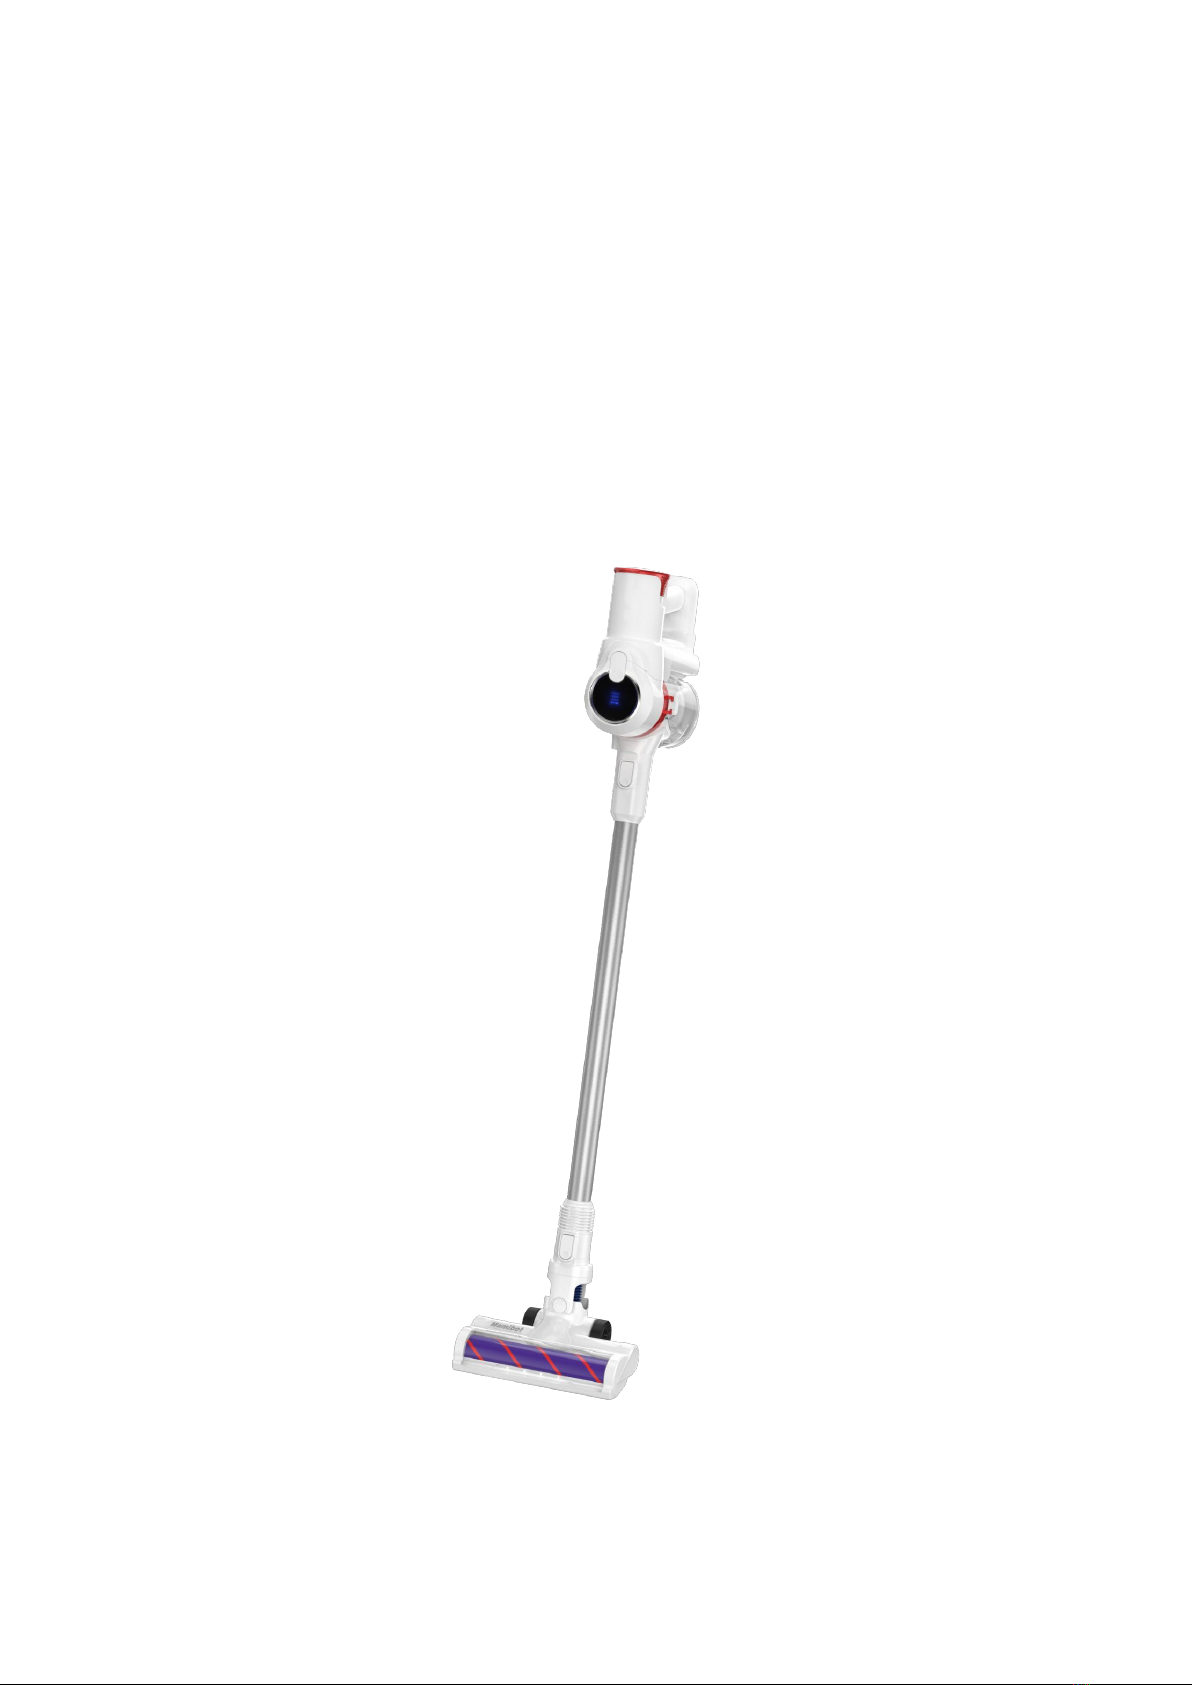
1. Product Description
Main View
Dust Box View
24
25

6
1.1 Product diagram:
1
Main Brush Set
2
Aluminum Tube
3
Tube Release
Button
4
Indicator Light
5
Body Release
Button
6
Power Switch
Button
7
Dust Box
8
Dust Box Upper
Part
Release Button
9
Dust Box
Bottom
Release Button
10
Battery Pack
11
Conversion Joint
12
Crevice Brush
13
Roller Brush
(For hard floor or
carpet)
14
Adapter
15
Body Release
Button
16
Dust Box Cover
17
HEPA Filter
18
Sponge Filter
19
Dust Box Air Exhaust
Cover
20
Centering Filter
System
21
Dust Box
22
Dust Box Bottom
23/25
Cradle A Or B
24
Lock Button
1.2 Specification
Mamibot V8 Cordless Vacuum Cleaner
Model No.:
V8
Rated Power:
350W
Rated
Voltage:
22.2VDC
Battery
Capacity:
2200mAh
Vacuum
Power(kPa):
Standard: >9kPa
Max:>27kPa
Dust Box(L):
0.5
Working
Time:
Standard: 35-40mins
Max:about 10mins
Charging Time:
About 5Hrs
Noise
Level(dB):
<80
Dimension(mm):
With Tube
1130x240x225
Adapter
Output:
26VDC 0.45A
The data come from the lab of Mamibot Manufacturing USA Inc. It
might slightly be different with the users data due to different working
environment and usage, please subject to the final products.
1.3 PRECAUTIONARY MEASURES
If just start to vacuum, the brush or extension tubes are blocked, you

7
should switch off the vacuum cleaner at once. First clear the blocked
substance before you attempt to start the vacuum cleaner again.
1.4 CAUTION:
Do not operate the vacuum cleaner
too close to heaters and like
radiators, cigarette butts etc.
Before using the vacuum cleaner,
please remove large or sharp objects
from the floor in order to avoid
damaged filter. Do not use the
vacuum to clean anything that is
easy to burning, such as gas and
cigarettes.
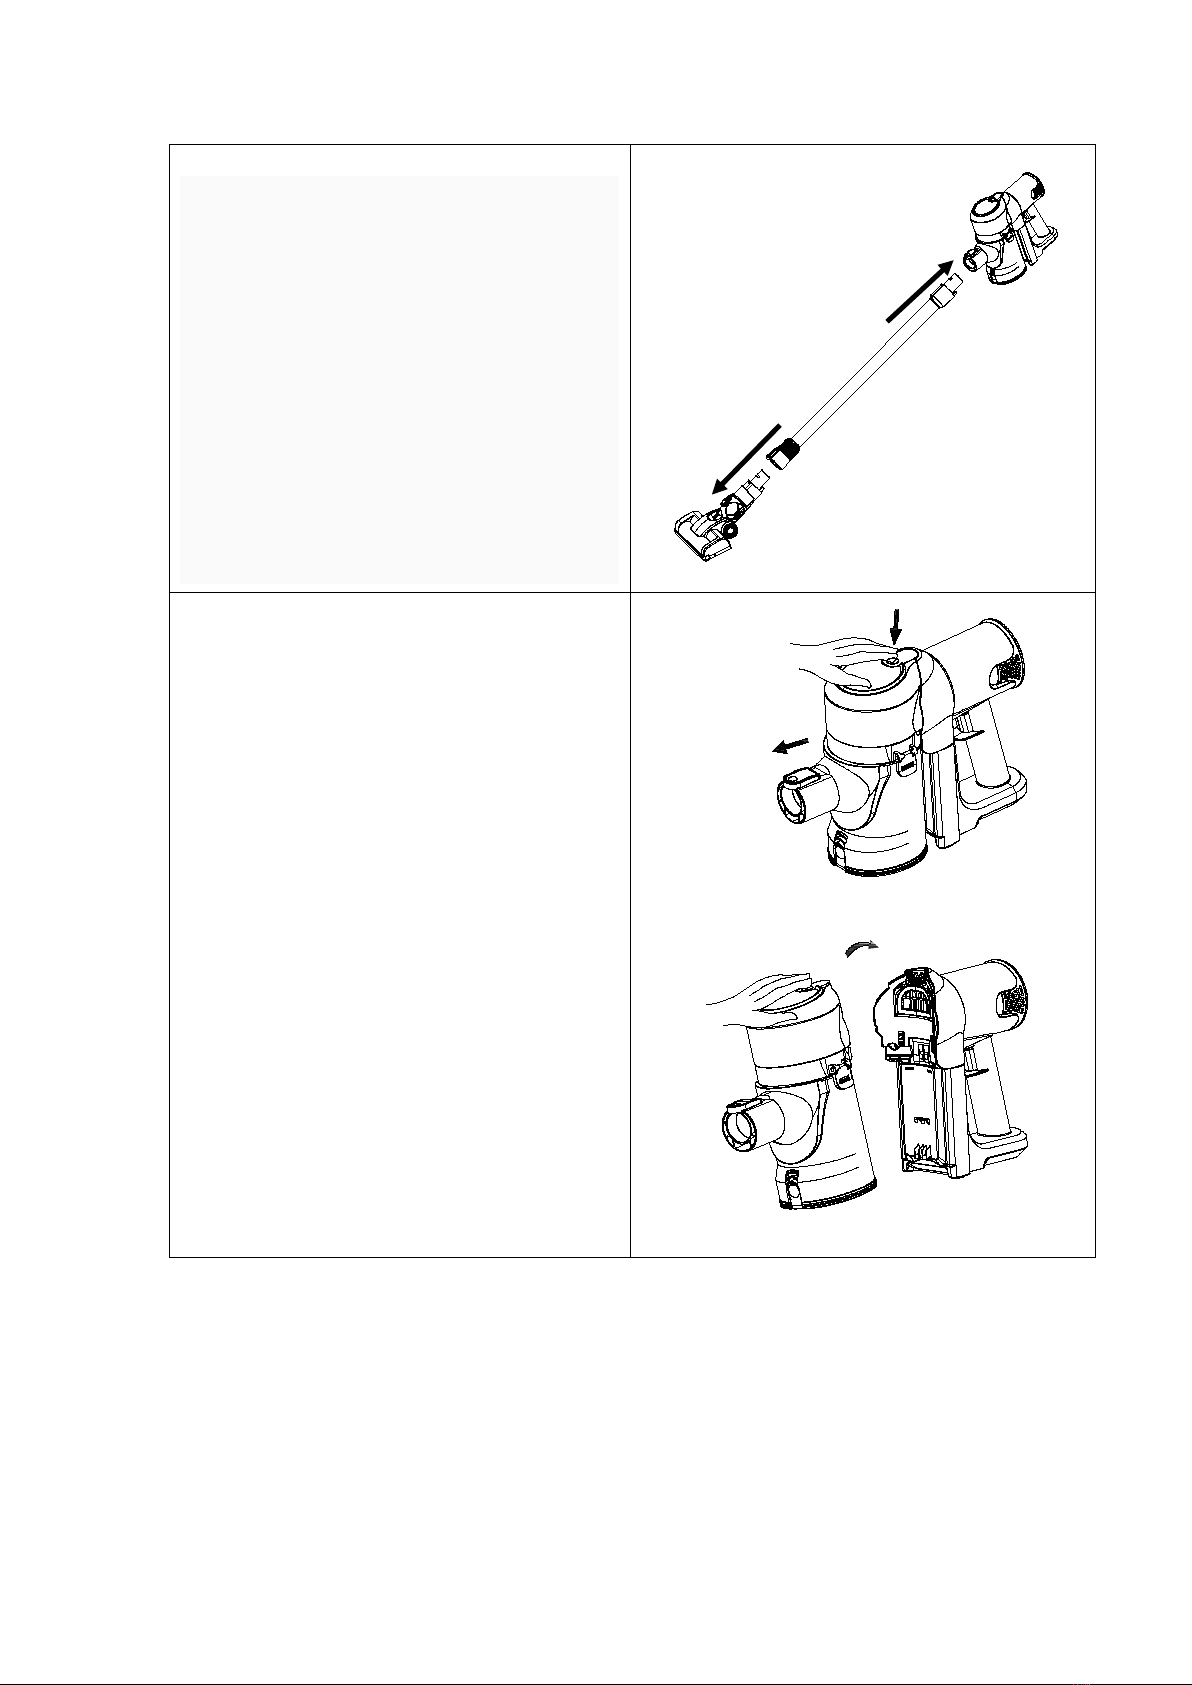
2. ASSEMBLING
2.1 Connecting the Crevice
Brush
①When users are going to vacuum
hard-to-reach areas like windowsill,
sofa gaps, book shelves, inside closet
or inside computer cases, crevice
brush would be a better choice for
cleaning.
Connecting the conversion joint first,
then fix the crevice brush on the joint.
②When users are going to clean the
higher places, such as ceiling,
curtains, connecting the aluminum
tube and the crevice brush to clean is
practical and easy.
①
②
8
2.2 Connecting the Main Brush
With the main brush, users can set to
clean hard floors like marble, wooden
floors, tiles, short rugs.
Connecting the aluminum tube
with the cleaner head until we
hear the voice of “click”.
Connecting the aluminum tube
with the main brush set until we
hear the voice of “click”.
2.3 Remove or install the dust
box
Remove dust box from the
cleaner head:
Push the body release button, then
take out the dust box from body (Fig.
A).
Install dust box on body:
Put the handle on dust box
hook(please pay attention to the
fitting position and direction),then
press them until we hear the voice of
“click”(Fig.B).
2、move
1、push here
Fig.A
Fig.B
9
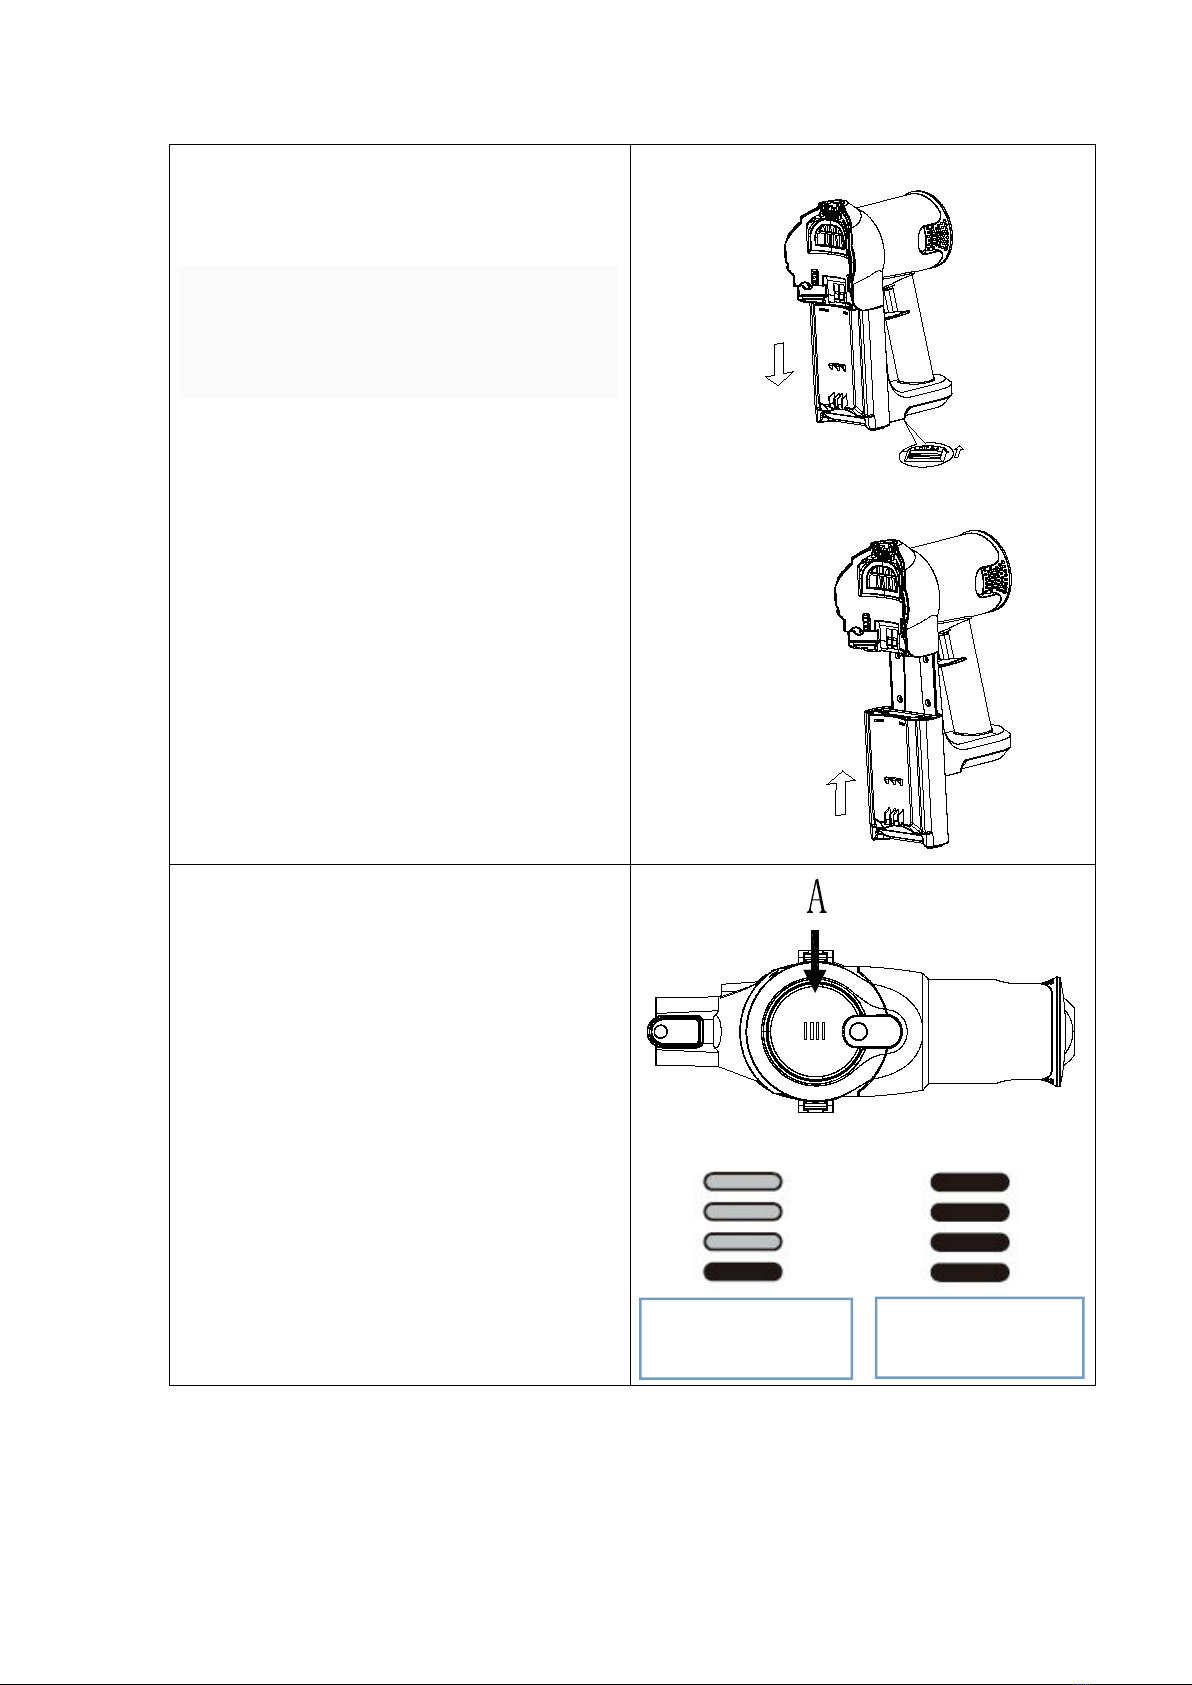
2.4 Install and remove the
battery pack
(a) Remove the battery pack: Push
the button at the bottom of the
battery, and then pull the battery
pack along the battery slot and
remove it from the body(Fig. A).
(b) Install the battery pack: Place the
battery pack on the battery slot and
push it upward until we hear the
voice of “crack”(Fig. B).
2、move
1、push here
Fig.A
Fig.B
move
2.5 Charging Indicator
Charging Status: The indicators will
flash blue color when charging, the
four indicators will keep on after fully
charged.
Working Status: The indicators will
keep on when working, and the
indicators will be off one by one with
the consumption of battery power.
When there is only one indicator
on(the battery power is lower than
25%), the indicator will flash blue and
alerts users to charge the cleaner.
Battery power is
lower than 25%.
Battery power is
75%-100%.

10
3. Operation
3.1 Switch on/off
Press the power switch button once to switch on V8, and enter Standard
Mode.
Press the power switch button again at Standard Mode, then enter Max
Mode.
Press the power switch button again at Max Mode, the cleaner will be
switched off.
3.2 Charging
Connecting the adapter with the
power adapter and device, the
battery indicators will flash blue
from low to high. Battery is fully
charged if all the indicator lights
are illuminated without flashing.
3.3 Maintenance and Clean
3.3.1 Dust Box Cleaning
1). Remove the dust box from
cleaner head.
2). Press the dust box bottom
release button, then the dust will
fall down automatically. usually
you may only do like this to drop
the dust (fig.A).
3). If the centering filter system is
too dirty, please take out the dust
box cover, the Hepa, the sponge
filter and dust box air exhaust
cover, then you can clean them
with soft brush or wash them with
water. You should dry them
completely before use
again(fig.B).
Fig.A
Fig.B

11
3.3.2 Hepa and Sponge Filter
Cleaning
1). Remove the dust box from
body.
2). Rotate the dust box cover
anticlockwise from “close” to
“open”, take out the dust box
cover, take out the sponge and
HEPA filter set(fig. A).
3). Cleaning the Sponge and
HEPA filter by soft brush or rinse it
in warm water and dry them
completely before use again. All
the filters are washable (we
recommend you to clean the
filters when feeling the suction
power becoming weak)(fig.B).
Note: The above filters should be
equipped in correct places.
Fig.A
Fig.B
3.3.4 Roller Brush Cleaning
1). Pull the lock button on the
brush set out, and take out the
brush(the hard floor brush or the
carpet brush), then get out the
screws on the brush(see the steps
in the figures on the right).
2). Clean dust, hair, fabric
particles on the brush bar with
your cleaning tool, cut hair with
knife or scissor if the brush bar is
tangled.
3) . Dry the brush sets before the
second use.
Users can replace the brush bar to
clean the floor or clean the short
rugs depends on actual situation.
① ②
③ ④
Sponge and HEPA
Filtet
12
A.○
1○
2
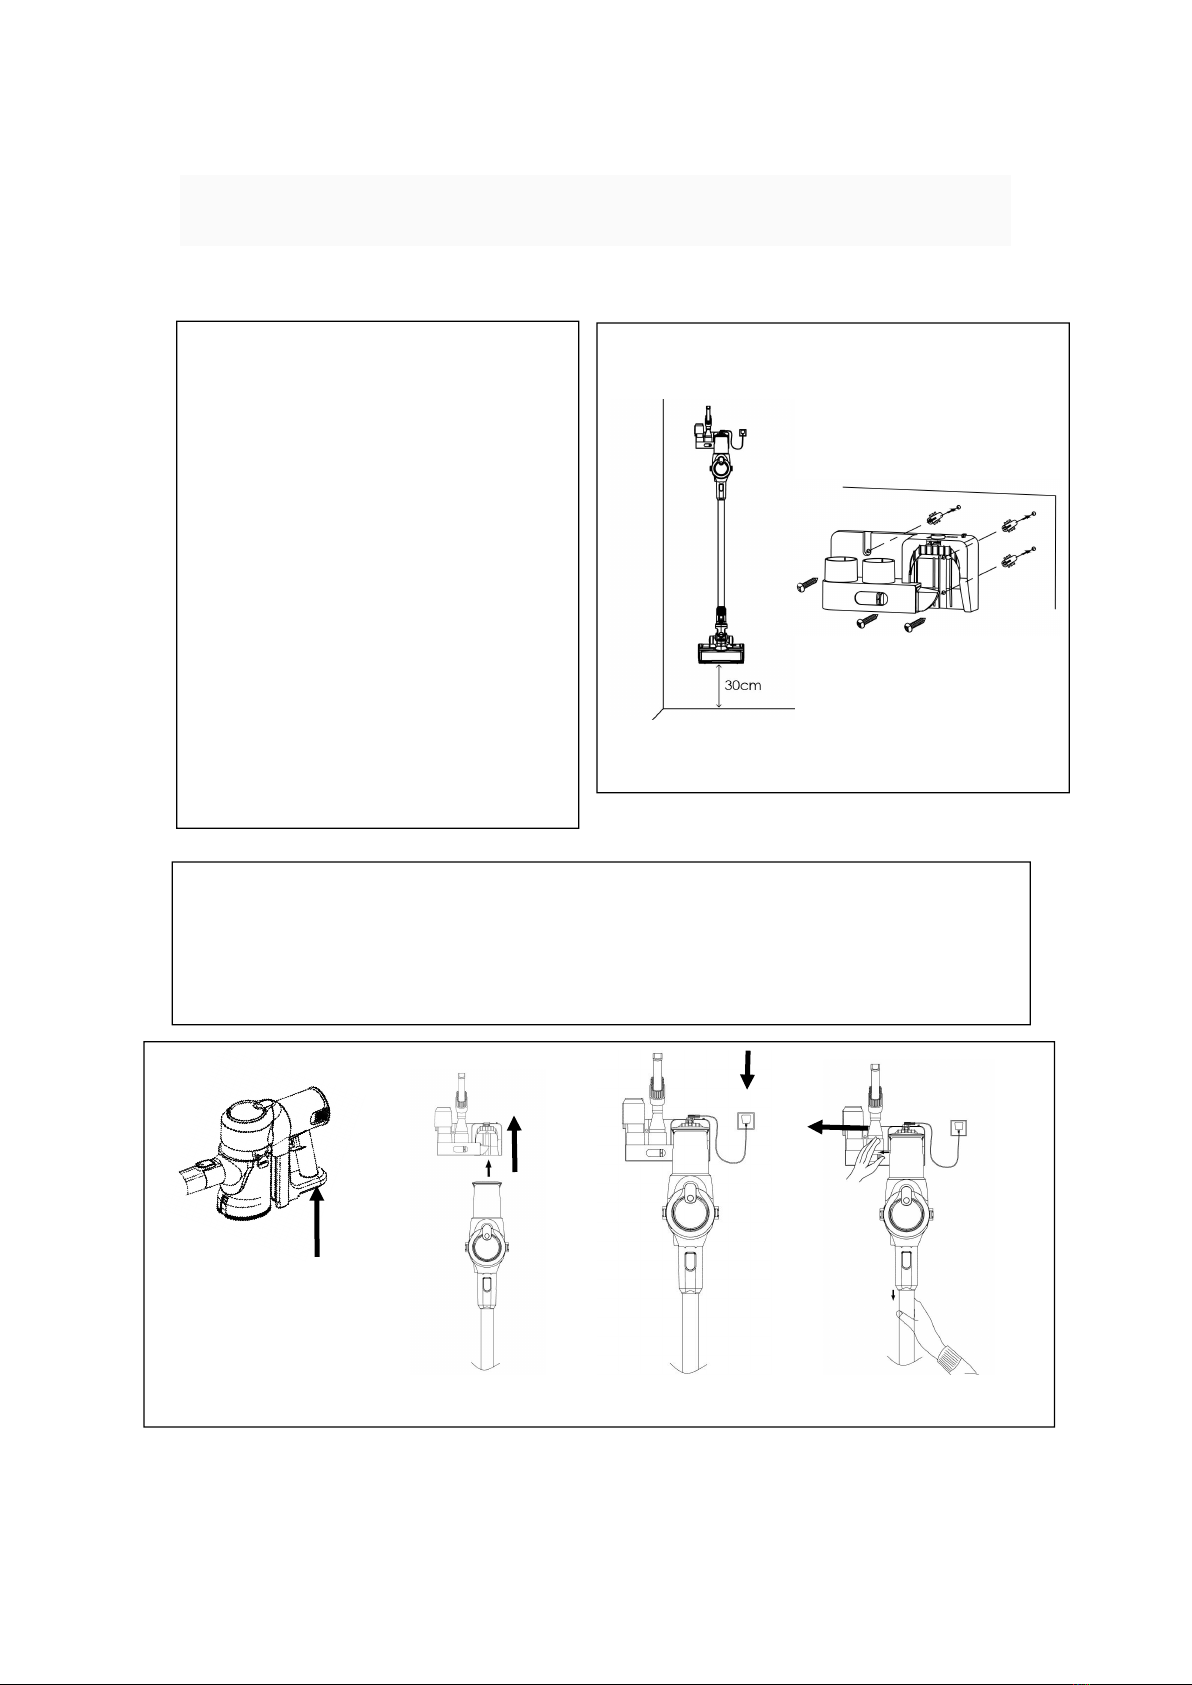
3.4 Cradle Installation
There are two kinds of Crade installation: A OR B, please assemble the cradles
according to the actual products in your hand.
-
○
3○
4○
5○
6
A: It is suggested that the height
between the vacuum cleaner’s
brush set and the floor surface
should be about 30cm. Please
refer to the figure ○
1 .
1). Fix the cradle on the wall
with provided screws and
expansion pipes○
2 .
2). Hold the cleaner, and push
the hand along the lock slot of
cradle until we hear a “crack”
○
3○
4.
3). Plug in and charging○
5.
4). Plug out the adapter, pull the lock button toward the left with hand,
then take off the cleaner○
6 .
13
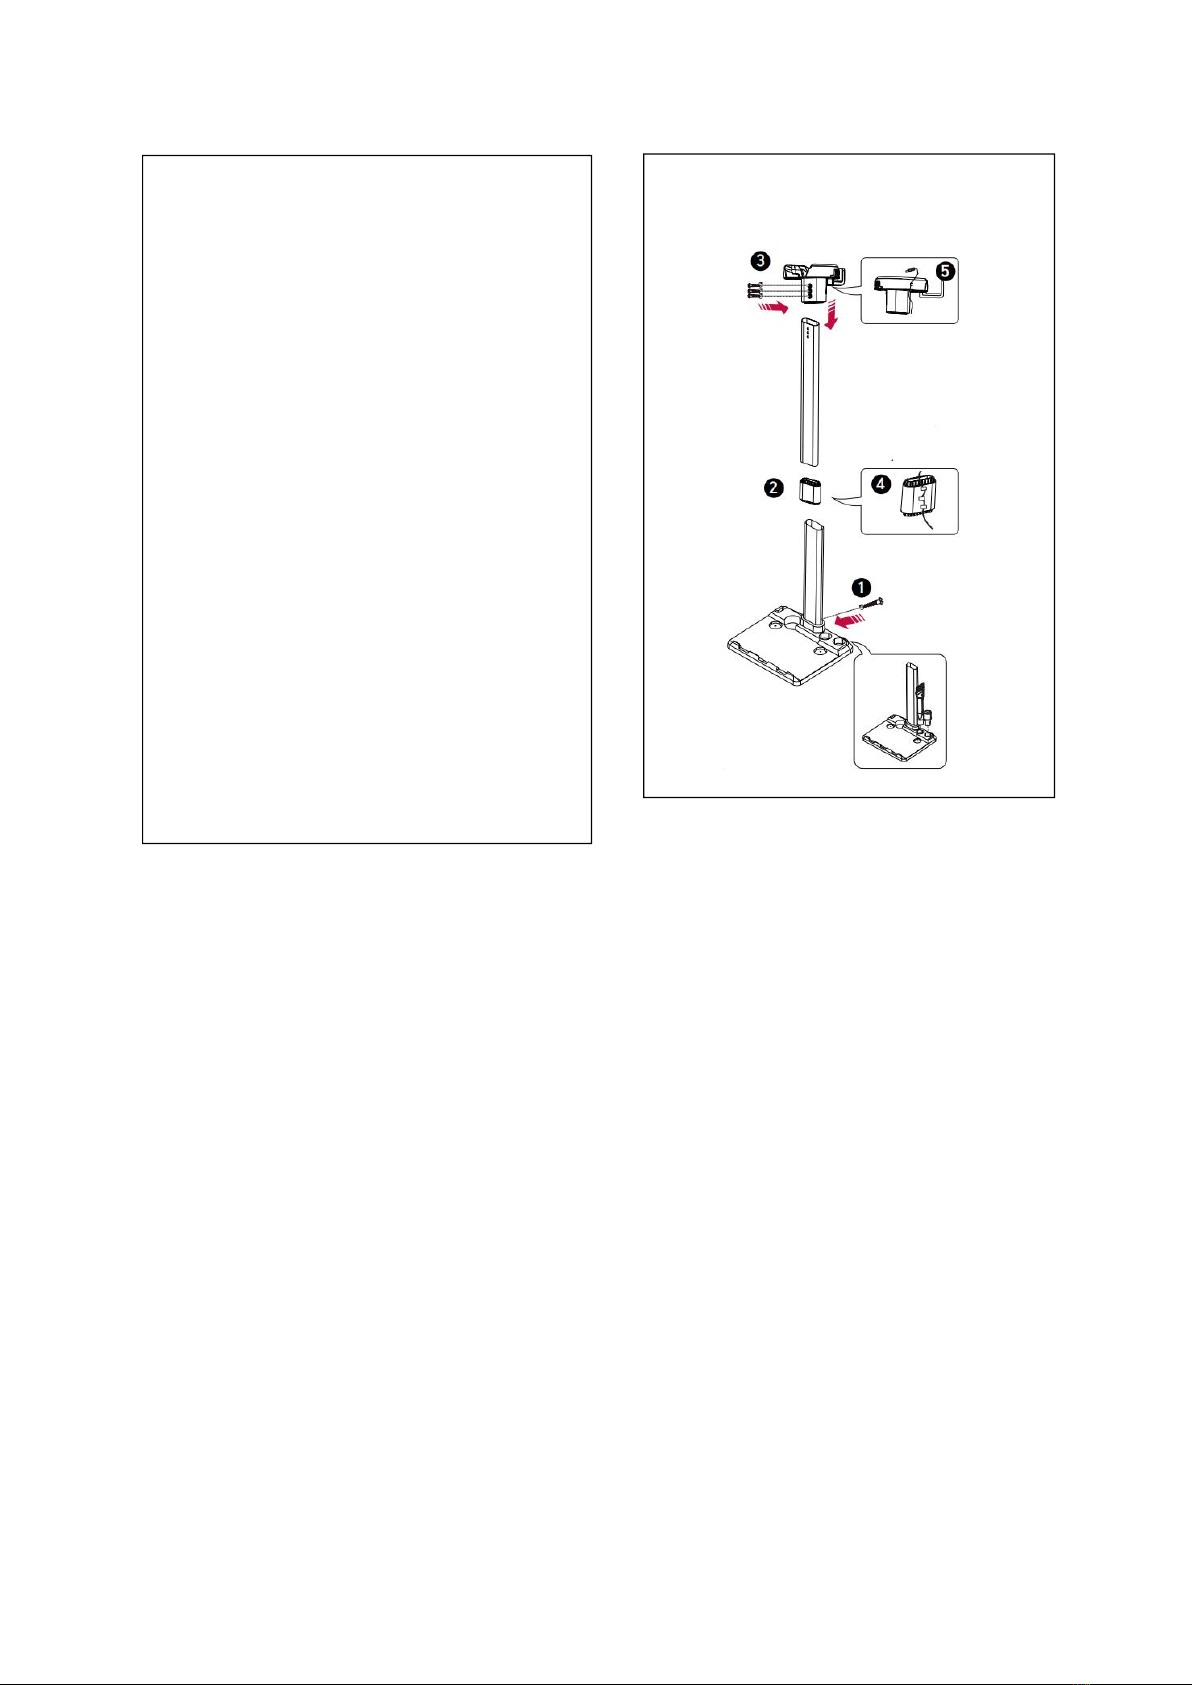
B:
1). Put the stand base on the flat
floor steadily.
2). Fix the tube on the stand base
by using the screw. Please refer to
the figure ○
1;
3). Connecting the 2 aluminum
tubes with the joint. Please refer to
the figure ○
2;
4). Fix the tube on the stand head
with 3 screws. Please refer to the
figure ○
3.
5). Plug the adapter in and out.
Please refer to the figure ○
5.
B.
14
4. TROUBLESHOOTING
If there is any failure of V8 cordless vacuum cleaner, please follow below
solutions to check and solve the problems. If none of the solution is workable,
please contact the authorized agent for inspection and further solutions.
PROBLEM
POSSIBLE REASON
POSSIBLE SOLUTION
Machine does not
work.
The battery power is
low.
Check the battery power
and recharge it.
The machine can
not suck ash or
suction is very weak.
●The dust box may
be full.
●Lack of battery
power.
●The HEPA or sponge
filters are blocked.
●Non-dried filters
after washing.
●Air channel is
blocked.
●Empty dust box.
●Charge the cleaner.
●Clean the HEPA or
sponge filter.
●Dry the filters after
washing.
●Check the air channel
and take out the
blocked debris.
Dust escaping from
vacuum.
●Dust box is full.
●The HEPA or sponge
files may not be
installed.
●Empty dust box.
●Check to see if the HEPA
or sponge filter are
installed.
Failure of main
brush.
The brush is tangled by
cables, hair or other
trashes.
Check and clean the brush.
Short running time.
●Aged battery pack.
●Non-fully charged
battery pack.
●Over heated or over
cooled battery
pack.
●Replace the battery
pack
●Recharge the battery
pack
●Cool down and restart

15
No LED indicator or
flashing when
charging.
Adapter is not plugged
in properly.
Check the connection of
the adapter, the power
supply and the charging
port, make sure they are in
position.
Battery leakage.
Battery reaches life time
or in no use for long
time.
Replace the battery in time.

16
5. Name and Content of Hazardous Substances
Component
Content of Hazardous Substances
Plastic
Shell
PCB
Cables
Metal
Parts
Adapter
Electronic
Component
s
Rubber
Components
Cadmium(Cd)
o
o
o
o
o
o
o
Lead(Pb)
o
o
o
×
o
o
o
Mercury(Hg)
o
o
o
o
o
o
o
Hexavalent
Chromium(CrVI)
o
o
o
o
o
o
o
Polybrominated
Biphenyls(PBB)
o
o
o
o
o
o
o
Polybrominated
Diphenyl
Ethers(PBDE)
o
o
o
o
o
o
o
Bis(2-ethylhexyl)
Phthalte(DEHP)
o
o
o
o
o
o
o
Butyl Benzyl
Phthalate(BBP)
o
o
o
o
o
o
o
Dibutyl
Phthalate(DBP)
o
o
o
o
o
o
o
Diisobutyl
Phthalate(DIBP)
o
o
o
o
o
o
o
The time of the components for environment protection concern is 10 years.
The time is valid under the use conditions of this manual.
O: It indicates that the content of the hazardous substances in all
homogeneous materials of the components is in compliance with the council
RoHS 2 Directive (EU) 2015/863 and (EU) 2017/2102 amending Annex II to
Directive 2011/65/EU.
X: It indicates that the content of the hazardous substances in all
homogeneous materials of the components is the exempt item according to
the council RoHS 2 Directive (EU) 2015/863 and (EU) 2017/2102 amending
Annex II to Directive 2011/65/EU.
17
6. Recycling of V8
We reserve the right to changes in text, design and technical
specifications which are subject to change without prior notice.
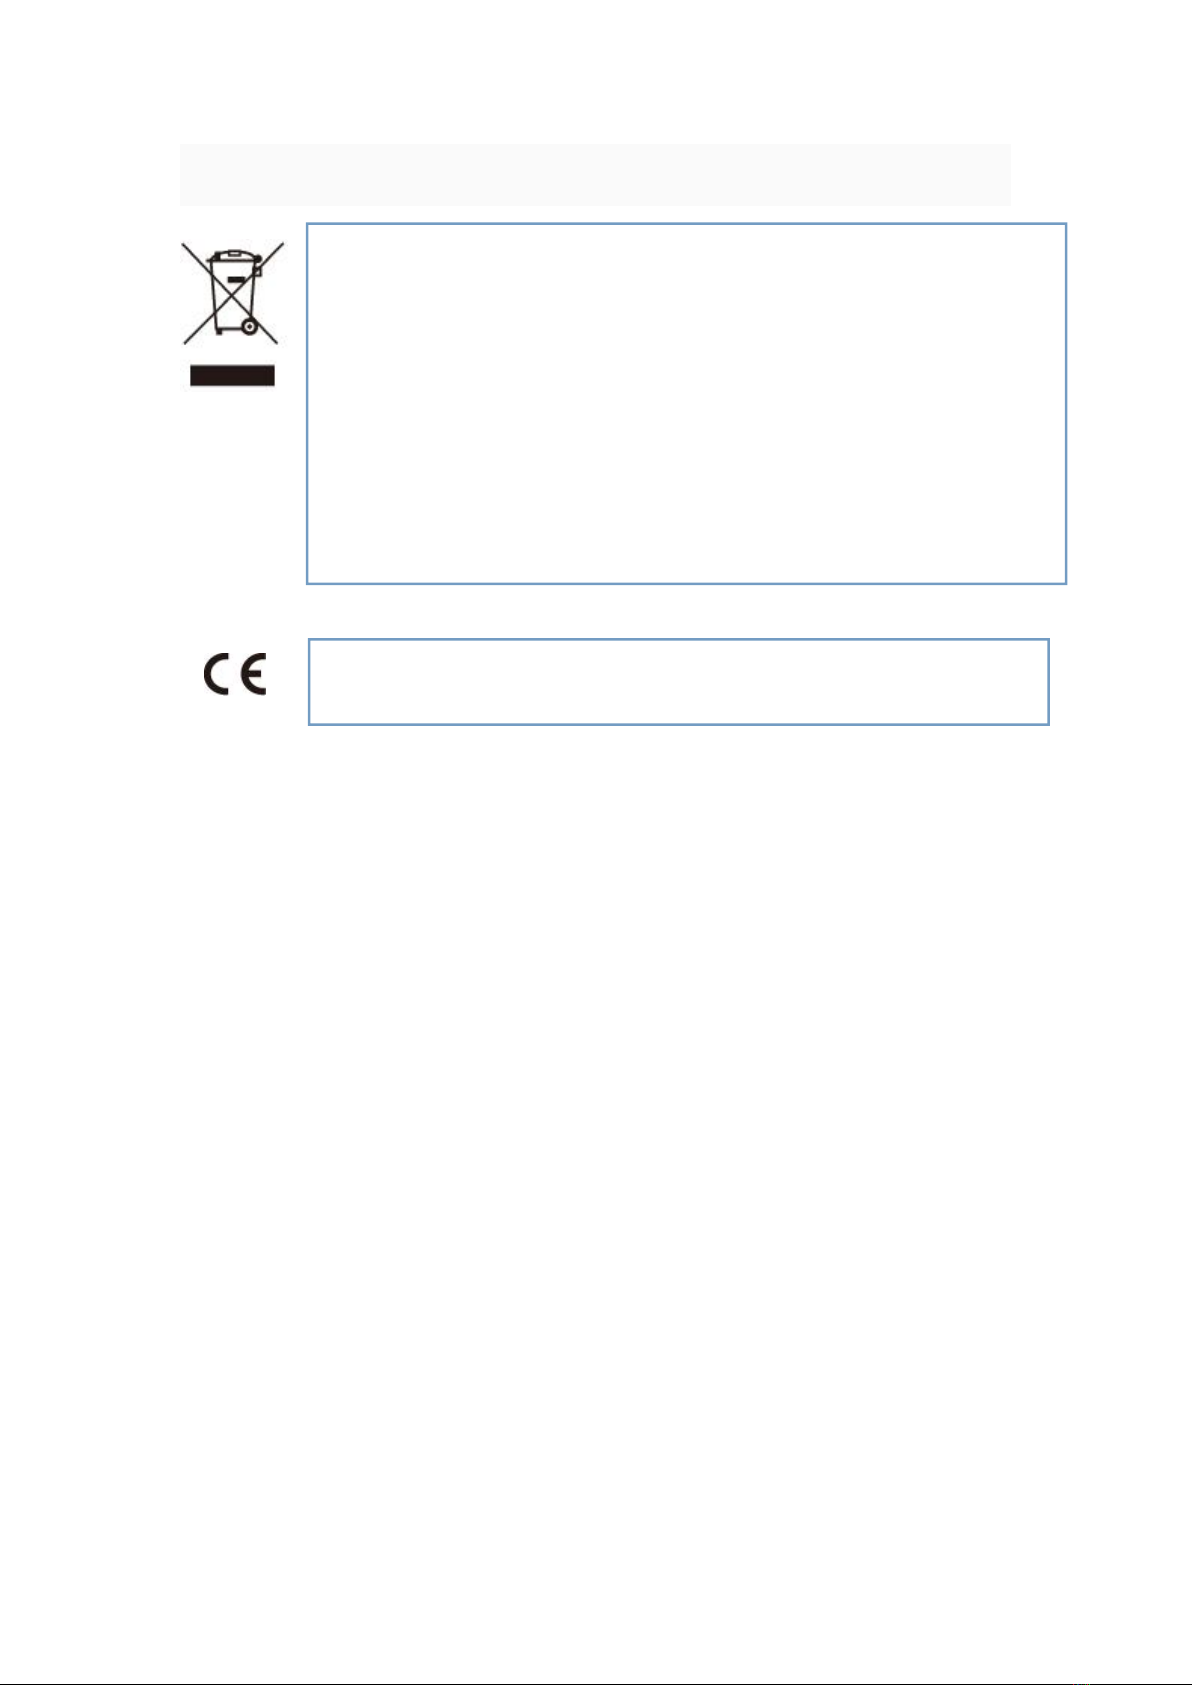
The symbol on the product or on its packaging indicates that
this product may not be treated as household waste. Instead it
should be taken to the appropriate collection point for the
recycling of electrical and electronic equipment. By ensuring
this product is disposed of correctly, you will help prevent
potential negative consequences for the environment and
human health, which could otherwise be caused by
in-appropriate waste handling of this product. For more
detailed information about recycling of this product, please
contact your local council, your household waste disposal
service or the shop where you purchased the product.
The product meets the necessary requirements of the EU
directives applicable to the specific product.


Table of contents
Other mamibot Vacuum Cleaner manuals

mamibot
mamibot ProVac Plus2 User manual

mamibot
mamibot ProVac Plus2 User manual

mamibot
mamibot EXVAC660 Platinum User manual

mamibot
mamibot iGlassbot W110-F User manual

mamibot
mamibot EXVAC660 Platinum User manual

mamibot
mamibot iGlassbot W110-F User manual

mamibot
mamibot EXVAC880 Wisor User manual

mamibot
mamibot PETVAC280 User manual

mamibot
mamibot V6 User manual

mamibot
mamibot iGLASSBOT W120-T User manual


