Mammut Airbag Technology 3.0 User manual

PROTECTION AIRBAG SYSTEM 3.0
User Manual
DE Benutzerhandbuch
EN User Manual
FR Manuel de l’utilisateur
IT Istruzioni per l’uso
ES Instrucciones de uso
NO Brukerhåndbok
SE Användarhandbok
JA ユーザーマニュアル
E
N
11
Contents
1. Introduction and operation 12
2. Warning 12
3. Operation 12
4. Parts needed for operation 12
5. Instructions 13
5.1 Preparing, putting on and deploying
the airbag 13
5.2 Further use (folding) 14
5.3 Installing the airbag system 16
5.4 Removing the airbag system 16
5.5 Training deployment 16
5.6 Attaching equipment to the backpack 17
6 Cartridges 17
6.1. General 17
6.2 Types and refilling 17
6.3 Notes 18
7. Flying with an avalanche airbag 18
8. Cartridge rental stations 18
9. Care, maintenance and additional
information 18
9.1 Cleaning 18
9.2 Maintenance and disposal 18
9.3 Maintenance after use in an avalanche 18
9.4 Storage 18
9.5 Service life 18
9.6 Specifications 19
9.7 Product labeling 19

E
N
12 Protection Airbag System 3.0
1. Introduction and operation
Thank you for purchasing a Mammut avalanche air-
bag. Please read this manual carefully and note the
warnings and guidelines.
If you are caught up in an avalanche, a Mammut av-
alanche airbag increases your chance of staying on
the surface. However, an avalanche airbag does not
provide any guarantee of survival, as its effective-
ness in the avalanche depends to a great extent on
the volume of snow, the density of the snow and, in
particular, the nature of the terrain. You should there-
fore never take the extra risk. An avalanche is always
life-threatening, regardless of the equipment used.
Like a Barryvox®, probe, shovel and first aid set, an av-
alanche airbag should be part of every ski tourer’s or
freerider’s standard safety equipment. Sound training
in risk management and familiarization with your safe-
ty equipment are also essential requirements.
Avalanche
Airbag
Shovel
Barryvox®
Cell phone
Probe
Firstaid set
2. Warning
Anyone using Mammut equipment is personally re-
sponsible for learning the proper use and technique.
Every user assumes all risks and accepts entire re-
sponsibility for all damages or injuries of any nature
that may result during use of Mammut products.
Neither the manufacturer nor the retailer accept any
liability in the event of misuse and improper use and/
or handling. These guidelines are intended to help you
use the product correctly. Since it is not possible to
list all incorrect usages and possible errors, these
instructions can never replace your own knowledge,
training, experience and personal responsibility.
3. Operation
The avalanche airbag uses the physical law of in-
verse segregation (sorting effect). This means that in
an equally moving mass of particles (e.g. snow), the
smaller particles gravitate to the bottom while the
larger ones rise to the surface. Pulling the deployment
handle of the avalanche airbag increases the wearer’s
volume, significantly boosting this effect. Conse-
quently, the avalanche airbag can actively help pre-
vent burial or partial burial and, in an ideal situation,
allow self-rescue or rapid location.
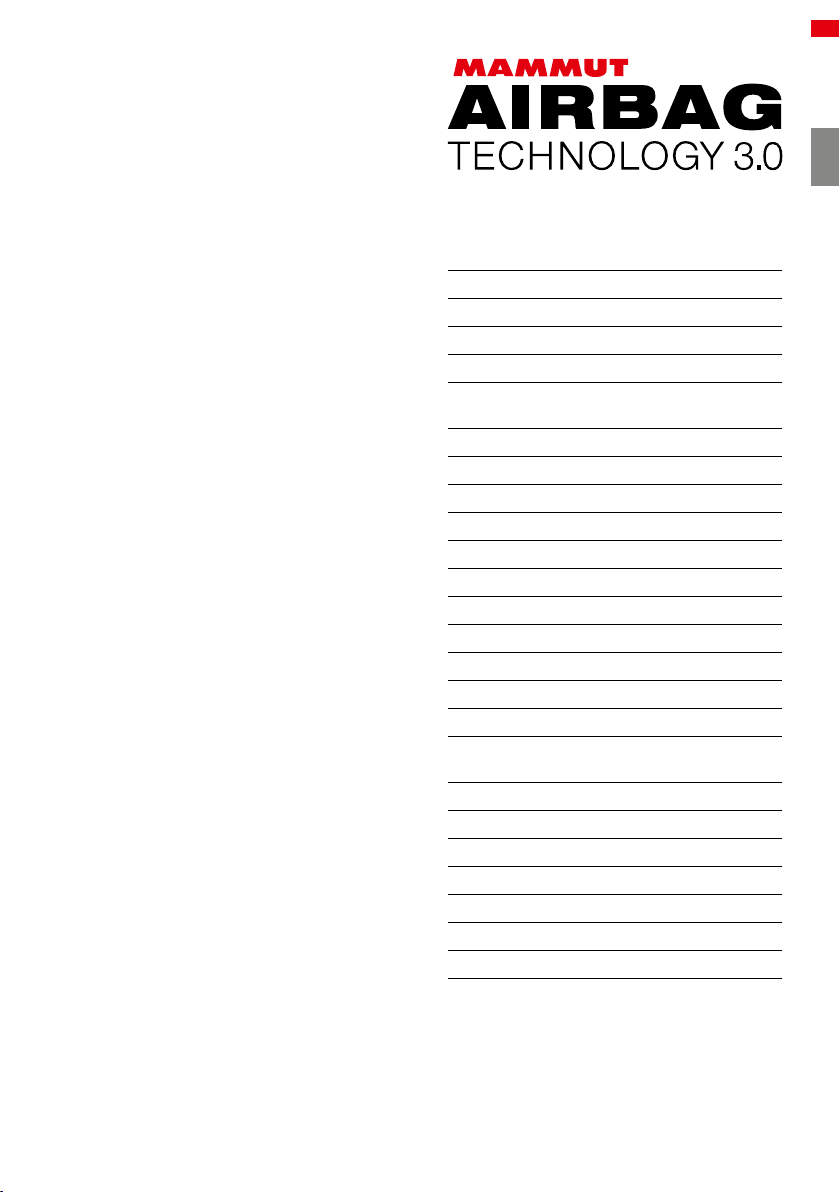
4. Parts needed for operation
01 Backpack (if you have bought the airbag system by
itself, you must purchase the matching backpack
separately)
02 Airbag system
03 Manual
04 Trigger test tool (for a test deployment without the
cartridge)
05 Pressure cartridge (the required system cartridge
is not included and must be purchased separately)
E
N
User Manual 13
i
01
03
05
04
02
5. Instructions
5.1 Preparing, putting on and deploying the air-
bag
01 Check that the airbag system has been installed
correctly before entering terrain with a potential av-
alanche risk. Follow the instructions in Section 5.3.
02 Always check the filling pressure of the cartridge
before use.
ACartridge with pressure gauge: At a room tem-
perature of 20 °C/68°F, the arrow must be in the
green area.
BCartridge without pressure gauge: the actual
weight of the cartridge (without protective cap)
must correspond to the weight indicated on the
cartridge (+/-5 g).
0
+/– 5g
02
A B
03 Screw the cartridge all the way into the mechanism,
secure it in the cartridge pocket using the Velcro
closure and close the pocket. Make sure there are
no foreign objects in the pocket. The Mammut air-
bag may be used only with Mammut or Snowpulse
cartridges.
CAUTION: Screw the cartridge in completely (the
black rubber seal must not be visible). The cartridge
must be secured using velcro.
03
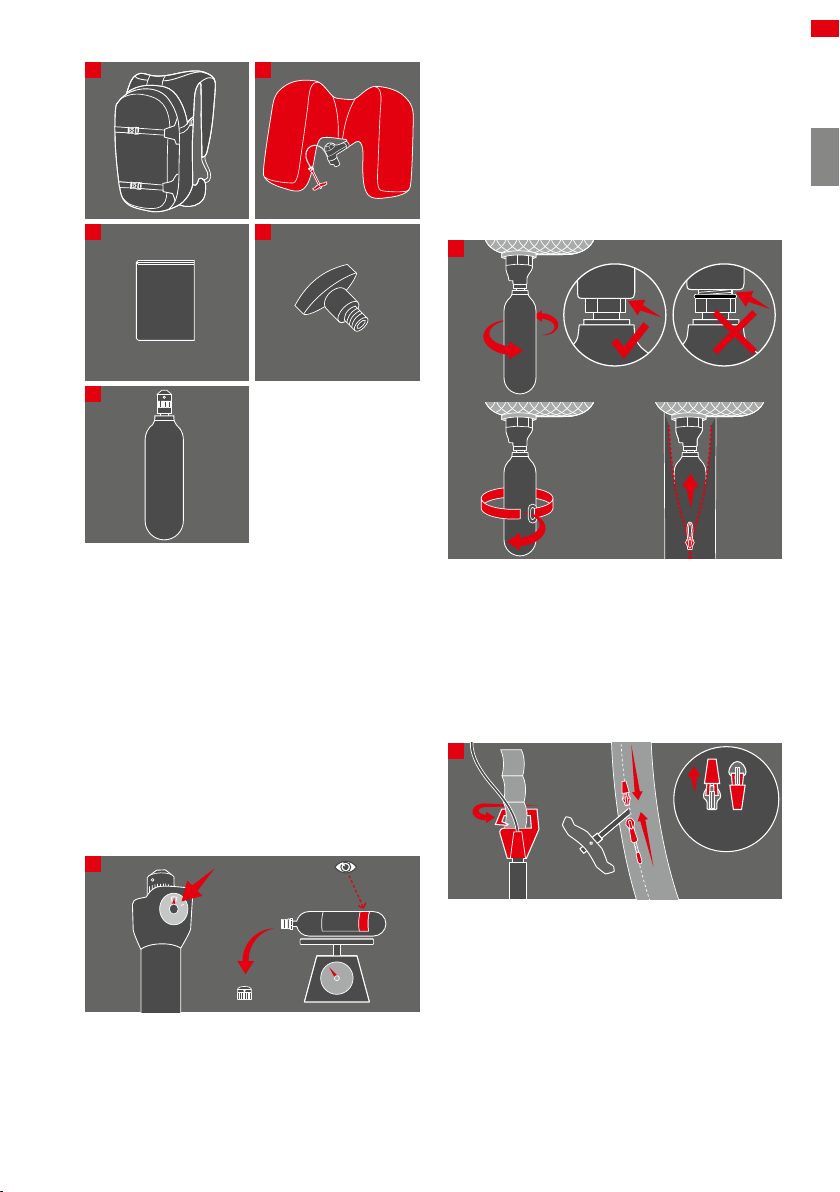
04 Adjust the height of the deployment handle on the
left shoulder strap. There are three different set-
tings (S/M/L). The handle should ideally be at chest
height. The hook should be pushed securely into
the loop, as shown in the graphic.
Close the upper zipper until it is just below the at-
tachment. Use the lower zipper to install and re-
move the handle.
You can lock the zipper by folding the handle up.
S
M
L
04
locked unlocked
05 It is important to ensure that the Protection Airbag
System 3.0 is sitting correctly, since this deter-
mines the angle to the body at which the airbag
deploys. The back height of all Protection air-
bags must therefore be adjusted to the user. The
length of the back can be continuously adjusted.
In general, the backpack is sitting correctly if your
shoulders are in line with the airbag opening. The
diagram is provided for guidance. For comfort rea-
sons, the position may vary from the preferred set-
ting. However, make sure that the airbag does not
sit too low, as shown. Adjust the hip belt using the
Velcro closure on the back of the hip belt padding.
E
N
14 Protection Airbag System 3.0
06
08
07
5.2 Further use (folding)
The avalanche airbag can be reused after deploy-
ment. However, after deployment in an avalanche,
your avalanche airbag must be checked by Mammut
Customer Service. This is the only way to guarantee
smooth deployment. If you have used your airbag in
an avalanche, please contact your Mammut retailer.
We strongly advise against using your airbag without
having it checked first.
To prepare your avalanche airbag for further use:
01 Unscrew the cartridge and remove it from the sys-
tem.
02 Open the airbag system pocket zipper.
03 Remove the protective cap, press the deflation but-
ton and press the air out of the airbag. The less air
there is in the airbag, the easier it will be to fold.
02 03
04 Close the airbag system pocket zipper again.
05 Open the airbag zipper from the left to the right
shoulder strap.
04 05
05
cm inch size
51.0 20 XL
48.5 19 L
46.0 18 M
06 To put on the avalanche airbag correctly, thread the
hip belt through the leg strap; close the hip belt (the
hip belt should sit approximately on the hip bone);
tighten the shoulder straps; close the chest strap.
The length of the leg loop can also be adjusted. The
leg loop should fit tightly.
07 Before entering areas with an avalanche risk, re-
move the deployment handle from the pocket and
turn into a T position. To stow the deployment han-
dle, press the button under the grip and twist it into
a vertical position. Place the handle in the shoulder
strap pocket and close the zipper.
08 If you get caught in an avalanche, deploy the airbag
immediately. It is better to use it once too often than
once too little. Pull the deployment handle hard and
decisively.
The airbag will automatically fill in approximately three
seconds. You will hear a relatively loud noise as the
airbag fills.

E
N
User Manual 15
d) Fold the airbag above the left shoulder strap, in the
same way as you did for the right shoulder strap. Once
again, place the shoulder strap and airbag material
under the backpack or the middle part of the airbag.
However, there is no zipper here.
d)
e) Fold the top part of the airbag 3 or 4 times.
e)
f) Place the airbag in the pocket provided and close
the Velcro closure.
f)
06 Spread the airbag out flat and fold it as shown in
the illustration. A video guide demonstrating how
to fold the airbag is available on our website
mammut.com/airbags
CAUTION: The airbag should never be rolled up be-
fore packing.
a) Fold the inner flaps.
b) Right shoulder strap: airbag folds. Check the width
of the shoulder strap. Close the zipper up to the top
edge of the backpack.
CAUTION: Fold the airbag, do not roll it up. It is not
important whether you fold it 3, 4 or 5 times.
a)
b)
c) Place the shoulder strap under the backpack and
the excess airbag material at the top under the middle
fold from step a).
c)

E
N
16 Protection Airbag System 3.0
07
08 Thread the four colored airbag buckles through the
appropriate loops (from bottom to top).
BLUE GREEN
GREY
YELLOW
08
09 Fold the airbag and pack it as described in Section
5.2.
10 Attach the deployment handle as described in Sec-
tion 5.1.
5.4 Removing the airbag system
The Protection Airbag System 3.0 can be removed
from the backpack in just a few steps. See illustration
in Section 5.3.
01 Unscrew the cartridge.
02 Open the airbag pocket.
03 Open the airbag system pocket.
04 Loosen the four airbag buckles.
05 Loosen the deployment handle in the shoulder
strap and feed it into the main compartment.
06 Thread the deployment handle and airbag system
through the opening in the airbag system pocket.
5.5 Training deployment
Training with your avalanche airbag is necessary in or-
der to become familiar with your system and to be able
to act quickly and intuitively in an emergency. In par-
ticular, you should practice deploying your avalanche
airbag in order to realize how hard you need to pull
on the deployment handle. In order to avoid refolding
your avalanche airbag after every practice, you can
also perform a test deployment without a pressure
cartridge. The Trigger Test tool allows you to perform
this test deployment very easily. We recommend at
g) Close the zipper on the shoulder strap first and then
close the Velcro closure again.
h) Thread the zipper pull through the loop.
g/h)
07 Use a new cartridge or refill the cartridge and check
the cartridge pressure (see Section 5.1).
08 Screw in the cartridge and secure it in the cartridge
pocket (see Section 5.1).
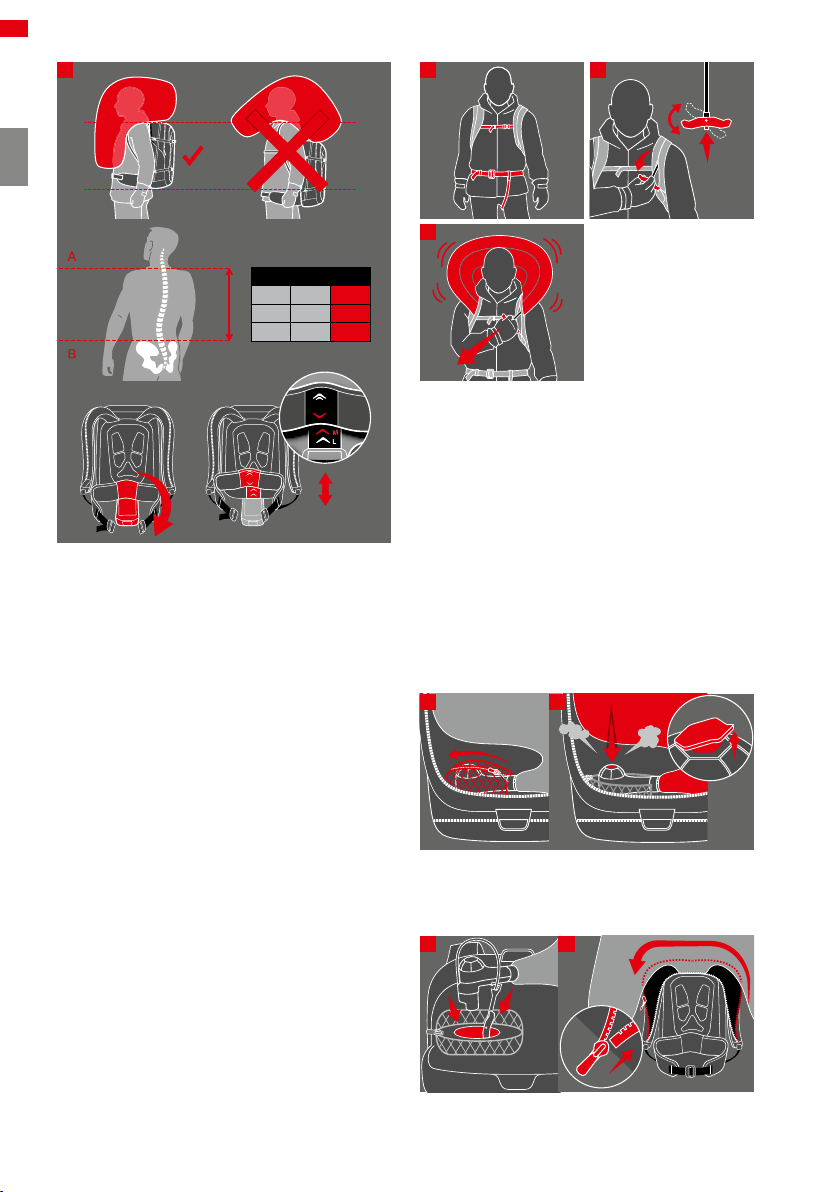
5.3 Installing the airbag system
The Protection Airbag System 3.0 can be installed in
various compatible backpacks. Please note that the
Protection Airbag System 3.0 can be installed only in
Protection Airbag System 3.0 compatible backpacks.
01 Open the airbag pocket: open the zipper from the
center and slide the zipper pull to the right shoulder
strap.
02 Spread the airbag out flat. Remove all the air from
the airbag, if necessary (see Section 5.2).
03 Make sure the airbag has not been attached the
wrong way round.
03
DO NOT
TWIST
04 Thread the deployment handle and airbag system
through the opening in the airbag system pocket.
05 Close the airbag system pocket.
04 05
06 The deployment handle must not be wound around
the airbag system.
07 Place the deployment handle in the left shoulder
strap.

E
N
User Manual 17
01
04
03
6 Cartridges
6.1. General
The pressure cartridges are the airbag system’s en-
ergy store. We stock a number of cartridges that are
compatible with the Protection Airbag System 3.0. All
cartridges that were compatible with the Inflation Sys-
tem 2.0 (from 2011/2012) are also compatible with the
new Airbag System 3.0.
One cartridge allows only one deployment. After de-
ployment the empty cartridge must be refilled.
6.2 Types and refilling
Use only Mammut or Snowpulse cartridges with
Mammut airbags:
Carbon cartridges
These are the lightest cartridges we stock and must
be replaced by a Mammut retailer after deployment.
Many Mammut retailers offer a cost-effective price for
exchanging old cartridges for new ones. Not available
in the USA and Canada.
Steel cartridges
Steel cartridges must be replaced by a Mammut re-
tailer after deployment. Many Mammut retailers offer
a cost-effective price for exchanging old cartridges
for new ones. Not available in the USA and Canada.
Aluminum cartridges
Aluminum cartridges are distributed mainly in the
USA and Canada. Customers can refill the cartridges
themselves. Please read our manual for refilling car-
tridges and refer to the list of official filling stations for
207 bar aluminum cartridges:
mammut.com/cartridge-refill
least one test deployment before the winter season
begins.
Using the Trigger Test tool
01 Screw the Trigger Test tool all the way into the de-
ployment mechanism. Caution: the Trigger Test
Tool must not be overtightened.
02 Put the backpack on (see Section 5.1). In order to
make the deployment as realistic as possible, we
recommend wearing your skiing clothes during the
test deployment. Deploying the airbag while wear-
ing gloves is particularly good practice.
03 Deploy your avalanche airbag as described in Sec-
tion 5.1.
04 Then unscrew the Trigger Test tool from the deploy-
ment mechanism.
01
5.6 Attaching equipment to the backpack
Our backpack models offer a number of options for at-
taching a variety of equipment to your backpack. The
following points should be considered:
01 It is important to ensure that any attachment of
additional equipment does not inhibit the deploy-
ment of the airbag. In other words: Do not block
the opening of the airbag (e.g. attaching a rope to
the backpack).
02 Your shovel and probe can be placed in your back-
pack. Most backpacks have a separate compart-
ment for safety equipment.
03 Your ice ax can be attached to the outside of your
backpack. Always use a protective ax cap, such
as the Mammut Ice Spike Protection. This prevents
the tip of the ax damaging the avalanche airbag in
an emergency. The Ice Spike Protection is suitable
for most popular mountain tour ice axes.
04 We recommend that you always attach your skis
diagonally across your backpack. Although fix-
ing your skis in a A-shape is possible, we advise
doing so only in safe terrain. Fixing your skis in an
A-shape can impair the inflation of the airbag.

E
N
18 Protection Airbag System 3.0
04 Check the airbag for holes or tears.
05 If the airbag is wet, spread it out flat and leave it
to dry.
06 Check the airbag system for damage (cracks in the
housing, dents, threading, etc.).
07 Check your backpack, shoulder straps and hip belt
for holes, tears and damaged seams.
If you discover signs of damage or have other doubts
about reliability, please contact Customer Service.
Damaged equipment must either be properly dis-
posed of or repaired by our customer services before
use. It is forbidden to make any repairs and changes to
the product, which are not explicitly described in this
manual, by yourself.
9.3 Maintenance after use in an avalanche
Any use in an avalanche can damage the avalanche
airbag due to the enormous forces it is subjected to.
Maintenance of the system after use in an avalanche
is therefore essential. This maintenance must be per-
formed by Mammut Customer Service. Contact your
retailer or Mammut Customer Service to arrange a
check or maintenance for your airbag.
9.4 Storage
Store your Mammut avalanche airbag in a cool, dry
place.
Remove the cartridge if you intend to store the sys-
tem for a long time. Store your cartridges in a cool, dry
place. Use the cartridge cover and original packaging
to store cartridges.
9.5 Service life
Given optimum storage and rare use, you should
replace your avalanche airbag after a maximum of
10 years (from the date of manufacture) or after a max-
imum of 40 deployments (with or without cartridge).
The product’s service life depends on many factors,
such as frequency of use, handling, climatic influenc-
es, etc., and cannot be determined precisely in ad-
vance.
The following table provides guidelines concerning
the service life:
Frequency of use in days of
use per year (given optimum
storage)
Approximate
service life
Rare use
Up to 10 times per year Up to 10 years
Occasional use
Between 10 and 40 times per year 5–7 years
Frequent use
Between 40 and 80 times per year 3–5 years
Constant use
80 times per year 1–3 years
6.3 Notes
– Cartridges must be replaced or refilled after use. For
filling instructions, see
mammut.com/airbags
– The filling pressure must be checked before each
use.
– Use only Mammut or Snowpulse cartridges with
Mammut airbags
– Cartridges must never be exposed to excessive heat
(direct sunlight, oven, etc.)
– Cartridges may be used only within the permitted
temperature range (-30 to +40 °C)
– Cartridges must not be damaged. Damaged car-
tridges must be replaced.
– The cartridge must be screwed all the way into the air-
bag system (the black rubber seal must not be visible)
– The cartridge must be secured in the backpack using
velcro
7. Flying with an avalanche airbag
In general, it is possible to transport Mammut ava-
lanche airbags by air (please note, a special regulation
applies for the USA). The pressure cartridges used in
avalanche airbags are classed as hazardous goods.
Special regulations therefore apply if you wish to carry
them with you on a flight.
The latest updated information on flying with cartridg-
es can be found here:
mammut.com/airbags-travel
8. Cartridge rental stations
Our numerous cartridge rental stations offer a simple
solution for traveling with your avalanche airbag. Sim-
ply rent your avalanche airbag cartridge locally.
A list of cartridge rental stations can be found here:
mammut.com/airbags-travel
9. Care, maintenance and additional information
9.1 Cleaning
Only clean your Mammut avalanche airbag with water.
Do not use solvents. After cleaning, the airbag must
be completely dry before reuse. Dry the airbag in the
open air. Spread the airbag out flat. Do not dry in direct
sunlight or using a tumble dryer or heater.
9.2 Maintenance and disposal
We recommend regular maintenance of your ava-
lanche airbag.
Check your equipment for signs of damage and wear
before and after each use.
The following points should be noted:
01 Make sure that the airbag system is installed (Sec-
tion 5.3) and folded correctly (Section 5.2).
02 Make sure that your cartridge has the correct pres-
sure and is completely screwed in. (The black rub-
ber seal must not be visible) (Section 5.1).
03 Perform at least one training deployment each sea-
son. A training deployment can also be performed
with an empty cartridge or using the Trigger Test
tool. If the deployment is successful, you will hear a
clear “click” sound (Section 5.6).

E
N
User Manual 19
this design is protected by copyright © Mammut Sports Group
Style:
Date:
Season:
D&D: Producer:
Inflation System 3.0 Sticker “production Wi1819”
01.12.2017
Wi1718
AFi Payer
Highmark Ination System 3.0:
used font for serial No. and Prod. Year:
ARIAL / 6.pt
Mammut Ination System 3.0:
Serial No.
Standard
YYYY-MM
1509xxxx1
EN16716:2017
Serial No.
Standard
YYYY-MM
XXXXXXXXXX
EN16716:2017
Serial No.
Standard
YYYY-MM
XXXXXXXXXX
EN16716:2017
Serial No.
Standard
YYYY-MM
1509xxxx1
EN16716:2017
Date of manufacture
Year and month
Unique serial number
The first four digits refer
to the production batch
number
9.6 Specifications
Type: Protection Airbag System 3.0
Permitted operating
temperature: –30 °C to 40 °C
Operating altitude: 0 to 6,000 m above sea level.
Airbag volume
(inflated): 150 liters
System weight
without cartridge
and
without backpack: approx. 920 g
Filling process: approx. 3 to 5 seconds
Manufacturer: Mammut Sports Group AG
Birren 5
CH-5703 Seon
CE: PPE Regulation (EU) 2016/425
(Cat. 2)
Standard: EN 16716:2017
EU Declaration
of Conformity https://ppe.mammut.com
The following factors reduce the service life of an ava-
lanche airbag: use in an avalanche, heavy falls, abra-
sion, wear, long periods of direct sunlight, salt water,
salt air, corrosive substances. The use of avalanche
airbags in rental operations can also drastically re-
duce their service life.
Careful and regular maintenance can increase the
service life of an avalanche airbag (Section 9.2).
9.7 Product labeling
01 Airbag system
02 Backpack
Brand logo
Airbag system type
Note to read user handbook Applicable standard for avalanche airbag systems
Manufacturer and
address
CE compliance label
Manufacturer and address Note to read user handbook
Production batch
number
Airbag system type
Mammut
item number
Paper lables for SMS Wi 1415 date: 18.09.2013
prepared: AFipage: 1 this design is protected by copyright © Mammut Sports Group
Style No.: xxxx-xxxxx
Batch# & Prod.Date: xxx-xxxx
Mammut Sports Group AG
Birren 5, CH-5703 Seon
Switzerland
Style No.: xxxx-xxxxx-xxxx-xxx
Batch No.: xxx-xxxx-xxxxx
Mammut Sports Group AG
Birren 5, CH-5703 Seon
Switzerland
RAS (Dong In)PAS, Highmark (Pungkook)
this design is protected by copyright © Mammut Sports Group
Style:
Date:
Season:
D&D: Producer:
Protection Airbag Woven Label
26.05.2015
Wi1617
AFi
Smoke
Pantone: 18-5105 TPX
White
Pantone: 11-0601 TPX
Fire
Pantone: 18-1763 TPX
(bright red)
Nilorn
Name:
Mam-Airbag-Protection

E
N
20 Protection Airbag System 3.0

Head Office
Mammut Sports Group AG
Birren 5
CH-5703 Seon
mammut.com
mammut.com/airbag
MAN-MAM-140-3
Other manuals for Airbag Technology 3.0
2
Table of contents
Popular Protection Device manuals by other brands


Liquid Image
Liquid Image Summit Series user manual

SNOWSOUND
SNOWSOUND MITESCO 419-A manual

Manson Engineering Industrial
Manson Engineering Industrial SSB-2180 user manual

RCT
RCT Muirihead 3747 product manual

Meilhaus Electronic
Meilhaus Electronic Red-USB Iso user manual

LOGICDATA
LOGICDATA ACS-CB-SENS user manual


