USING YOUR PMI® PICK OFF STRAP
•Before using your PMI® Pick Off Strap at height, become familiar with its
features and proper use. There are many ways to use the PMI® Pick Off
Strap safely and effectively. You must obtain appropriate training before
attempting to use it.
•The PMI® Pick Off Strap is tted with an adjustable V-Ring attachment
point with a sliding bar that uses friction to allow any hauling progress
to be captured and to lengthen under load when properly threaded. If not
threaded properly, the strap will not hold and can result in serious injury
or death. See Diagram B to see a properly threaded adjustable V-Ring
attachment point
•Control the load by holding the Hand Strap and feeding the loose end of the
webbing through the Sliding Bar while tilting the back of the V-Ring with
the other hand until the webbing slowly adjusts. See Diagram B.
•The PMI®Pick Off Strap should always be used with appropriate locking
carabiners connected to the V-Ring attachment point and/or the D-Ring
anchor end of the strap. With the D-Ring end of the strap connected to
an anchor point and the metal V-Ring attachment point connected to the
load, pulling on the loose end of the strap will result in a 2:1 theoretical
mechanical advantage. See Diagram C.
•With the V-Ring attachment connected to an anchor point and the D-Ring
end of the strap connected to a load, pulling on the loose end of the
strap will result in a change of direction with no theoretical mechanical
advantage. In Diagram C, the carabiner attachment points would be
switched to illustrate a change in direction.
ADJUSTING THE LENGTH OF THE STRAP
•Regardless of which end is anchored or which is attached to the load,
pulling on the loose end will result in a shortening of the distance between
the anchor and the load.
•To extend the length of the strap while under load, hold the Hand Strap
on the loose end rmly while using your other hand to press forward on
the top of the adjustable V-Ring attachment point. (See Diagram B). Allow
the webbing from the loose end to feed through through the sliding bar to
create length*. Be sure to control the load at all times by keeping a rm
grasp on the Hand Strap. Keep ngers, Personal Protective Equipment and
clothing away from the moving webbing so they do not get caught!
*Note: You can lengthen the strap only up to the point where the Hand
Strap contacts the sliding bar.
•Inspect the strap upon receiving it and before and after each use to ensure
proper function, product integrity, and condition of stitching.
•Inspect by starting at one end and look at and feel every inch of the strap.
Watch for signs that might indicate possible damage such as discoloration,
chemical odors, abrasion marks, cuts, nicks and any visible differences.
•IF IN DOUBT, THROW IT OUT- If you are not sure about the integrity
of your strap, DO NOT USE IT. Consult PMI if you need help or have
questions.
•Maintain an Equipment Log for each individual strap and review it regularly.
Include information such as date of manufacture, date placed in service,
dates of use, conditions under which equipment is used, results of
inspections, and other information specic to your application.
•Keep your strap clean using the guidelines in the section titled “Cleaning
your PMI® Pick Off Strap”. Dirt rubbing into and against the bers will
deteriorate it.
•Store your strap in a clean, dark, dry environment, not on a cement floor,
and away from exposure to chemicals, noxious fumes or other harmful
agents.
CLEANING YOUR PMI®PICK OFF STRAP
Washing - You can wash a strap that is dirty by hand using clean cool to
warm water <30°C (<86°F) with a mild soap. PMI recommends using PMI
Rope Soap, otherwise non detergent soaps are best. Soap used should not
contain any bleaching agents.
DO NOT:
• DO NOT use top loading washing machines with agitators because they
may tangle the strap and can cause damage to the machine.
• DO NOT use a commercial dryer to dry the strap.
• DO NOT leave wet straps on a surface from which contaminants might
leach (such as concrete) for an extended period of time.
• DO NOT expose any straps to exhaust fumes.
DISINFECTING - Disinfection of a strap may occasionally become necessary,
such as when exposed to bloodborne pathogens. To disinfect a strap,
PMI recommends following the NFPA standard for cleaning rescue gear of
bloodborne pathogens. Keeping in mind that undiluted household bleach is
known to damage nylon, NFPA calls for using a diluted solution of household
bleach to clean rescue gear exposed to bloodborne pathogens. Add 60 ml of
household bleach per 4 liters of tap water. That’s about one quarter (1/4) cup
of household bleach per gallon of water. Be aware that some commercial bleach
solutions are stronger than the recommended 1.5% that is typical for household
bleach. Soak the gear in the diluted solution for ten minutes, then rinse
thoroughly with tap water. The rinsing cycle is critical to prevent any damage to
the rope from the bleach. It is good to soak the gear in tap water for the same
amount of time it soaked in the bleach solution. Allow the gear to thoroughly
dry in a cool place before storing it. Never dry your strap(s) in direct sunlight or
laying on a concrete slab. Never store gear when it is wet.
WARNING!
The use of bleach over a long period of time, in repeated uses, can cause
damage to bers such as nylon. Bleach should be used sparingly and then
only when needed. If there is noticeable damage DO NOT use the strap.
DRYING - Allow the strap to dry in a cool, dry, well-ventilated area out of
direct sunlight. For best results, it should be hung up to air dry in a low-
humidity environment and off of surfaces from which contaminants might
leach (such as concrete).
WRITE IT DOWN - Remember to record the cleaning on the Equipment Log.
KEEP IT CLEAN - Store your strap in a clean, dark, dry environment, away
from exposure to acids, other harmful chemicals, noxious fumes or other
abuse.
RETIREMENT CRITIERIA
• RETIRE IMMEDIATELY any strap where the stitching is cut, torn,
excessively worn or visibly damaged.
• RETIRE IMMEDIATELY any strap whose strength may have been
compromised during use.
• RETIRE IMMEDIATELY any strap which is subjected to uncontrolled or
excessive loading.
• RETIRE IMMEDIATELY any strap which is greater than 10 years old,
regardless of history and usage.
• RETIRE IMMEDIATELY any strap whose history and past usage you are
uncertain about.
• RETIRE IMMEDIATELY any strap that has been exposed to heat, direct
flame or excessive abrasion.
• RETIRE IMMEDIATELY any strap that has been exposed to liquids, solids,
gases, mists, or vapors of any chemical or other material that can
deteriorate the strap.
• RETIRE IMMEDIATELY any strap that does not pass inspection when
following the inspection procedures in these instructions, both before and
after each use.
• RETIRE IMMEDIATELY any strap when there is any doubt about its safety
or serviceability.
WARNING!
CUT RETIRED straps to discourage future use and discard them entirely. A
retired strap should not be stored, kept or maintained in such a way that it
could inadvertently be used for life safety purposes.
INSTRUCTIONS FOR USE
INSPECTION, CARE & MAINTENANCE
V3-0714
Thank you for purchasing PMI Products!
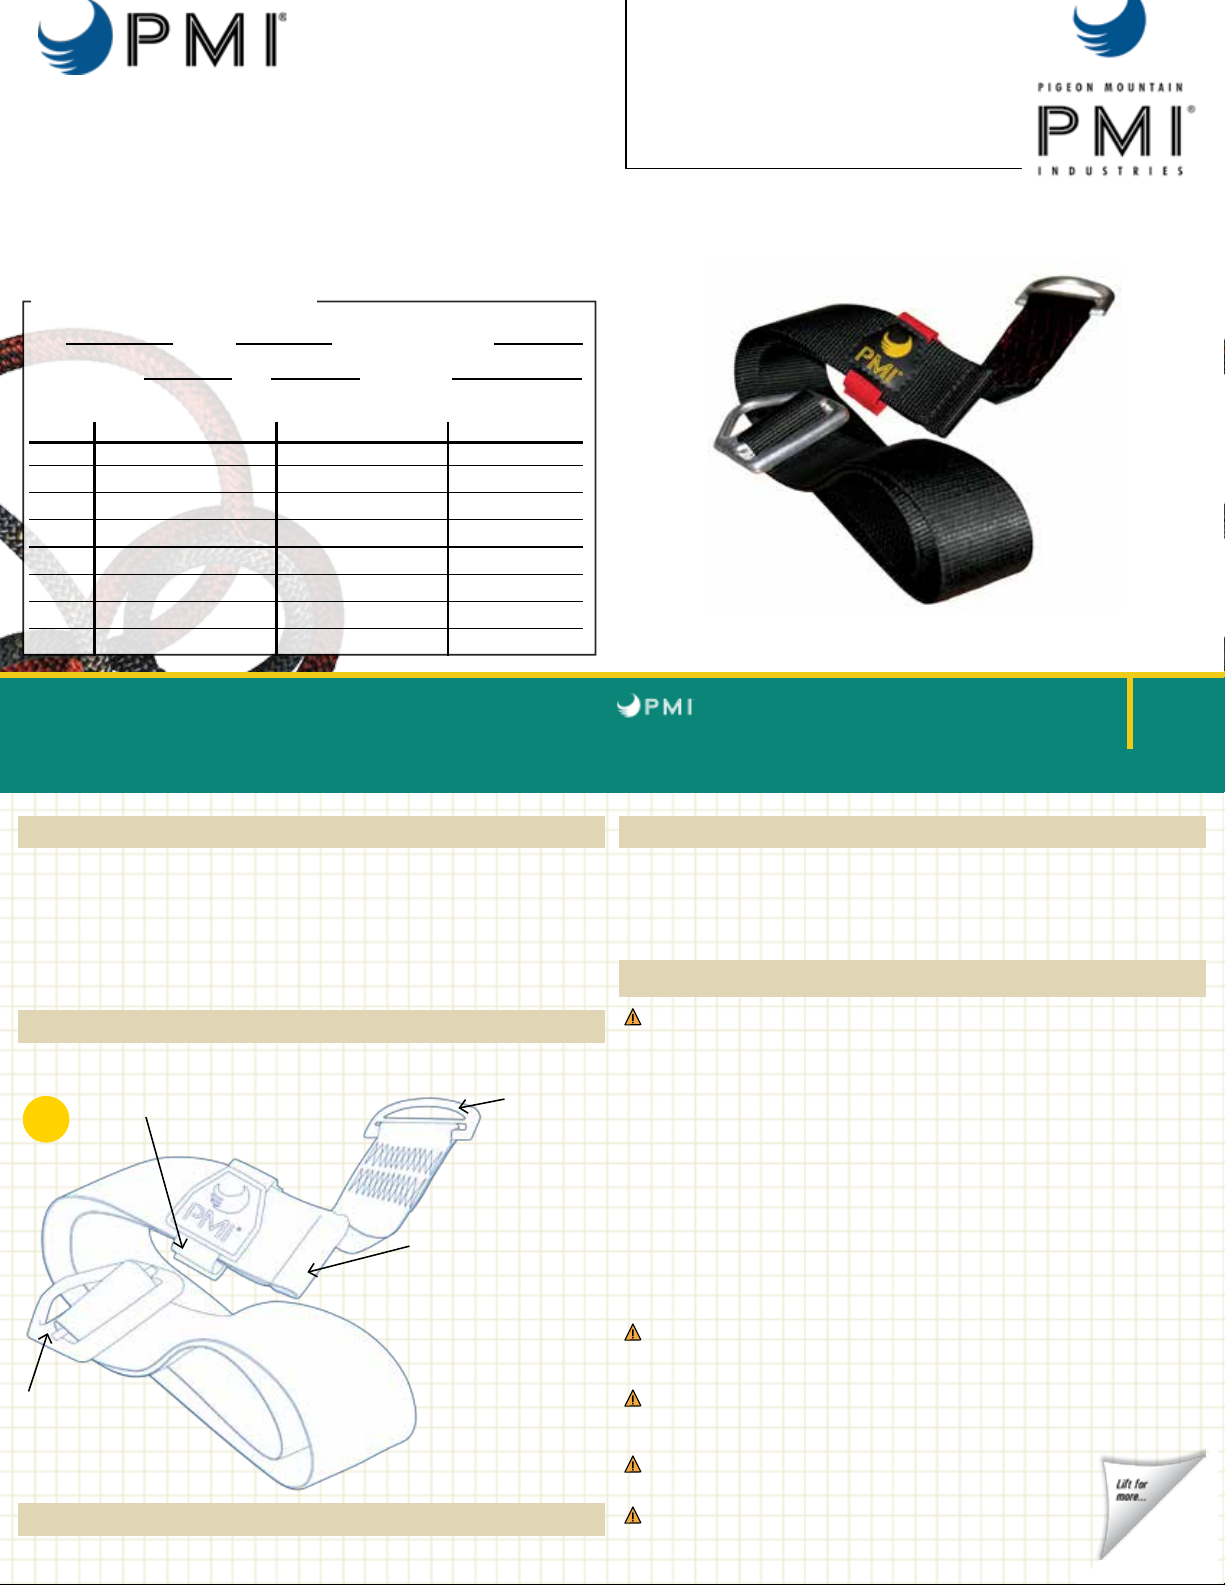
DIAGRAM B
•D-Ring anchor
attachment point
A properly threaded adjustable
V-Ring attachment point
•V-Ring load
attachment point
•Sliding Bar
•Tilt top of the
adjustable
V-Ring
attachment
point to extend
the strap while
under load.
•Hand Strap
•Anchor attachment point
•Load attachment point
DIAGRAM C
PMI LIMITED WARRANTY
PMI products are warranted to the original retail purchaser to be free
from defect in material and workmanship for a period of one year. PMI
will repair or replace the item without charge provided inspection at our
factory discloses no misuse or alteration, which, in our judgment, has
affected the condition or functioning of the product. All implied warranties
imposed by law in connection with the sale of PMI products are also limited
in duration to a period of one year. PMI expressly excludes and shall not
be liable for any consequential damages arising out of any breach of the
express or implied warranties on sales of PMI products. Because of the
high risks involved in high angle rope work such as, but not limited to,
rescue, rope access, caving, rappelling, rock climbing and mountaineering,
no further warranties exist or are implied by PMI. Regulations issued under
the Magnuson-Moss Warranty Act require us to include the following
statement: some states do not allow limitations on how long an implied
warranty lasts nor the excluding or limitation of incidental or consequential
damages, so the above limitations may not apply to you.