manuals.online logo
Brands
  1. Home
  2. •
  3. Brands
  4. •
  5. MANN+HUMMEL
  6. •
  7. Industrial Equipment
  8. •
  9. MANN+HUMMEL MICRODYNNADIR BIO-CEL 50 Owner's manual

MANN+HUMMEL MICRODYNNADIR BIO-CEL 50 Owner's manual

TECHNICAL INSTRUCTION – MICRODYN BIO-CEL®
FORM NO.: TI-WW024
REVISION: B | DATE: 07/01/2020
MICRODYN BIO-CEL®
Diffusor Replacement
Introduction
This document is showing the procedure of diffusor replacement. The procedure can be applied for BIO-CEL®
50/52/100/104/208/400/416/L/XL (not for BIO-CEL® L-2/XL-2). The pictures used in this instruction belong to BIO-CEL®416,
the general steps are the same for all above mentioned BIO-CEL modules.
In case of any question which might derive during the mounting procedure, please don´t hesitate to contact us, the contact
information are shown at the end of the document.
For disassembly of the diffuser case from the module frame please refer to the corresponding document on our website
(https://www.microdyn-nadir.com/mbr-bulletins-guides/)
Safety Precautions
Please follow section 1, Safety & Warnings in the latest version of the MICRODYN BIO-CEL MBR Operation and Maintenance
Manual.
Material Required for disassembly & assembly
Please refer to the corresponding scope of supply document ((https://www.microdyn-nadir.com/mbr-bulletins-guides/) for the
part numbers needed for this replacement.
Pos. Part Remarks
1 BIO-CEL® Diffuser Set Set of diffusers + connectors
2 BIO-CEL® Diffuser Assembly Tool a Torque wrench with special wrench socket (must be ordered separately)
3 Set of fork or socket wrenches of different sizes Customers scope of supply
4 Integrity test kit Customers scope of supply (optional only)
TECHNICAL INSTRUCTION – MICRODYN BIO-CEL®
FORM NO.: TI-WW024
REVISION: B | DATE: 07/01/2020
Diffusor Replacement Procedure
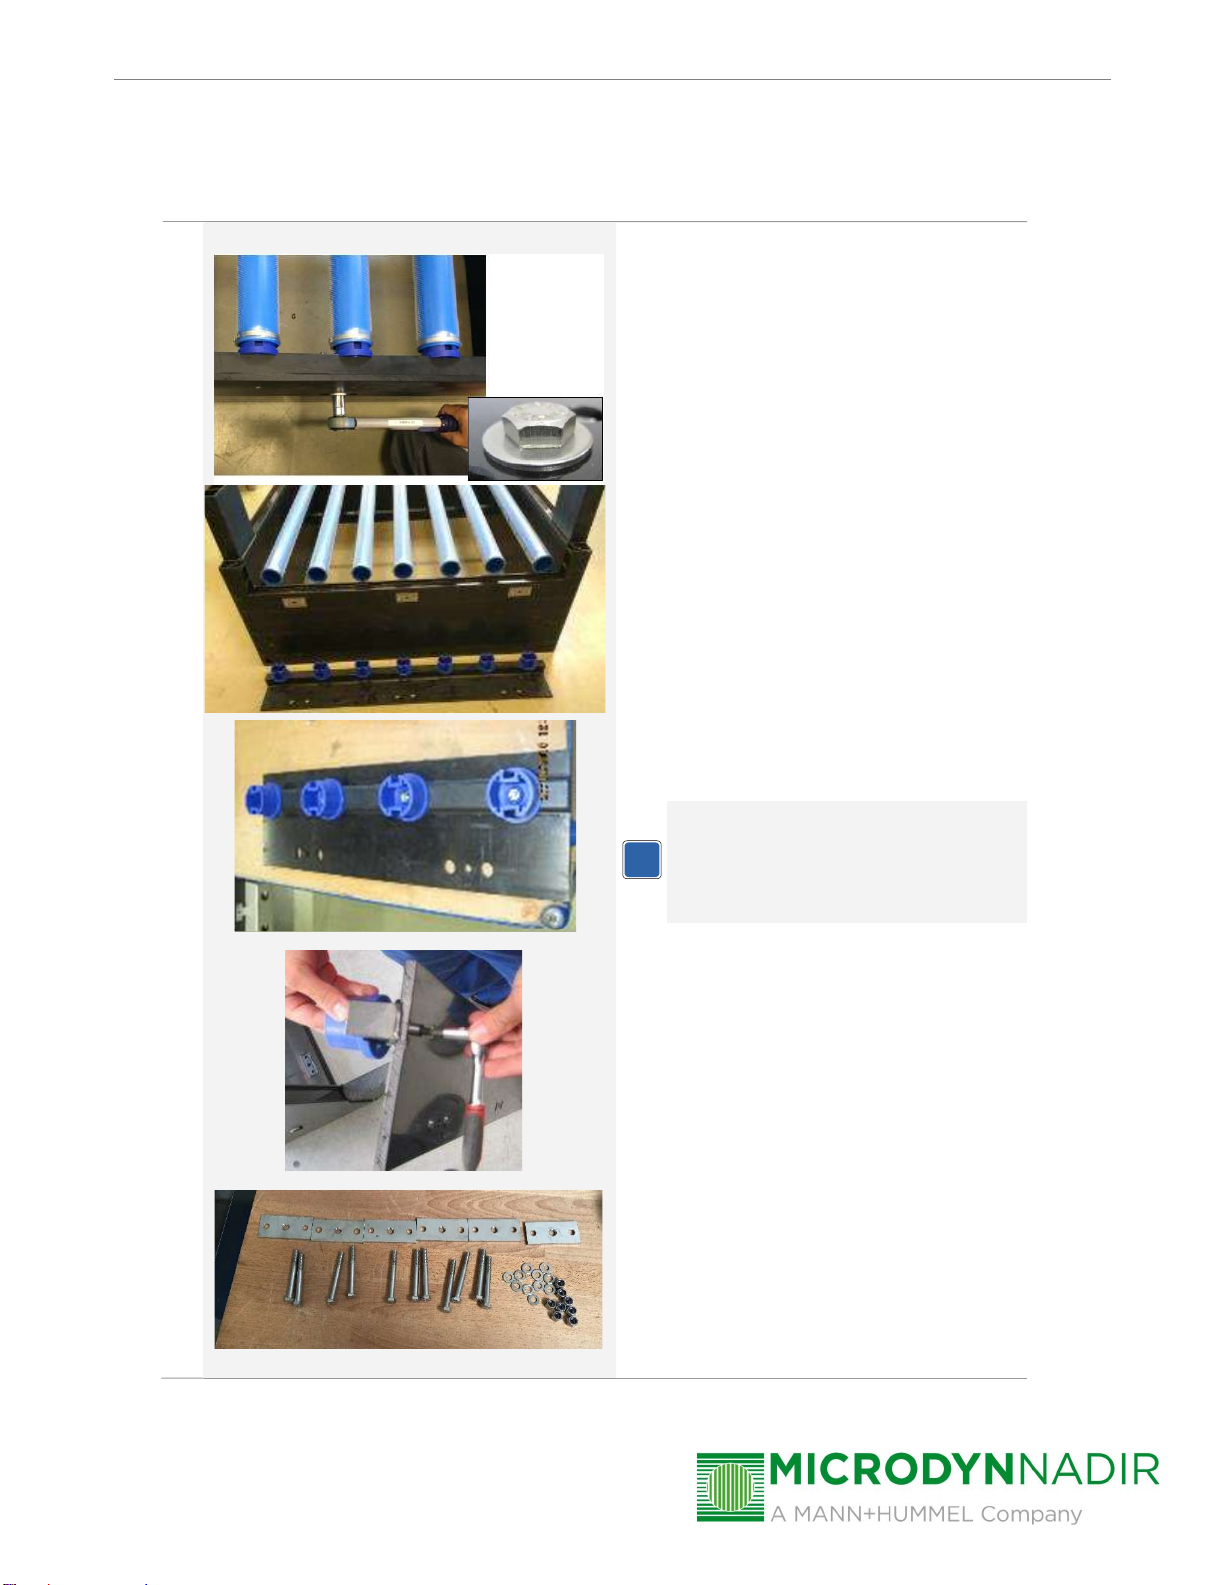
DISMANTLING OF OLD DIFFUSORS
1
Dismantle the diffusor counterpart plate
by loosening the outer screws.
Remove the blue caps, they are not
needed any more.
NOTE
Removing the blue caps are only
needed if they are still mounted.
Put the plate and steel parts aside for
later mounting
i
TECHNICAL INSTRUCTION – MICRODYN BIO-CEL®
FORM NO.: TI-WW024
REVISION: B | DATE: 07/01/2020
2
Turn the frame on the rear end.
Disassemble the blind cap with the
special socket wrench.
If there are round shaped blind caps
(older systems) use a pipe wrench to
remove it.
Remove the double threaded connector
with the blind plug from the opposite
side of the distributor
TECHNICAL INSTRUCTION – MICRODYN BIO-CEL®
FORM NO.: TI-WW024
REVISION: B | DATE: 07/01/2020
3
Clean the air distributor as good as
possible.
If sludge is present in the distributor,
open the ½“ screw on the bottom of
the distributor to flush the sludge out.
Once the distributor is clean again,
tighten the screw again with 45Nm.
ATTENTION!
Make sure that the surface of the
distributor is absolutely even and
free from any deformation. Make
sure that the surface and inside of
the distributor is free of sludge
and debris like stones, wood
pieces, dust or chips.
TECHNICAL INSTRUCTION – MICRODYN BIO-CEL®
FORM NO.: TI-WW024
REVISION: B | DATE: 07/01/2020
MOUNTING OF NEW DIFFUSORS
1.
Take the new diffusor tubes and screw
the double threaded connector into the
diffusor tube till the end.
Make sure there is a flat seal mounted
on the diffusor tube.
ATTENTION!
Please check for any damages on
the diffusors before mounting.
Damaged diffusor membranes can
lead to severe performance loss
and damage of the module.
2.
Check that the flat seal (63x4mm, one
side rough) is on the blind plug.
The rough side of the flat seal needs to
be outside (looking at you).
flat seal
TECHNICAL INSTRUCTION – MICRODYN BIO-CEL®
FORM NO.: TI-WW024
REVISION: B | DATE: 07/01/2020
3.
Set the base frame into a position that
allows you to mount the diffusors
vertically.
Mount the diffusor tube into the bore
hole from below. Make sure the diffusor
is correctly plugged in the bore hole
and the sealing is pressed against the
distributor.
Screw the double threaded connector
with the blind cap hand tight.
Make sure that on both sides of the
distributor flat seals are mounted.
ATTENTION!
Upon screwing do not grab
around the perforated area of the
diffusor tube.
When screwing please hold only
at the overlapping
Sealing
pressed
against the
distributor
TECHNICAL INSTRUCTION – MICRODYN BIO-CEL®
FORM NO.: TI-WW024
REVISION: B | DATE: 07/01/2020
4.
Adjust the diffusors in a way, that the
perforated areas are on the sides. On
top and bottom of the diffusors
must not be any perforation.
Use the special socket wrench to
tighten the blind plug. Use a torque
wrench and adjust the torque to 30
Nm.
Make sure that the flat seal on the blind
plug won´t squeeze out during
tightening.
Check again if the orientation of the
perforated areas is correct.
Check if all diffusors are correctly
plugged into the bore holes of the
distributor
Check if all flat seals are on their
position, pressed to the air distributor
and are not squeezed out.
Check again for any damages on the
diffusor membranes.
ATTENTION!
Disorientation of perforated areas
or damage on diffusor membrane
can lead to severe performance
loss and damage of the module.
Not
perforated
area on top
Not perforated
area on bottom
P
erforate
d
area on
the side
P
erforate
d
area on
the side
30 Nm
TECHNICAL INSTRUCTION – MICRODYN BIO-CEL®
FORM NO.: TI-WW024
REVISION: B | DATE: 07/01/2020
1.
Prepare the steel parts which are
needed to mount the plate on the
frame (refer to page 2).
Take the back plate (without blue caps)
and position it in a way that all
threaded pins do fit into the bore holes
of the plate.
TECHNICAL INSTRUCTION – MICRODYN BIO-CEL®
FORM NO.: TI-WW024
REVISION: B | DATE: 07/01/2020
2.
Take the steel parts of the back plate.
Position the stiffener plate on the frame
and put the screws through the two
outer bore holes.
Place a washer and a nut on each
screw and tighten
TECHNICAL INSTRUCTION – MICRODYN BIO-CEL®
FORM NO.: TI-WW024
REVISION: B | DATE: 07/01/2020
INTEGRITY TESTING OF DIFFUSOR SYSTEM (OPTIONAL)
1.
Prepare a testing adapter which allows you
to connect a hose on the flange connection.
Apply 55 ± 5 mbar pressurized air and check
for any leakages.
Use a 20% glycerine-water solution (or
equivalent leakage detection spray) to check
for any leakages on all connections at the
distributor.
If any leakages are present, try to tighten. If
leakages are still present, renew the flat
seals.
NOTE
If you strictly followed the
procedure, integrity testing is not
necessary. Nevertheless, we do
recommend performing a test if
possible.
Contact
Europe
Germany: +49 611 962 6001
Italy: +39 0721 1796201
info@microdyn-nadir.com
Americas
USA: +1 805 964 8003
Brazil: +55 11 3378 7500
info@microdyn-nadir.com
Asia
China: +86 592 677 5500
Singapore: +65 6457 7533
infochina@microdyn-nadir.cn
i

This manual suits for next models

8

Popular Industrial Equipment manuals by other brands

STEIN U90 operating instructions

STEIN

STEIN U90 operating instructions

Schmid & Wezel EFA VB 215 Original operating instructions

Schmid & Wezel

Schmid & Wezel EFA VB 215 Original operating instructions

ABB HT611069 Operation manual

ABB

ABB HT611069 Operation manual

BOSHART 850-WSP Operation, maintenance and installation manual

BOSHART

BOSHART 850-WSP Operation, maintenance and installation manual

tams elektronik KSM-3 manual

tams elektronik

tams elektronik KSM-3 manual

Ortlinghaus TENSIOBAR TPI 780 EN operating instructions

Ortlinghaus

Ortlinghaus TENSIOBAR TPI 780 EN operating instructions

EDER Titan 80 Pro operating instructions

EDER

EDER Titan 80 Pro operating instructions

HEIDELBERG DryStar 2000 CAN instruction manual

HEIDELBERG

HEIDELBERG DryStar 2000 CAN instruction manual

3M SelfCheck System 6210 Staff guide

3M

3M SelfCheck System 6210 Staff guide

Easthill Group The Eastwood Company 11797 operating instructions

Easthill Group

Easthill Group The Eastwood Company 11797 operating instructions

COMPTROL DST226C instruction manual

COMPTROL

COMPTROL DST226C instruction manual

Komatsu Utility D155AX-5 Operation & maintenance manual

Komatsu Utility

Komatsu Utility D155AX-5 Operation & maintenance manual

Air Liquide OP 310 operating manual

Air Liquide

Air Liquide OP 310 operating manual

Raven AutoBoom XRT Series installation manual

Raven

Raven AutoBoom XRT Series installation manual

Beckhoff KL6904 operating instructions

Beckhoff

Beckhoff KL6904 operating instructions

Blatchford SBWTTCP22 Instructions for use

Blatchford

Blatchford SBWTTCP22 Instructions for use

Scheppach HD2P Translation of original instruction manual

Scheppach

Scheppach HD2P Translation of original instruction manual

Armstrong 21 Series quick guide

Armstrong

Armstrong 21 Series quick guide

manuals.online logo
manuals.online logoBrands
  • About & Mission
  • Contact us
  • Privacy Policy
  • Terms and Conditions

Copyright 2025 Manuals.Online. All Rights Reserved.