Marantz SR-3600 User manual

Model SR-3600
STEREO RECEIVER
&*'^'/e /4P *,*' {/--*^^-" )' /' r/,
rrrsfrpSllrl 7.
i'ANANTZ COIIPAITIY, IITC. 20525 IIORDHOfF STREET, CI{ATSIYORTH, CAUFORT{IA 91313

Grunor I0 BtDuct ffi trsI 0f H.tGrHc sroc[
00 mT lrmlt corti (lR EtEit
ro ustn-stxvtctASrt PIBTS nstDt
ffrEn struEn6 I0 oulufnD $mff pfnsorrrr
Warning: To reduce the risk of lire or
electric shock, do not expose this
appliance to rain or moisture.
The lighting llash with arrowhead
symbol, within an equ:lale'-al
triangle, is intended to alerl lhe user
to the presence of uninsulated
"dangerous voltage" within the
product's enclosure that may be oi
sufficient magnitude to constiture a
risk of electric shock to pe;'sons.
The exclamation point n ithin
an equilateral triangle is intended
to alert the user to the presence
o, importanl operaling and main-
tenance (servicing) rnslructions in
the literalure accompanying the
appliance.
"Note to CATV system installer:
This reminder is provided to call the CATV
system installer's attenlion to Article 82622 ol
the NECrthat provides guidelines for proper
grounding a(d, in particular, specifies that the
cable ground shall be connected t6 the groun-
ding syslem ol the building, as close to the
point of cable entry as practical."
SAFETY INSTRUCTIGilS
: Read lisiructions - Alr :-* :t: z-:
:E-=: -: -s:'Jctions shou: :+ -:- :i - :
:ie ::: a-:a is operatec
2. Betarn iFstruciions - -i i!': , : r
-J==: -; -s:'uclions shou : :: -:-i -+: ':'
ili;:; -81=:elge-
3. Heed |fernings - All *="- -;: :- -;
a!a':;aaa* :li in theopera''- :t.--: : -n
sir3,l: :: athered to.
Follow lnstructions - A ::e":-- -.: :-: .2
us! -Si'-tl 3ns should 53 :'- :^!::
\rfal€r anci Moisture - -. 1:: :-::
s:ra,: -:: :e used near ra::" - -' :.
a-:: -:a' : bathtub. v,as:::r. . ---:-
S:.. a--:r_, tub. in a ,'i:: :::***-: l-
-::' a :.', -irrf,g pool. a-: --: .:
a Caats and Stands - The a:: !.-ri i-r: I
:e ;s=: :r.'; a'ith a cari :- :--i.-: --:: i
rgi:--g-aed by lhe mar-::::-'-'
6i". La =:: a:ce and cartco-:.-:: :- -:-:: :
a€:rc,,3: J,rii.'] care. Quick :::is irl?S.s ri
:!'C€. an: i13ven SUr{aCeS -.ai :e-:.: :.:
aa: raa:s a:a cart ctmbina::- :: :.:a-'-
PORTABLE CART
WARNING
?. Ytlall orCeiling llounting - --: -: :-::
shl- ': ie -rJnted to a waa: :' :: - ; : - ,
as :ec:--e.ied by the !r:=---:.:'--:'
8. Ventilation - The applia::: :::-: ::
s,!te:ea - :ra1 its location a: :.: i : : - :,:*:
3c: a:e-=': ,iith its proper . =-' :' : - =:
exa-:: :re appliance s-:- : -: :i
sliijalSc :r a 5ed, sota- i..-j :. -. -..3-
s,riac= :la'. rnay block :.aa .:-^". a.,a-
cp=^:n-cs: ::.:'acedinabui;:.- -s:: : :-
s.c3 as : ;cckcase or ca: -E: ''Z -i:
scece ii3 iiow ol air lhrou:- :-= .=-: +
tiO. ,3e1i?gS.
9. Heat - Tre appliance shou:: :: s:-=:-:
at,ay i-c- leat sources suci es -:: :::--<
^ea: reg s:Ers. sloves, or oi:e'a:: a-:::
::ruc;flg amplifiers) that produce hea:
Porver Sources - The applianc€ shoulcj :e
::rnecied to a power supply only of the t1;:
:esarl3ed in the operating inslructions or as
-::{ed on lhe appliance,
Grounding or Polarization - The p.q-
::Jtions that should be taken so thal tire
;'3rnding or polarizalion means ol a-
arpliance is not deleated-
Power-Cord Protection - Power-supply
:rrds should be rouled sothat they are nci
::iely lo be walked on or pinched by ilems
::aced upon or againsl them. paying patr
:icular attention lo cords at plugs, con-
i.enience receptacles, and the point where
lhey exit from lhe appliance.
Cleaning - The appliance should be
cleaned only as recommended by the
manufacturer.
Nonuse Periods - The power cord o{ lhe
appliance should be unplugged from lhe
outlei when teft unused for a long period of
rime.
Obiect and Liquid Entry - Care shouu be
laken so that obiects do not fall and liquids
are not spilled inlo the enclosure through
openings.
Damage Requiring Sevice - The
appliance should be serviced by qualified
:actory authorized service peGonnel when:
A. The power-supply cord or the plug has
=een damaged; or
= Obiects have lallen. or liquid has been
s3'iled into the appliance; or
a :ie apDliance has been expo$ed to rain:
:'
: -:: agfirai.iae dies nor appear to operate
-:'-a _. a- e!- ::is a rarked change in ped
-: --:-:: :-
: -- = ::: :-:= -35 :een cropped. or the
=-,:.:;-'a :A-3,:3:
Serr-i:,;.-E - --: -s=' sa3:ld no1 attempt
:: ::-" :: :-: =:: a-::: 3=vond lhat
:::: :a: - -: :::':: ^: -st-iclrons. All
::-:- ::-. : -: a-:- - ae ieferred lo
:-.--' :-: i- jitr Sa'VlCe persOn-
.':
:tr
'a
Power Unes - An ouldoor antenna should be
located away Irom power lines.
Outdoor Antenne GrouBding - l, an outsiie
antenna is connected to the receiver. be sure
the antenna system is grounded so as lo pr+
vide some prolection against voftage surges and
built up slatic charges. Section 810 of the
National Electrical Code, ANSUNFPA No.
70-1984, provides information with respect lo
proper grounding o{ the mast and supporting
structure, grounding of the lead-in wire to an
antenna discharge unit, size of groufiding con-
ductors, bcafon of anlenna{ischarge unil. con-
nection to grounding electrodds, and re-
quirements lor the grounding electrode. See
Figure.
ause No. 10 AWG (5.3 mmr) copper, No. I
AWG (8.4 mrn2) aluminum, No. 17 AWG (1.0
mm2) copper-clad sleel or bronze wire, or
larger, as a ground wire,
bsecure antenna lea&in and ground wires to
house with slan+ot insulalors spaced ,rom
4-5 feet (1,22-1.83 m) apart.
cMount anlenna discharge unit as close as pos.
sible to where lead-in enters house.
rlrsuutms9
4I]ENNA
sERvrc€ | ,i---:\ ,/ ,- lt-rrosrnmar
EilTMilCE
im'urolli -' : .-- - \ r-: 7 \)( itr:ENNA
; - t-'-:'r.: \c/ ;' / \ f,.sHarcr
:>tr> S /
**,.-*-:.]]*=--\:F
- - t=, -'.4 a-*a _
::\: r: _-!-!::= : -:_:..:- :..-:..1: Ge$Eol6 EtEcrcffi
duse jumper wire not smatl€r rhan No. 5 AwG l)-,.;.::1:.,i;;ii;Br'it'iili
(13.3 mmz) copper, or the equivalent. when a ::': c'; '': 2' I
separate antenna€rounding electrode is used.
See NEC Section 81G21 U). FOR U.S.A. OttLY
=7 -#
i.=..,1 ,!!
-;

roBEwonD
Toobtain optimum perlormance and enioyme,rt
from your Model 5,Il-3600 please study the6e
in structions caretully.
Refer to the figure 2 on page 4. The callout
numbers conespond to th6e found in this
manual. All references to the c-onnections and
controls are printed in BOU)FACE type as they
appea( on the unit, I
BEAB PlilEt CotiltcTtoils
Figure 'l shows the location of the input ard out-
put jacks on the rear panel. (Front panel con-
trols and jacks will be discussed tater).
The-stereo pairs ol shiny round jacks such as
thoff used lor the phono inputs are called "RCA
phoro jac*s" and are designed to accommodate
shielded audb cables outfitled with "BCA phono
plugs". Appropdale cables of various lengths are
available at your i/hrantz dealer. Lengths of up
to 24 t. may be u*d. ll it as necessary to pur-
chase cable lor yo.r insiallation, u,e suggesfi ),ou
lirst arrange your eomponents in the desired
position, and then with a measuring tape deier-
mine how much cable will be needed. This will
ensure that l,ou do not underestimate lhe
lengths required for a neat, attractii€ installation.
To avoid confugion, connect one cable at a time
between the unit and the other componenls of
your system. This is the safest way to avoid
cross-connecting ctrannels or confusing source
outputs with inputs.
SPEAKERS
Use speaker systems with impedarrce ratiqgs of
&16 ohms. When you hork up 2 sets of speaker
systerns, be sure to use speakers with ratings
ol 8-16 ohms.
Before hooking up your speaker system, check
its impedarEe, which shoukd be indicated either
on the.back of the speaker, or in its insutruction
manual.
HOOKffiG UP SPEAfiEBS
On the rear panel there are two sets of speaker
terminals, SPEAKER A and B, to vytrich two
speaker systems may be connected. Connect
the speaker leads of the right-hand speaker to
terminals "R" of "A" (or "'B'), and the speaker
leads of the left-hand speaker to terminals "L"
of "A" (or "B'). Make sure thd the " + " speaker
lead is connected to the " + " terminal, and the
" - " lead to the " - " terminals. Strip 1.Ocm
(U8") ol the insulalion irom the end ot each
speaker lead. Twisi the exposed strands tight-
ly, and secure tlre end with a tolrch of solder.The
te{minals are the grsh-insert t1pe. lnsert the erd
of the lead into the hole while pushing on the
button. Then release the button; the hole win
close and the cord is firmly fixed.
ATTEf,TA IilSTAtI.ATIOf, AilD
c0ilrIEcTtot
I Ft A0tenna
Proper antenna installation is the key to smooth
signal reception. To install the sr+died T-shape
indoor antenna, stretch it taut and secure
horizontally aloqg a wal! or ina location where
sigrral reception is @imai- Secure*y connect the
antenna to FM antenfia terminals markd
"30OO" on lhe rear pa.nel^ lf an s.rtdoor tlpeFM
antenna is installed, the T-shape antenna is not
necessary. For proper use of your outdoor FM
antenna. follow the instructions below-
1. Be sure to select the most appropriate type
of antenna for the signal receplion conditions
in your area
2. A 75-ohm coaxial cable is remmmended to
condect the anlenna to the unit. Be sure to
use the coaxial iack cn the rear panel mark-
ed Antenna A.
3. Set the'antenna in a position as h{gr s pc;i-
ble if buildings,mountains or other obstruc-
tions nearby aftect reception.
I hble Ft (Antenna B)
This coaxial lqck on the rear panel is used for
receiying (FM) signals from cable or pay W
(CATV), where FM signals are being tranSmit-
ted separately lrom video signals (e.9., a sddlite
cable TV with hi-li stereo sodnQ.
Note: this is used in coniuction with the Anlen-
na B (Cable FM) button (24) on the front panel.
AM Loop Antenna
To outdoor
AM Antenna
I AM Antenna
The loop antenna is provided for optimum AM
reception- Attach the loop ar*enna onto the
antenna holder on the rear panel, and @nnect
the lead wires to the antenna screw terminals
marked "GND" and "AM". lf an outdoor anien-
na is desired tor better recedion or il you are
in a difficull reception area, oonnec,t lhe anten-
na to the same terminals as the loop antenna.
you should leave the loop antenna connected
to the terminals even when the extemal anten-
na is connocted.
Qp0O Antenna
75O Coaxial Antenna
Cable Fil Antenna
B SBIE FU
@
This information beglmes your permanenl
o

cotilEcTttG G0tt,tPoilEitrs
Connect all ne@ssary audiofuisual cornponents
to the rear panel ol the unil, using RGA phono
plugs. See the illustration br properly completed
cOnnections. When connecting FICA phono
plugs be sure thal L(left). R(right) markings on
each componenl are matched correctly. Connect
the ground wire'of the turntable to the terminal
marked GND on lhe re;eiver...
PHoilo Mil'tsc sErmToa
The unit has a built-in MC head amplifier, you
can selectthe MM (moving magnet) or Mo(mov-
ing coil) phono position. lf your turntable uses
an MC cartridge, sel the selector to the MC posi-
tion. ll an MM cartridge is used, set tlie selector
to the MM position.
ESt L00PrtG lll AllD 0llT
BECEPTACTTS
AUDIO IN/OUT
For use with an equalizer,an additional casseue
recorder, dynamic range expander, etc. Simg
ly remove jumper pins and connect the audio
component according to the instructions sup.
plied with that component. Components con-
nected to ESL LOOPING terminals are always
in signal path, before pre.amp controls (tone,
volume etc.) See diagram below:
VIDEO IN/OUT
For use with a video enhancer, video noise
reduction device, etc- Simply rensve jumper pin
and connect'video component as per the instruc-
tions supplied with that component. The equip
ment connected to this loop will enhance dubb-
ing between video sources as well as monitar-
ing playback. See diagram below:
AVt
Vid@
PNEANP OUI ATD MAITI AUP Iil .
REGEPTACTES
There are two pairs ol teririnals markeg
PFIEAMP OUTand MAIN AMP lN A and B con-
nected with jumper pins on tle reai chassis. Nor-
mally with the pins in place, your receiver is in-
tegrated- However, by removirq tte jumper pins,
your unit in essence becomes tno independent
components consisting of one preamplitier and
one main-amplifier (for A and B).'These recep
tacles are intended for use with any oplional
equipment designed to be installed between the
preampliter and the main-amplifier or for
separate use of either section alone. Equipment
such as an audio qualizer or reverberation
unit can be used; or another preamplifier or
main-amplifier may be hooked up. Simpty
disconnect lhe lumper pins and fcilow lhe
instructions supplied with the accessory equip-
ment. Wheft no auxiliary equipment is being us-
ed, the jumper pins MUST be reinserted in order
to use the receiver. Set A is for the front stereo
amplifierslA speakers), and the set B is for the
rear stereo amplifiers (Bspeakers).
CEITTER GHATTET OUT
The mono signal (left and righl channels) from
the PREAMP OUT A will come out of this out-
put. A power amplifier can be connecied to the
terminat lor driving a subwooler speaker system,
it so ciesired.
AMPLIFIER BRIDGED MODE
OPERATIOil
ln the bridged mode operation only tr,to speakars
are used. ln addition, the power is csubie that
of normal 4 channel separation.
The e lead of the LEFT speaker corc should
be connected to the SPEAKEP A LEFT =
{BRIDGED e) terminal and e }ead shculd be
connected Io the SPEAKER B LEFT : |SRIDG.
ED e) terminals.
The e lead of the RIGHT speaker cori shculd
be connected to the SPEAKER A filGHT :
(BRIDGED e ) terminal and the = 1.u" ="ou,"
be connected to the SPEAKER B RIGHT =
{BRIDGED 3 ) terminal-
Noie: The polential of the bridged 3 ler;-niea:
of this unit is not the same as the earth potec-
tial. Connect the speaker system direciiy ta i.is
unit via lhe speakercrords; never use the speake.
selectar box oI something similar in belr'ieen th.
speaker cord so that the lead ofihe card dces
not touch lhe other terminal or the metal oart oi
this'unit.
SURBOUilO SOUIID SYSTEM
Surroirnd souM can be achieved by using the
controls on theSR€ooosurfbund system, which
incorFrates high powered 4-channel amplifiers
and 4 speaker systems. The sources can be
video tapes and.discs which have Dolby Sur-
mund encoded, and rprmal stereo programs lor
simulaled surround etfects (Matrix and Hall
etlects).
IIIPORTANT: Please make sure that the NOFI-
MAUBHIDGED selector button on the rear panel
is swithched ro NORMAL position, and the 4
speakers are conneetd properly to the speaker
terminals. Use speaker terminal A for the front
speakers, and speaker terminal B for the rear
speakers.
SWITCHES AiID GOilTBOTS
(1) Power Button
This button turns on the @wer when pressed.
1'he digital lrequency display will be lii when the
power is on. Press the button again tg tum of{
the power.
(2) Frequency Display
lndicates the frequency of the radio station cur-
rently tuned in. "FM" and "MHz" denote FM
reception, and "AM" and "KHz" mean AM
reception. The word "MEMORY" will appear
when the Memory Button is pressed.
(3) Signal lndicatot
The thres.LED array shows the incoming signal
strength ol a tuned station. When all three LED's
are lit up, you are receiving an optimal signal.
(4) Sterco lndacator
Lighis when an FM stereo signal is tuned in.
When the stereo signal ls too weak, it can be
only received as mono and the indicaior will
not light up.
(5) luto Scan lrdicator
This LED lights up when the Auto Scan Bunon
is depressed to show lhat the FM auto scan-
ning mode is activated.
(6) Cable Fil lndicator
This LED lights up when the Cable FM bulton
is depressed and activatecl.
(7) Bridged lndiHtor
This indicator will light when the NOR-
MAUBRIDGED selector on the rear panel is srrrit-
ched lo the BRIDGED position.
(8) Freset Slation Buttons
These buttons are used to preset (memorize)
Cesifed stations. and to tune in (recall) the
station oreset.
(9) Preset Shift Button
This button allows you to program the desired
siations into presets "11-20, and to trrne in (recall)
the very same stations.
{10) Tunlng Up/I}own Button
Used to tune in a desired radio stalion. Press
the left part of tile button (marked <) to tune in
lnwer frequencies, or press the right part (mark-
ed >).to tune in higher irequencies.
(11) f,lemory Button
Enters a given station lrquency into the
memory. Press the memory button first, then
press the desired stalion button. This button
must be pressed before each preset button is
pressed.
{12} Volume Control
Used to regulate the volume level. Turn
clockwise to increase the level, and
counterclockrvise to reduce it, The LED indicator
on the knob shows the position of the level set.
(13) ileadphone Jack
Plug your headphones into this iack for private
tistening. Tum off bOh Speaker A and B buttons,
so thal the sound only comes slt of the head-
phones. The volume level oI tlre headphones
can h controlled by the volume control.
(14) Speaker Buttons {A.E)
Allours you to s€lect the speakerq,Etem you wish
to use. Press button A to activate the speaker
system connected to the A terminals on the rear
panel, or press button B for the speaker system
connected to the B terminals.Depressing both
buttons A and B will activate both speaker
systems for simultaneous operation. When on-
ly one speaker system is hooked up use tte @r-
responding speaker button, and release the
other button.
cRr
tonild
6 Oul
av2
Vidco
Frit

Figwe 1
CASSETTE D=CI(
Mi'PACT ItrSCPI.AYER
t
STEREO FOUr'EN
AI'PUFIEB
VTOEO GASEETTE *ECORDER SEIKEFI'HGHT SPEAIGRILEFT
SPEAKER'HGilIT SPA!{(EftLEFT
sit*g

{15} Flemora $eneor
Thi$ is thE target eye whie{ receives operating
commands in the form of infra-red beams emit-
ted ,rom ths remote 6ntrcl unit.
{16} BassrffidrTreble Tone Contt$16
These cantrcls allow you to regulate freguency
response in 3 separate ranges. Use them to
tailor your tavorite sound. Thc Bass Control is
lor adjusting the low lreq$ency range; the Mid
Control is'for the middle lrequency rangs; and
the Trsble Gontrol is for the high frequeilcy
range. Eact control can be roftated chckwise to
boost the relative response, and counter'
clockrvisB to reduce it- Adiust to thF sound you
liks be$l by using lhese cqntrols.
(171 Eahnce Control
Regutatesthe balance of sound o*put from the
speakers. Turning the control to lhe lelt siifts
the center ol total sound to tng lsft, ancl tuming
to the dght moves the center to the right- Nor-
mdly in the mid#ition. the sound produced
lro* both left and right speakers should he
equally balaficed for opiinal ster€ophonic
reproduction.
(18) Sobsonic Fltter Button
The submnic fiher cuts off the noise in low frs.
quency range y{ithout allectirq thc sound quali-
U. When this button is in the depressed posi-
fion, frequerEie$ beiou a)Hz are rolled df at ttl€
- 6dUoctave, reducing disturbing subsonic ef-
fects $uch as lo* frequency noise causd by
record wrapage or $hock produced whsn the
stylus is lowered otrto a recod-
(lsl High Fiher Eutton
Allours1pu to ru&rce high kequencyinterlerene
suoh as anRryirig record scratches, tape his$,
FM bac*groud *oise, etc. hlorroalb, ho$,€rrer,
keep thas slvitch OFF lsl odimum trequency
reploduction d all Hogram sourees.
(20) Loudn€€g Butlsn
The human ear ha$ a leodency tc become l€$s
sensitive to vely low or high freguenciet when
listening at rduced vn{ume levels, The buuon
activats a corlpen$ation lunction by boosting
th@ frequencies, so thd a more natural sound
can be heard at low rrolume levels.
(21) uom gulton
When this butlon isdeprssed the inputsigftals
are cslerted to monaural, including stereo FM
broadcasts. ln the oIl position, stereo sour€s
are reproduced stereophonically-
(22) Fufictioa Selector tuttoas
ThBse bqttons are u*d to select the program
s0trrces you wis*r to fstsn to. Press the PHQNO
button to play the tumHblq CD button for the
compact disc player; TUNER vrrhen listsning io
an AM or FM broadcasi {sslect by AM/FM bul-
ton); TAPE 1, TAPE 2 buttons lor a cassette
deck, a video ca$sette recorder or a videq disc
plalEr @nnec*d to the unit. The indkBtor abow
eoch button l€hts up rvhe-n the button is
pre$sd.
(23) FU Uut€ Otl Button
Nonnaltythisbrston sficxrld be lelt ln the olf posi-
tion, * thal any urflvanted inter$tation nois6 dur-
ing FM tuning is suppressed. Usethis button on-
ty vuh6n tuning in a very weak FM station in the
manual scanning mode.
(24) CaHc FS Ertton
The button allqrs )pu to select between the t$ro
antenna inputq B5-ohm coa:<ial) on the rsar
panel. Leava the buuon out (OFF poshion) lor
the regular FM use. Depress the button
toCable FM (which comes wilh SableTvl.
(25) Preset Scan Button
This button ellows you to scan only t*e pre$et
statiqns in sequertce for a lew setg!.ids eaeh-
(26) FM AutE Scan Button
When this button is pr6ssed, ihe Ftl runing
mode changes lronr manual to the auto#atlc
scanning mode. Use it when you rxisl': to scan
statio*s quiekly- ln the manual scao.|i$g msde,
thetuning u#dsnn brtofl mlst becca&**ously
pressed lor tuning. {Note: the bulio.: *as E+ ef-
fect tor AM tuning, which hes 1* be don€
manuatly.)
{27} Audio liluting Butlon
Press this button when you wish to q$ickly and
temporarily reduce the sound level. Pr€ss tie
button again to restore the original \.$lu$:e tevel
setting.
t28) $urromd }brmal Button
Depress the buuon to deactivate ttre ssrisljrld
system. Lsa\re atfte "ofr" po6i*o.t wte? rtg{ il+
mg ths srrround $Vstsn {an idettlisa} stereo
signal is ddirered to the lru*t a*d rear
speakers).
t29l $wround Stmo &.rtton
Delivers a diflerence signal {L-ff} ie S}e rear
speakec. Ellective tor adding specid ar&iac+
to sterao programming.
(30) Surmurd Hail Button
Delivers adelared diflerence sig*at &&{s t}!s
raar sgeakers and mixes same ihe sigtld wtLll
normal sfiereo ior the lrBnt speat{stE.
Depros8 the button on E€t the surrsared €#B*{
as if listening in a hall.
tgI) Suround Hby &rfton
Bepress the butoo to get the Dolby Ste{s} *!r-
round eflect, uith video tape and yid€s 6E€s
which have Ddby $urround encaded.
{3I4 Surround Ba*ance Contrpt
Use the control when the Dolby *sltsl: is
depre$68d, for @nlrolling tte balarce *i vear
SHkers. For srrect s€fiing, si.titch tl1e &eke{
A B$ton olt, push the Mono Blton" etld 3d;t3st
the inprJt balance such that rear ,apeal(ei leYel
is minimized-
t
{33} $urround Level Conkol
Use the control to balance the level between
kont and rear speakers- Adjust lor rear speakerc
as "till" {minirnal audible level}, and do not wer-
power lronl speakers.
Remote Control Functions
(34) Power Button for oflroff.
{35} Function Selector Buttons {same as item
22r.
(36) Preset Statiotl Bultans {same as item 8}.
{3fl Tuning Buttons (same as item 1O}.
t38) Volune Buttons {sane m tte item 12}. The
volume conlol {rotary} on tlle main unit will
i turn automslically by m€ans o{ a built'in
motor ddw when the volume control but-
tons on ths remot€ control are pres$gd.
(39)Audio Muting button (sarne as the item 24
ss

OPERATIOII
" The SFi-360O employs a quartz l'LL synthesis
tuner for easy and accurale iuning, with tuned
frequencies visible on the digital readout- Us-
ing the unit's memory circuit, you can preset
your desired statioos, This is a feature only a
synthesis tuner can offer, allowing you recall of
a storsd station frequency instantly with a light
tap on a preset butlon.
One staiion button can store one AM or one FM
statioil in ils memory. TheSR-3600 permits a
lotal of 20 stations to be stored. For example,
you could store 12 FM and I AM stations
randomly.
There is a special back-up systsm for the unit's
memory circuit. lf the power cord is unplugged,
or il there is a pourer failure, the back-up system
will reiain the frequencies stored in the memory
circuil forlhree days (the memory is retained as
long as the power cord is plugged into an AC
outlet. regardlss ol the PO\iJEB button orrofq.
lf you leave the power cord unplugged for ovar
three days, the slored stations will be lost.
. Before commenclilg speratian. check to see
that all conneciisns are prcperiy made.
. Always be sura te set the volume conlrol to
the *iinimufi? Sositian belore turning on po,!ver.
. Select speaker button A ct B (or both) for
the speak€r system(s) you are going to use-
r llhen using headphones, set both speaker
buttons to the released (OFF) position.
" Set the tooe controls and loudnss buuon
as desired-
Radio Listening
1. Press the TUNEH button on the Function
Sclector, and select AM or FM using the AMJFM
buttofi. t
2. Tune in to the desired station using the tun-
ing sr the preset station buttons.
3^ Raise the volurne to the desired level.
TUFIING
The cnit is designed to pernnit ihree modes ol
tunicE: aui+sca* turirlg, manual tuning, and
preset *]erlory iun;Eg,
. Auto-scan Tu*ing gor FM feception Onty)
Set the FM Auto Scan butron te the depressed
positisc-
Press the DOWN ar UP part of the Tuning
swilch. Automatic scanning of FM band begins.
Scanning stops when it reaches a poini where
the iilprri signal exceeds a certain acceplable
level. The receiving trequency is shown on the
readcut- To tune ifl lo anolher stdiofl, press the
DOWN or UP part, of the Tuning switch depen-
ding on the frequency of the desiredstation.
. Manual Tuning
Set the FM Auto Scan button to the released
(out). A touch ol the tuning syviich, on either
the DowN or uP part, win shift the tuning fre-
quency in 1ookHz increments. lf you keep the
switch pressed down, release the $ilitch tostop.
r Preset llllenrory Tuning
Tune in to the desired slation in either the
autoscan cr manual tuning mode.
For Presats 1-lO
Press the Memsry button, then press any sta-
tion button "l through 10, lo enter the frequency
ioto lh6 memory. Aterirard, you rll;ry recall thd
freguency anytire ky$mgly pee$ngthe same
button.
Unce you have presseC the Memory button, you
must press a slation button within a few seconds
or lhe memory funciion will tum off MEMORY
in the readout tums ofQ- ln thissase, begin again
following the above procedure,
Fgr PJesets 11-20
Press the Memory button, then prss the Shift
button (the shift LED will alsr light up when a
preset button iS depressed.) Now press any sta-
titrr button lrom 1t*20 to enter the fr8quency
into the memory. You may recall that lrequen-
cy any lime by first pressing lhe Shift button and
then the same station buuon-
Once you have pressed the Shift button, it wiu
remain "On" for five seconds. This allows you
to select different station Bresets above 1O
wilhout having to constantly press the Shilt but-
ton. ll pu wieh to select the prset brson below
stalions 10 for I through 10, urait until the shift
LED indicator lighr goes out.
Note: It you have lurnd olt the unit, and tum
it on again, the unit will tune in to the station fre.
quency to which it was tuned imndiately before
it was shut off.
. Preset Scanning
Depressthepresetscanbutton once to scan
the preset stations automatically lor a lew
seconds each from the presel 1 through 20 in
sequence- The LED pres.6t indicatorwill light up
tor a few seconds accordingly to show which
preset station is being scanned al that moment.
So when you have iound th€ stalion you wish
to listen to, just depress the corresponding
preset buton (which will also stop Freset
scanning),
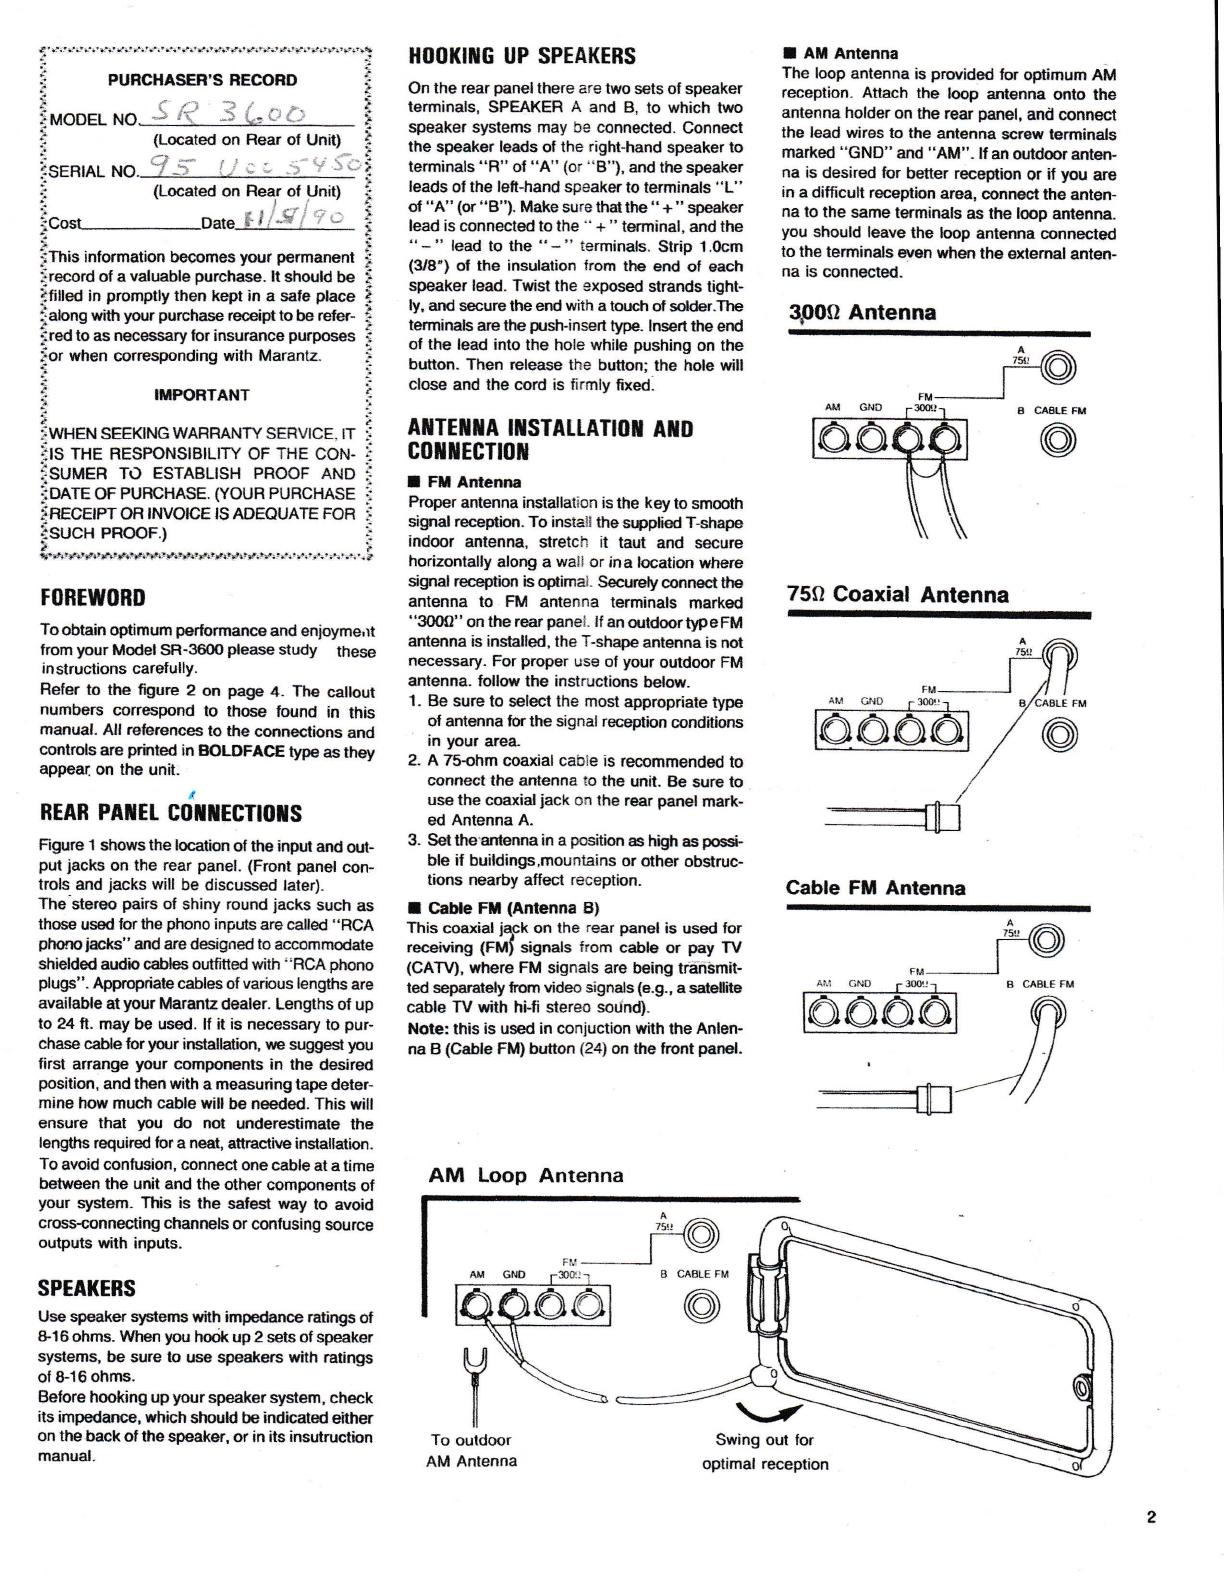
Listening To C.able Fll
ll you subscribe to a cable or pay Tv which of-
fers a Satellite TV broadcast with a hi-fi stereo
FM audb signal, 1ou can enjoy its optimal sourd
qualrty by using tfie Antenna B coaxiat socket
bn lhe rear panel. The procedures are a$ bllorrs:
1 . C,oilnect to the Antenna B gcket lrom your
cable TV decrder.
2. Depress ttle Cable FM buuon on the lront
panel. The LED indicator On the display window
will light up to show that the bukoE is activatd.
Tune to thg lrequency ol ihe Cable FM stalion.
lf you waat to store the frequency,. Use one of
the preset buttons as tor normal FM {you would
still have to activate the pable FM button first
to listen to this frequency).
Tumtable Listening
1- Prsss the PHONO button on the Funclian
Selector-
2. Start play, and lhen raise the volume.
Listeoing from Compact llisa Player
1. To listen to a compact disc, press the CD
button oil the lunction selector.
2. Start ptay according to the instruction
manual.
3. Haise ihe volume to the desired level.
Tape Dec-lr Playback
'l - Press the TAPE 1 or 2 button on th6 Func-
tkln Selector according to which tape deck you
are going to play.
2, Start playback.
3. Raise the volume to the desired level.
Recordiag Program Source
Play the desired program sour6 according to
lhe procedures ncted above. Tlesisnal &orn the
source will appear at TAPE 1 OUT or TAPE 2
OUT tsrninals ofl the rsar panel. Put the tape
deck in tte rurrf,*g modeto rsord the signal.
Duir6 rewding, manixlaling the rolume con-
trol, ione contro&s, eic, will have no effect on the
signal being sent through the TAPE 1 or TAPE
2 OUT terminals-
Dubbing
Two tape decks can be used to perform tape
to-tape copyirg {dubbing) This receiver ailows
full duhbing from TAPE 1 to TAPE 2 or from
TAPE 2 to TAPE 1.
Put TAPE 1 or TAPE 2 deck, whichever deck to
be dubbed (recorded), in playback mode.
(depress the coresponding TAPE 1 or TAPE 2
button ON). Then set the other deck to record-
ing mode, and slan dubbing- During dubbing,
you may listen to ths signal with the volume con-
lrol, etc. Sel as desired, since it will not aflect
the iecording Signal.
*
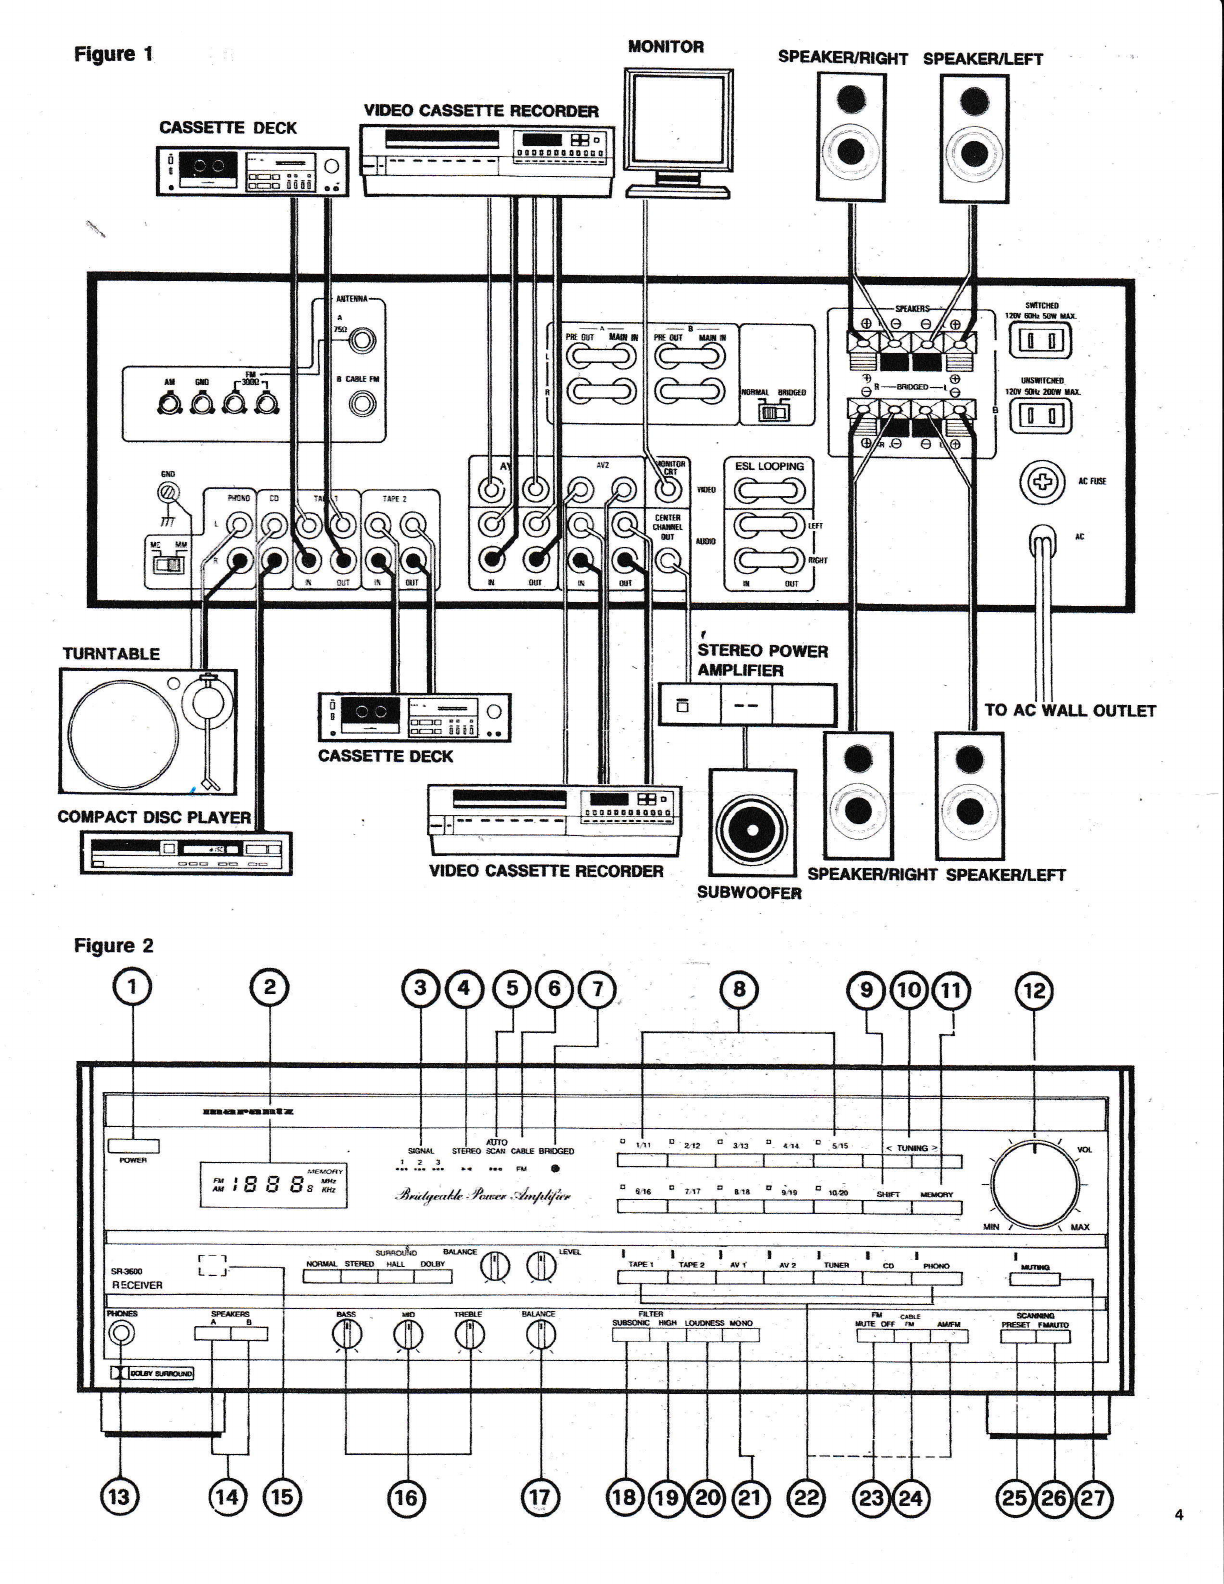
PTAYBICI( IflD BECORDITS TTITH AV
t0urPuttlT
The SH€600permats connection and switching
ol audiovlsual components, so that the receivCr
can be used as an AV control cefiter. There are
two sets ol inputs tor slereo AV components
such as one video disc player and one stereo
video recorder or two slereo video reccrders.
There is also a setrarate monitor GRT output ior
coancction ol a color monitorTV for high quali-
ty vierying. This system then not onty provides
for easy slection of vido sources, but also
allows high pertormaace operation for exceller*
sound quality such as digital sound from a Hi
Fi video recorder.
ln addition, video sound trac*s can be dubbed
onlo a tape recorder connected tO lhe receiver,
or vice versa. Video dubbing is also possible
lrom AVl to AVz, sr AVZ to AV1. To carry o$
playback with th6 equiproGnts conrEcted ta the
AV inputs, set the function setector to AV't or
AV2. Set the fi or video monitor to the video
input mode to vie* the picture, Adiust the
volume and other confiols on the receiver as
desired.
Reaoding (Dutrbing)
Set the lunction selector to AV1 or AVZ, where
the ssurce to be rec-orded is connected, Then
record with the video recorder Sayback to the
AVl to AVz lerminals on the rear panel. The
video signal being re6.ordd can be monitored
by a TV or video monitor.
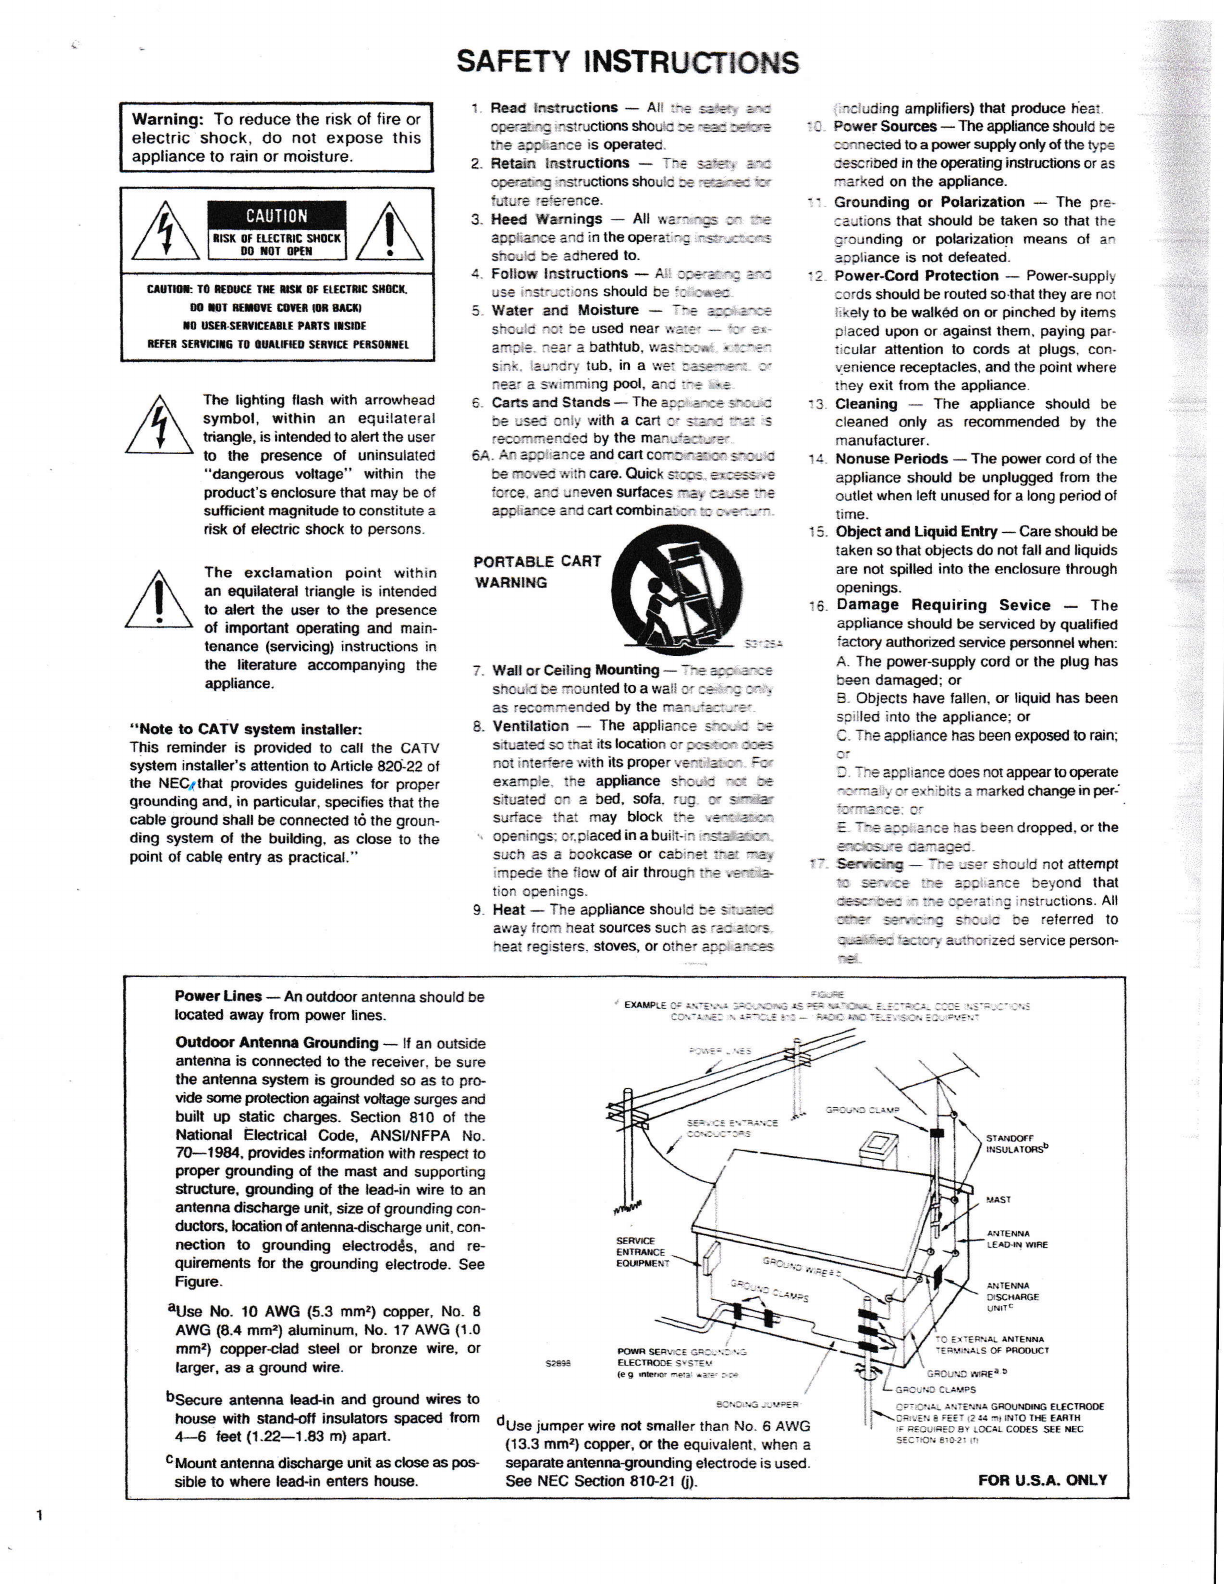
lrur Ax0 r0lsr
ln any high fidelity installarion, hum may be
caused by the interconnection gf a turntablG,
r€eiver, and speakers as the result of wiring,
different grounding or locatior ot components.
lf hum is experienced with your unit, disconnect
everything but the speakers trom the unit. Plug
in the turntable and ithumor tlowling appears,
mwe thetumtable awaylrom the speakers as
much as possible.
Note hum rnay also fu induced by fautty cable
connections or by running the cableslooclce
to a strong AC field.
When your unit picks up noise during the reep-
tion of broadcasts, causes are rpstly due to ex-
temal obiects such as fluorescent lamps and
house appliances using a mot(r or thermostal,
or other$ thal may induce the noise.
Eilher relocating the unit away from the noise
sources or usirg an improved outdoor antenna
may readily sdve the problem.
In the eveni yor cannd lind lte cause, c,tlsrrlt
your dealer or a qualified elec.trician.

PROTEGTIOX GIBCUIT
The SR€600 incorporales dl pcsible satety
measures by combining muhfi*e prdecticn cir-
cuits to prev€nt accident or damage.
lf for some reason the protection circuit is ac-
tivated, there wifi be a srdden cut-ofi sound lrom
the speakere.
ll no sound is produced, the reason may be due
to the functioning ot the proiection circuit. FiFt,
tum ofi the povyer and disconneci the plug from
the electrical outlet, and c-heck to b€ sure that
the speaker cables are not short-circuited. Also
check to make sure the impedance of each
speaker is 8 ohms or over (rf it is below 4 ohms,
lhe unit will be overloaded due to low im-
pedance). When u$rq 2 seh d speakersystems
simultaneously, make sure that the impedance
of each speaker is 16 ohms or more.
Afterchecking the abve points, tum the p,ourer
on. The protection cirsuit will automatically be
deactivat€d and the unit will start functioning
again.
The protection circuit normally operates when
the unit is first tumed sr to prBvent a pop$ng
noise lrcm occllring- No sound is produced for
seneral sgcords after turnon.
MilHTEilAIICE
Cl-EAllllrlc
TtlB faish ol th€ knobs and fronl panel will lasi
indelinitely with proper care and cleaning-
NEVER use scouring pads, steel wool, scouring
po,yders, or harsh chemical agents, such as lye
solution. These will mar the linish. Clean with
a soft, lint-free cloth or cltton swab slightly
dampened with a mild solutign of detergent and
water.
FUSE REPL'TCEUENT
ln the event the luse blows out, replace it
ONLY wilh a fuse of thesame type and rating.
Replacement with a fuse of a higher rating or
slo,l,er action will not protect the unit and will void
the wananty.
The unit power should be switched OFF betore
repacing the fuse. Should the replacernent fuse
blow out within a short period oi time after the
unit is tumed on, the unit should be taken io an
authorized service facility.
REPAIRS
To service your Marantz unit, rerer to a Marantz
fac{ory aulhorired wananty sfaim. The Marantz
Comparry and its iadory trained ec*rnicians have
the knowedge and special equipment needed
for repair and calibration ol this precision
instrument"
ln the event of difficulty, please call the proper
toll lree number listed bolow, and ask for
Marantz Service:
For the Continental United States
(except ILL):
For lllinois:
For Hawaii and Alaska:
80G,447-1970
8m€32{}800
.80G.447-0&0
When deliverirg the prcduct lor service, you
should take a opy ol your purchase receipt and
a lull description ot lhe problems you have
ensountered.
REPAO$NG FOB SHIPillENT
Should it become necesary lo repack your unit
brshipmentto thelctory, to anauthorized ser-
vice station, or ebewhere, pleaS observe the
bllowing precautions:
a. Pack the unit carefully, using the original
material.
b- Slrip via a reputable canier(do not use Parcel
Past) and obtain a shipping receipt lrom the
carrier.
c. Be sure to include your return address on the
shipping label.
ftiilted h Talwm
f,mqro2367
ilARANTZ is a registersd trdsna*.
Other Marantz Stereo Receiver manuals

Marantz
Marantz 1530 User manual

Marantz
Marantz SR5005 User manual

Marantz
Marantz 26 User manual

Marantz
Marantz NR1510 User manual

Marantz
Marantz SR8000 User manual

Marantz
Marantz 2216 User manual

Marantz
Marantz SR4120 User manual

Marantz
Marantz SR5010/U1B User manual

Marantz
Marantz NR1603 User manual

Marantz
Marantz SR7300 User manual

Marantz
Marantz SR7200 User manual

Marantz
Marantz SR-12S1 User manual

Marantz
Marantz SR7013 User manual

Marantz
Marantz SR5009 User manual

Marantz
Marantz 2250B User manual

Marantz
Marantz NR1509 User manual

Marantz
Marantz 2215 User manual

Marantz
Marantz SR4500 User manual

Marantz
Marantz SR1030 User manual

Marantz
Marantz SR7200 User manual