Marathon MBWC24-2DSS Assembly instructions

Owner's
Use & Care Guide
MBWC24-2DSS
FRENCH DOOR WINE &
BEVERAGE CENTRE
Congratulations on the purchase of your new Premium Wine & beverage
cooler!
To activate your Warranty, please register your appliance at www.stirlingmarathon.com or by
completing and mailing the enclosed Warranty Registration Card. We are confi-dent you will
have years of hassle-free enjoyment and ask that you please retain the Use & Care Guide for
future reference and your safety. Before installing please, read your Use & Care Guide carefully
and pay special attention to the Safety & Warning information outlined in the following pages
For immediate assistance: 1-844-309-9777
www.stirlingmarathon.com

Table of Contents
Important Safety information ..........................................................................................................
Installation location................................................................................................................................
Installation requirements ...................................................................................................................
Ventilation Grill Assembly...................................................................................................................
Switching the appliances ‘‘On’’........................................................................................................
Control description ...............................................................................................................................
Recommended Wine Serving Temperature Chart.................................................................
Troubleshooting.......................................................................................................................................
Warranty......................................................................................................................................................
3
4
5-6
7
8
Care & Maintenance...............................................................................................................................
/RXcabW\UbVS@S[]dOPZSAVSZdSa..................................................................................................
9
10
11
12
13
14
Important Safety Information
3
•Do not move your Cabinet while loaded with wine. You might distort the body. The wine cellar should be installed in a
suitable place to avoid touching the compressor with hand.
•This appliance can not be used by children aged from 8 years and above and persons with reduced physical, sensory or
mental capabilities or lack of experience and knowledge if they have been given supervision or instruction concerning use of
the appliance in a safe way and understand the hazards involved. Children shall not play with the appliance. Cleaning and
user maintenance shall not be performed by children without supervision.
•If the power cord is damaged, it must be replaced by a manufacturers authorized servicer or a similarly qualified person in
order to avoid a hazard.
•Opening the door for long periods can cause a significant increase in the temperature in the compartments of the appliance.
•Clean regularly surfaces that can come in contact with food and accessible drainage systems.
•If the refrigerating appliance is left empty for long periods, switch off, defrost, clean, dry, and leave the door open to prevent
mould developing and odour within the appliance.
DO NOT USE AN EXTENSION CORD
To reduce the risk of fire, electrical shock, or
injury when using your appliance, follow these basic precautions:
•Read all instructions before using the Wine cooler.
•DANGER or WARNING: Risk of child entrapment.
•Child entrapment and suffocation are not problems of the past. Junked or disposed of appliances are still dangerous even if
they will “just sit in the garage a few days”.
•Before you throw away your old Wine cooler/Beverage Cooler: Take off the door. Leave the shelves in place so that children
may not easily climb inside.
•Children should be supervised to ensure that they do not play with the appliance.
•Never clean appliance parts with flammable fluids. The fumes can create a fire hazard or explosion.
•Do not store explosive substances such as aerosol cans with a flammable propellant in this appliance. The fumes can create
a fire hazard or explosion.
•WARNING: Keep ventilation openings, in the appliance enclosure or built-in structure, clear of obstruction;
•To avoid a hazard due to the possible instability of the appliance, it must be levelled following the instructions.
•WARNING: Do not damage the refrigerant circuit;
•WARNING: When positioning the appliance, ensure the supply cord is not pinched or damaged.
•WARNING: Do not locate multiple portable socket-outlets or portable power supplies at the rear of the appliance.
•Flammable and explosive items should never be put in or stored near the wine cooler.
-------------------SAVE THESE INSTRUCTIONS --------------------
WARNING
DANGER

Installation location
Installing your Marathon Wine & beverage center
Before using your new Wine Cooler, we recommend leaving Cooler door open and
unplugged for 24 hours before installation or use. This will allow time to clear any
residual odours from the interior liner and hardwood shelves.
Your Premium Marathon Wine et beverage cooler is engineered for built-in or free-
standing installation. The front bottom vent must not be covered.
Your Marathon cooler is also equipped with 4 adjustable feet to facilitate easy
levelling. We recommend that you tighten the back feet first and then adjust the
front feet to level the wine and/or beverage cooler
Installation location
Choosing the right location for your Wine Cooler is important. We highly recommend the
following location criteria:
• The appliance must be positioned such that the plug and power outlet are
accessible. Release the power cord and move the appliance to its final location.
The appliance should be installed in a suitable place where the compressor will not
be subject to physical contact, unencumbered and well ventilated
• Dry area, not too damp or humid – ideally at maximum 65% relative humidity for
peak performance and reduced sweating on the interior door when opening. If the
temperature is above or below this range, it may affect the performance of
the wine and/or beverage cooler . Placing in cold, hot or humid temperature
conditions may cause temperature fluctuations and increased running operation
costs.
• Flat, level floor
• Approved electrical outlet (preferably with a surge protector) within 3 feet of the
Wine Cooler.
• Minimum 1 meter from any microwave oven. Certain microwave ovens do not have
a wave interference shield. When placed too close to the wine or beverage cooler,
the performance may be affected.
•Marathon Wine & beverage coolers are NOT CERTIFIED for outdoor use.
Outdoor use will void your warranty and possibly cause a safety hazard and
result in fire or personal injury.
CAUTION! Your Marathon & beverage cooler is equipped with a three-prong power
cord which has a ground wire. The power cord should never be altered or used with
an extension cord or power bar. Improper use of the grounding plug can result in the
risk of electric shock. Consult a qualified electrician or service person if the grounding
instructions are not completely understood. If the power cord is damaged, it must be
replaced by a qualified person to avoid electrical hazards.
4

Installation RequirementsInstallation Requirements
Ø Min. 2 ½ ’’
Make up air
(recommended)
CUTOUT
MBWC24-2DSS
Cutout & Dimensions
DIMENSIONS
22 13/16’’ | 57.5cm
23 7/16’’ | 59.5cm
32 ¼’’-35’’ | 82-89 cm
23¼’’ | 59 cm
min. 23 ⅞’’ | 60.5 cm
32 11/16’’ - 35 ¼’’ | 82-89 cm
Please ensure you have a minimum of 3/16” clearance on each side of the unit. This space will
allow fresh air to flow freely and remove and insert easily the wine cooler as needed.
Warning! DO NOT SEAL BY SILICON OR ANY OTHER MANNER THE SIDE OF THE UNIT
OTHERWISE THE GUARANTEE WILL BE VOID.
In “Hot and Humid locations”, an air vent with a minimum ventilation size of 200mm x
40mm MUST be cut out on each side OR 2 circular shapes with a diameter of 65mm at the
top of either side of the partitioning, allowing cool air to flow into the rear of the cabinet.
This air vent must not be opened on the same side as other appliances, such as ovens, or an
area that is sealed and without access to fresh cool air. FaiFailing to comply with the above
specifications could result in WARRANTY BECOMING VOID.
5

6
Installation RequirementsInstallation Requirements
MBWC24-2DSS
Cutout & Dimensions
DOOR CLEARANCE
227/16’’ | 53 cm
32 7/16’’ | 82.4 cm
11 9/16’’ | 29.4 cm
23 ½’’ | 59.6 cm
34 ⅝’’ | 88 cm
1. Please follow the installation diagram when installing built-in
wine cellars. Use no less than the minimum installation
dimension or it will affect the venting of the unit.
2.The built-in wine coolers has a power switch located on the
control panel so access to electrical outlet is not needed to
power off your unit.
3.The wine cooler requires a standard 120 volt/15 amp
dedicated power supply.
4.The power cord is approx. 6 ft./2M in length and is fixed on
the right side at the back when looking from the front of the
cabinet.
Ventilation Grill Assembly
Ventilation Grill Assembly
7
To protect your wine and/or beverage cooler while transit, We have
carefully packed and protected the ventilation grill in the styrofoam
and/or separate cardboard carton. DO NOT DISCARD PACKAGING
without removing the stainless steel ventilation grill.
Please note that for model MBWC24-2D, the legs are adjustable to 2 inches to assist with
varied counter heights A minimum of 34.5” height is required for the front ventilation plate
to be properly secured once installed. The stainless front ventilation grill is packaged
separately in the wine cooler. Once the wine and beverage cooler is levelled and placed into
the location, the front ventilation grill is easily installed and secured by the 4 stainless screws
included.
MBWC24-2D is designed for standard counter high installations which requires adjusting the
legs to 34.5” in order to fit the standard 5” ventilation grill. If you have a custom installation
between 32.5”-34.5”, a smaller 3.25” ventilation grill also comes with the unit.

Use and care
•Gurgling sound - caused by the refrigerant flowing through the appliance’s coils.
• Crackling/popping sounds - resulting from the contraction and expansion of the
refrigerant gas to produce cold.
• Fan operating sound - to circulate the air within the wine cellar.
8
Unpacking and cleaning the wine cooler
Use a soft cloth to clean the interior surface with lukewarm water.
Switching The Appliance On
Before connecting the refrigerator to an electrical power supply, let it stand upright for
approximately 2 hours to let the refrigerant settle in the compressor. This will reduce the
possibly of malfunctions in the cooling system due to transportation. Please wipe and clean
the interior of the refrigerator thoroughly with a damp, non-abrasive cloth.
Once positioned, plug the wine & beverage cooler into the power outlet and turn “ON” by
pressing the “Power Button” for 3 seconds.
When you use your Marathon wine & beverage cooler for the first time (or restart the
appliance after having it shut off for a long time) there will be a few degrees variance
between the temperature you have selected and the one indicated on the LED readout.
This is normal and will adjust to the desired temperature once the compressor and cooling
system has been running for several hours.
IMPORTANT: If the unit is unplugged, power is lost, or is turned off, wait 3 to 5 minutes
before restarting the unit. The compressor will not re-start immediately and requires this
time to automatically restart.
Frost Free Fan Cooled Operation
Your Wine cooler is engineered with a high efficiency compressor cooling system that uses
a fan to cool and regulate your desired temperature setting. This means you never have to
worry about defrosting your wine & beverage cooler and it will provide years of hassle-free
enjoyment. Like all Frost Free and compressor appliances, you will hear the fan operating
and the compressor cycling on and off while it defrosts itself. The following sounds will most
likely occur during normal operation:

Control description
LED Temperature Control
IMPORTANT: The LED temperature displays the actual internal air temperature of your
Marathon Wine & beverage cooler. The temperature settings are preset at the factory
and in the event of a power interruption, all previous temperature settings are
automatically erased and it will revert to the factory preset temperature settings.
Once you program your desired temperature setting, it is strongly recommen-
ded not to adjust frequently. The thermostat is accurate and will maintain the
temperature inside the wine cellar +/- 2.5º C. Please note that the depending
on the thickness of the wine bottle, and loading, the actual temperature of the
wine may differ from the wine and beverage cooler setting by +/- 1ºC.
9
1
2
3
Temperature Display
Displays the current temperature.
Temperature adjustment °C or °F Temperature Conversion
Press once and each time afterwards the inside temperature will reduce by 1°C.
To set, simply stop when you have reached your desired temperature setting.
The temperature display will then revert to the current temperature and start
cooling to your desired temperature. If pressed several times, the tempera-ture
setting will reach its lowest setting (5°C - wine cooler, 2°C - Beverage coo-ler),
then start again at the maximum temperature setting (20°C - wine cooler, 10°C
- Beverage cooler). To change the temperature display to Celsius or Fa-
hrenheit simply press and hold the button for 3 seconds.
Interior light & Power “ON/OFF”
Press the Interior light button to turn ON or OFF the interior LED light.
Press and hold the button for 3 seconds to turn the power ON or OFF.

Use and care
CARE & MAINTENANCE
Clean your Wine Cooler/Beverage Cooler
1. Turn off the power, unplug the appliance, and remove all items including shelves and rack.
2. Wash the inside surfaces with a warm water and mild soap solution.
3. Wash the shelves with a mild soap solution.
4. Wring excess water out of the sponge or cloth when cleaning area of the controls, or any
electrical parts.
5. Wash the outside cabinet with warm water and mild liquid detergent. Rinse well and wipe dry
with a clean soft cloth.
1. Remove all stored wines/beverage
2. Securely tape down all loose items (shelves) inside your appliance.
3. Turn the adjustable legs up to the base to avoid damage.
4. Tape the door shut.
5. Be sure the appliance stays secure in the upright position during transportation.
Also, protect the outside of the appliance with a blanket or similar item.
10
•
Energy saving tips
•
•
The appliance should be located in the coolest area of the room, away from
heat-producing appliances and out of direct sunlight.
Ensure that the unit is adequately ventilated.
Do not keep the door open any longer than necessary.
Power failure
In the event of a short power outage, your wine cooler will save your set temperature preferences.
Any power outage lasting longer than 10 minutes, the unit will reset back to the factory default
temperature settings.
Most power failures are corrected within a few hours and should not affect the temperature of your
appliance if you minimize the number of times the door is opened. If the power is going to be off for
a long period, you need to take the proper steps to protect your contents.
Vacation Time
Short vacations: Leave the appliance operating during vacations of less than three weeks.
Long vacations: If the appliance will not be used for several months, remove all items and turn off
the appliance. Clean and dry the interior and exterior thoroughly.
To prevent odour and mould growth, leave the door open slightly blocking it open if necessary.
Moving your Wine & Beverage Cooler:

Temperature chart
Recommended Wine Serving Temperature Chart
The chart below is a guide to recommended temperatures for wines. This is a guide only as personal
preferences vary…enjoy!
Important information about storing your wine
Your Marathon wine and/or beverage cooler has been “engineered to perform” and provide the perfect conditions
for storing and/or serving your wine. Fine wines require long and gentle development and need specic condi-
tions in which to reach their full potential. Ideally, for long term storage, we suggest keeping your wine cooler at a
constant temperature between 12ºC and 14ºC.
Please note that not all wines will improve over the years, and some must be consumed within the first few years of
bottling, while other fine wines are capable of ageing over 50 years. For questions regarding the maturity of your
wines, we suggest you consult your local wine retailer for information on the wine of your choice.
11
Adjusting shelves
12
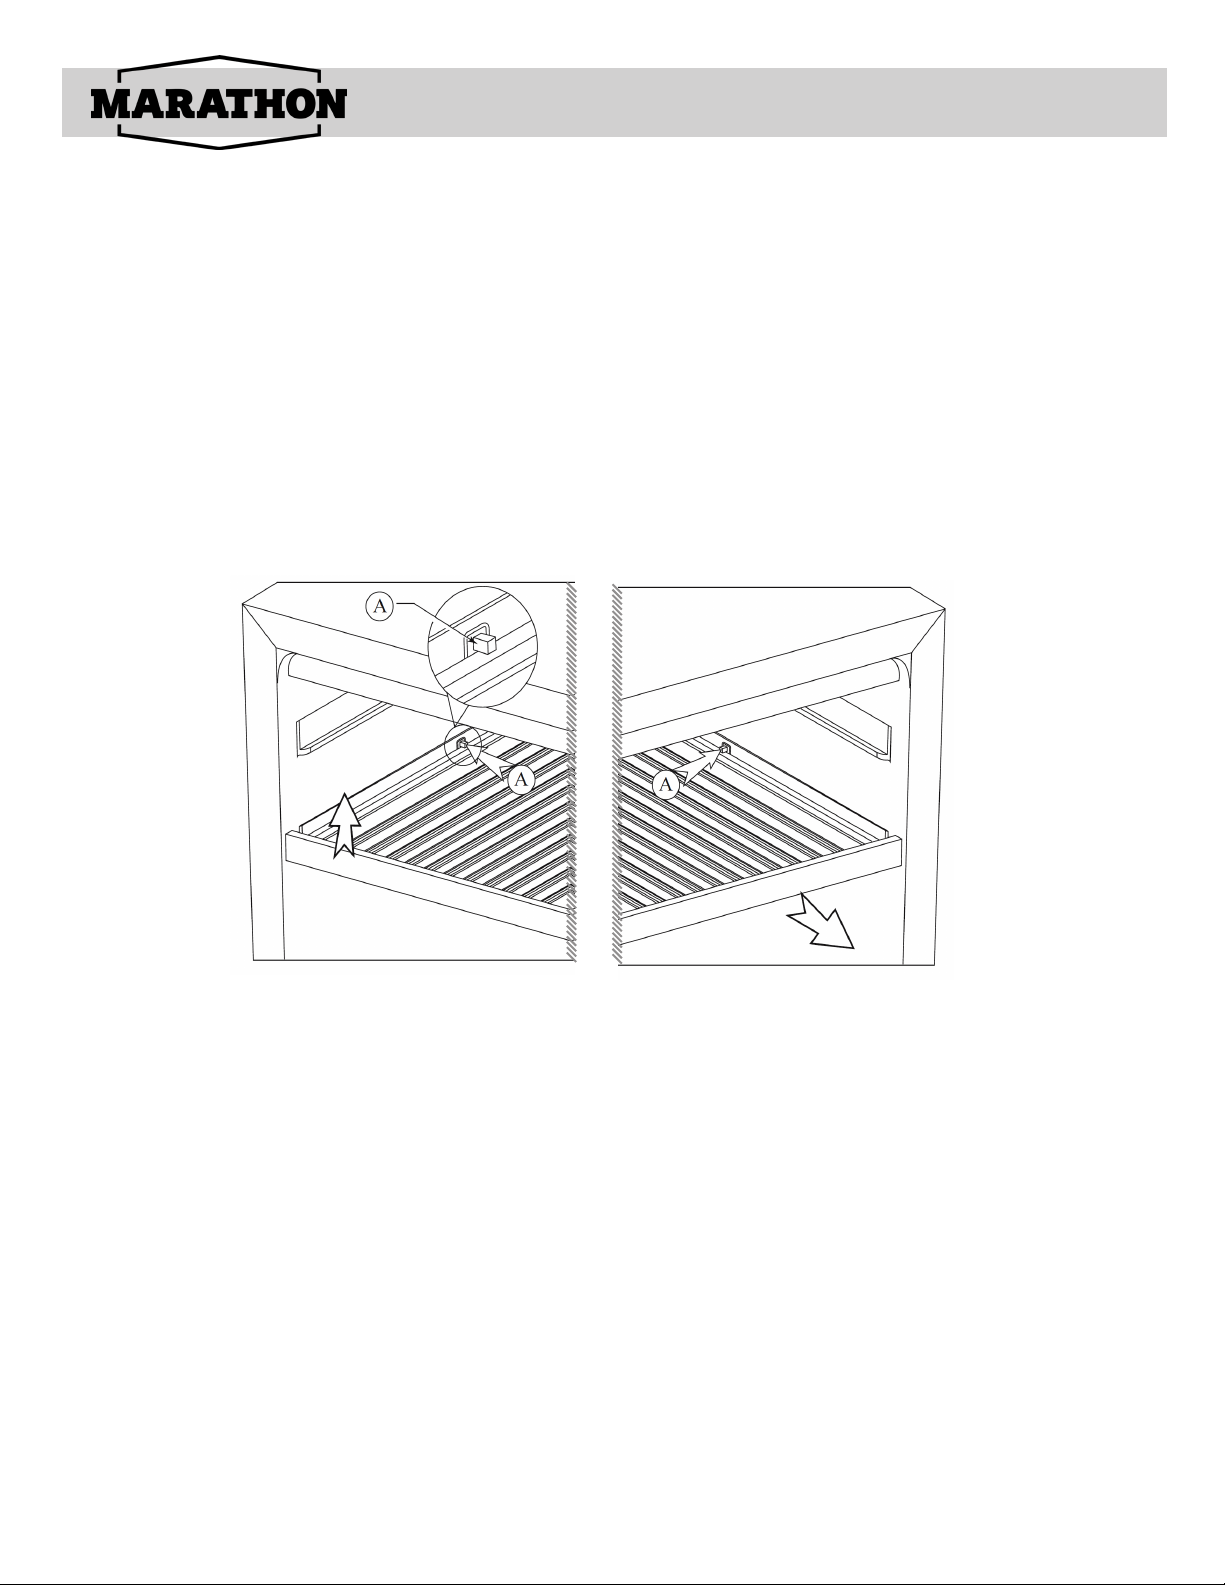
Adjusting the Removable Shelves
For easy access to the stored contents you must pull the shelves approximately 1/3 of its
depth out of the rail compartment. The shelves designed with a notch on each side of the shelf
tracks to prevent bottles from falling.
When removing any of these shelves out of the rail compartment, tilt the shelf as per the dia-
gram and simply pull out, or push in the shelf until it sits on the support brackets securely.
Then simply press the shelf limit pin “A” on both sides and then lift slightly and pull gently to
remove .
Left side Right side
”A” is shelf limit pin
13
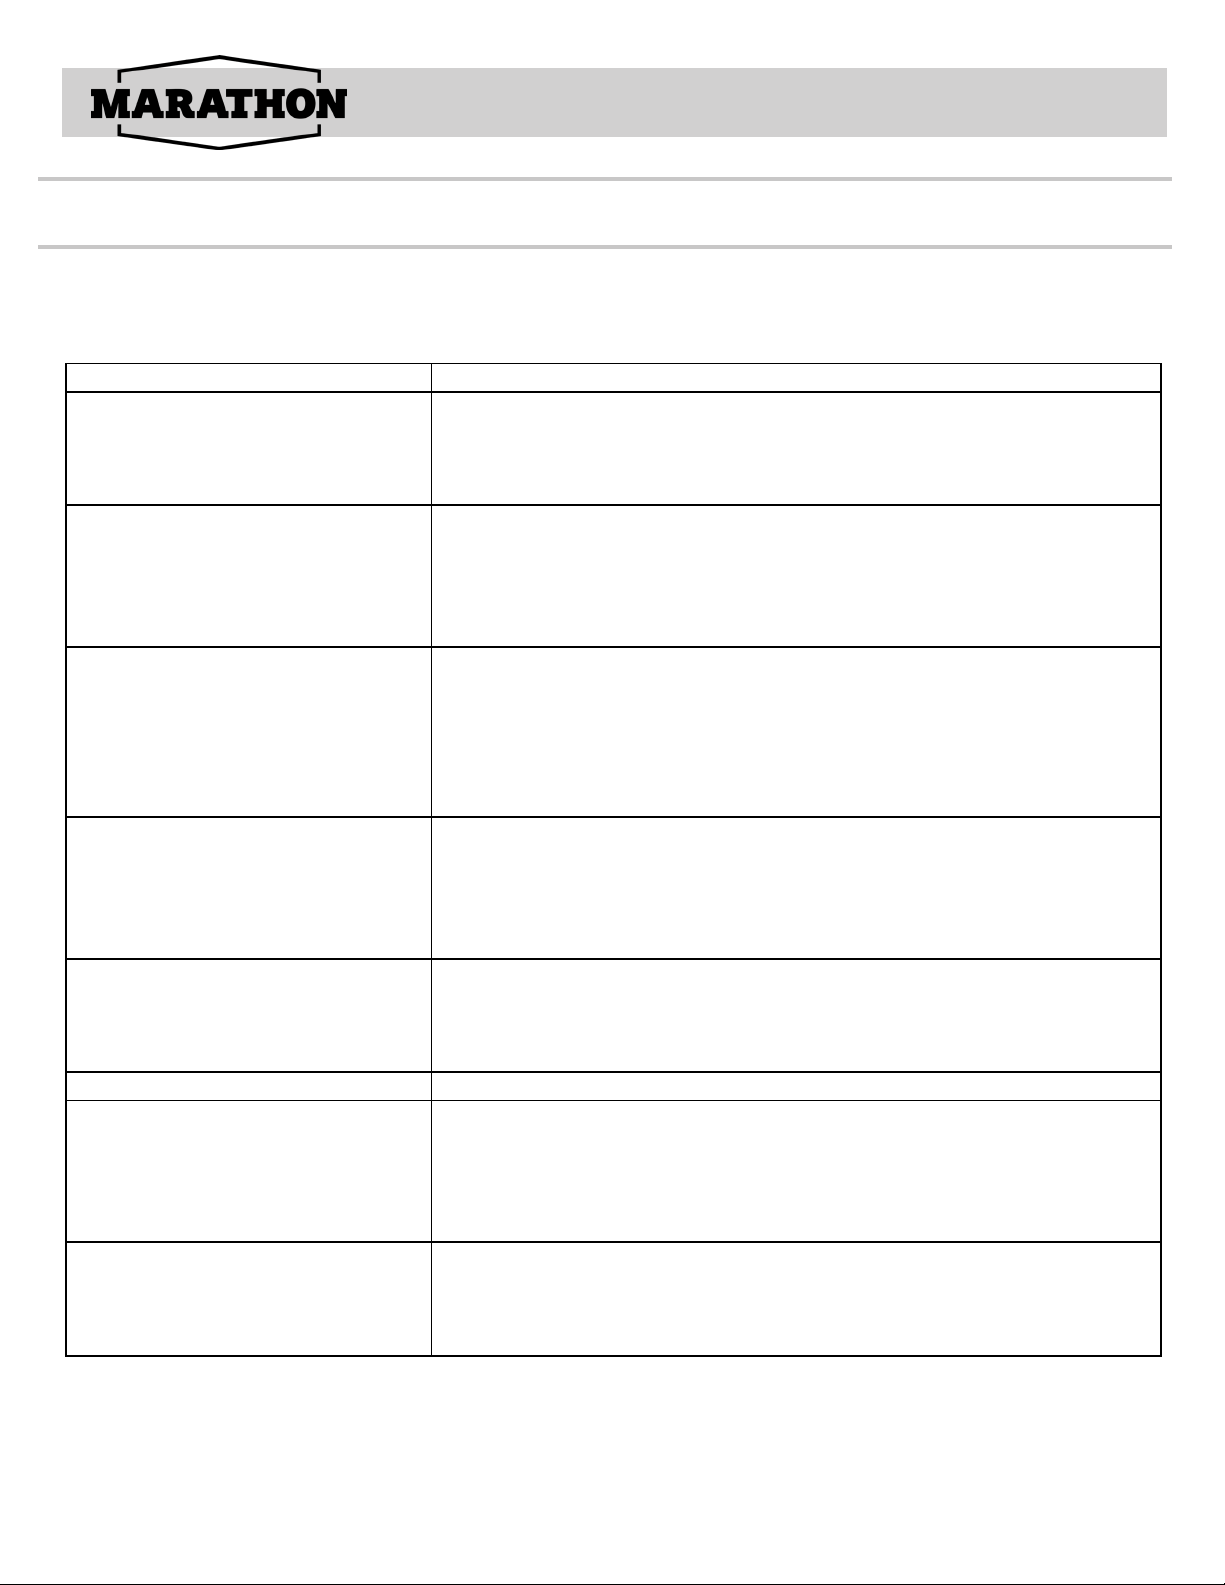
Troubleshooting
Problem Possible causes
The appliance is not running The appliance is not plugged in.
The appliance is not turned on.
Check the voltage of the installation.
Check if the circuit breaker or the fuse has blown.
The door is fogging or sweating Fogging on interior glass is normal since when opening the interior is cooler than
the room temperature.
If sweating on exterior glass, the ambient temperature and/or humidity is too
high. Please relocate to a better temperature-controlled environment (15°C-25°
C and maximun 70% humidity)
The appliance is not cold enough Check the temperature control setting.
Check if the ambient temperature is beyond the appliance
operating temperature. The door is opened too frequentlty.
The door is not closed properly.
The door is not sealing properly.
Insufficient free space around the appliance.
The external temperature is high.
A large quantity of bottles has been put into the cellar.
The appliance is opened frequently.
The door is not properly closed.
The cellar has not been correctly set.
The LED lights do not operate The appliance is not plugged in.
The fuse has blown.
The LED lights are broken
The light switch is off.
Vibration Check and ensure that the appliance is level.
The appliance makes a lot of noise The ratting noise may come from the flow of the refrigerant, which is
normal. At the end of a cooling cycle, you can hear the noise of water
circulating. Expansion and contraction of the internal walls may cause a
cracking sound. The appliance is not level.
Check if the fan is in good condition.
The door does not close properly The appliances is not level.
The door seal is dirty or damaged.
The shelves are not positioned correctly.
A part of the contents is preventing the door from closing.
The compressor starts and stops
frequently
You can solve many common problems easily, saving you the cost of a possible service call. Try
the suggestions below to see if you can solve the problem before calling the service technician.
IMPORTANT! There are some sounds during normal use (compressor, refrigerant/circulation)
For immediate assistance: 1-844-309-9777 or [email protected]
For immediate assistance: 1-844-309-9777
www.stirlingmarathon.com
14
2 Year Limited Warranty
When operated and maintained according to the instructions in the Use & Care Guide, Marathon, a registered trademark of Stirling Marathon Limited, agrees to repair or replace this
product for 2 years from the date of original purchase and/or agrees to pay for parts and service/labour required to correct defects in materials or workmanship. Any and all Service
must be approved and provided by an Authorized Stirling Marathon Service provider. YOUR EXCLUSIVE REMEDY UNDER THIS LIMITED WARRANTY
SHALL BE PRODUCT REPAIR OR REPLACEMENTAT THE SOLE DISCRETION OF STIRLING MARATHON LIMITED AS PROVIDED HEREIN. This limited warranty is
valid only in Canada and the Continental United States with proof of original purchase and conrmed warranty registration.
TERMS OF WARRANTY BY PRODUCT
Refrigeration & Freezers
Refrigeration & Freezers
Premium Wine coolers
Carry-In
In-Home
In-Home
How to Obtain Service
Carry-In: The original purchaser must deliver or ship the defective product to an authorized Stirling Marathon Service present a copy of the original bill of sale or Warranty
Registration Conrmation.
In-Home: Contact Authorized Service Center and provide a copy of the Original bill of sale or Warranty Registration Card. If you are in a remote area or the closest Authorized
Service Center is further than 100 km (60 miles), you will be required to deliver the appliance to the closest Service Center at your expense.
Stirling Marathon is not be responsible or liable for any spoilage or damage to food or other contents of this appliance, whether due to any defect of the appliance, or its use,
whether proper or improper.
Items Excluded from Warranty
•Damages due to shipping damage or improper installation.
•Damages due to misuse or abuse.
•Content losses due to failure of the unit.
•Commercial or Rental Use Limited to 90 days Parts & Labour.
•Plastic parts such as door bins, panels, door shelves, racks, light bulbs, etc.
•Punctures to the evaporator system due to improper defrosting of the unit.
•Service or Repair by unauthorized service technicians.
•Service calls that do not involve defects in material and workmanship such as instruction on proper use of the product, door reversal or improper installation.
•Replacement or resetting of house fuses or circuit breakers.
•Delivery costs incurred as the result of a unit that fails.
•Expenses for travel and transportation for product service if your appliance is located in a remote area where service by an unauthorized service technician is not available.
•The removal and reinstallation of your appliance if it is installed in an inaccessible location or is not installed in accordance with published installation instructions.
•Liability under this warranty is limited to repair, replacement or refund. If a replacement unit is not available or the unit cannot be repaired, liability is limited to the actual.
•Purchase price paid by the consumer.
•This warranty applies only to the original purchaser and does not extend to any subsequent owner(s) and is non-transferable.
•No warranty or insurance herein contained or set out shall apply when damage or repair is caused by any of the following:
Accident, alteration, abuse or misuse of the appliance such as inadequate air circulation in the room or anormal operating conditions (extremely high or low room temperature). Use for
commercial or industrial purposes (i.e. If the appliance is not installed in a domestic residence). Fire, water damage, theft, war, riot, hostility, acts of God such as hurricanes, floods etc.
•Service calls resulting in customer education.
•lmproper installation (ie. Building-in of a free-standing appliance or using an appliance outdoors that is not approved for outdoor application).
Less than 6 cu.ft.
Greater than 6 cu.ft.
Premium Built-in
V.10/2020
Table of contents
Other Marathon Kitchen Appliance manuals


Popular Kitchen Appliance manuals by other brands


Waring
Waring WICSP180 Instruction book

Sirman
Sirman Stromboli Installation, operating and maintenance instructions

Davis & Waddell
Davis & Waddell essentials DLE0032ST instruction manual

Cuisinart
Cuisinart AIR-200 INSTRUCTION AND RECIPE BOOKLET

Wilton
Wilton Chocolate Pro TL-094 owner's manual

Alfa Pro
Alfa Pro ACHILLE user manual