Marc Pro PLUS+ User manual

1

User Manual
Marc Pro, Inc.
5702 Bolsa Ave.
Huntington Beach, CA 92649
Toll Free: (855) Marc Pro
Read this User Manual carefully before you start using your Marc Pro Plus. It is imperative that you
carefully read the “Warning and Cautions” and “Safety Guide” sections of the User Manual.
Indications For Use:
The Marc Pro Plus is intended for muscle conditioning by stimulating
muscle in order to improve or facilitate muscle performance.
The Marc Pro Plus is to be used for temporary relief of pain
associated with sore and aching muscles in the shoulder, waist,
back, neck, upper extremities (arm), and lower extremities (leg) due
to strain from exercise and normal household and work activities.

1
Contraindications:
Do not use Marc Pro Plus if you have one or more of the following medical conditions:
1. This device must not be used on persons with cardiac pacemakers, debrillators;
or other implanted metallic electronic devices.
2. Epilepsy
3. Following acute trauma or fracture
4. Following recent surgical procedures
5. Critical ischemia of lower limbs
6. Abdominal or inguinal hernia
7. Stimulation should not be applied over, or in proximity to, cancer or cancerous lesions
Precautions:
1. Some persons may experience skin irritation or hypersensitivity due to the electrical stimulation or electrical conductive medium (gel).
2. This device should be kept out of the reach of children.
3. This device should be used only with the leads, electrodes, and accessories recommended for use by the manufacturer.
4. Caution should be used when there is a tendency to hemorrhage following acute trauma or fracture
5. Transcutaneous Electrical Nerve Stimulation is not effective for pain of central origin, including headache.
6. Transcutaneous Electrical Nerve Stimulation is not a substitute for pain medications and other pain management therapies.
7. Transcutaneous Electrical Nerve Stimulation devices have no curative value.
8. Transcutaneous Electrical Nerve Stimulation is a symptomatic treatment and, as such, suppresses the sensation of pain that would
otherwise serve as a protective mechanism.
9. This Marc Pro Plus should not be used while driving, operating machinery, or during any activity in which involuntary muscle
contractions may put the user at undue risk of injury.

2
1. The long term effects of prolonged use of electrical stimulation are unknown.
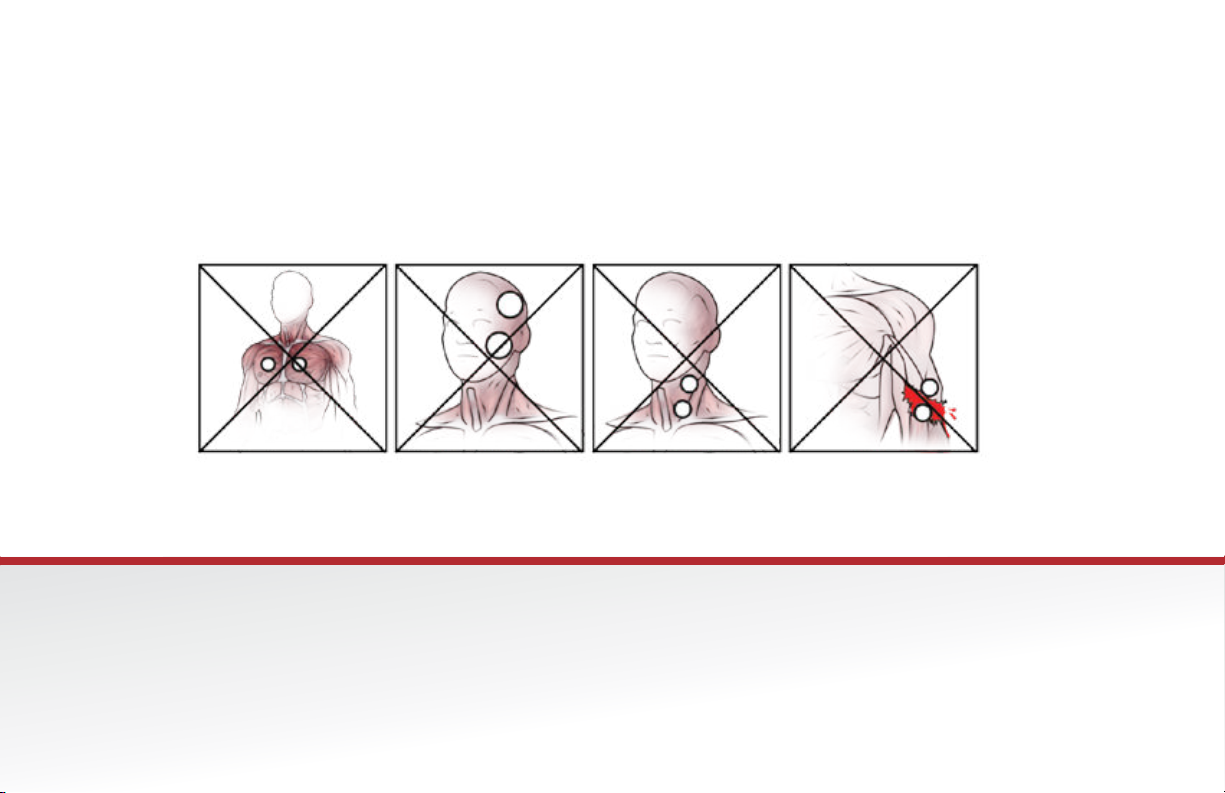
2. Stimulation should not be applied over the neck. Severe spasm of the muscles may occur and the contractions may be strong enough to
close the airway or cause difculty in breathing. Stimulation over the neck could also have adverse effects on the heart rhythm or blood pressure.
3. Stimulation should not be applied over the carotid sinus nerves, particularly in patients with a known sensitivity to the carotid sinus nerve.
4. Stimulation should not be applied transthoracically in that the introduction of electrical current into the heart may cause cardiac arrhythmias.
5. The effects of stimulation of the brain are unknown. Therefore, stimulation should not be applied across the head and electrodes should not be
placed on opposite sides of the head.
6. Stimulation should not be applied transcerebrally.
7. Electrodes should be applied only to normal, intact, clean skin. Electrodes should not be applied over open wounds or over swollen, infected,
or inamed areas or skin eruptions, e.g., phlebitis, thrombophlebitis, varicose veins, etc.
8. Electrodes should not be shared with other persons. Each person should have their own set of electrodes; otherwise, undesirable skin reactions may occur.
9. Self-adhesive electrodes should be replaced if they no longer stick rmly to the skin.
10. Stimulation should not be applied when in the bath or shower.
11. Safety of powered muscle stimulators for use during pregnancy has not been established.
12. Marc Pro Plus should not be used while driving, operating machinery, or during an activity in which involuntary muscle contractions may put the user
at undue risk of injury.
13. Do not use the device in humid atmosphere (sauna, hydrotherapy, etc)
14. Persons with suspected heart problems or epilepsy should obtain apposite medical advice.
15. Caution should be used when applying the device over a menstruating uterus.
16. Caution should be used when applying the device over areas of skin that lack normal sensation.
17. Operation in close proximity to shortwave or microwave therapy may produce instability in the output of the device.
18. Simultaneous connection to h.f. surgical equipment may result in burns at the site of stimulator electrodes and possible damage to the device.
19. To ensure proper use and to mitigate the possibility of interference, avoid placing in close proximity to other electromagnetic devices.
20. Never use the Marc Pro Plus while sleeping.
21. Never immerse the Marc Pro Plus in any liquid.
Warnings:
Adverse Reactions:
1. Skin irritation and burns beneath the electrodes have been reported with the use of stimulation electrodes applied to the skin
2. Headache and other painful sensations have been reported during or following the application of electrical stimulation applied to the head, face and near the eyes.
3. You should stop using the Marc Pro Plus and should consult with your physician if you experience adverse reactions from the unit.

3
Marc Pro Plus is not intended for adjunctive
therapy in the treatment of medical diseases
and conditions of any kind.
• Marc Pro Plus is not designed for disease aficted
muscles and its use on such muscles is contraindicated.
The Marc Pro Plus uses RF energy only for its
internal function. Therefore, its RF emissions
are very low and are not likely to cause any
interference in nearby electronic equipment. If
any nearby electronic equipment shows any signs
of malfunctioning stop using the Marc Pro Plus
immediately.
Marc Pro Plus is intended for use on healthy muscles.
• It is to be used by adults only
• Keep out of the reach of children
• We recommend that pregnant women
not utilize muscle stimulators
Never use the Marc Pro Plus
on:
• Atrophied muscles
• Muscles with spasms
Do not use the Marc Pro Plus:
• For muscle reeducation
• To prevent or retard disuse atrophy
• To prevent venous thrombosis
• To maintain or increase
range of motion
• For muscle spasms
• For blood ow deciencies
On or near the vicinity
of skin lesions or
eruptions of any kind
On the neck or any
area of the throat
On the head or any
area of the face
On both sides of
the thorax
Never Apply Electrodes:

4
Who should not use the Marc Pro Plus!
Read and answer the following 9 Questions:
If you answered “Yes”, “maybe” or “I don’t know” to any one or more questions,
do not use the device and contact Marc Pro for more information.
*
If you answered “No” to all 9 questions, you can use the Marc Pro Plus.
Questions Questions
YES / NO YES / NO
1. Are you equipped with a cardiac pacemaker,
debrillator, or other implanted metallic or
electronic devices?
2. Are you epileptic?
3. Have you recently been subject to a surgical
procedure (less than 6 months)?
4. Do you have blood ow deciency in your
lower limbs?
5. Do you have an abdominal or inguinal hernia?
7. Are you pregnant?
8. Do you suffer from cardiac problems or diseases?
9. Is the region you want to stimulate suffering
from any type of medical condition and or being
monitored by a doctor or therapist?
6. Do you suffer from cancer?

5
Contents:
Included Supplies:
Your Marc Pro Plus is supplied with
the following unique accessories
developed for optimal results.
• Marc Pro Plus device P/N MPP
• 6 packages of electrodes P/N 70011
• 2 lead wires P/N 51010 / 51011
• 1 recharger P/N 51018
• This user manual P/N 70022
• A carrying case P/N 70020
Replacement electrodes and accessories can
be purchased at www.marcpro.com/store. If
there are any discrepancies please contact us.

6
Power Button
To power on or off device; push the “POWER” button
at the top of the device
Frequency Control
Frequency buttons are located in the section above the word
‘FREQUENCY;’ each button is equipped with its’ own LED to
light up when pressed as an aesthetic feature.
Each channel has its own frequency control. From here you
can adjust frequency by pushing “LOW” to lower and “HIGH”
to raise your frequency.
Knobs
Once desired frequency is reached output is controlled by 1
1/4” knob per channel. Each knob is individually marked with
diagrams stating “INTENSITY” at the top and a semi-circle
reducing in thickness to “OFF;” thus indicating the direction
in which to spin the knob to reach desired level. To raise
intensity which has a maximum of “9.0” spin to right, to lower
and turn off spin to left.
Timer
Timer buttons are located under display in an outlined section
labeled “TIMER.” To use time; press “SET” until desired
treatment time is shown on display, then you may press
“START STOP” to start or stop your timer.
Output Jacks
Output Jacks are located at front of device; directly above
channel A’s jack is labeled “A” and directly above channel B’s
jack is labeled “B.”
Custom connector on device has a shape similar to a
sideways 8 or innity symbol; which is ¾” end to end, simply
insert plug into device’s jack when desired. (There is no up/
down or polarity to achieve)
For more information on use and or recommendations
for device, electrodes or other accessories please see
“Instructions” or “Care of your Marc Pro Plus” sections
Controls:

7
Care of your Marc Pro Plus
Physical Characteristics:
Length 7 inches
Width 4 inches
Height 2 inches
Weight 1 lb 6 oz
Recharging the Battery:
• Before use, be sure that the battery is
charged. After powering on the device
a battery indicator on the LCD screen
will give the current level. If the battery
icon is fully or partially shaded then the
device can be used.
• If the battery icon is empty or ashing,
the device should be charged.
• To charge, plug the recharger into the
back of the unit and into the wall outlet.
Charge for 8-12 hours, or overnight.
• When done recharging always
remember to unplug the recharger
from the back of the machine, if it is left
in, the unit will not work.
• A fully charged battery should last for
10 or more hours of use.
Electrode Use and Care:
• When electrodes (pads) are not in use always place on
plastic sheet and seal in Ziploc bag.
• We recommend that you change pads after 20 uses because
conductivity will decrease due to body oils accumulated on electrodes.
• Old or worn electrodes can also reduce the comfort of stimulation.
• Only use the electrodes supplied by Marc Pro. Other electrodes may
present a risk of unsuitable electrical characteristics with your stimulator.
• Do not use the same electrodes on several different people.
• Do not plunge the electrodes into water.
• Do no apply a solvent of any kind onto the electrodes
• Always stop the stimulator before removing or moving the electrodes.
• Always place electrodes on dry, clean, oil and lotion free skin.
• If you’re using an optional aloe based skin gel: use a small amount (about the
size of a pea) under each electrode. Rub completely into the skin before placing
electrode. This can help ensure the most comfortable and strongest signal.
NOTE: Electrode is 2 inch round with conductive hydrogel w/.08” round female
connector; not to exceed 0.1 Watt/cm2.

8
Instructions:
Before the unit is used you must make sure that the battery is charged. Take the unit out of the case and hit the power button. The
battery icon on the screen should be partially or fully shaded dark to indicate battery life. If the battery icon is empty of ashing then
recharge the unit (see: charging instructions)
Make sure all knobs are in the off position and that the recharger is unplugged from the back of the machine. Take the gray lead wires
out and plug the plastic end into the channel A output jack. Take the black lead wires out and plug the plastic end into the channel B
output jack.
Take out a package of electrodes, and remove from Ziploc bag. Next connect the 4 pins on the end of the lead wires to each of the four
electrodes. Place the electrodes on the skin according to the diagrams on the following pages. Note: Skin should be clean and dry.
Get into a relaxed and still position (laying down, sitting in a chair or on a couch). You should be comfortable and the muscles being
worked should be free to contract without resistance.
(If you are tense and resist the contractions or if you’re in a position that causes signicant resistance you will not benet from the Marc Pro Plus)
Once the pads are in place, hit the power button at the top of the interface. Next select the frequency for each channel according to
the instructions on the following pages.
Next click on the Channel A and B Intensity knobs and slowly turn up each knob according to your tolerance. The session protocols
on the following pages will give you an ideal setting range for each channel.
-For Low Frequencies:
You will start to feel a gentle rhythmic pulsating sensation that will get stronger and stronger as you turn the dial up. A strong visible
contraction is possible and desirable in most areas of the body. An intensity level between 6-9 is commonly reached, but it is OK to
turn the intensity up slowly. In general the higher the intensity the better the results will be; however, it is very important that the signal
level stay within your tolerance.
(Remember: As long as the intensity is not raised above your tolerance and you don’t resist the contractions, even extremely strong and
visible contractions will not fatigue your muscles. This is ideal for conditioning and is what makes the Marc Pro Plus technology so unique)
-For High Frequencies
You will start to feel a gentle buzzing/vibration that will get stronger as you turn up the dial. An intensity level between 4-9 is commonly
reached, but it is OK to turn the intensity up slowly. In general the buzzing sensation should be felt over your pain level and typically
the higher the intensity the better the results will be. However, it is very important that the signal level stay within your tolerance.
Step 1
Step 2
Step 3
Step 4
Step 5

9
A typical session should last 30-60 minutes. If being used for pain or recovery, sessions are typically performed 1-2 times per day
as needed until recovered or pain free. For conditioning and enhanced performance the only difference is consistency. Using the
Marc Pro Plus proactively (e.g., 1-2 times per day 3 or more days per week) creates the conditioning benets that will not only help
muscles recovery better, but also help them perform better.
Note: In Low Frequency mode longer sessions (1-4 hours) can be used if needed to obtain desired benets. Fatigue should not be
a concern, but watch for skin irritation during extended session times.
When the session is over, turn the two intensity knobs to the off position. Unplug the electrodes and leads and place them back in
their storage container. It is important that the electrodes are placed and sealed back in their Ziploc bag to ensure that they last to
their full potential. (See electrode care with any additional questions.)
Additional Notes:
During your treatment you may use the built in timer. Press down on the “select” button until your desired
treatment time comes up on the screen and then press “start” to begin the count down.
Ifatanytimeduringyourtreatmentyoufeeltheoutputinterruptedandgetanoticationsaying“checkleadsandpads”
followedbythe“SelectFreq”noticationabovethechanneldisplay,thismeanstheconnectionhasbeencompromised.Please
turnknobto“offposition”onaffectedchannelandcheckelectrodeandleadwireconnections;oncecorrectedyoumayreselect
frequencyandclickontheknobandturnbacktodesiredintensity.
Step 7
Step 6

10
Pad Placement: Never place pads in the following locations:
• Anywhere on or through the head • On the front or sides of the neck
• Across the heart (on the front of the chest) • From the front to the back of the chest
(transthoracic)
The Marc Pro Plus electronic muscle conditioning and pain device is comfortable and designed to be very easy to use.
There are two completely independent channels (A and B) and two self adhesive electrodes that stick to the skin per
channel. The two electrodes connected to channel A can be used on one muscle or group of muscles; while the two
electrodes connected to channel B can be used on another muscle or group of muscles.
It’s important to realize that electrode placement is not an exact science. Don’t be overly concerned with pin point
accuracy or matching any diagram exactly. The Marc Pro Plus was designed to be simple to use; you don’t need to know
about motor points, trigger points, or any signicant anatomy or physiology. How your body feels and responds is most
important to choosing the best electrode placement.
To start, identify the muscle that you would like to condition, help recover or address pain after activity. Think about a
potential weak link (what gets tired rst and recovers last). If it’s a single muscle place an electrode at either end of the
muscle or above and below the muscle belly (the most dense central part of the muscle). If you want to activate more
than one muscle with a single channel then place one electrode on the belly of each muscle and apply low frequency
stimulation (e.g., one electrode on the most dense part of your left trap and one electrode on the most dense part of your
right trap). If you are experiencing pain in your joint, take two electrodes and sandwich that joint and apply high frequency
stimulation through it. “Low frequency” stimulation includes all frequencies under 20Hz, “high frequency” is all frequencies
20Hz and above.

11
Connect the two electrodes to channel A and slowly turn up the channel A intensity dial. As the muscle starts to contract
and relax you will be the best judge of electrode placement. If the target muscle is contracting well; then your placement is
good. If the muscle is not contracting well or at all then simply repeat the process moving the electrodes until you get the
target muscle to contract. Even very small adjustments (as little as an inch) in electrode placement can make a signicant
difference in the strength of the contractions. These small adjustments can also have a signicant effect on which muscles
are being activated.
Next you can follow this same procedure with the two electrodes attached to channel B.
Note that depending on electrode locations you may contract additional muscles beyond your target; this will only improve
the results. The benets will be regional, but focused on the muscles that are actually contracting the most.
The following diagrams show some common and popular pad placement locations. You’ll notice that sometimes one of
the Marc Pro Plus channels is used to focus intensely on just one muscle, and in other cases one of the Marc Pro Plus
channels is used to activate numerous muscles at the same time. For some focusing on small specic areas is needed to
obtain the desired results; while other times excellent results and efciency can be obtained by stimulating multiple muscle
areas at the same time.
Remember that these diagrams are just examples and general guidelines for electrode placement. The ideal electrode
placement will take into account exactly what muscles you are trying to help and how you feel when the device is used.

12
In the default Pre-Set mode the Low Frequency button will deliver a frequency of 2Hz and the
High frequency button will deliver a frequency of 60 Hz.
When and How to use Low:
Low frequency will create relaxing rhythmic muscle contractions. Though they can get very strong
they should remain comfortable and are completely non-fatiguing; this makes them ideal for moving
nourishment and waste the keys to conditioning and recovery (but remember Marc Pro Plus’s unique
low frequency technology can also really help soreness as well).
It’s hard to go wrong with Low Frequency as it can benet all major muscle groups, but use common
sense. No need to try to pump low frequency through a knee or ankle joint; there’s just not much
muscle to contract. Instead contract the largest muscles around your target to bring nourishment in
and get waste out. The stronger the contractions the better as long as it remains comfortable and
within your tolerance.
A 30-60 minute session is great, but there’s not much of a time limit on low frequency as it won’t
fatigue your muscles and just keeps helping more the more you use it.
Low and High Frequency Together
As you’ll see in the following examples it is common to combine settings. For example Channel A will
use low frequency on the quad to recover (moving nourishment and waste) while at the same time
Channel B is sandwhiching the knee shutting down any residual extremity pain.
LOW VS HIGH FREQUENCY { IMPORTANT --- CRITICAL INFORMATION }

13
When and How to use High:
High frequency will create a strong, but soothing and constant buzzing sensation (no contractions).
This is ideal for shutting down more nagging soreness and pain not responsive to low frequency.
You must take more care in choosing electrode placement with high frequency.
High frequency is typically not recommended for many major muscle groups such as (quads, calves,
hamstrings, traps, biceps, triceps, forearms). On these muscles when the intensity is turned up the
muscle is likely to tetanize (fully contract and hold tight). Allowing the muscles to tetanize for any
duration of time will likely cause muscle fatigue. When using high frequency we advise to never
allow the muscle to tetanize; which may require avoiding high frequency in that location or
lowering the intensity level.
High frequency is very effective at shutting down soreness of the joints and muscle groups that are
very resistant to tetanization and fatigue such as the low back muscles. Examples include (ankle,
knee, hip, shoulder, wrist, low back, mid back, neck).
When you use high frequency you want to feel the buzzing right where the pain is; if that’s not the
case move the electrodes (if the pain is in a muscle that will tetanzie like the quads or calves use low
frequency). Once it’s buzzing right where the pain is turn the intensity strong enough to block the pain
signals, but always stay within your tolerance.
A 30 minute high frequency session is great and will typically provide lasting relief. To avoid skin
irritation we recommend not performing high frequency for more than 60 minutes at one time.

14
Optimizing Results
Positioning:
Be sure that there is no resistance against the Marc Pro muscle contractions. Get into a comfortable and relaxed position
where the muscle can contract as freely as possible. For the legs a recliner type position is ideal. For the traps and
shoulders try to lean or lay back so you’re not having to support those muscles in an upright position.
When to Use:
A short 10-20 min session before activity can be a great warm-up. For the best recovery you’ll start Marc Pro shortly after
activity completion or before the end of the day. With that said, using Marc Pro the next day or any time after soreness has
set in will still be effective. For improved conditioning and to proactively address issues, use Marc Pro
on the target muscles at least three times per week for at least 30 minutes each session.
How Long and How Often:
The best way to see more results is to use the Marc Pro longer and or more often. Remember that recovery is not one size
ts all. Sometimes 20-30 minutes will do the trick, other times you can see a world of difference by using low frequency
for hours. Marc Pro low frequency won’t fatigue your muscles regardless of duration, but keep it convenient (e.g., if you’re
watching a two-hour movie no need to stop Marc Pro after 30 min; keep it going and if needed turn down the intensity a bit
to prevent it from getting annoying).

15
Electrode Placement:
Use the book and online examples as much as possible, but don’t get caught up in following those exactly. Just make sure
that your target muscles are contracting. Or that high frequency is buzzing right where the pain is without causing any
muscle tetanization. If they’re not, adjust and try different placements until you nd what provides the best results.
Electrode-Skin Interface and Comfort:
Place electrodes on clean, dry, unbroken skin. Removal of hair isn’t typically necessary, but can help if you’re having a
problem with adhesiveness, comfort, or signal strength. Though the device should often feel strong and even very intense
it should not feel sharp or biting in any way. If this occurs rst check the condition of electrodes and replace if overly worn.
Next try a slightly different electrode position. A slight movement of electrodes (even just an inch or two) can sometimes
eliminate an uncomfortable skin sensation. You can also use a small amount of aloe based gel rubbed into the skin
completely beneath the electrodes to aid comfort.

16
Treatment Modes – Pre-Set (default) or Manual (advanced users only)
The Marc Pro Plus comes in a simple to use and recommended “pre-set mode”. The Low frequency button will deliver the rhythmic
non-fatiguing muscle contractions used for conditioning and recovery. The High frequency button will deliver a very strong, but soothing
buzzing sensation. This can provide additional pain control sometimes needed in trouble spots like the back and joints.
Though it’s not necessarily recommended advanced users can put the Marc Pro Plus device into “manual mode” and choose between
over 70 frequency options and experiment with the results. If you nd a frequency you like best you can even program those to be your
personalized pre-sets. This gives the advanced user or experimenter total exibility and control over the stimulation they receive.
When the Marc Pro Plus device is powered on the LCD prompts the user to select a frequency for each channel. The device is
delivered in Pre-Set mode; which we highly recommend. Selecting Low will put that channel at 2 Hz. Selecting High will put that channel
at 60Hz
How to Toggle between Standard and Pre-Set Mode:
To switch modes simply hold down the two inner frequency buttons while powering on the device. Repeating this process will toggle
between the two modes. The LCD screen will identify which mode you are in.
In manual mode the frequency selection buttons at the bottom of the interface can be used to select any frequency from 1Hz to 70Hz.
In Pre-Set mode the “low” button defaults to a recommended 2Hz and the “high” button defaults to recommended 60Hz. However if
experimentation with manual mode results in your preference for particular frequencies you can choose any frequency to be your “pre-set”
Setting the frequency for Pre-Set Mode:
Holding down the two frequency buttons on the left side of the device while powering up will put the device into set mode. Use the
Channel A frequency selection buttons to choose the pre-set frequency that you would like for the low button and use the Channel B
frequency selection buttons to choose the pre-set frequency that you would like for the high button. (Default is 2Hz for low button and
60Hz for high button). Once you have chosen your presets; power off the device. The device will remember these pre-sets until they
are changed following the same procedure.

17
To see Marc Pro in use and for electrode placement examples, please visit www.marcpro.com/placements

18
Are the target muscles
being activated and/or
is the activation strong
enough? If not re-position
the electrodes to nd the
optimal placement.
* Under side of each
foot, either arch or heel
SETTINGS
Channels: Frequency: Intensity:
SETTINGS
Channels: Frequency: Intensity:
A LOW 6+
B LOW 6+
A LOW 7+
B LOW 7+
Table of contents
Other Marc Pro Fitness Equipment manuals