Marco FILTRO Manual-Fill Jug User manual

Service Manual 1000615 Filtro Jug MF 1000616 Filtro Flask MF 02-05-2006 Page 1 of 9
FILTRO
Manual-Fill Jug & Flask Version
- P/N: (Jug) 1000 15 ; (Flask) 1000 1
SERVICE MANUAL
Ireland Tel: (01) 295 2674
Ireland Fax: (01) 295 3715
Marco Beverage Systems Ltd.
63d Heather Road,
Sandy ord Industrial Estate,
Dublin 18,
Republic o Ireland
UK Tel: (0207) 274 4577
UK Fax: (0207) 978 8141

Service Manual 1000615 Filtro Jug MF 1000616 Filtro Flask MF 02-05-2006 Page 2 of 9
INTRODUCTION
The in ormation provided in this manual is intended to assist in the installation and
maintenance and service o the Manual-Fill versions o the Filtro Filter co ee Brewer. Please
read the instructions care ully to prevent accidents and ensure an e icient installation.
This manual is not a substitute or any sa ety instructions or technical data a ixed to the
machine or its packaging. All in ormation in this manual is current at the time o publication
and is subject to change without notice.
Only technicians or authorised service providers should carry out maintenance o these
machines.
The company accepts no responsibility or any damage or injury caused by incorrect or
unreasonable installation and operation.
SAFETY INSTRUCTIONS
•
Read and keep these instructions.
•
To protect against electric shock do not immerse mains cord in water or other liquid.
•
To prevent cha ing o the cable, do not let the mains cord hang over the edge o a
table or counter; or touch hot sur aces.
•
Do not operate any product with a damaged cord, plugs, or a ter the machine
mal unctions or has been damaged in any manner. I the supply cord is damaged, it
must be replaced by the manu acturer or approved service agent in order to avoid a
hazard.
•
Switch o at the mains (unplug or disconnect rom outlet). Allow to cool be ore
removing components.
•
The use o non-approved spares and/or accessories may cause damage and/or
injuries.
•
Do not use outdoors.
•
Do not use the product or anything other than its intended use.
•
Keep the outside o the co ee maker clean and dry at all times.

Service Manual 1000615 Filtro Jug MF 1000616 Filtro Flask MF 02-05-2006 Page 3 of 9
TECHNICAL DETAILS
Model Manual-Fill Jug
1000 15
Manual-Fill Flask
1000 1
Supply voltage 230V 230V
Frequency 50Hz 50Hz
Power 2300W 2100W
Dimensions 220x385x4 0
[WxDxH] mm
220x385x 15
[WxDxH] mm
Empty Weight .1kg 7.1kg
Capacity (per hr) 18L 18L
Brew time 5 min .5 min
Brew capacity max 1.8L 2.2L
INSTALLATION
ELECTRICAL
•
Electrical speci ication: 230Vac. 50Hz.
•
This machine must be connected to a used 13A single-phase power supply.
•
This machine is provided with a 3-pin plug and must be connected to an earthed
supply.
LOCATION
•
Position the brewer at bu et height on a irm level base that can bear the weight o
the machine when it is illed.
•
Position the brewer level and in such a way that it cannot cause any damage i it
leaks.
•
Position the brewer within 1.5 metres rom a suitable power socket.
OPERATION
!
!!
!
Allow time for all the coffee to drain from the filter bowl before
removing.
!
!!
! Protect the controls against grease and dirt.
!
!!
! Never use warm or hot water to fill the machine.
!
!!
! Risk of scalding. Beware of removing the filter basket/jug/flask when
the brewer is in operation. ALL users of this machine should be trained
and should be aware that the machine dispenses very hot beverages.
!
!!
! Do not place an empty glass jug on a hotplate when it is switched on
except immediately before brewing.
PRIMING
The co ee machine needs to be primed with water prior to being turned on and its irst
operation; an amount o water will always remain in the machine.
•
Insert an empty ilter basket into the machine and place an empty jug/ lask on the
lower hotplate (or base in the case o the lask version)

Service Manual 1000615 Filtro Jug MF 1000616 Filtro Flask MF 02-05-2006 Page 4 of 9
•
Pour a jug (1.8l/2.2l) o water into the tank (cold water reservoir).
•
Plug the machine into the power supply and switch on the power button. The switch
indicator and ‘Brewing’ light will illuminate and the buzzer will sound or 1sec. The
boiler will heat up and water will start to low through the machine.
•
At the end o the process the ‘Brew Ready’ light will illuminate and the buzzer will
sound. Only hal o the water will have trans erred to the jug/ lask and the remainder
will stay in the machine.
•
The machine is now ready or use.
•
I the machine is ever ully drained this process must be repeated.
BREWING COFFEE
• Use ine grain co ee which has been ground or use with ilter brewers.
• Keep the jugs/ lasks and basket ilter clean
• Put the correct amount o ground co ee into the ilter paper. Your co ee supply
company may have pack sizes to suit the brews o your new brewer; i not, as an
approximate guide or your irst brews:
Glass Jug Flask
Water Volume 1.8L 2.2L
Co ee 65-90 grams 75-110 grams
• Level o the sur ace o co ee by gently shaking the ilter bowl. Slide the co ee ilter
bowl into the guide rails and push ully home.
•
Pour a jug/ lask (1.8l/2.2l) o water into the tank (cold water reservoir).
•
Plug the machine into the power supply and switch on the power button. The switch
indicator and ‘Brewing’ light will illuminate and the buzzer will sound or 1sec. The
boiler will heat up and water will start to low through the machine.
•
At the end o the process the ‘Brew Ready’ light will illuminate and the sounder will
sound. (2 short pulses).
•
The co ee is now ready to serve.
The upper hot plate is independent o the brewing process and can be turned on or o when
required
SPOIL INDICATOR
The ‘Brew Ready’ light will automatically turn o a ter 20 minutes rom the completion o a
brew and this can be used as a spoil indicator to signal i the prepared co ee has passed it’s
usable duration.
MAINTENANCE
This machine has been designed to give many years o trouble ree service.
It is designed, manu actured and tested to ISO9001:2000 standard.
The only regular maintenance required is occasional de-scaling.
In common with all co ee brewer manu acturers, service calls resulting rom lime scale are
not covered by warranty. Fitting a scale reducer is recommended, especially in hard water

Service Manual 1000615 Filtro Jug MF 1000616 Filtro Flask MF 02-05-2006 Page 5 of 9
areas. This can reduce the build-up o scale but may not stop it altogether. The machine
should be de-scaled regularly. (3-6 months) The requency that de-scaling is required
depends on the local water supply; hard water areas need more attention.
The ‘Descale’ indicator is set to trigger every 300 cycles as a reminder or the user to descale
the machine. The machine will continue to operate but the ‘Descale’ light will not reset until
the ‘Descale Reset’ button is depressed and held during a power up sequence.
DESCALING PROCEDURE
• Dissolve the recommended amount o scale remover (see instructions or scale
remover) in one litre o warm water (approx 60 – 70 °C).
• Slide an empty ilter basket into the basket guide rails and place an empty jug/ lask
under it.
• Care ully pour the solution into the tank (cold water reservoir) and switch on the
machine. The solution will now run through the heating system and discharge into the
jug/ lask. Leave the lid o the tank open.
• Switch o the machine a ter one minute.
• Wait about 2 minutes. The solution will react with the scale in the heating system.
• A ter the 2 minutes switch the machine back on and allow the rest o the solution to
run through the system.
• At the end o the process the ‘Brew Ready’ light will illuminate and the sounder will
sound. (2 short pulses).
• Dispose o the de-scale solution and rinse out the jug/ lask.
• A ter descaling the machine, lush the system twice by ollowing the co ee brewing
procedure without using ilter paper or co ee. Remember to empty the jug/ lask each
time.
• Switch o the machine and thoroughly clean the basket ilter and the jug/ lask.
• The machine is now ready or use.
• The ‘Descale’ light will not reset until the ‘Descale Reset’ button is depressed and held
during a power up sequence.
CLEANING
The exterior o this machine may be cleaned with a damp cloth and a light detergent. Do
not use abrasive cloths or creams, as this will spoil the inish o the machine. Do not use a
water jet or spray. The glass jugs and lasks can be washed normally and rinsed clean. The
co ee deposits in the co ee jugs/ lasks and the ilter can be cleaned with a suitable Jug/Urn
Cleanser.
The Filtro is designed with a spray head which can be easily removed by hand or cleaning or
de-scaling - the bayonet type o ixing can be simply twisted in and out o position. Ensure
that the spray head is securely in place when replacing it.

Service Manual 1000615 Filtro Jug MF 1000616 Filtro Flask MF 02-05-2006 Page 6 of 9
TROUBLESHOOTING GUIDE
I you have any di iculty with your machine do not hesitate to call us. Some common aults
and solutions are highlighted in the table below.
Fault Possible Cause Action
T e mac ine is not working
and t e lamp in t e switc es
are not lig ting.
T e fuse in t e fuse box as
been triggered t e units loading
t e system too eavily
Replace/Reset t e fuse.
Connect t e unit to a more
suitably rated supply.
T e "Brewing" LED is on but no
water is flowing into t e filter
basket.
T e dry boil or t ermal fuse on
t e boiler is triggering and
olding t e boiler off.
Descale t e boiler.
or
Replace t e boiler.
T e "Descale" LED as turned
on.
T e units as been operating
for 300 cycles since t e last
descale
Descale t e boiler.
T e "Descale" LED stays on
even after a descale operation.
T e "Descale" counter as not
been reset
Reset t e "Descale" counter at
power-up.
T ere is water coming from
under t e mac ine
T e overflow is operating, t e
tank is being over-filled.
Use mac ine to empty tank.
[N.B. a full tank is about 2.3L]
T e coffee is too weak. Not enoug ground coffee as
been used in t e filter.
T e spray ead disk is scaled
up or dirty and t e flow in
uneven.
Increase t e amount of coffee.
Remove t e spray ead disc
and clean.
T e coffee is too strong. Too muc ground coffee as
been used in t e filter.
Reduce t e amount of coffee.
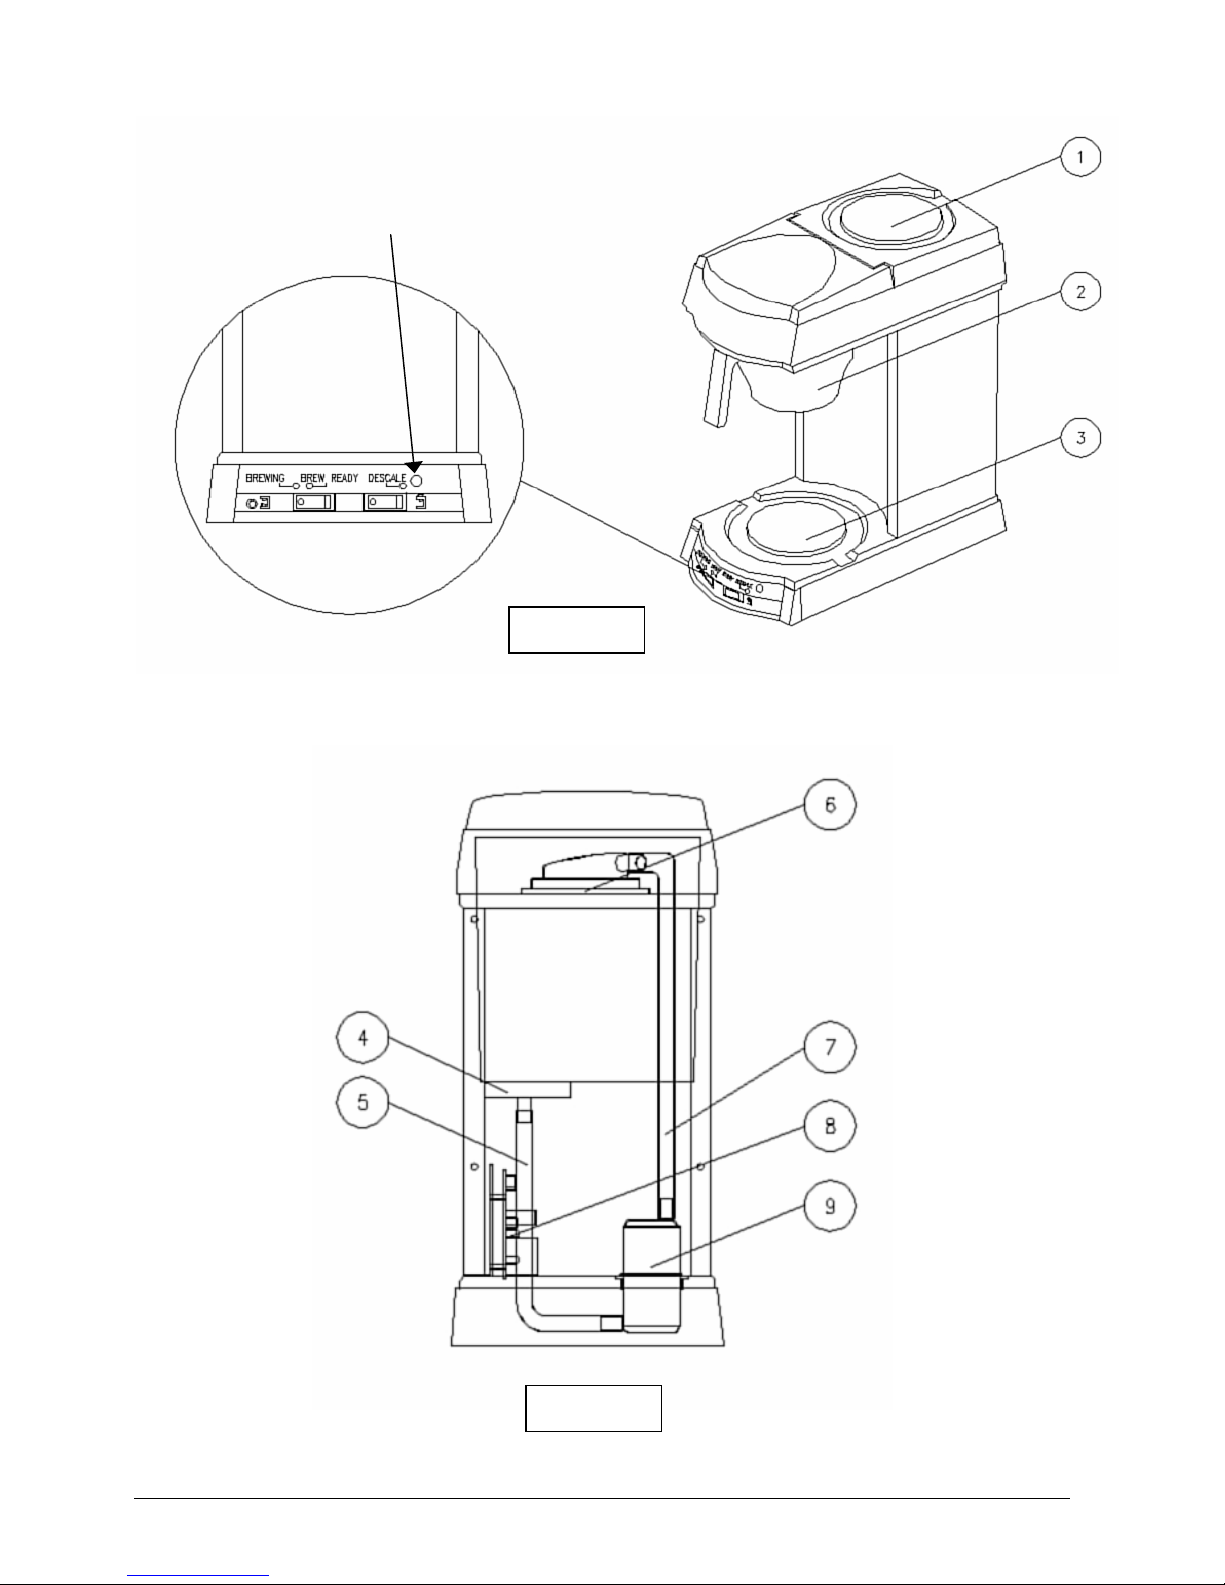
SPARE PARTS LIST
Part
Number
Description
1000615
1000616
Reference
(see Figs 1& 2 )
2300072 Basket FILTRO
2
1801196 Spray ead Rose FILTRO
6
1600341 P.C.B. FILTRO Control
8
1600342 P.C.B. FILTRO Display
1501058 Flas Boiler 230V 2100W
9
1800643 Hose Silicone FILTRO Flask Hot side
7
1800644 Hose Silicone FILTRO Flask Cold side
5
1800641 Hose Silicone FILTRO Jug Hot side
7
1800642 Hose Silicone FILTRO Jug Cold side
5
1501076 Float switc FILTRO
4
1500925 Hotplate FILTRO c/w PTC
1,3
1500927 Hotplate FILTRO – plate w/o PTC
1,3
1500926 Heater PTC FILTRO
1,3
8000200 Filter Paper - FILTRO
8000270 ScaleKleen 200g
1700173 Airpot Lever 2.2L
1700170 Jug Glass Coffee 1.8L

Service Manual 1000615 Filtro Jug MF 1000616 Filtro Flask MF 02-05-2006 Page 7 of 9
Figure 1
Figure
2
“Descale Reset” Button

Service Manual 1000615 Filtro Jug MF 1000616 Filtro Flask MF 02-05-2006 Page 8 of 9
Figure 3: Wiring diagram for FILTRO Manual
-
Fill Jug [P/N 1000 15]

Service Manual 1000615 Filtro Jug MF 1000616 Filtro Flask MF 02-05-2006 Page 9 of 9
Figure 4
: Wiring diagram for FILTRO M
anual
-
Fil
l Flask
[P/N 1000 1
]
This manual suits for next models
3
Table of contents
Other Marco Coffee Maker manuals

Marco
Marco SP9 User manual

Marco
Marco FILTRO SHUTTLE 5.6kW User manual

Marco
Marco FILTRO User manual

Marco
Marco Flash 1900042 Series User manual

Marco
Marco Qwikbrew 2 Twin User manual

Marco
Marco Flash Autofill 1900043 Series User manual

Marco
Marco BRU F60M User manual

Marco
Marco SP9 User manual

Marco
Marco OTTOMATIC User manual

Marco
Marco Quikbrew Twin User manual