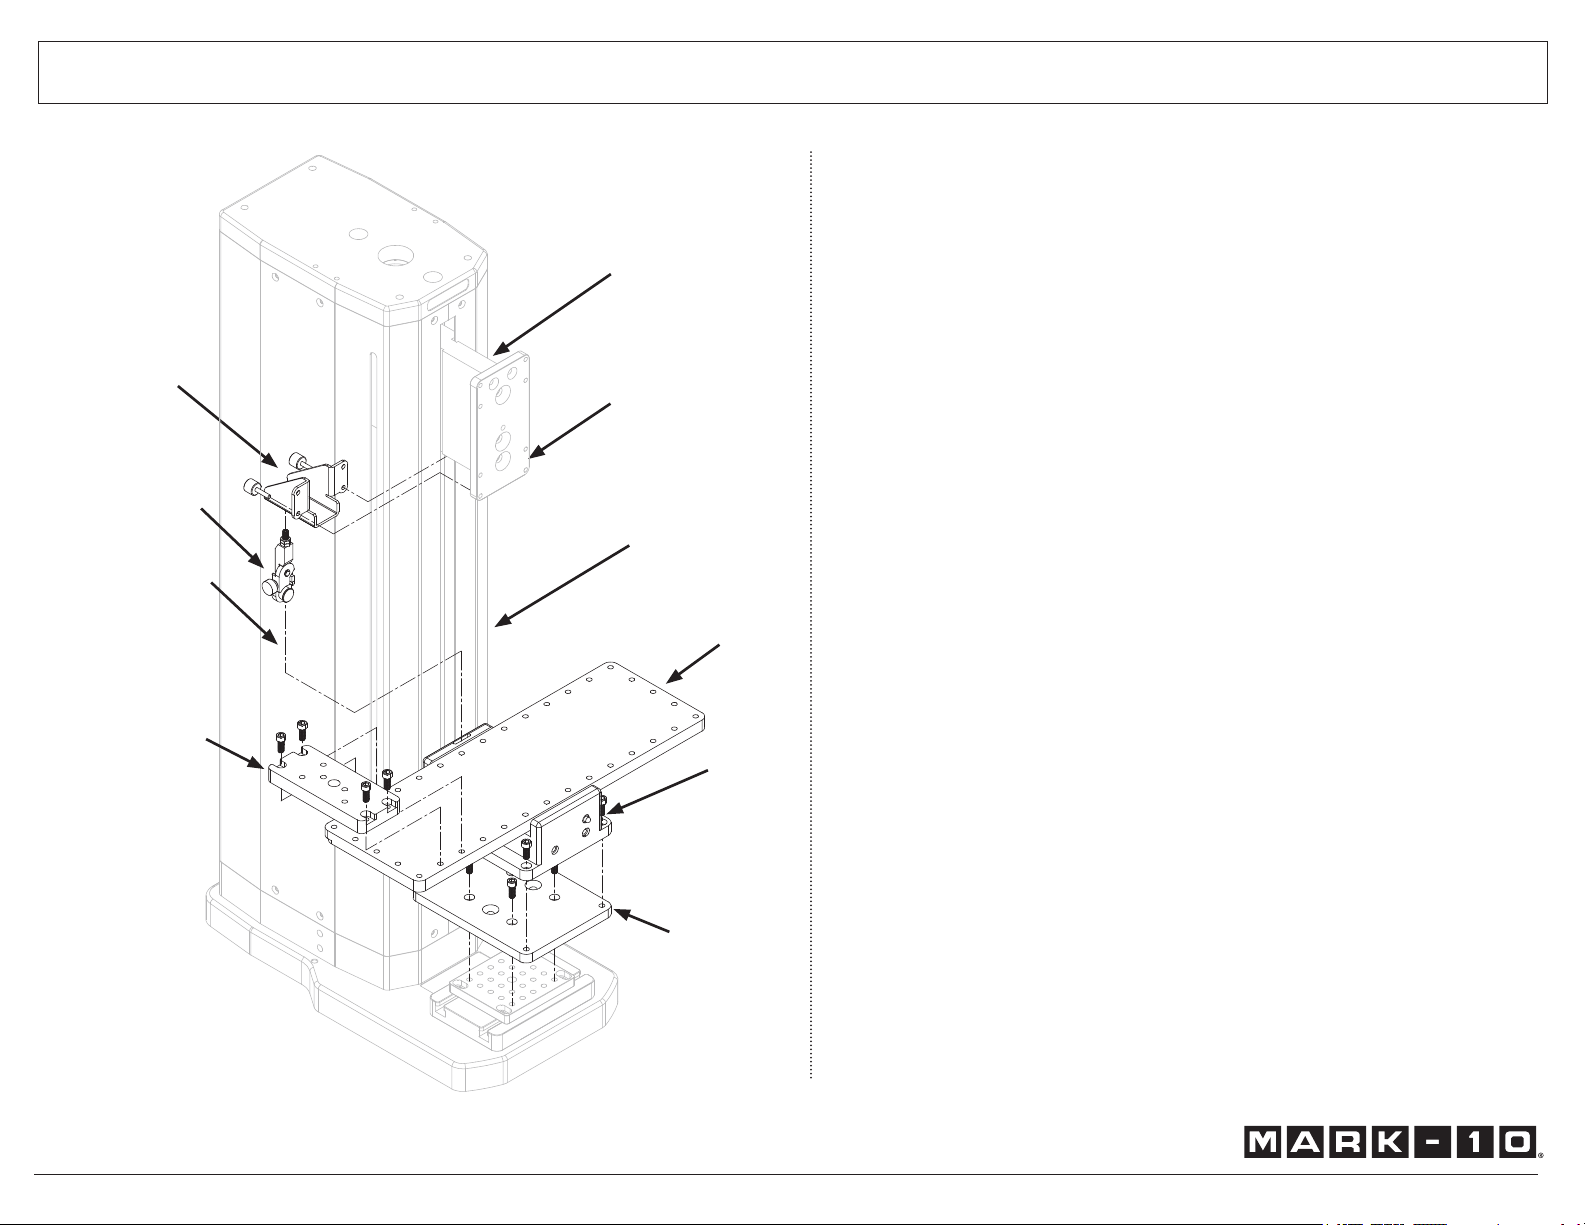
manuals.online logo
Brands
  1. Home
  2. •
  3. Brands
  4. •
  5. Mark-10
  6. •
  7. Kitchen Appliance
  8. •
  9. Mark-10 G1109 User manual

Mark-10 G1109 User manual

Popular Kitchen Appliance manuals by other brands

Saturn ST-EK8037 manual

Saturn

Saturn ST-EK8037 manual

BOSKA Pro 853560 instruction manual

BOSKA

BOSKA Pro 853560 instruction manual

Enders 7909 instruction manual

Enders

Enders 7909 instruction manual

Kalorik USK PPG 37241 operating instructions

Kalorik

Kalorik USK PPG 37241 operating instructions

Scarlett SC-FD421001 instruction manual

Scarlett

Scarlett SC-FD421001 instruction manual

FoodSaver V4925 owner's manual

FoodSaver

FoodSaver V4925 owner's manual

Course	Housewares B416144 quick start guide

Course Housewares

Course Housewares B416144 quick start guide

AEG SANTO Series operating instructions

AEG

AEG SANTO Series operating instructions

Melissa 643-036 instruction manual

Melissa

Melissa 643-036 instruction manual

cecotec ROCK'NTOAST 3IN1 instruction manual

cecotec

cecotec ROCK'NTOAST 3IN1 instruction manual

Gourmia GMF225 instructions

Gourmia

Gourmia GMF225 instructions

Electrolux EKM7 Series Instruction book

Electrolux

Electrolux EKM7 Series Instruction book

Magio MG-965 instruction manual

Magio

Magio MG-965 instruction manual

Keimling Naturkost Excalibur 56301WH Operation manual

Keimling Naturkost

Keimling Naturkost Excalibur 56301WH Operation manual

Beper 90.071 use instructions

Beper

Beper 90.071 use instructions

Geryon E2900-M user manual

Geryon

Geryon E2900-M user manual

Morphy Richards 46718 owner's manual

Morphy Richards

Morphy Richards 46718 owner's manual

Kenwood A995 manual

Kenwood

Kenwood A995 manual

manuals.online logo
manuals.online logoBrands
  • About & Mission
  • Contact us
  • Privacy Policy
  • Terms and Conditions

Copyright 2025 Manuals.Online. All Rights Reserved.

GAUGE PLATE
BRACKET
INTERMEDIATE
PLATE
The G1109 90° peel fi xture mounts to a Mark-10 ESM303 test stand. The illus-
tration at left depicts proper installation. Please follow these instructions:
1. Mount the intermediate plate to the base plate of the ESM303 test stand
with four socket head screws.
2. Mount the fi xture onto the intermediate plate with four socket head screws.
3. Install a force gauge onto the force gauge mounting plate using only the
upper two thumb screws, provided with the ESM303.
4. Install the G1078 grip onto the gauge plate bracket.
5. Attach the gauge plate bracket to the back of the force gauge mounting
plate by installing the two provided thumb screws through the correspond-
ing clearance holes, into the threaded holes in the force gauge housing.
6. Position the crosshead at an appropriate starting position for the test.
7. Pull the loose end of the pull cable from the rear of the fi xture until the work
table has reached the end of its leftward travel.
8. Consider asking for the assistance of a colleague with this step. While
holding the work table in place at its end of travel, wrap the pull cable at
least three times around the bollard on the G1078 grip, then route the cable
through the slot and tighten with the thumb screw.
9. If the optional AC1080 grip adapter is required, install it to the work table
with four socket head screws.
10. This step is not necessary, but is recommended to protect the pull cable.
Connect the limit switch cable from the connector on the right side to the
connector at the rear of the ESM303 labeled “AUX. LIMITS”. When the
work table reaches the end of travel, the test stand will stop and the the
indicator in front of the fi xture will illuminate.
If using the optional AC1078 or AC1079 adjustable angle adapter, refer to the
installation instructions on Page 2.
ESM303
TEST STAND
WORK TABLE
G1078 GRIP
FORCE GAUGE
MOUNTING PLATE
G1109 90° Peel Fixture - Installation Instructions
Mark-10Corporation www.mark-10.com [email protected]
Toll-free:888-MARK-TEN Tel:631-842-9200 Fax:631-842-9201
  
32-1232
AC1080 GRIP
ADAPTER
(OPTIONAL)
LIMIT
SWITCH
CABLE
CONNECTOR
PULL CABLE
CROSSHEAD
PAGE 1 OF 2
G1109 90° Peel Fixture
AC1078 & AC1079 Angle Adapters (optional) - Installation Instructions
Mark-10Corporation www.mark-10.com [email protected]
Toll-free:888-MARK-TEN Tel:631-842-9200 Fax:631-842-9201
  
32-1232 PAGE 2 OF 2
AC1078 AC1079
1. Install the G1109 fi xture to the ESM303 test stand, as described on Page 1.
2. Install the column to the base of the G1109 with two thumb screws.
3. Tie a loop with the pull cable through the hole in the grip adapter, then fasten the
desired grip to the adapter.
4. Install the G1078 miniature bollard grip to the force gauge, then wrap and secure
the pull cable as described on Page 1.
5. When setting up the sample, adjust the pulley height as needed, and route the
pull cable around the pulley.
COLUMN
PULLEY
THUMB
SCREWS
G1109
1. Install AC1079 to the base plate of the ESM303 test stand using four socket
head screws.
2. Install the intermediate plate onto AC1079 using two fl at head screws.
3. Install G1109 to the adapter plate using four socket head screws.
INTERMEDIATE
PLATE
AC1079 ANGLE
ADAPTER
G1109
GRIP
ADAPTER
G1078
PULL
CABLE