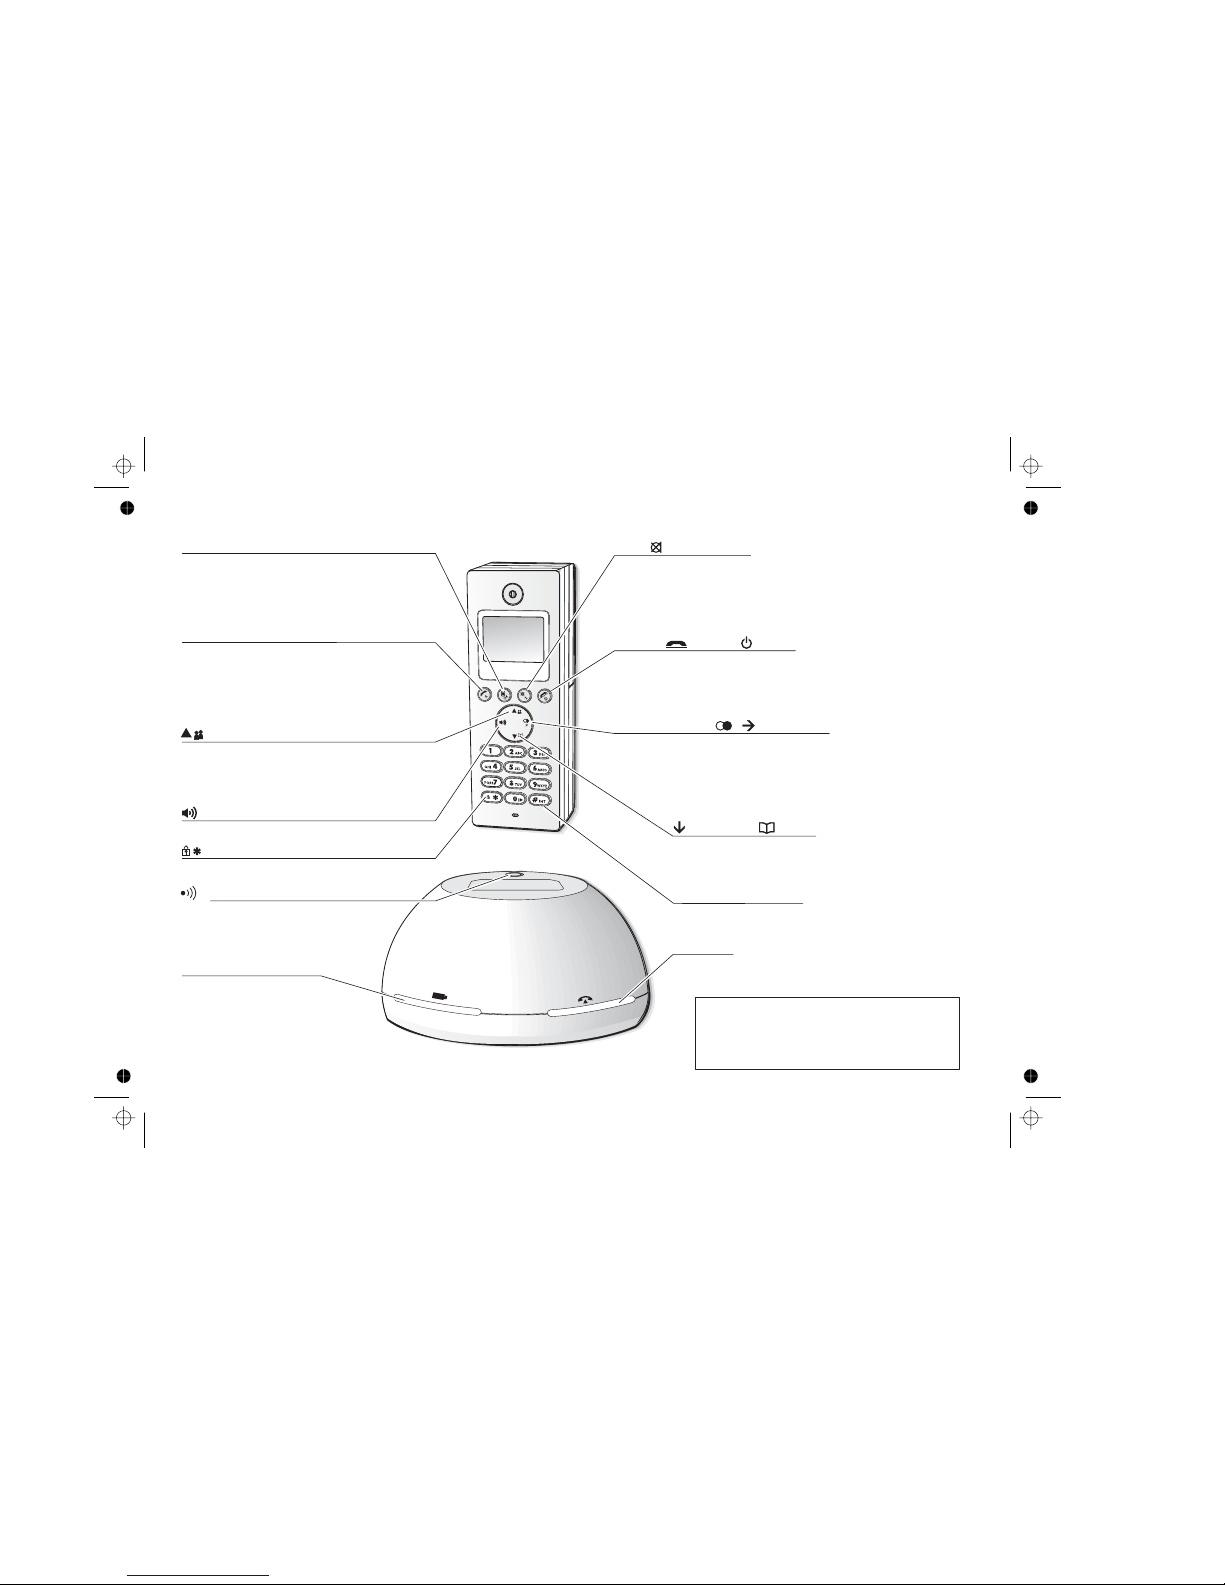
Marks & Spencer IDECT X2I TWIN User manual

instruction manual
telephone
Back cover
Front cover
Ver 2 2OctO
07
Your guarantee
All of our technology products are guaranteed for 2 years, 5 years for televisions.
Please retain your Marks & Spencer till receipt which is proof of purchase, and will
validate the date from which your guarantee will run. It is essential to keep your receipt
to preserve the guarantee. Please also retain the original packaging in case you need
to return the product.
In the unlikely event of a fault please call our technology customer service centre on
0845 671 0665. Alternatively, if the product costs under £150, please return it with
original packaging to any Marks & Spencer store (except Outlet stores and Simply
Food stores) along with your receipt. If it is within 90 days of purchase we will offer an
exchange for a new product, or a full refund. After 90 days and for the remainder of
your guarantee period, we will arrange for the product to be repaired. Should a repair
not be possible, we will exchange the product for a new one or the nearest equivalent.
In the unlikely event of being unable to exchange, we will offer a full refund.
This guarantee is only valid within the United Kingdom, Republic of Ireland and/or
Channel Islands. This guarantee excludes faults caused by accident, neglect, misuse,
not following the instructions or normal wear and tear.
The guarantee is in addition to your statutory rights and supersedes any guarantee that
is with the product.
Once the tamperproof seal on your technology product is broken, refunds can only be
given in accordance with your legal rights. Remember you are not entitled to a refund if
you simply change your mind, or if you damage the goods after you buy them.
© Marks and Spencer plc
Registered Office: Waterside House
35 North Wharf Road, London, W2 1NW
Registered No: 214436 (England and Wales)
www.marksandspencer.com
M&S technology customer services: tel 0845 671 0665
Mar
T04/ 8811 / 60 n57
3

Important note — emergency calls
The isnotdesigned formaking emergency
calls if the mains power fails. So you should make
alternative arrangements for access to Emergency
Services.
(This means that you should also have a basic
phone, that does not need mains power, connected
to your line so that you can make calls during a
power failure.)
If you need help …
The Help Line is available from 9.00 am to 5.00 pm,
Monday to Friday, on
Calls are charged at Local Call rate.
Unpacking your
In the box are:
■
the cordless handset (up to four, depending on
which u’ve bought)
■the base unit
■and a battery compartment
cover for each handset
■atelephone line cable for the base unit
■amains power lead and adapter for the base
unit
■
up to three charger pods, each with a separate
mains power lead and adapter, for multi-handset
systems
Keep the packaging materials in a safe place in
case you later need to transport the unit. Keep
your sales (till) receipt, which is your guarantee.
Before you can use the handset to make calls
you’ll need to fit and fully charge the batteries,
as described on pages 5 and 6. Please read the
notes on page 4 before you install the base unit.
a batteries
0845 6 0665
telephone
telephone system
the telephone system yo
71

MENU/OK button
Press to start using Menu functions
Press while reviewing Phonebook, Redial or Caller
Display records, to start editing.
When editing or using Menu functions, press to
confirm your selection.
Phone On/R (Recall) button
Press to begin or answer a call, or to use the Recall
function
You may need the Recall function during a call if
your is connected to aPBX
HANDSET LOCATOR (PAGE)
button
Press to make all registered handsets ring
(this is useful if you've forgotten where you
put a handset).
UP/Caller Display (CID) button
Press during a call to increase the volume in the earpiece
Press to show the list of Caller Display records.
Where to find it
IN USE light
This comes on when you have a connection to the
telephone line.
HANDSET CHARGING light
MUTE button
Press during a call to mute the mouthpiece so the
person on the other end can’t hear you.
/ X (Cancel)
Press while editing or using Menu functions, to
cancel what you’re doing and return the display to
Standby mode.
HANG UP /ON–OFF button
Press to end a call.
Press and hold for 4 seconds to turn the handset off.
Last Number Redial / /Pause button
Press to open a list of the last 5 phone numbers you called.
Press and hold while dialling to insert a pause (you might need this on a PBX).
#/INT (Intercom) button
Press and hold for 1 second to make an intercom call (if you have
more than one handset).
SPEAKERPHONE button
Press to switch the speakerphone on and off.
KEYPAD LOCK button
Press and hold to lock the keypad.
/Phone Book button
Press during a call to turn down the volume in the earpiece.
Press while using Menu functions to move through the options.
Press to open the Phone Book.
To subscribe to network features like Caller Display
and Call Waiting, simply call your network service
provider (the company that supplies your line). You
don’t need to do anything special on your telephone
phone to set these features up.
Press briefly to turn the handset on.
and unlock
and speakerphone .press while using Menu functions to
move up through the options.
telephone

Help Line: (Local Call rate) 1
18:44 12/08
JANE 1
02:21
When this shows ‘nearly empty’ ( ), put the handset on
the base unit or charger pod to charge the batteries.
While the batteries are being charged, the symbol blinks.
Appears when you have a connection to the outside line.
Flashes when there’s an incoming call to be answered
(even if the ringer is turned off).
Appears when the speakerphone is turned on.
Appears when the answering machine function is on. Flashes
when a new message is rec ived.
Appears when you are using last number redial
Appears when the keypad is locked.
Appears when the ringer volume is set to silence.
Symbols on the display
The handset’s number (if you
have more than one handset on
your
The handset’s name
(the default is )
HANDSET
The time and date
Intercom
call
Memory/
store
Flashes while your handset is ringing for an intercom call, and
comes on steadily when the call’s connected.
Comes on when you’re storing numbers in memory, and when
you’re making calls to stored numbers.
Signal
level
This lashes while the handset is trying to establish a link
.
.
ft
othe
base unit If flashes while you’re on a call, move closer to the
base unit
Battery
charge
Phone
Speakerphone
TAM
Redialling
Keypad Lock
Ringer
Silenced
New call Appears when you have missed incoming calls (if you
subscribe to Caller Display).the display also shows" ''X new call
What the symbols mean
Call Duration.
level
e
0845 671 0665
''
telepone system)

Contents
Read these notes first 4
Choosing a site for the base unit and
charger pod 4
Radio signals between handset and
base unit 4
Mains power connection 4
Installation and set-up 5
Before you start 8
Electrical safety 8
Interference 8
‘Out of range’ warning 8
Switching on and off 9
To lock the keypad 9
Your handset’s name 10
Time and day 11
Ringer volume and melody 12
Making and answering calls 14
Using the speakerphone 14
To make a call 14
To answer a call 14
To end a call 14
Earpiece volume 15
To mute the mouthpiece 15
Last Number Redial (LNR) 15
To delete redial numbers 16
To store a Redial number in the
Phone Book 17
Using the Phone Book 18
To store a new number 18
To call a stored number 19
To delete all Phone Book entries 21
Caller Display 22
To check Caller Display records 23
To return a call 23
To store a Caller Display number in
the Phone Book 23
To delete a caller display record 24
To delete all caller display records 24
Using a multi-handset system 25
To make an intercom call 25
To end an intercom call 25
To answer an intercom call 26
To transfer a call 26
To shuttle between two calls 27
To set up a three-way conference 27
To end the conference 27
New Call tone 28
To page all handsets from the
base unit 28
Answering machine setup 29
29
To change answering mode: 29
The outgoing message 30
To record a new outgoing message:
30
Setting the ring delay 31
Call Screening 32
To switch call screening on: 32
Answering machine operation 33
2
Your telephone answering modes

Contents
3
Turn the answering machine on or
off: 33
Message Playback 34
To play back recorded messages: 34
To replay the message: 34
To play the next new message: 35
To play the previous message: 35
To delete the current message: 35
To Delete all stored messages: 35
Memo Recording 36
To record a memo: 36
Remote operation 37
To activate remote control: 37
To play messages remotely: 38
Custom settings 39
Ringer volume and melody 39
Earpiece volume 39
Registration 42
To reset all handset settings to their
defaults: 44
To change the PIN: 45
Setting the Alarm 46
To set the alarm: 46
Troubleshooting 48
Cleaning and care 53
Guarantee and service 54
Technical details 55
Registering new handsets 56
To register a new handset 56
To de-register a handset 57
Connection and conditions for use
You can connect your telephone to a direct exchange line (DEL) — a line
connected to a local exchange, with its own phone number; to an
extension socket connected to a DEL; or to an extension on an approved
compatible PBX. Do not connect the telephone as an extension to a
payphone.
The ringer equivalence numbers (RENs) of all instruments (phones,
fax machines, etc.) connected to an exchange line must not add up to
more than 4 — otherwise, one or more of them may not ring and/or
answer calls correctly. The telephone has a REN of 1, and most other
telephones have a REN of 1 unless marked otherwise.
Default setting 58
Help Line: (Local Call rate)
0845 671 0665

Read these notes first
Choosing a site
for the base
unit and
charger pod
The base unit and charger pod(s) should be placed on a
level surface, in a position where:
■the mains adapter plug will reach an easily accessible
AC switched mains supply socket — never try
to lengthen the mains power cable
■the base unit’s telephone line cable will reach your
telephone line socket or extension socket (the charger
pod does not have a telephone line connection)
■it is not close to another telephone — this can cause
radio interference
■it is not close to a sink, bath or shower, or anywhere
else where it might get wet
■it is not close to other electrical equipment — fridges,
washing machines, microwave ovens, fluorescent
lights, TVs etc.
Radio signals
between
handset and
base unit
To use your handset and base unit together, you must
be able to establish a radio link between them. Be
aware that:
■Any large metal object — like a refrigerator, a mirror
or a filing cabinet — between the handset and the
base unit may block the radio signal.
■Other solid structures, like walls, may reduce the
signal strength.
Mains power
connection
IMPORTANT — The
pod must be used with the mains adapter supplied with
the unit. Using any other adapter will result in non-
compliance with EN60950, and will invalidate any
approval given to this apparatus.
!Make sure mains powerto the base unit stays switched
on. The
operation; not just for charging the batteries.
4
Color profile: Disabled
Composite Default screen
2 0 V3
telephone base unit and charger
telephone needs electrical power for normal

Installation and set-up
5
1
3
5
4
Choose a suitable
site for the base
unit
See page 4
Plug the mains adapter into
a 23 0 V AC, 50 Hz mains
socket, with the switch on
the socket set to OFF
Plug the mains adapter into a 230 V AC,
50 Hz mains socket, with the switch on
the socket set to OFF
Switch on at the mains socket(s)
If you have one or more charger pods …
2
Use the telephone line
supplied with your
do not use any other
telephone line cord
cord
Connect the
mains power
lead and the
telephone line
cord into the
underside of
the base unit
See the note
on page 4
Color profile: Disabled
Composite Default screen
telephone —
Help Line: (Local Call rate)
0845 671 0665

Installation and set-up
6
Make sure the battery compartment door is securely
in place. If you have problems fitting the batteries,
contact the Help Line on 0845 6 0665.
6
B.Plug the battery connector
into the socket at the top of
the battery compartment.
C.Place the battery in the
compartment
Always use the battery
pack supplied — never
use any other kind of
batteries in the handset.
D.Fit the battery compartment
cover, sliding it into place and
pressing firmly to make sure it is
secure
A.Remove the battery compartment cover.
Fit a battery pack in each handset
+
+ +
RED
BLACK
Color profile: Disabled
Composite Default screen
71

Installation and set-up
7
7Charge the batteries for 15 hours
Before you use the handset for the
first time, it’s important to charge the
batteries fully.
The handset ‘beeps’ when it’s correctly
in position on the charging cradle.
Leave the handset on the charging
cradle for 15 hours.
Make sure the mains socket is
switched on if you want to use
the phone — it will not work
without electrical power
Connect the base unit to the telephone line
Switch off power at the mains socket
Insert the telephone line plug into
the socket as shown
Switch mains power back on
8
Use the plug to
raise the shutter
before pushing
it into the socket
NOTE: the charger pod does not have
a connection to the telephone line.
The navigation buttons
In the instructions, these buttons are
represented by arrows, as shown here.
UP
DOWN
P
Color profile: Disabled
Composite Default screen
Only blinks initially when
are fully charged the battery
even when the handset is on
handset charger Light still on.
charging -- when the batteries
symbol stays on constantly
the base with the base
Help Line: (Local Call rate)
0845 671 0665

Before you start
Electrical
safety
■DON’T let the base unit or charger pod get wet.
Electrical equipment can cause serious injury if used
while you are wet or standing in water.
■If the base unit or charger pod ever falls into water,
DON’T retrieve it until you have unplugged the power
lead from the mains and the telephone line plug from
the telephone socket (base unit only); then pull it out by
the unplugged cables.
■NEVER use your r-
storm — unplug the base unit from the telephone line
and the mains socket when there are storms in your
area. Damage caused by lightning is not covered by the
guarantee.
Interference If the sound quality gets worse as you move around
while on a call, this is probably caused by interference
between the handset and the base unit, perhaps
because you are too near to another phone or other
electrical equipment.
Move to a different position to clear the interference.
If you do not move, your call may be cut off.
!Radio interference in the environment may occasion-
ally cause a short break in the link between the
handset and the base unit while you are on a call.
The ‘signal level’ on symbol handset’s display may
flash until the link is restored.
‘Out of range’
warning
If you hear a warning tone during a call, and/or the
sound in the earpiece becomes faint or distorted, you
may be going out of range of the base unit. Move
nearer to the base unit within 20 seconds, until the
tone stops. Otherwise, your call may be cut off.
8
Color profile: Disabled
Composite Default screen
telephone outdoors during a thunde

Switching on and off
To switch the
handset on
and off
To switch the handset off (in case you need to
save battery power when the handset is away
from the base unit):
◗Press the HANG UP button and hold it for
4 seconds
èThe display goes blank.
To switch the handset back on:
◗Briefly press the HANG UP button, or replace
the handset on the base unit or charger pod
èThe display shows Searching. When it
detects the base unit it will return to standby
mode.
To lock the
keypad
◗Press the LOCK/* button and hold it for
èThe display shows Keys Locked
To unlock the keypad:
◗Press the LOCK/* button and hold it for
base unit or charger pod
Notes ■When the handset is switched off, it can’t be used for
making calls, including emergency calls.
■When the handset is switched off, it won’t ring for
incoming calls, but the base unit will ring. To answer a
call when the handset is switched off, you need to
switch it back on. It may take a few moments for the
handset to re-establish a radio link with the base unit.
9
Color profile: Disabled
Composite Default screen
2 seconds.
2 seconds or replace the handset on the,
Help Line: (Local Call rate)
0845 671 0665

Your handset’s name
Before you start to use yourhandset,
especially if you have a multi-handset system, you’ll
probably want to personalise the display with your name.
The name can have up to 12 characters (including
spaces).
To change
the name
1Press the MENU/OK button
èDisplay shows Main Menu >Phonebook
2Press the âbutton TWICE
èDisplay shows Main Menu >Personal Set
3Press the MENU/OK button
èDisplay shows Personal Set >Handset Tones
4Press the âbutton ONCE
èDisplay shows Personal Set >handset Name
5Press the MENU/OK button
èThe display shows Enter Name and the
current name.
6If necessary press the X (Cancel) button to
delete characters from the current name.
7Key in your chosen name
8When you’ve finished, press the MENU/OK
button
9Press and hold the HANG UP button to go
back to standby mode
10
Color profile: Disabled
Composite Default screen
telephone

Time and day
To set the time and day:
1Press the MENU/OK button
èDisplay shows Main Menu >Phonebook
2Press the âbutton ONCE
èDisplay shows Main Menu >Clock & Alarm
3Press the MENU/OK button
èDisplay shows Clock & Alarm >Set Date/Time
4Press the MENU/OK button
èDisplay shows 01:01 00/00 >Set Date/Time
5Key in the time and date in the format
HH:MM DD/MM then press the MENU/OK
button
Remember to use the 24-hour clock and to
include any 0s (zeroes) — for example, 9:30 am
is 09:30; 6:05 pm is 18:05.
6Press the MENU/OK button
èAny other handsets that have been
registered will be automatically updated.
7Press and hold the HANG UP button to go
back to standby mode
11
Color profile: Disabled
Composite Default screen
Help Line: (Local Call rate)
0845 671 0665

Ringer volume and melody
Handset
ringer
1Press the MENU/OK button
èDisplay shows Main Menu >Phonebook
2Press the âbutton TWICE
èDisplay shows Main Menu >Personal Set
3Press the MENU/OK button
èDisplay shows
4Press the MENU/OK button
èDisplay shows Handset Tone >Ring Volume
5Press the MENU/OK button
èDisplay shows Ring Volume >Low
6Use the âor ábutton to adjust the volume
level between low, medium, high or silence
7Press the MENU/OK button to select the
new level
èDisplay shows Handset Tone >Ring Volume
èThe display shows the current melody.
Press the áor âbutton to play the
melodies. When you reach the one you
want (there are ten different melodies),
èThe display shows Ring Melody
11 Press and hold the HANG UP button to go
back to standby mode
12
Color profile: Disabled
Composite Default screen
Personal Set >Handset Tones
Press the MENU/OK button
press the MENU/OK button to select it
8
èThe display shows the
Press the âbutton once.
Handset Tone >Ring Melody
9
10

Base unit
ringer
1Press the MENU/OK button
èDisplay shows Main Menu >Phonebook
2Press the âbutton TWICE
èDisplay shows Main Menu >Personal set
3Press the MENU/OK button then the â
button Four times
èDisplay shows
4Press the MENU/OK button TWICE
è
Display shows
BS Ring Vol >Ring Vol Med
5Use the âor ábutton to adjust the volume
level between Low, Med, or High
6Press the MENU/OK button to select the
new level, then press the button once
èDisplay shows BS Ring Mel
7Press the MENU/OK button once to begin
editing the melody
èDisplay shows
8Press the áor âbuttons to play each of the
melodies .
9Press and hold the HANG UP button to go
back to standby mode
Ringer volume and melody
13
Color profile: Disabled
Composite Default screen
â
Personal Set >Base Tone
Base Tone>
BS Ring Mel > Melody 1
MENU/OK button.you will hear a confirmation
When you reach the one you prefer, press the
beep and the display show
èBS Ring Mel
Base Tone>
Help Line: (Local Call rate)
0845 671 0665

Making and answering calls
Using the
speakerphone
The speakerphone lets you hear calls without holding
the handset to your ear.
You can switch between speakerphone and earpiece
mode during calls at any time by pressing the
PHONE/SPEAKERPHONE button. The display will show
the speakerphone icon.
To make a
call
1Key in the telephone number
If you make a mistake, press MUTE/CANCEL to
clear digits one by one from the display.
2Press the PHONE button
To answer a
call
When there’s an incoming call, the base unit and handset
ring (unless the handset’s ringer is turned off). If you
subscribe to Caller Display (see page 22) the caller’s
number or name may appear on the display; otherwise,
the display shows <<External CALL>>.
To end a call ◗Press the HANG UP button so that the
IN USE light on the base unit goes out
◗Or just replace the handset on the base unit
èThe display shows Calling and the duration
of the call for 5 seconds.
14
Color profile: Disabled
Composite Default screen
(You can dial the number after you press the
PHONE button to get Dial tone ,if you prefer,
but you can’t correct any mistakes if you do it
Either way,the display shows ''calling''
as soon as the PHONE button is pressed.
this way.)

Earpiece
volume
During a call, to adjust the volume in the earpiece
or speakerphone:
◗Press the áor âbutton
There are five volume levels. After you end the
call, the volume will stay at the level you’ve set.
To mute the
mouthpiece
During a call, to mute the mouthpiece so the
person on the other end can’t hear you:
◗Press the MUTE/CANCEL button
To un-mute the mouthpiece, press the
MUTE/CANCEL button again.
Last Number
Redial (LNR)
1Press the Redial button
èDisplay shows Redial and the last number
dialled
2Press the áor âbuttons to choose the
number from the last five numbers dialled
3Press the PHONE button to dial the number
Making and answering calls
15
Color profile: Disabled
Composite Default screen
èDisplay shows Mute on
Help Line: (Local Call rate)
0845 671 0665

To delete
redial numbers
1Press the Redial button
èDisplay shows Redial and the last number
dialled
2Press the áor âbuttons to choose the
number from the last five numbers dialled
Press the MENU/OK button
èDisplay shows Redial >Copy to Phbk
Press âbutton once
èDisplay Shows Redial >Delete
Press button once
Making and answering calls
16
Color profile: Disabled
Composite Default screen
3
4
5MENU/OK to delete
èyou will head a confirmation beep.
then return to Redial list mode.
To delete All
redial numbers 1Press the Redial button
èDisplay shows Redial and the last number
dialled
Press the MENU/OK button Once then
èDisplay Shows Redial >Delete All
the button Twice.
â
Press the MENU/OK button Twice to
delete, display briefly shows Redial
list Empty then return to standby
mode.
2
3

To store a
Redial number
in the Phone
Book
1Press the Redial button, then the áor â
button until the number is displayed
2Press the MENU/OK button
èDisplay shows Redial >Copy to Phbk
3Press the MENU/OK button
èDisplay shows Redial >
4Key in a name (See the list below for which
buttons to use for which characters)
5Press the MENU/OK button
èDisplay shows the number for editing Enter
Number:
6If necessary, edit the number
7Press the MENU/OK button
èYou will hear a long confirmation beep and
the redial list will be displayed
Making and answering calls
17
Color profile: Disabled
Composite Default screen
Enter Name
$
$$$
,+-
∑
Γ
Ξ
﹠§
*
Ì
Θ
£ Ұ
Bu t t o ns t o p r ess f o r t ex t ch ar act er s - press t he but ton repeatedly
until you get the character you want
1 7
2 8
3 9
4 0
5
6 X
backspace/delete
∑
Ξ
9
?
[ ] { }
Ì
%∧
¿
-
*
$
Help Line: (Local Call rate)
0845 671 0665
This manual suits for next models
1
Table of contents
Other Marks & Spencer Telephone manuals