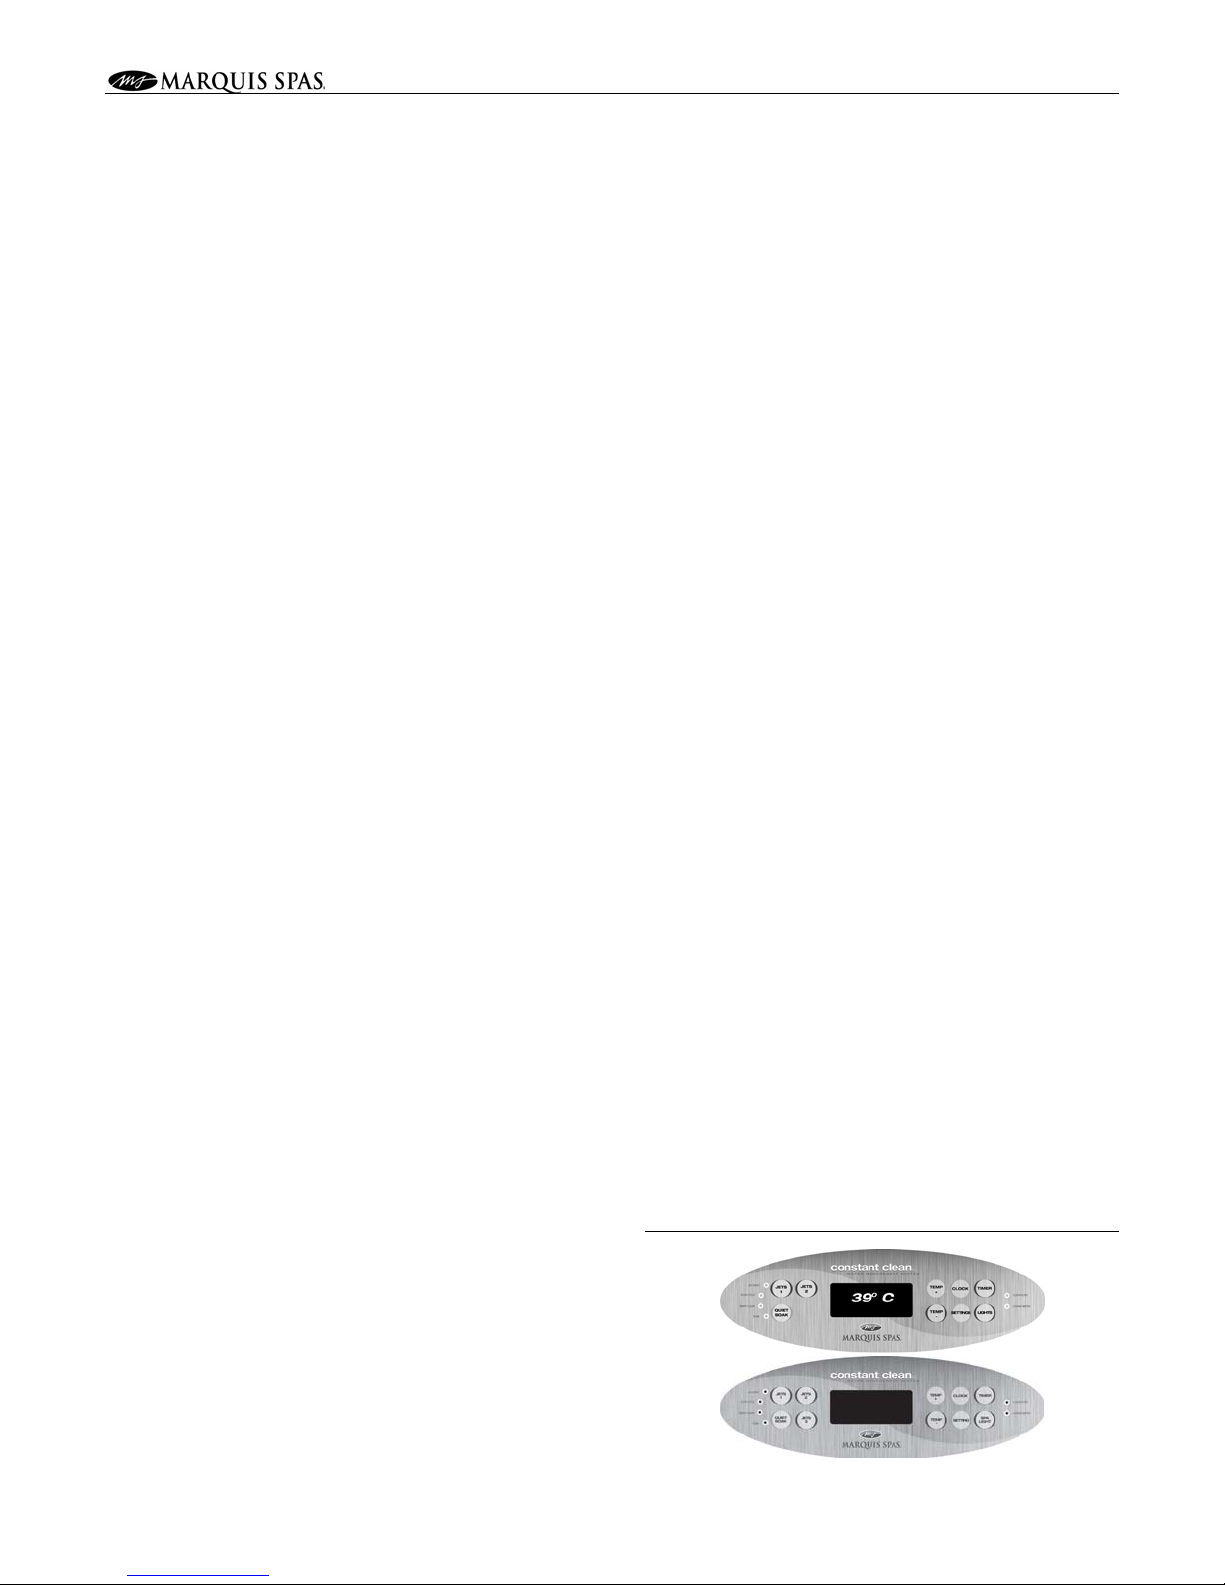
M A R Q U I S S P A S ®OWNER’S MANUAL
SAFETY INSTRUCTIONS
The following instructions contain important safety information. We strongly
encourage you to read and apply them.
IMPORTANT SAFETY INSTRUCTIONS
WHEN INSTALLING AND USING THIS ELECTRICAL EQUIPMENT, BASIC
SAFETY PRECAUTIONS SHOULD ALWAYS BE FOLLOWED, INCLUDING THE
FOLLOWING:
1. READ AND FOLLOW ALL INSTRUCTIONS.
2. WARNING: To reduce the risk of injury, do not permit children to use this
product unless closely supervised at all times.
3. DANGER: RISK OF CHILD DROWNING. Extreme caution must be
exercised to prevent unauthorized access by children.To avoid accidents,
ensure that children cannot use the spa or hot tub unless they are
supervised at all times.
4. WARNING: Disconnect all supply circuits before obtaining access to the
terminal.
5. A ground/earth terminal is provided on the terminal block located on the
outside of the control box. To reduce the risk ofelectric shock, connect this
terminal to the grounding/earth terminal of your electrical service or supply
panel with a continuous green/yellow, insulated copper wire. The wire must
be equivalent in size to the circuit conductors supplying the equipment.In
addition, a bonding terminal (pressure wire connector) is provided on the
outside of the control box for bonding to local ground/earth points. To
reduce the risk of electric shock, this connector should be bonded with a
No. 8 AWG (8.42mm2) solid copper wire to any metal ladders, water pipes,
or other metal within five feet (1.5m) of the spa to comply with local
requirements.
6. Your spa uses ground fault circuit interrupters (GFCIs) or residual current
devices (RCDs) in the electrical sub-panel. Before each use of the spa and
with the unit operating, press the Test button on each breaker. The switch
should click over to the “Trip” position. Wait thirty seconds and reset each
RCD breaker by switching it completely off and then completely on. The
switch should then stay on. If either of the interrupters does not perform in
this manner, it is an indication of an electrical malfunction and the possibility
of an electric shock. Disconnect the power until the fault has been identified
and corrected.
7. Install the spa so proper drainage is provided for the compartment
containing the electrical components.
8. DANGER: RISK OF ELECTRIC SHOCK. Do not permit any appliance,
such as a light, radio, telephone, or television within 1.5m of the spa or hot
tub.
9. WARNING: TO REDUCE THE RISK OF INJURY.
• The water in the spa should never exceed 40° C. Water temperatures
between 38° C and 40° C are considered safe for a healthy adult. Lower
water temperatures are recommended for extended use (exceeding 10
minutes) and for young children.
• Since excessive water temperatures have a high potential for causing
fetal damage during the early months of pregnancy, pregnant or possibly
pregnant women should limit spa water temperatures to 38° C.
• Before entering a spa, the user should measure the water temperature
with an accurate thermometer since the tolerance of temperature-
regulating devices may vary as much as +/- -3° C.
• The use of drugs, alcohol, or medication before or during spa use may
lead to unconsciousness with the possibility of drowning.
• Persons suffering from obesity or with a medical history of heart disease,
low or high blood pressure, circulatory system problems or diabetes
should consult a physician before using the spa.
• Persons using medications should consult a physician before using a spa
since some medication may induce drowsiness while other medication
may affect heart rate, blood pressure, and circulation.
10. DANGER: TO REDUCE THE RISK OF INJURY TO PERSONS. Do not
remove the suction fittings.
11. DANGER: RISK OF INJURY. Never operate a spa if the suction fitting(s)
are broken or missing. Never replace a suction fitting with one rated less
than the flow rate marked on the original suction fitting. The suction fittings
in the spa are sized to match the specific water flow created by the pump.
Should the need arise to replace the suction fittings or the pump, be sure
that the flow rates are compatible.
12. DANGER: Children are especially sensitive to hot water. At no time should
children have unsupervised access to the spa. Children must notbe
allowed to climb onto the spa cover. All Marquis Spas are equipped with a
locking safety cover.Always lock the child resistant locks after using the
spa for your children’s safety.
13. CAUTION: To reduce the number of airborne bacteria in an enclosed spa
area, proper ventilation must be provided.
14. WARNING: The design and construction of this spa are in accordance with
all applicable regulations. Modifying or adding spa components may affect
proper spa functioning, and may void the compliance markings.
15. SAVE THESE INSTRUCTIONS.
PERSONAL SAFETY
Prolonged immersion in hot water can result in HYPERTHERMIA, a dangerous
condition which occurs when the internal temperature of the body reaches a
level above normal (37°C). The symptoms of hyperthermia include dizziness,
fainting, drowsiness, lethargy, and a body temperature above 37°C. The
physical effects of hyperthermia include unawareness of impending hazard,
failure to perceive heat, failure to recognize the need to exit the spa, physical
inability to exit the spa, fetal damage in pregnant women, and unconsciousness
resulting in a danger of drowning.
WARNING: The use of alcohol, drugs, or medication can greatly increase the
risk of fatal hyperthermia in hot tubs and spas.
Persons taking medications which induce drowsiness such as tranquilizers,
antihistamines, or anticoagulants should not use the spa.Pregnant women and
persons with a medical history of heart disease, diabetes, or high blood pressure
should consult a physician before using the spa.
PERSONAL SAFETY DOS:
• Be sure your spa is connected to the power supply correctly – use a
licensed contractor.
• Disconnect the spa from the power supply before draining the spa or
servicing the electrical components.
• Test the RCD monthly.
• Test the water temperature with your hand before entering the spa to be
sure that it’s a comfortable temperature.
• Do not use the spa if water temperature is outside of set temperature.
• Remember thatwet surfaces can be very slippery. Take care when
entering and exiting the spa.
• Use the safety cover when the spa is not in use, whether it is empty or full
of water.
• Keep the water clean and sanitized with correct chemical care.
• Turn on the jets when adding ANY spa water chemicals.
• After running the pump for three consecutive 15 minute periods (if so
desired), allow for a 30 minute cool-down period.
• Clean the filter cartridge(s) monthly to remove debris and mineral buildup
which may affect the performance of the hydrotherapy jets, limit the flow,
or trip the high limit thermostat which will turn off the entire spa.
PERSONAL SAFETY DON’TS:
• Don’t use the spa with the equipment compartment door removed.
• Don’t use the spa for long periods of time at water temperatures in excess
of 40°C.
• Don’t allow the jet pump(s) to operate for an extended period of time with
the cover in place. Extended pump operation will cause a slow heat
buildup due to water friction. The spa equipment controls are equipped
with a built-in safety timer that will automatically shut off the jet pump(s)
after 15 minutes of continuous operation should it have been left on
inadvertently.
• Don’t operate the spa at any time with the filter cartridge(s) removed.
• Don’t lift or drag the cover by using the tie-down straps or cover skirting;
always lift and carry by using the external handles.
• Don’t store chemicals in the spa’s equipment compartment.
2


 owner's manual")