Marshalltown SHOCKWAVE 2.0 POWER SCREED User manual

SHOCKWAVETM . POWER SCREED
Part# SW200H | EDI# 32856
104 S. 8th Ave. | Marshalltown, IA
Phone 800-888-0127 / 641-753-0127 | Fax 800-477-6341 / 641-753-6341
www.MARSHALLTOWN.com
WS3664

2 of 16 104 S. 8th Ave. Marshalltown, IA Phone 800-888-0127 / 641-753-0127 • Fax 800-477-6341 / 641-753-6341 www.MARSHALLTOWN.com WS3664
TABLE OF CONTENTS
Safety Precautions ......................................................................................................................................................................................... 2
Warranty ........................................................................................................................................................................................................... 3
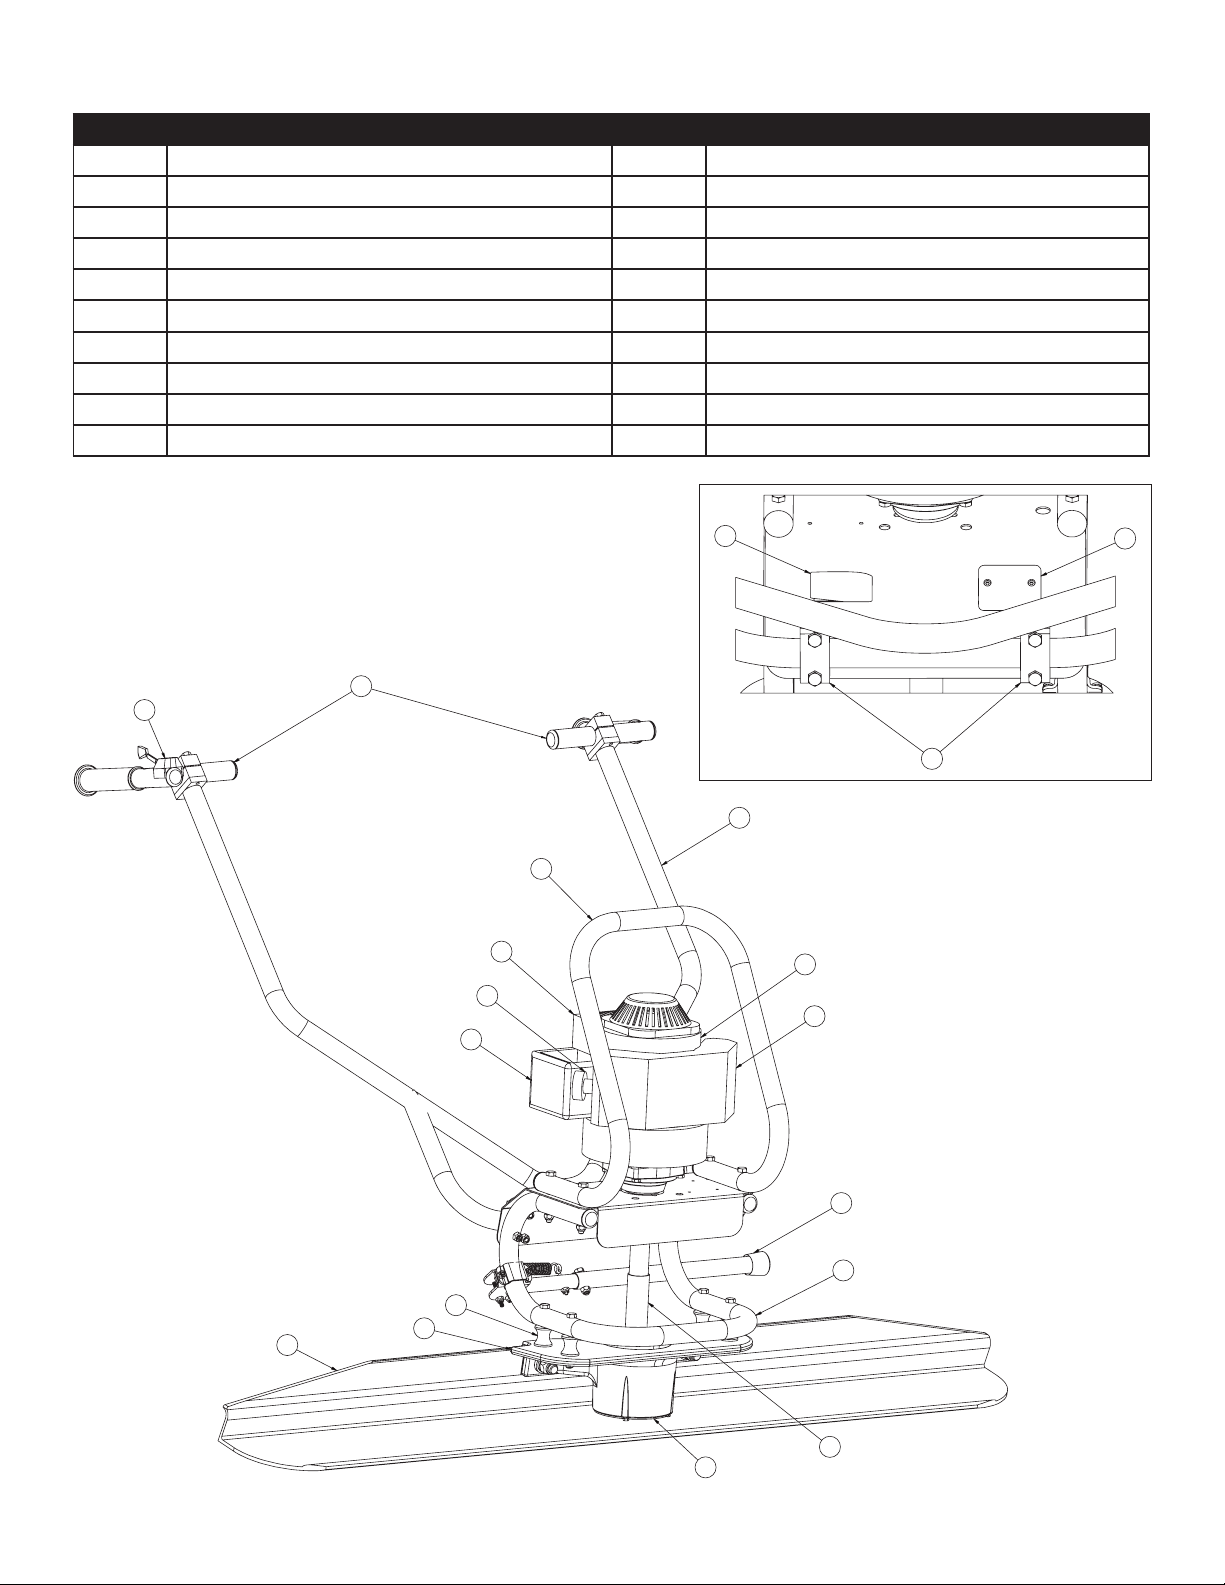
Common Components...................................................................................................................................................................................4
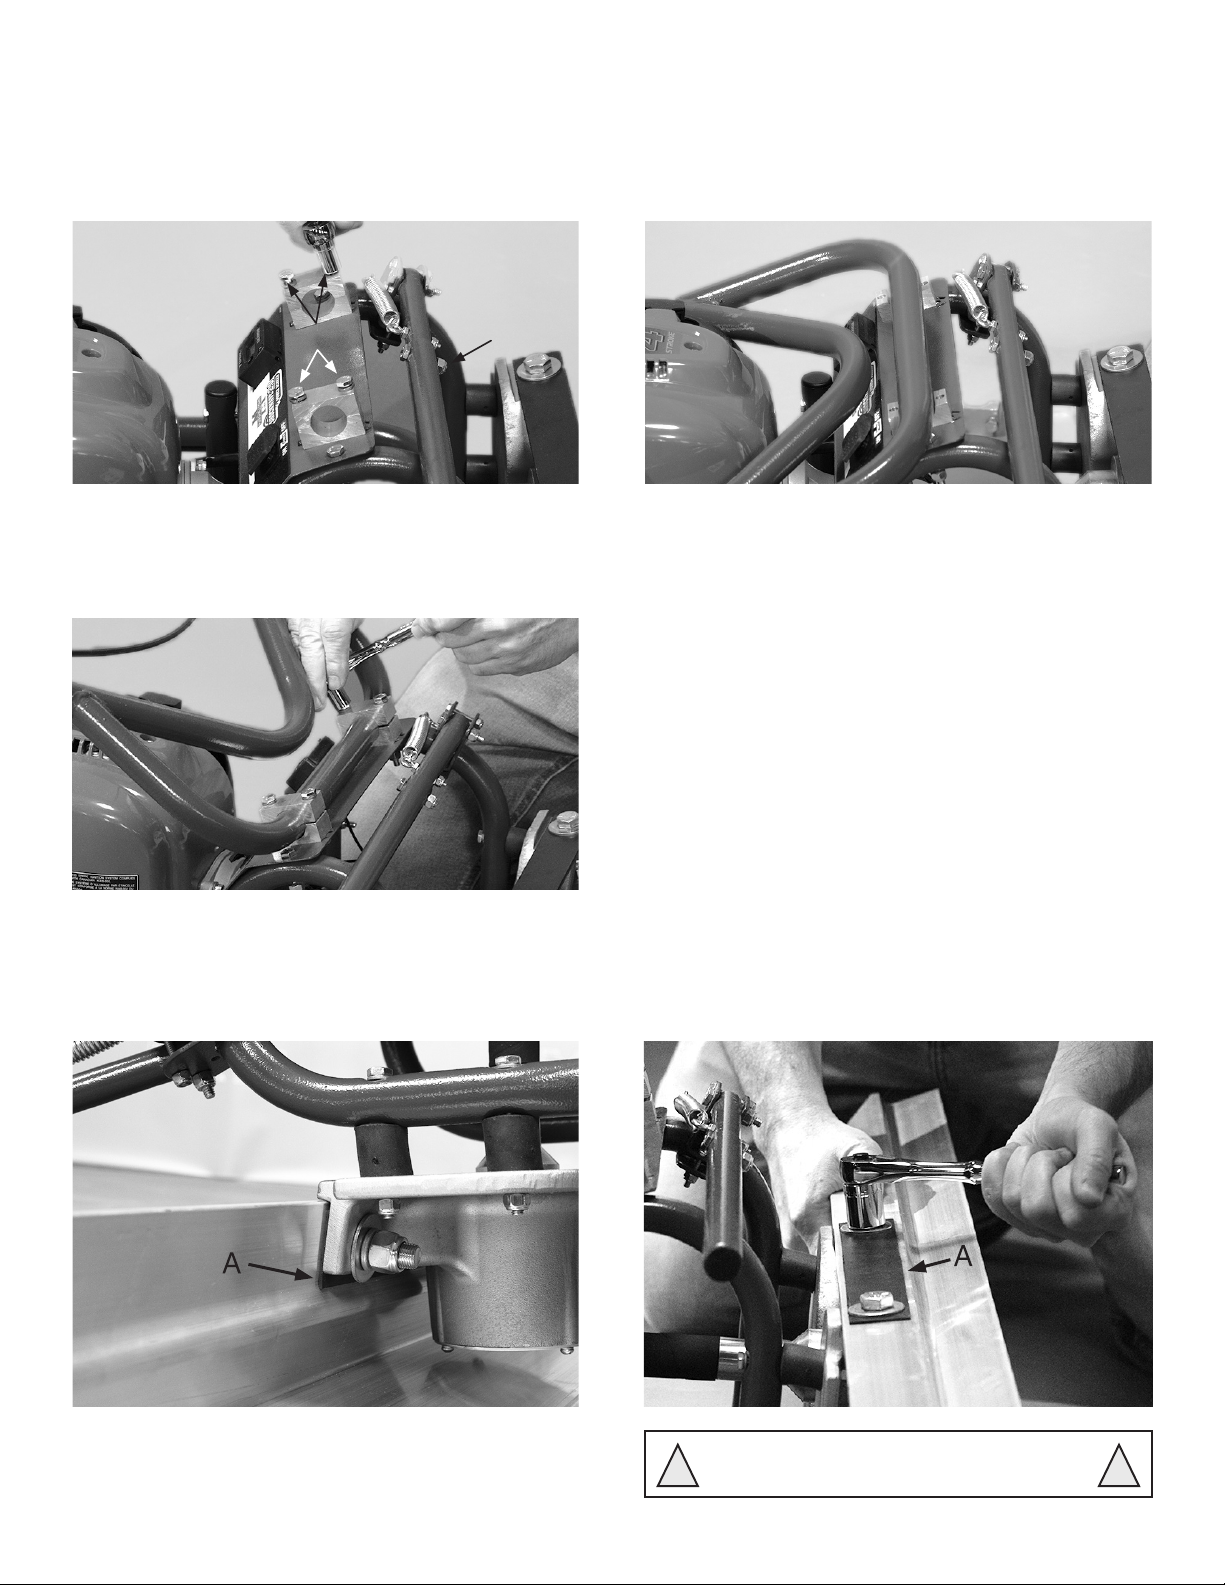
Installing Handle Bars & Kickstand..............................................................................................................................................................5
Attaching Blade ............................................................................................................................................................................................... 5
Installing Throttle Cable..............................................................................................................................................................................6-7
Machine Adjustments ....................................................................................................................................................................................8
Technical Data/Capacities ............................................................................................................................................................................9
Maintenance.....................................................................................................................................................................................................9
Parts Breakdown......................................................................................................................................................................................10-11
How to Wet Screed....................................................................................................................................................................................... 12
How to Screed Form to Form ..................................................................................................................................................................... 13
How to Operate.............................................................................................................................................................................................. 14
Operating on Wet Concrete ........................................................................................................................................................................ 15
SAFETY PRECAUTIONS
DANGER!
• DANGER or
WARNING!
WARNING safety signs are located near specific hazards.
CAUTION!
• General precautions are listed on CAUTION safety signs.
This machine was built with user safety in mind; however, it can present hazards if improperly operated and serviced.
Follow operating instructions carefully and use good judgement when operating!
If you have questions about operating or servicing this equipment, please contact your MARSHALLTOWN distributor or
MARSHALLTOWN at 800-888-0127 or 641-753-0127.
ALWAYS
• Always stop engine between loads of concrete
• Always screed while walking backwards
• Always clearly mark and be aware of all grade pins,
form stakes or other trip hazards
• Always follow all safety warnings and labels of the
engine manufacturer
• Always read and understand the owners manual of
the engine manufacturer
• Always wear approved hearing, eye and breathing
protection
• Always use form oil to coat blade or other parts
susceptible to concrete build up (avoiding electrical
connections) before each use
• Always properly secure screed before transporting
• Always follow recommended maintenance schedules
• Always make sure all connections and fasteners are
tight before every use
• Always always make sure engine is in "OFF" position
when servicing or not in use
• Always use in a well ventilated area
• Always keep Shockwave™ 2.0 engine manual handy
on the job site
• Always replace parts as they become damaged or worn
NEVER
• Never operate screed without all parts and safety
covers correctly attached
• Never allow children to operate
• Never operate under the influence of drugs or alcohol
• Never use screed for anything other than its
intended purpose
• Never allow engine to run unattended or idle on
top of wet concrete
• Never place concrete higher than the leading
“curl edge” of the blade
• Never fill gas tank while engine is running
• Never start engine near spilled fuel
• Never fill gas tank, operate, or service screed
near open flame
• Never use parts or blades from other manufacturers
• Never service a hot engine
• Never operate without proper training
• Never spray water or other liquid on a hot engine

3 of 16
104 S. 8th Ave. Marshalltown, IA Phone 800-888-0127 / 641-753-0127 • Fax 800-477-6341 / 641-753-6341 www.MARSHALLTOWN.comWS3664
MONTH WARRANTY
This product is warranted to the original purchaser only to be free of defects in material and workmanship,
under normal use and servicing, for a period of 12 months from the purchase date, excluding the engine.
Warranty on the engine is limited to the warranty extended by the engine manufacturer and any warranty claims
related to the engine should be directed to the engine manufacturer. MARSHALLTOWN’s sole obligation under
this warranty is limited to the replacement or repair of the product or covered part(s) at no charge delivered
to you F.O.B standard ground rates from its designated facility if the product is determined upon inspection
by MARSHALLTOWN to have been defective in materials or workmanship. MARSHALLTOWN’s warranty for
replacement parts will extend for the duration of the original product warranty.
This warranty will not apply when the product becomes damaged or inoperative due to misuse, abuse, normal
wear and tear, neglect, improper maintenance, accident, or freight damage; if the product has not been
operated and maintained in accordance with the instructions furnished in the Operator’s Manual; or when the
product has been altered or modified without approval from MARSHALLTOWN.
Under no circumstances shall MARSHALLTOWN be responsible or liable for any consequential, special, or
punitive damages, pickup and delivery of the unit, inbound shipping charges to MARSHALLTOWN’s service
facility, rental charges for a replacement unit, loss of income, or other loss resulting from the failure of the
product to function properly because of a defect in material or workmanship covered under this warranty.
There are no warranties which extend beyond the description of this warranty. No employee or agent of
MARSHALLTOWN has the authority to modify this warranty.
If you wish to make a warranty claim, contact Customer Service at 1-800-888-0127 for return authorization and
instructions.
THE FOREGOING LIMITED WARRANTIES ARE EXCLUSIVE AND ARE GIVEN AND ACCEPTED IN LIEU OF
ANY AND ALL OTHER WARRANTIES EXPRESS OR IMPLIED, INCLUDING WITHOUT LIMITATION, IMPLIED
WARRANTIES OF MERCHANTABILITY AND FITNESS FOR A PARTICULAR PURPOSE, AND ALL OTHER
REMEDIES. MARSHALLTOWN’S TOTAL LIABILITY ARISING OUT OF SUPPLYING AND THE USE OF THE
EQUIPMENT, WHETHER BASED ON A CLAIM OF WARRANTY, NEGLIGENCE, OR OTHERWISE, SHALL NOT
EXCEED THE COST PAID BY YOU FOR THE EQUIPMENT.

4 of 16 104 S. 8th Ave. Marshalltown, IA Phone 800-888-0127 / 641-753-0127 • Fax 800-477-6341 / 641-753-6341 www.MARSHALLTOWN.com WS3664
COMMON COMPONENTS
REF # DESCRIPTION REF DESCRIPTION
1 START/STOP SWITCH 11 DRIVE SHAFT
2 ENGINE 12 VIBRATION DAMPENERS
3 RECOIL STARTER 13 BLADE
4 OIL CAP 14 ECCENTRIC WEIGHT COVER
5 GAS CAP 15 FRAME
6THROTTLE LEVER 16 LIFTING BAR
7 HANDLE BAR MOUNTING BLOCKS TACHOMETERHOUR METER
8 HANDLE BARS 18 BOARD MOUNTING PLATE
9 ADJUSTABLE HAND GRIPS 19 THROTTLE CABLE (NOT PICTURED)
10 KICKSTAND 20 AIR FILTER
6
9
8
20
5
3
16
2
4
10
15
18
13
14
12
11
117
7

5 of 16
104 S. 8th Ave. Marshalltown, IA Phone 800-888-0127 / 641-753-0127 • Fax 800-477-6341 / 641-753-6341 www.MARSHALLTOWN.comWS3664
ASSEMBLY INSTRUCTIONS
Step 1 – Remove the 4 hex screws (A) that hold down
the two handle mounting blocks.
Step 2 – Slide kickstand arm onto kickstand end and
fasten with nut & bolt (B) as shown.
Step 4 – Making sure all mounting block and frame holes
are aligned, insert hex screws and tighten with ⁄"
wrench or socket.
Step 3 – Place handle bars into mounting blocks, making
sure handle bars are centered evenly across the
mounting blocks.
INSTALLING HANDLE BARS AND KICKSTAND
ATTACHING BLADE
Attach blade as shown, making sure the blade is
positioned on the “back side” of the base casting with
blade spacers (A) on both sides of the blade.
Make sure bolts are tight before each use.
! !
Assembly is easy, following these steps:
AB

6 of 16 104 S. 8th Ave. Marshalltown, IA Phone 800-888-0127 / 641-753-0127 • Fax 800-477-6341 / 641-753-6341 www.MARSHALLTOWN.com WS3664
INSTALLING THROTTLE CABLE
Step 1 – Remove carburetor cover by pressing clips.
Step 4 – Attach the throttle lever to the “T” grip handle,
as shown above.
Step 3 – Fasten the throttle cable as shown. Make sure
there is a nut on each side of plastic fitting. Make sure the
cable does not work itself out of the plastic fitting while
tightening.
Step 2 – The throttle has a rotating silver peg (A) with a
slot on one side of it. One end of the throttle cable has a
metal barrel (B) that fits into this slot. Insert barrel into
the slot so when the throttle cable is pulled, it will pull the
throttle open (toward the base plate of the screed).
B
A

7 of 16
104 S. 8th Ave. Marshalltown, IA Phone 800-888-0127 / 641-753-0127 • Fax 800-477-6341 / 641-753-6341 www.MARSHALLTOWN.comWS3664
Step 7 – Secure throttle cable using clips, as shown
above.
Step 6 - Once cable is through throttle lever, return the
lever to the “idle” position shown above. Using pliers, pull
all extra slack out of the cable, making sure you are not
actually opening the throttle at the carburetor. Once all
slack is removed, tighten locking screw.
NOTE: the plastic housing of the throttle cable will fit up
into the throttle cable housing.
Step 5 – Thread the exposed metal end of the throttle
cable into the throttle lever. The lever will need to be
“opened” to expose the hole it fits into. Back out the set
screw to allow the cable to pass through.
INSTALLING THROTTLE CABLE

8 of 16 104 S. 8th Ave. Marshalltown, IA Phone 800-888-0127 / 641-753-0127 • Fax 800-477-6341 / 641-753-6341 www.MARSHALLTOWN.com WS3664
MACHINE ADJUSTMENTS
CAUTION
Always make sure engine is stopped with switch in "OFF" position before making adjustments.
!!
ADJUSTABLE
HANDLES
Your Shockwave™ 2.0 screed has handles that can be
adjusted for a customized fit.
The height of the handle can be adjusted right below the
motor.
ADJUSTABLE
GRIPS
The grips can also be moved to accommodate wider
and narrower grips, as well as flipped to the inside of the
machine for an even narrower grip.
The pitch of the grips can be adjusted 360˚ vertically.

9 of 16
104 S. 8th Ave. Marshalltown, IA Phone 800-888-0127 / 641-753-0127 • Fax 800-477-6341 / 641-753-6341 www.MARSHALLTOWN.comWS3664
Check and retighten eccentric
weights Every 10 hours or every month
Check oil level Before each use
Change engine oil First month or 10 hrs. - 6 mo. or 50 hrs
after
Check fuel level Before each use
Inspect air filter Before each use
Replace air filter Every 25 hours or every 3 months
Spark plug - check and adjust Every 100 hours or 1 year
Spark plug - replace Every 300 hours or 2 years
Cooling fins Every 50 hours
Electronic connections Before each use
Model Number SW200H
Drive System Flexible Shaft
Weight 31.5 lbs. (14.3 kg)
Blade Lengths 4, 4.5, 6, 8, 10, 12, 14, 16'
1.2, 1.8, 2.4, 3, 3.7, 4.3, 4.9 M
Blade Weight 1.85 lb./ft. 2.75 (kg/m)
Engine Type 4-stroke, overhead cam, single cylinder
Engine Make Honda
Engine Model GX35
Engine Horsepower 1.6 hp (1.2 kW) @ 7,000 RPM
Engine Displacement 2.18 cu-in (35.8 cm3)
Spark Plug CM5H (NGK)
CMR5H (NGK)
Spark Plug Gap 0.60 - 0.70 mm
(0.024 - 0.028 in)
Engine Speed - Idle 3,100 ± 200 RPM
Oil Type - Engine SAE 10W-30 (refer to engine manual)
Oil Capacity - Engine 0.11 qt (3.5 oz., 0.10 L)
Fuel Type Pump octane rating 86 or higher (refer to engine manual)
Fuel Tank Capacity 0.166 US gal (0.63 L)
The Shockwave™ 2.0's hour meter is a
great way to keep track of maintenance
schedules and track service life.
TECHNICAL DATACAPACITIES
CAUTION
Your Shockwave™ 2.0 ships with a pre-measured bottle of oil (3.5 oz).
Do not at anytime have more than 3.5 oz. of oil in the engine. Too much oil will foul
out the spark plug resulting in an engine that is hard to start and keep running.
!!
MAINTENANCE

10 of 16 104 S. 8th Ave. Marshalltown, IA Phone 800-888-0127 / 641-753-0127 • Fax 800-477-6341 / 641-753-6341 www.MARSHALLTOWN.com WS3664
PARTS BREAKDOWN
REPLACEMENT PARTS INDEX
EDI PART# DESCRIPTION DETAILS INCLUDED
13308 13308 HANDLES WITH GRIPS 17, 18, 47
13309 13309 GRIPS 47
13310 ENG-HONDA HONDA ENGINE 1, 44
13312 13312 THROTTLE LEVER 46
13313 13313 THROTTLE CABLE 50
13314 13314 HANDLEBARS 3
13315 13315 HANDLEBAR CLAMPS W/HARDWARE 2, 36
13316 13316 HANDLEBAR CLAMP HARDWARE ONLY 36
13317 13317 ON/OFF SWITCH W/WIRES 6, 51
13318 13318 ON/OFF SWITCH WIRES 51
13319 13319 TACHOMETER 5, 45
13324 13324 CLUTCH 15, 44
13330 13330 ECCENTRIC WEIGHT & HARDWARE 8, 9, 11, 12, 31
13331 13331 ECCENTRIC WEIGHT HARDWARE ONLY 9, 11, 12, 31
13333 13333 BLADE LOCKING HARDWARE 19, 32, 42, 43
13334 13334 DRIVE SHAFT 15
32858 SW200FR REPLACEMENT FRAME 2.0 26, 27, 28, 35, 36, 37, 38
32859 SW200MB MACHINE BASE 2.0 4
32860 SW200VD VIBRATION DAMPENING KIT 7, 37
32861 SW200KICK KICKSTAND 21, 22, 23, 24, 25, 34, 36,
37, 39, 40, 41, 49
32862 SW200EC ECCENTRIC COVER WITH HARDWARE 29, 33
13323 13323 DRIVE TRAIN 10, 13, 14, 16, 30
BLADE SIZE CHART
EDI Part # SIZE-FT. SIZE-M
32403 32403 4 1.2
32404 32404 4.5 1.37
32405 32405 6 1.8
32406 32406 8 2.4
32407 32407 10 3.0
32408 32408 12 3.7
32409 32409 14 4.3
32410 32410 16 4.9
32411 32411 16 4.9
DET. QTY. DESCRIPTION
1 1 GX35 HONDA MOTOR
2 8 HANDLEBAR CLAMP
3 1 HANDLEBAR ASSEMBLY
4 1 MACHINE BASE
5 1 HOUR METER
6 1 ON/OFF SWITCH
7 4 VIBRATION ISOLATOR
8 1 ECCENTRIC WEIGHT
9 1 LOCK WASHER
10 1 ECCENTRIC SHAFT
11 1 ECCENTRIC TIGHTENING CAP BOLT
12 1 WEIGHT TIGHTENING CAP
13 1 LOWER BEARING HOUSING
14 1 COUPLING DRIVE SHAFT
15 1 DRIVE SHAFT (NOT PICTURED)
16 1 CLUTCH
17 1 HANDLEBARS, L-GRIP
18 1 HANDLEBARS, T-GRIP
19 2 BLADE MOUNTING LOCKNUT
20 1 BLADE
21 1 KICKSTAND END
22 1 KICKSTAND ARM
23 2 KICKSTAND EYEBOLT
24 1 KICKSTAND BUMPER
25 1 EXTENSION SPRING
26 1 UPPER FRAME
27 1 LOWER FRAME
28 1 ENGINE MOUNTING PLATE
29 1 ECCENTRIC COVER CAP
30 3 DRIVETRAIN MOUNTING BOLT
31 1 ECCENTRIC WEIGHT LOCKNUT
32 2 BLADE MOUNTING BOLT
33 4 ECCENTRIC SCREW CAP
34 2 KICKSTAND BRACKET MOUNTING BOLT
35 4 FRAME MOUNTING BOLT
36 16 ⁄" -20 BOLT
37 16 ⁄” -20 LOCKNUT
38 4 CAP PLUG (NOT PICTURED)
39 1 KICKSTAND BRACKET, REAR
40 1 KICKSTAND BRACKET, FRONT
41 5 #10-24 LOCKNUT
42 4 BLADE MOUNTING WASHER
43 2 BLADE MOUNTING LOCK WASHER
44 4 ENGINE MOUNTING SCREW
45 2 TACHOMETER MOUNTING SCREW
46 1 THROTTLE LEVER
47 2 HANDLEBAR GRIP
48 2 BLADE SPACER
49 1 KICKSTAND STOP BOLT
50 1 THROTTLE CABLE (NOT PICTURED)
51 1 ON/OFF SWITCH WIRES (NOT PICTURED)

11 of 16
104 S. 8th Ave. Marshalltown, IA Phone 800-888-0127 / 641-753-0127 • Fax 800-477-6341 / 641-753-6341 www.MARSHALLTOWN.comWS3664
PARTS BREAKDOWN
DETAIL A
SCALE 1 / 5
A
DESCRIPTIONQTY.DET.
GX35 HONDA MOTOR11
HANDLEBAR CLAMP82
HANDLEBAR ASSEMBLY13
MACHINE BASE14
HOUR METER15
ON/OFF SWITCH16
VIBRATION ISOLATOR47
ECCENTRIC WEIGHT18
LOCK WASHER19
ECCENTRIC SHAFT110
ECCENTRIC TIGHTENING CAP BOLT111
WEIGHT TIGHTENING CAP112
LOWER BEARING HOUSING113
COUPLING DRIVE SHAFT114
DRIVE SHAFT (NOT PICTURED)115
CLUTCH116
HANDLEBARS, L-GRIP117
HANDLEBARS, T-GRIP118
BLADE MOUNTING LOCKNUT219
BLADE120
KICKSTAND END121
KICKSTAND ARM122
KICKSTAND EYBOLT223
KICKSTAND BUMPER124
EXTENSION SPRING125
UPPER FRAME126
LOWER FRAME127
ENGINE MOUNTING PLATE128
ECCENTRIC COVER CAP129
DRIVETRAIN MOUNTING BOLT330
ECCENTRIC WEIGHT LOCKNUT131
BLADE MOUNTING BOLT232
ECCENTRIC CAP SCREW433
KICKSTAND BRACKET MOUNTING BOLT234
FRAME MOUNTING BOLT435
1/4"-20 BOLT1636
1/4"-20 LOCKNUT1637
CAP PLUG438
KICKSTAND BRACKET, REAR139
KICKSTAND BRACKET, FRONT140
#10-24 LOCKNUT541
BLADE MOUNTING WASHER442
BLADE MOUNTING LOCK WASHER243
ENGINE MOUNTING SCREW444
TACHOMETER MOUNTING SCREW245
THROTTLE LEVER146
HANDLEBAR GRIP247
BLADE SPACER248
KICKSTAND STOP BOLT149
THROTTLE CABLE (NOT PICTURED)150
ON/OFF SWITCH WIRES151
THIS PRINT DISCLOSES SUBJECT MATTER IN WHICH MARSHALLTOWN COMPANY HAS PROPRIETARY RIGHTS. THE RECEIPT OR
POSSESSION OF THIS PRINT DOES NOT CONFER, TRANSFER OR LICENSE THE USE OF THE DESIGN OR TECHNICAL INFORMATION SHOWN
HEREIN. REPRODUCTION OF THIS PRINT OR ANY INFORMATION CONTAINED HEREIN OR MANUFACTURE OF ANY ARTICLE HEREFROM,
FOR DISCLOSURE TO OTHERS, IS FORBIDDEN, EXCEPT BY SPECIAL WRITTEN PERMISSION FROM MARSHALLTOWN COMPANY.
UNLESS OTHERWISE SPECIFIED:
ALL DIMENSIONS ARE IN INCHES [MILLIMETERS]
HEAT-TREAT
[.5]
[.013]
-
[.12]
GENERAL UNSPECIFIED TOLERANCES
SUPPLIER VERIFICATION IS
REQUIRED PRIOR TO APPROVAL
DATE
DWN.
BY
CK.
BY
APVD.
BY
SCALEE.D.I.
NO.
PART
NO.
DIE NO.
GA. NO.
MACH. NO.
FIXT. NO.
SHEET
OF
DRAWING NO. RE V.
MATERIAL
DATE DATE
TITLE:
REV. REVISION DESCRIPTION DATE APVD.
°
C
#
`.0005
`.005
`.010
`-
.XXX
.XX
.XXXX
X
CRITICAL DIMENSION / NOTE
`1/32FRACTION:ANGLE: `.5
DECIMAL: in. [mm]
.X`.020 [.25]
1 : 9 -
1 1
SHOCKWAVE 2.0 - EXPLODED BOM BREAKDOWN
N/A
nbrand
11/15/2022
32856 SW 2.0
N/A
N/A
V7C:\VaultLocal\Public\ARWorkingDirectory\HSM\VibratoryScreed\Shockwave2.0EXPVIEWFORMANUAL.idw
N/A
SW200H
1
46
36 2
17
47
18
32
42
36
6
45
35
10
13
14
15
16
44
5 3
2
24
20
28
26
41
39
36
40
37
25
23
37
41
19
43 42
7
4
8
31
12
9
11
30
29
33
49
48
34
21
22
27
DETAIL A
SCALE 1 / 5
A
DESCRIPTIONQTY.DET.
GX35 HONDA MOTOR11
HANDLEBAR CLAMP82
HANDLEBAR ASSEMBLY13
MACHINE BASE14
HOUR METER15
ON/OFF SWITCH16
VIBRATION ISOLATOR47
ECCENTRIC WEIGHT18
LOCK WASHER19
ECCENTRIC SHAFT110
ECCENTRIC TIGHTENING CAP BOLT111
WEIGHT TIGHTENING CAP112
LOWER BEARING HOUSING113
COUPLING DRIVE SHAFT114
DRIVE SHAFT (NOT PICTURED)115
CLUTCH116
HANDLEBARS, L-GRIP117
HANDLEBARS, T-GRIP118
BLADE MOUNTING LOCKNUT219
BLADE120
KICKSTAND END121
KICKSTAND ARM122
KICKSTAND EYBOLT223
KICKSTAND BUMPER124
EXTENSION SPRING125
UPPER FRAME126
LOWER FRAME127
ENGINE MOUNTING PLATE128
ECCENTRIC COVER CAP129
DRIVETRAIN MOUNTING BOLT330
ECCENTRIC WEIGHT LOCKNUT131
BLADE MOUNTING BOLT232
ECCENTRIC CAP SCREW433
KICKSTAND BRACKET MOUNTING BOLT234
FRAME MOUNTING BOLT435
1/4"-20 BOLT1636
1/4"-20 LOCKNUT1637
CAP PLUG438
KICKSTAND BRACKET, REAR139
KICKSTAND BRACKET, FRONT140
#10-24 LOCKNUT541
BLADE MOUNTING WASHER442
BLADE MOUNTING LOCK WASHER243
ENGINE MOUNTING SCREW444
TACHOMETER MOUNTING SCREW245
THROTTLE LEVER146
HANDLEBAR GRIP247
BLADE SPACER248
KICKSTAND STOP BOLT149
THROTTLE CABLE (NOT PICTURED)150
ON/OFF SWITCH WIRES151
THIS PRINT DISCLOSES SUBJECT MATTER IN WHICH MARSHALLTOWN COMPANY HAS PROPRIETARY RIGHTS. THE RECEIPT OR
POSSESSION OF THIS PRINT DOES NOT CONFER, TRANSFER OR LICENSE THE USE OF THE DESIGN OR TECHNICAL INFORMATION SHOWN
HEREIN. REPRODUCTION OF THIS PRINT OR ANY INFORMATION CONTAINED HEREIN OR MANUFACTURE OF ANY ARTICLE HEREFROM,
FOR DISCLOSURE TO OTHERS, IS FORBIDDEN, EXCEPT BY SPECIAL WRITTEN PERMISSION FROM MARSHALLTOWN COMPANY.
UNLESS OTHERWISE SPECIFIED:
ALL DIMENSIONS ARE IN INCHES [MILLIMETERS]
HEAT-TREAT
[.5]
[.013]
-
[.12]
GENERAL UNSPECIFIED TOLERANCES
SUPPLIER VERIFICATION IS
REQUIRED PRIOR TO APPROVAL
DATE
DWN.
BY
CK.
BY
APVD.
BY
SCALEE.D.I.
NO.
PART
NO.
DIE NO.
GA. NO.
MACH. NO.
FIXT. NO.
SHEET
OF
DRAWING NO. REV.
MATERIAL
DATE DATE
TITLE:
REV. REVISION DESCRIPTION DATE APVD.
°
C
#
`.0005
`.005
`.010
`-
.XXX
.XX
.XXXX
X
CRITICAL DIMENSION / NOTE
`1/32FRACTION:ANGLE: `.5
DECIMAL: in. [mm]
.X`.020 [.25]
1 : 9 -
1 1
SHOCKWAVE 2.0 - EXPLODED BOM BREAKDOWN
N/A
nbrand
11/15/2022
32856 SW 2.0
N/A
N/A
V7C:\VaultLocal\Public\ARWorkingDirectory\HSM\VibratoryScreed\Shockwave2.0EXPVIEWFORMANUAL.idw
N/A
SW200H
1
46
36 2
17
47
18
32
42
36
6
45
35
10
13
14
15
16
44
5 3
2
24
20
28
26
41
39
36
40
37
25
23
37
41
19
43 42
7
4
8
31
12
9
11
30
29
33
49
48
34
21
22
27

12 of 16 104 S. 8th Ave. Marshalltown, IA Phone 800-888-0127 / 641-753-0127 • Fax 800-477-6341 / 641-753-6341 www.MARSHALLTOWN.com WS3664
HOW TO WET SCREED
SETTING ELEVATION OF SLAB
• Use grade pins (A) to set height of slab in the middle of
the pour.
• Chalk line or expansion joint sets elevation around walls.
• Form boards set elevation where there are no walls.
Blade Length
12-18 inches
A A
A A
12" - 18"
A A
A A
AA
AA
C
B
B
B
B
MAKING WET PADS
1. Using hand float, make wet pads around all grade pins (A).
NOTE: Make sure all wet pad distances are shorter than
the length of blade being used.
2. Use blade to stretch from wet pad to wet pad
forming rows (B).
3. Once rows are formed, run screed blade off of the two
rows leveling the previously untouched concrete (C) in
between.
NOTE: Height of concrete in area (C) must be slightly
higher than wet pad rows (B) prior to striking off.
Once floated, wet pads (B) and concrete (C) will all be
the same height.
1
2
3

13 of 16
104 S. 8th Ave. Marshalltown, IA Phone 800-888-0127 / 641-753-0127 • Fax 800-477-6341 / 641-753-6341 www.MARSHALLTOWN.comWS3664
HOW TO SCREED FORM TO FORM
Length of blade should overlap form boards on both
sides of the pour.
Keep bottom of blade as flat as possible while striking
off of forms.
To ensure the longest possible blade life, use the
lowest possible vibration setting in relationship to the
slump of concrete being used.
Width of Screed Blade
Width of Form
Form Board
ELEVATED
TRAILING EDGE
Form Board
ELEVATED
LEADING EDGE
KEEP SCREED BLADE FLAT
Form Board
An elevated trailing edge may provide an area for
concrete to build up resulting in a slab elevation that
is too high.
An elevated leading edge can trap rocks between the
blade and forms resulting in a slab elevation that is too
high.

14 of 16 104 S. 8th Ave. Marshalltown, IA Phone 800-888-0127 / 641-753-0127 • Fax 800-477-6341 / 641-753-6341 www.MARSHALLTOWN.com WS3664
HOW TO OPERATE
FUEL AND OIL
Make sure gas tank has plenty of 86 octane or higher gasoline.
Your 4 stroke Honda engine uses straight gasoline. NEVER
USE A GAS/OIL MIX. Empty entire bottle of provided Honda
engine oil into crank case. The maximum oil capacity is 3.5 oz.
Always lay screed down on roll cage as shown when filling gas
and oil or checking oil. NEVER OVERFILL.
STARTING
1. On a cold engine, move choke lever to CLOSED
position. To restart a warm engine leave choke in
OPEN position
2. Press priming bulb repeatedly until fuel can be
seen in the clear-plastic fuel-return tube.
3. Press On/Off Switch to the On Position.
4. Pull the starter grip lightly until you feel resistance,
then pull briskly. Repeat until engine starts.
5. If the choke lever was moved to the CLOSED
position to start the engine, gradually move it to
the OPEN position as the engine warms up.
RESTARTING A WARM ENGINE
1. Leave the choke lever in the OPEN position.
2. If there is no fuel in the clear-plastic fuel-return
tube, press priming bulb repeatedly
until fuel can be seen in the tube.
3. Press On/Off Switch to the On Position
4. Pull the starter grip lightly until you feel resistance,
then pull briskly. Repeat until engine starts.
CLOSED
OPEN
1
2
3
4

15 of 16
104 S. 8th Ave. Marshalltown, IA Phone 800-888-0127 / 641-753-0127 • Fax 800-477-6341 / 641-753-6341 www.MARSHALLTOWN.comWS3664
Once the engine is warm and running by itself with the choke
OPEN you can begin screeding concrete.
For specific instructions on Wet Screeding and Form to Form
screeding please see pages 12 and 13.
1. Begin by placing concrete within your forms slightly higher
than the forms themselves.
2. Place screed on top of concrete and start engine.
3. Increase engine RPM until the clutch engages causing the
screed to vibrate.
4. Walking backwards, begin screeding concrete.
5. Your throttle lever does not require constant contact, but
you can adjust RPM and vibration to accommodate wet or
dry concrete. Dry or low slump concrete may require
more vibration to level and screed.
6. Continue moving backwards while keeping concrete placed
in front of the blade. The roll back feature of the blade will
help keep concrete from sliding over the blade.
Concrete placed too high may slide over the board! This
could make the screed too hard to pull and result in a slab
that is out of level.
OPERATING ON WET CONCRETE
DO NOT OVER VIBRATE CONCRETE
The following are signs of too much vibration:
!!
• Excessive concrete splatter
• Blade sinking below wet pads
• Ripple or “wake marks” following the blade
• Concrete easily sliding underneath form boards causing dips along the form edge
Always remember, the less vibration the better. Use only enough vibration to be able to
comfortably pull screed backwards, leaving a smooth, level surface.

104 S. 8th Ave., Marshalltown, IA
Phone 800-888-0127 / 641-753-0127
Fax 800-477-6341 / 64 1-753-6341
www.MARSHALLTOWN.com
WS3664
This manual suits for next models
1
Table of contents
Other Marshalltown Construction Equipment manuals
Popular Construction Equipment manuals by other brands

Dynapac
Dynapac CP224 instruction manual

Paragon Pro
Paragon Pro Tele-Tower 1101-22 Operator's manual

Kruger
Kruger HAP manual

Greenheck
Greenheck GPIA- 23.5-32G12-G Installation, operation and maintenance manual

Parkside
Parkside PFMR 1400 D3 Translation of the original instructions

WilTec
WilTec 62022 Operation manual