MASSCOOL MP-1372RS User manual

High Definition Media Home Theatre
MP-1372RS USER MANUAL

High Definition Media Player User Manual
2
Table of Contents
1. Before you get started ........................................................................................................................................................................................... 3
1.1 Safety Instruction ........................................................................................................................................................................................ 3
1.2 Specification ................................................................................................................................................................................................ 4
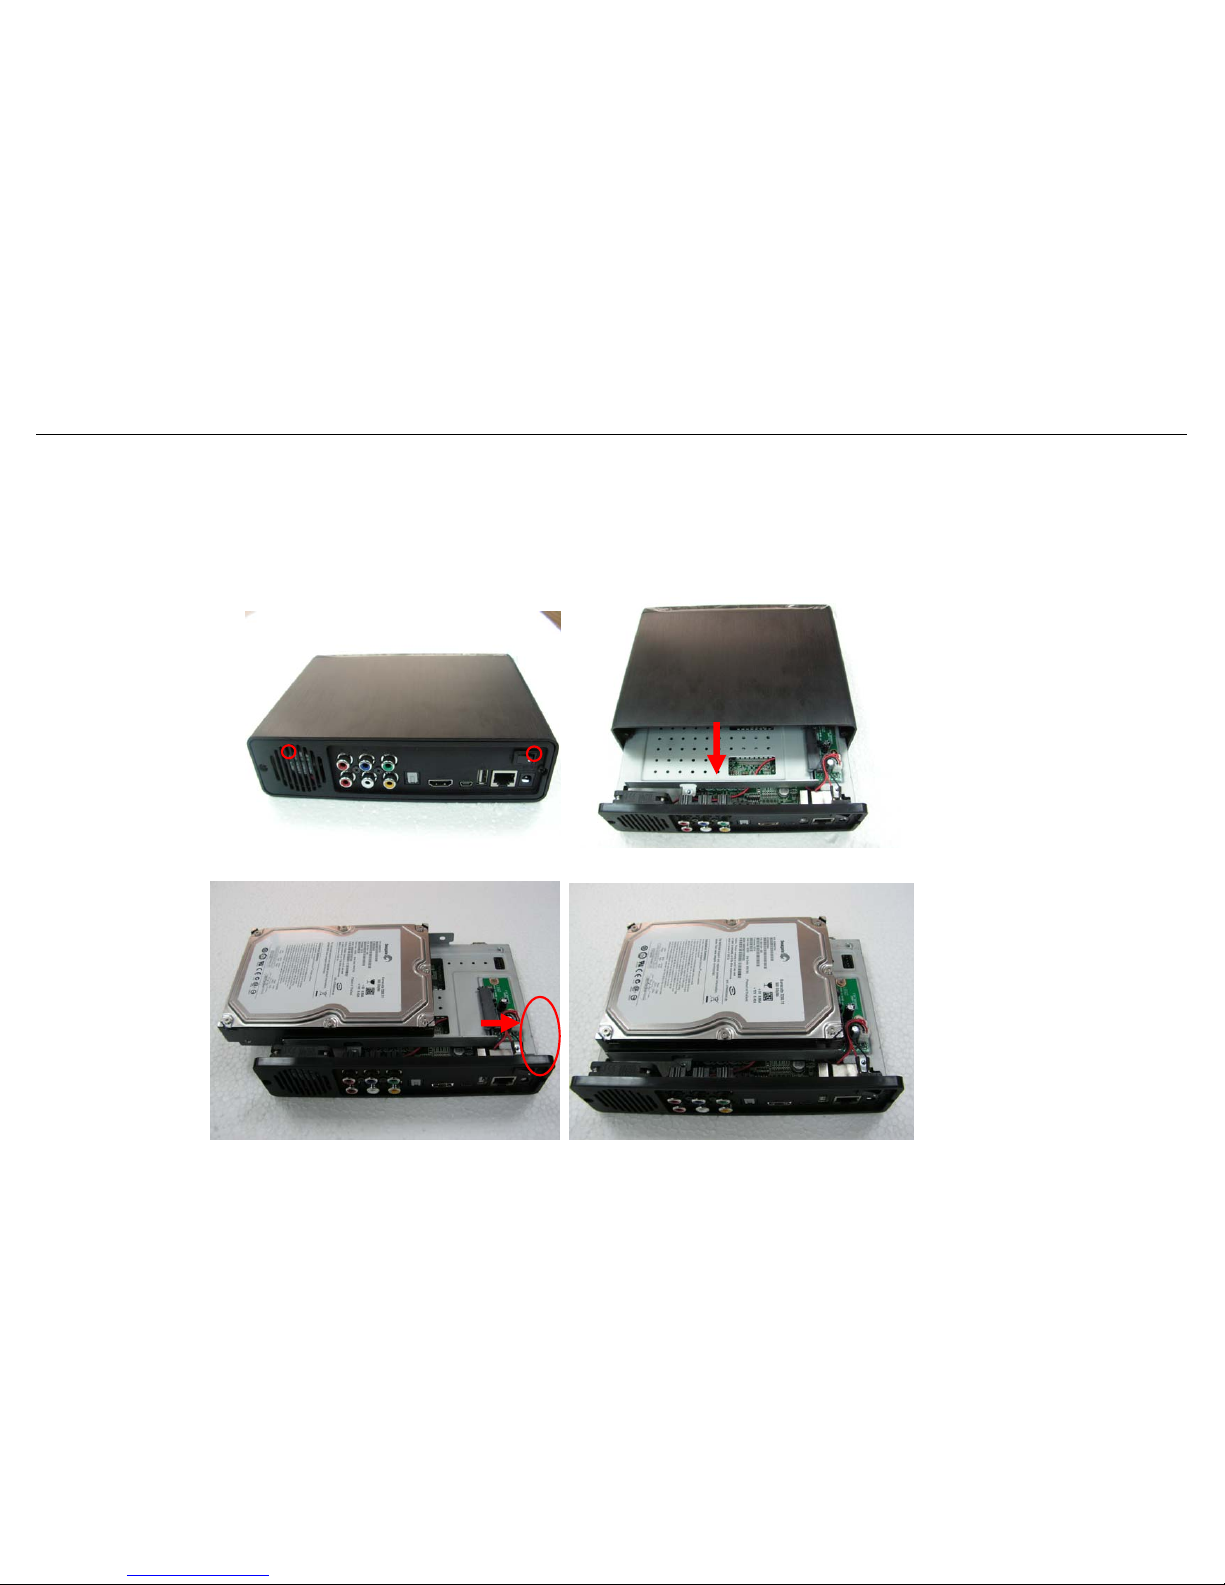
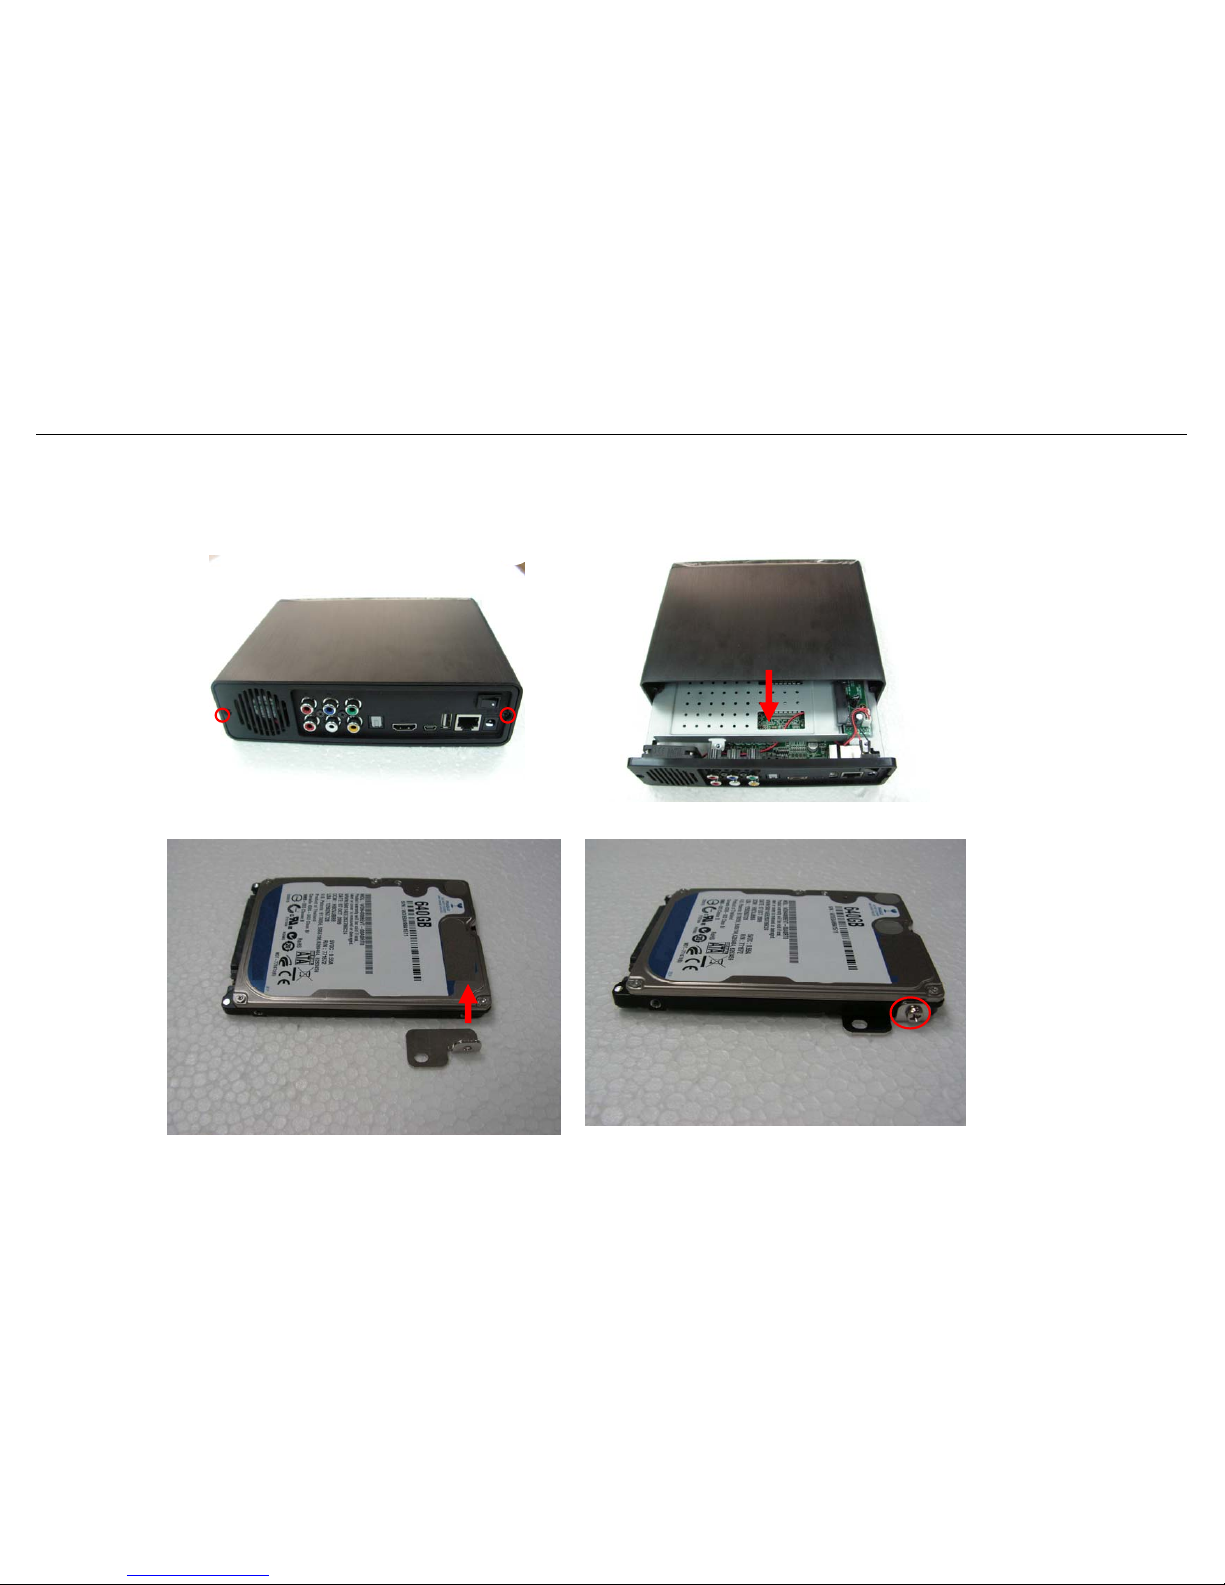
1.3 Package Contents ....................................................................................................................................................................................... 6
2Easy Installation Guide.......................................................................................................................................................................................... 7
2.1 Front / Back Panel ....................................................................................................................................................................................... 7
3Using Media Player .............................................................................................................................................................................................. 13
3.1 Remote Control Introduction.................................................................................................................................................................... 13
3.2 Getting Started........................................................................................................................................................................................... 14
3.2.1 Connect Media Player to your TV.................................................................................................................................................. 14
3.2.2 Initiate Media Player ....................................................................................................................................................................... 14
3.2.3 Setup................................................................................................................................................................................................ 15
3.2.4 Browser & Play ............................................................................................................................................................................... 21
4. Transcoding Software ........................................................................................................................................................................................ 29
4.1 Install and run under Transcode Server ................................................................................................................................................ 29
4.2 Adding Share Folders on PC.................................................................................................................................................................... 30
4.3. The ways connect to File Sharing folders and BT download management ....................................................................................... 31
4.3.1 Set up the media player ................................................................................................................................................................. 32
4.3.2 Connect to File Sharing Folder...................................................................................................................................................... 32
4.3.3 Connect to BT Download Management ........................................................................................................................................ 32
4.3.4 Account Management .................................................................................................................................................................... 36

High Definition Media Player User Manual
3
1.Before you get started
1.1 Safety Instruction
1. Always unplug the power cable before inserting Hard Drive.
2. A power supply with a different voltage will damage and make void of this product warranty.
3. Keep this equipment away from humidity or any type of moisture.
4. DO NOT drop or shake the device.
5. DO NOT press or put any weight on the device.
6. DO NOT clean the device with alcohol, thinner or benzene.
Caution!!!
You will be required to format internal HDD (Chapter 3.3.2), backup entire data before formatting.

High Definition Media Player User Manual
4
1.2 Specification
■Hardware Spec.
Composite Out X 1
HDMI 1.3 Out X 1
Video Output
YPbPr Out X 1
Audio Out L/R X 1
Audio Output SPDIF(Optical) X 1
File transfer port USB 2.0 Host port 2 Ports (USB 1 / USB 2)
Data transfer
with PC
USB 2.0 mini port X 1
Exterior
Interfaces
Ethernet 10/100Mbps
RJ-45
X 1
■Wireless Dongle: (Optional)
Wireless USB Dongle WI-FI Optional
Note: Please DO NOT buy any of wireless dongle in store. Only certain USB dongle works with this device.

High Definition Media Player User Manual
5
■Software Spec.
Movie Decoding
(Video)
MPEG-1
MPEG-2
MPEG-4
DivX 3/4/5/6,
Xvid
H.264, AVC
WMV 9
FLV
Real Video
8/9/10
MPG/MPEG/DAT support up to 1080p
MPG/MPEG/VOB/ISO/IFO/TS/TP/M2TS support up to
1080p
MP4/AVI/MOV support up to 1080p
AVI/MKV/ support up to 1080p
TS/AVI/MKV/MOV/M2TS support up to 1080p
WMV support up to 1080p
FLV support up to 352x288
RM/RMVB support up to 720p
Movie Decoding
(Audio)
Dolby Digital AC3/Plus/TrueHD 5.1ch
DTSMaster Audieo 7.1ch
MPEG-I Layer 1/2/3
MPEG-II Layer 1/2
MPEG4 HE AACv2
Real Audio, AAC, LPCM
HDMI RAW/SPDIF RAW
Audio Decoding
(Music) WMA, MP3, Real Audio (RA), WAV, OGG, AAC, FLAC, asf, M3U, MKA, MP4
Multi-Media Support
Picture Format JPG, JPEG, BMP, PNG, GIF, TIFF
Note: The specification and design is subject to change without any notice.

High Definition Media Player User Manual
6
1.3 Package Contents
Media player x 1
Remote Control x 1
AAA battery x 2
DC Adaptor (12V2A) x 1
Composite Video/Stereo audio Cable x 1
USB Cable x 1
Quick Start Guide x 1
User CD Disc x 1
Screw pack x 1

High Definition Media Player User Manual
7
2 Easy Installation Guide
2.1 Front / Back Panel

High Definition Media Player User Manual
8
HDD Installation Introduce
NOTE: Installing 3.5/2.5 -inches HDD is not a necessary step if you only want to playback via USB external hard drive.
3.5 - inches
Step 1: Loose the two screws in the rear panel, and then slide out the tray
Step 2: Install 3.5” SATA HDD to the SATA connector

High Definition Media Player User Manual
9
Step 3: Lock the tow screws.
Step 4: Slide the tray back into the aluminum case and lock both screws in rear panel.

High Definition Media Player User Manual
10
2.5 – inches
Step 1: Loose the two screws in the rear panel, and then slide out the tray
Step 2: Lock a screw to connect the A part and HDD.

High Definition Media Player User Manual
11
Step 3: Install 2.5” SATA HDD to the SATA connector
Step 4: Lock a screw to connect the A part and device.

High Definition Media Player User Manual
12
Step 5: Slide the tray back into the aluminum case and lock both screws in rear panel.

High Definition Media Player User Manual
13
3 Using Media Player
3.1 Remote Control Introduction
1. POWER 16. EJECT 31. CM SKIP
2. Display 17. TITLE 32. SELECT
3. Audio 18. HOME 33. COPY
4 Number Buttons 19. TV SYSTEM
5. GOTO 20. SUBTITLE
6. Setup 21.MENU
7. Enter/ZOOM 22. VOL + / -
8. Browser 23. MUTE
9. STOP 24.REPLAY
10. PLAY 25. Navigation
11. PREV 26. RETURN
12. SLOW 27. PAUSE
13. Option 28. NEXT
14. REPEAT 29. FR/FF
15. ANGLE 30. CONFIRM
24
33
3
20
31
17
1
5
1
5
2
27 910
11
7
8
18
23
19
22
6
28
25 26
29
30
32
21
12
14
16
4

High Definition Media Player User Manual
14
3.2 Getting Started
Please make sure that you’ve installed the AAA batteries into the remote control.
3.2.1 Connect Media Player to your TV
Connect either HDMI or Composite from media player to your TV.
When connecting the HDMI cable to TV, the device will detect the highest resolution that will possibly work for
your TV.
When connecting the Composite cable (CVBS) to TV, make sure your TV system is either PAL or NTSC.
3.2.2 Initiate Media Player
After installed HDD inside for the first time, you will be required to format Hard Disk. Make sure the data
has been backup before click “OK”.

High Definition Media Player User Manual
15
3.2.3 Setup
Through main screen menu, you will be able to enter into the Setup page such as Audio, Video, Network, System and
MISC. You may press ENTER (Key 7) to access each setting.

High Definition Media Player User Manual
16
3.2.3.1 Audio
This setting is focusing on the outputs of Audio. There are 4 digital outputs, HDMI LPCM, HDMI RAW, SPDIF LPCM
and SPDIF RAW.
HDMI LPCM (2CH): When player audio output connects to TV via HDMI, the player will decode audio as
STEREO.
HDMI LPCM Multi CH: When player audio output connects to TV via HDMI, the player will decode audio as
STEREO.
HDMI RAW: When player audio output connects to amplifier via HDMI, the player will send the RAW data to
amplifier. Amplifier will decode RAW data into multiple audio channels such as 5.1 or 7.1.
SPDIF LPCM (2CH): When player audio output connects to amplifier via SPDIF, the player will decode audio as
STEREO through amplifier.
SPDIF RAW: When player audio output connects to amplifier via SPDIF, the player will send the RAW data to
amplifier. Amplifier will decode RAW data into multiple audio channels such as 5.1 or 7.1.
TIPS:
¾If you only have HDMI TV, please choose HDMI LPCM(Stereo)
¾If you have HDMI TV with HDMI amplifier, please choose HDMI RAW or HDMI LPCM(Stereo)
¾If you have HDMI TV with SPDIF amplifier, please choose SPDIF RAW or SPDIF LPCM(Stereo)

High Definition Media Player User Manual
17
3.2.3.2 Video
Aspect Ratio: Choose one that is suitable for your TV system. Pan Scan 4:3, Letter Box 4:3, 16:09.
Pan Scan 4:3 : Keep the height of wide screen, and cut off the right/left screen to fit the 4:3 TV system.
Letter Box 4:3 : Keep wide screen, and black border will be covered on the top and bottom of screen to fit the 4:3
TV.
16:9 : Choose 16:9 to fit 16:9 TV system.
TV System: Choose the right resolution of output to TV.
TV System and
Resolution
Standard
Resolution(SD)
High Definition Resolution(HD)
NTSC NTSC, 480p 720p@60Hz, 1080i@60Hz, 1080p@60Hz
PAL PAL, 576p 720p@50Hz, 1080i@50Hz, 1080p@50Hz
TIPS:
¾Only HDMI supports High Definition Resolution
¾Connect player to TV via HDMI, TV will notify player what resolution it supported. If TV doesn’t support the
resolution, it will be un-selectable
¾In case if you choose a wrong resolution and your TV screen go black, you always can connect through
CVBS to get back the right resolution.

High Definition Media Player User Manual
18
Network
Wired LAN Setup: Select to set the network settings between DHCP (AUTO) and DHCP (Manual). If you have a
network device such as Router, and it could assign IP by itself. Please select DHCP (Auto). Otherwise, please
make sure your IP address, subnet mask and default gateway, then enter them manually.
Wireless Setup (Optional): Select to set the wireless network setting. When plug-in a USB WI-FI dongle, the
player will detect the dongle automatically.
Note 1: Please try not to buy any wireless USB dongle from any store due to the dongle is restricted with certain
dongles.
Note 2: The player with WIFI dongle will only be able to recognize the WEP with Open system, and only the Key 1 will
be recognized. Also, only WPA-Personal, WPA2-Personal and WPA-AUTO Personal are recognizable for the player.

High Definition Media Player User Manual
19
3.2.3.3 System
Menu Language: Select language. There are English, Traditional Chinese, Spanish, French, Germany, Italian,
Dutch, Polish, Czech and Simplified Chinese available.
Text Encoding: This setting is to display subtitle, file name and folder name in your language. Most of the time,
Unicde UTF-8 can support many languages. However if your language is not supported, choose the most
suitable one in the menu. If wrong setting is selected, unrecognizable characters may be seen
Login Control: Select ON to enable the BT web management access control.
BT and SAMBA: To enable File Sharing and BT services.
System Update: Select this setting to update the newest firmware. Please follow the steps below.
1. Prepare a USB flash drive or USB external hard disk and connect it to PC, then copy the firmware file to the
root folder
2. Plug in USB flash drive or USB external hard disk into the USB 1 or USB 2 host port of player
3. Select System Upgrade, press OK to proceed
4. Please wait for about 5 minutes. During the upgrade procedure, please DO NOT turn off the power
5. When finish, player will reboot automatically
HDD Format: When you insert a 3.5” SATA HDD on the system, you will need to format the HDD. Press OK, the
system will format the HDD.
Restore to Default: Once you press this function, all setting will be back to default.

High Definition Media Player User Manual
20
3.2.3.4 MISC
Resume Play: Select to turn ON/OFF to resume from video once you STOP the movie.
Slide Show Timing: This function is to set the timing of picture showing on TV. There are options of OFF/2 Sec/5
Sec/10 Sec/30 Sec/1 Min/2 Min.
Transition Effect: Select effect for slide show.
Ken Burns: Default active play mode.
Background Music: Play background music during slide show.
Screen Saver: Screen saver will activate if there is no any action of browsing for 5 minutes.
Movie Preview: Select On/Off for movie preview.
Seamless Playback: Select On/Off to make the movie file (.ts) play smoothly.
Table of contents