Master Gardner S-125 User manual

The Master Gardner Company
5770 N. Blackstock Rd.
Spartanburg SC 29303
(800)746-4664
www.mastergardner.com
ASSEMBLY MANUAL
Please read all instruction prior to assembly.
Do not completely tighten screws until the assembly has been
completed. Before assembly it is recommended to set parts on
a at surface and verify that there are no missing parts.
BROADCAST SPREADER
125 lb. CAPACITY
Model S-125

2
Table of Contents
General Warnings and Rules.................................................................................3
Hazard Signal Word Definitions.............................................................................4
Controls and Features Identification ......................................................................5
Component & Hardware .................................................................................. 6,7
Assembly Instructions.......................................................................8, 9 10, 11, 12
Operation Instructions..............................................................................13, 14, 15
Spreading Instructions .........................................................................................16
Maintenance and Storage....................................................................................17
Specification ........................................................................................................17
Parts Drawing & Parts List.............................................................................18, 19
Limited Warranty..................................................................................................20

3
GENERAL WARNINGS
READ and UNDERSTAND this manual completely before using Push Spreader.
Operator must read and understand all safety and warning information, operating instructions,
maintenance and storage instructions before operating this equipment. Failure to properly operate and
maintain the push spreader could result in serious injury to the operator or bystanders.
Operation Warnings
Do not at any time carry passengers sit or stand on the spreader.
Do not allow children to play on, stand upon or climb in the spreader.
Always inspect the spreader before using to assure it is in good working condition.
Replace or repair damaged or worn parts immediately.
Always check and tighten hardware and assembled parts before operation.
Do not exceed equipment maximum load capacity of 125lb.
Avoid large holes and ditches when transporting loads.
Be careful when operating on steep grades (hill) the spreader may tip over.
Do not push close to creeks, ditches and public highways.
Do not use spreader on windy days when spreading grass seed or herbicides.
Always use caution when loading and unloading spreader.
Never tow the spreader with a motorized vehicle.
.
Crush and Cut Hazards
Always keep hands and feet clear from moving parts while operating the equipment.
Always clear and keep work area clean when operating.
Always wear safety gear, eye protection, gloves and work boots when operating the spreader.
.
WARNING
The warnings, cautions, and instructions outlined in this instruction manual cannot cover all
possible conditions or situations that may occur. It must be understood by the operator that
common sense and caution are factors which cannot be built into this product and must be supplied
by the operator.
PROP 65 WARNING
This product contains chemicals known to the state of California to cause cancer, birth defects, or
other reproductive harm.
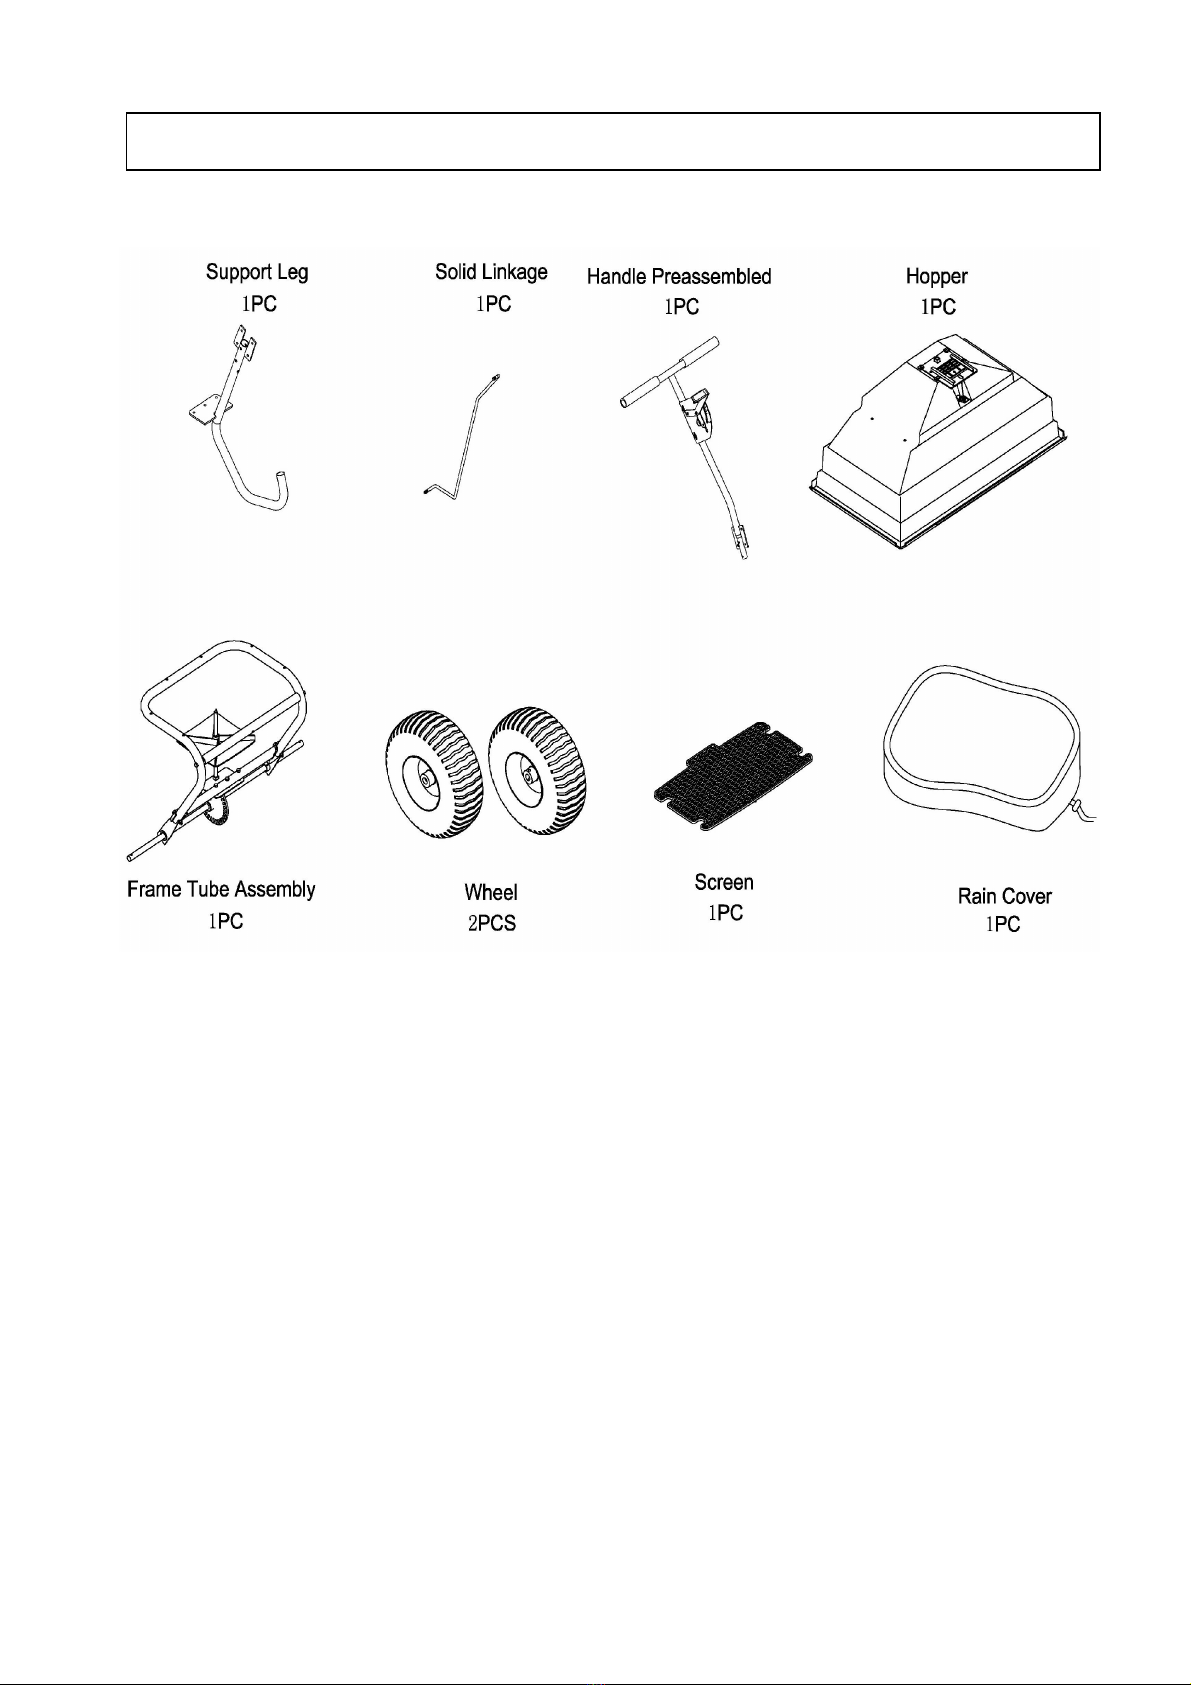
Assembly Is Required
This product requires assembly before use. See “Assembly”section for instructions. Because of the
weight and/or size of the push spreader, it is recommended that another adult be present to assist
with the assembly. INSPECT ALL COMPONENTS closely upon receipt to make sure no components
are missing or damaged.

4
Hazard Signal Word Definitions
ABOUT YOUR PUSH SPREADER
This push spreader is designed to spread a wide range of materials (Fertilizer, Grass Seed and Ice melt).
Materials such as Powders, Manure, Top Soil, Gravel, and Mulch have the wrong physical characteristics
and should not be used with this spreader. Never exceed the rated load capacity of 125lbs when
operating the spreader.
Your spreader needs to be pushed at three miles per hour, which is a brisk walking speed. Slower or
faster speeds will change the spread patterns. Wet spreading material will also change the spread pattern
and flow rate. Clean your spreader thoroughly after each use. Wash between the shut off plate and bottom
of the hopper.
Technical specifications on the push spreader are provided in the “Specifications”section of this manual.
This is the safety alert symbol. It is used to alert
you to potential personal injury hazards. Obey all
safety messages that follow this symbol to avoid
possible injury or death.
DANGER indicates an imminently hazardous
situation which, if not avoided, will result in death
or serious injury.
DANGER
WARNING indicates a potentially hazardous
situation which, if not avoided, could result in
death or serious injury.
WARNING
CAUTION indicates a potentially hazardous
situation which, if not avoided, may result in minor
or moderate injury.
CAUTION
CAUTION used without the safety alert symbol
indicates a potentially hazardous situation which,
if not avoided, may result in property damage.
CAUTION

5
Read this owner’s manual before operating the equipment. Familiarize yourself with the location and
function of the controls and features. Save this manual for future reference.
1) Handle – Pushes and moves the spreader easily.
2) Flow Control – Controls the flow of material being spread.
3) Hopper – Do not exceed rated load capacity 125lb.
4) Tires / Wheel – Do not exceed recommended rated 30PSI.
5) Impeller - Evenly distributes material.
6) Support Leg– Stabilizes load and spreader.
Controls and Features Identification
2
3
4
5
6
1

6
CAUTION
Read and follow all instructions for assembly and operation. Failure to properly assemble this
equipment could result in serious injury to the user or bystanders, or cause equipment damage.
PUSH SPREADER COMPONENT PARTS AND ASSEMBLY.
Take all parts out of the shipping crate and inspect components to ensure there are no missing pieces
before starting to assemble the push spreader follow steps 1 through 5.
TOOLS REQUIRED
•Pliers (2 Each)
•8mm Wrenches (2 Each)
•10mm Wrenches (2 Each)
•13mm Wench
•14mm Wrench
Component Parts

7
Component Parts

8
STEP 1: Installing the Wheels
1. On the left side of axle install a wheel bushing and wheel spacer into the axle.
2. Slide a wheel over the axle.
3. Put an Ø16 flat washer over the axle, insert the cotter pin through the hole and secure by bending.
4. On the right side of the axle slide a wheel bushing and the wheel spacer into the axle.
5. Put a wheel over the axle, line up the holes and insert the drive pin through sleeve and lock.
6. Put an Ø16 flat washer over the axle, insert the cotter pin through the hole and secure by bending.
NOTE: Four additional flat washers are provided for adjusting the gap between the wheels.
Assembly Instructions

9
Step 2: Assembling the Support Leg
1. Position the support leg so the J-shaped end is pointing away from the wheel assembly.
2. Insert the M8x75 hex bolt through the top hole on the support leg and slide the spacer over the bolt
end.
3. Take the support leg and insert the bolt through the upper cross bar on the mounting assembly
and loosely tighten with the M8 lock nut.
NOTE: Before tightening the bolt make sure the support leg flange and the lower cross bar
holes line up.
4. Insert M6 x 40 hex bolt through the holes in the flange and cross bar. Use the Ø6 big flat washer
and M6 lock nut and tighten all hardware.

10
STEP 3: Installing the Hopper
1. Lower the hopper over the mounting assembly, carefully line up the holes in the bottom of the
hopper with the spindle in the mounting plate of the axle.
2. Use the M6 x 40 hex bolt and Ø6 flat washer to attach the hopper to the mounting assembly and
secure with M6 lock nut.
3. Make sure the gear and pinion gear works smoothly. If not, adjust again until the gear and pinion
gear swivel smoothly.
4. Tighten all the hardware on the shaft support plate and hopper.
5. Insert the R pin through the top of the spindle.

11
STEP 4: Connecting Handle to the Support Leg
1. Slide the handle tube into the top of the support leg and align the two holes.
2. Insert M6x35 hex bots through the two holes on the support leg and tighten with the Ø6 spring
washer and M6 lock nut.
3. Insert M6x20 hex bolt through the hole in the side plate and tighten with Ø6 spring washer and M6
lock nut.

12
STEP 5: Connecting the Solid Linkage
1. Connect the solid linkage through the bottom fix plate using the Ø8 flat washer and tighten with a
M8 lock nut.
2. Connect the other end of the linkage to the flow control with an Ø8 flat washer and M8 lock nut.
3. Install the hopper screen in the bottom of the hopper.
4. Before using the spreader make sure all the hardware is tightened.
5. Use the rain cover as needed to protect material in the hopper or when spreader is being stored.

13
WARNING
Before using the push spreader, review the instructions below and safety information. Failure to
follow these instructions may result in property damage or injury to the operator or bystanders.
USING YOUR SPREADER
1. Inspect your spreader before each use. Make sure the wheels turn easily, and the gearbox moves
when the spreader is pushed. The hopper should be clean and free from cracks.
2. Spreader is designed to spread a range of materials (Fertilizer, Grass Seed and Ice melt).
Materials such as Powder, Manure, Top Soil, Gravel, and Mulch have the wrong physical
characteristics and should not be used with your spreader
3. Do not use spreader on windy days when spreading grass seed or herbicides.
4. Determine approximate square footage of the area to be covered and estimate amount of material
required. Please refer to fertilizer manufacturer’s recommendation. Break up any lumpy fertilizer
as you fill the hopper.
5. Before filling the hopper, make sure that the flow control lever is in the“0”position and the flow
control plate is closed.
6. Set the adjustable stop with the flow control lever always in the“0”position. Every time you are
ready to stop or turn back, close the flow control plate to stop dispersing the material and continue
one more stride. This reduces waste and avoids damaging the lawn with oversaturated product
coverage.
7. Follow fertilizer manufacturer’s recommended coverage rate for each product
8. To maintain the same coverage when walking at a different speed, adjust the flow rate. Reduce
the flow setting for slower speedsand increase the flow setting for higher speeds.
9. Keep the impeller plate horizontal when operating the spreader. Tilting the spreader will result in
uneven coverage.
10. Make sure the R pin is installed in the hopper before starting the spreader.
11. Always start walking prior to opening the closure plate.
12. Always close the flow control plate before turning or stopping the spreader.
13. If spreading material is accidentally deposited too heavily in a small area, soak the area thoroughly
with a garden hose or sprinkler to prevent burning of the lawn.
14. To insure consistent coverage, make sure each broadcast pattern slightly overlaps the previous
broadcast pattern.
15. When broadcasting spreading material, make sure the broadcast pattern does not hit evergreen
trees, flowers or shrubs.
16. Do not over apply spreading material. Follow the recommended coverage rate for each product.
Over application will lead to lawn damage and contamination.
Operation Instructions

14
ADJUSTING THE FLOW
1. You can move up the handle to adjust the spreader setting by following the direction of the
arrowhead. When then handle moves up to “30”, the adjustable plate is fully open, when it goes to
“0”, it’s fully closed.
2. Loosen the wing nut on the Bracket and move the adjustment lever handle up or down depending
on the amount of material required. Pushing the handle down will release more material and
pulling the handle up will stop the flow entirely.
3. Tighten the wing nut when the desired position is reached.
Operation Instructions

15
CONSISTENT COVERAGE
To insure consistent coverage, make sure each broadcast pattern slightly overlaps the previous broadcast
pattern as shown in figure below. The approximate broadcast widths for different materials are shown in
the application chart.
WARNING
Do not over apply spreading material. Follow the recommended coverage rate for each product.
Over application will lead to damage and contamination. If spreading material accidentally hits or
deposits too heavily, soak the area thoroughly with a garden hose or sprinkler to prevent burning.
Operation Instructions

16
CALCULATING AMOUNT OF MATERIAL NEEDED
To calculate the amount of fertilizer you will need to cover your lawn, divide the coverage amount listed on
the label by the weight of the fertilizer bag. For example a 10LB. bag of fertilizer with coverage of 10,000
square feet will distribute 1LB. of fertilizer every 1,000 square feet at full rate or 1/2LB. of fertilizer every
1,000 square feet at half rate. For pre-calculated rates see Chart A (Example: 25LB. bag with 15,000 sq.
ft. coverage = 1.7LB./1,000 sq. ft.). Use Chart B to find the closest spreader setting (Example:
1.7LB./1000 sq. ft. = Spreader Setting of 8).
Chart A - Square Foot Coverage per Bag*
LBS/1,000 SQ FT
Weight of Bag (LBS.)
5,000 SQ FT COVERAGE
10,000 SQ FT COVERAGE
15,000 SQ FT COVERAGE
5
1.0 LB.
0.5 LB.
0.3 LB.
10
2.0 LB.
1.0 LB.
0.7 LB.
15
3.0 LB.
1.5 LB.
1.0 LB.
20
4.0 LB.
2.0 LB.
1.3 LB.
25
5.0 LB.
2.5 LB.
1.7 LB.
30
6.0 LB.
3.0 LB.
2.0 LB.
35
7.0 LB.
3.5 LB.
2.3 LB.
40
8.0 LB.
4.0 LB.
2.7 LB.
45
9.0 LB.
4.5 LB.
3.0 LB.
50
10.0 LB.
5.0 LB.
3.3 LB.
55
11.0 LB.
5.5 LB.
3.7 LB.
*These are only estimates actual amounts may vary.
Chart B - Spreader Settings/Spread Widths
MULTI-
USAGES
LBS/1,000
SQ FT
SPREADER
SETTING
•
SMALL
PARTICLE
SPREAD
•
MEDIUM
PARTICLE
SPREAD
•
LARGE
PARTICLE
SPREAD
1
5
5-6 FT.
6-9 FT.
9-12 FT.
2
8
5-6 FT.
6-9 FT.
9-12 FT.
3
10
5-6 FT.
6-9 FT.
9-12 FT.
4
13
5-6 FT.
6-9 FT.
9-12 FT.
5
15
5-6 FT.
6-9 FT.
9-12 FT.
6
18
5-6 FT.
6-9 FT.
9-12 FT.
7
20
5-6 FT.
6-9 FT.
9-12 FT.
8
23
5-6 FT.
6-9 FT.
9-12 FT.
9
25
5-6 FT.
6-9 FT.
9-12 FT.
10
28
5-6 FT.
6-9 FT.
9-12 FT.
FERTILIZER
GRASS
SEEDS
ICEMELT
11
30
5-6 FT.
6-9 FT.
9-12 FT.
NOTE: DO NOT USE SALT. Using salt in this spreader will damage the mechanism and shorten the life of the
machine.
Spreading Instructions

17
WARNING
Improper maintenance and storage of the push spreader may void your warranty.
MAINTENANCE
•After each use clean material out of hopper.
•Rinse/dry inside and outside of the spreader after each use.
•Before operating make sure the tires have the RECOMMENDED TIRE PRESSURE 30 PSI.
•Periodically check all fasteners for tightness.
•Annually clean and lightly lubricate parts.
•Use a glossy enamel spray paint to touch up scratched or worn painted metal surfaces.
•Never exceed load capacity rating of 125lbs it will damage the spreader.
IMPORTANT:
If a part needs replacement, only use parts that meet the manufacturer’s specifications. Replacement
parts that do not meet specifications may result in a safety hazard or poor operation.
STORAGE
•Never allow material to remain in the hopper for extended periods of time.
•Before storing make sure the spreader is clean and dry for years of trouble free service.
•Store indoors or protected area during severe weather and winter months.
Load Capacity ...................................................................................................................... 125lb
Spreader Type .............................................................................................................. Broadcast
Hopper Material ..................................................................................................... Polypropylene
Hopper Dimensions ...............................................................................29 1/2” x 16 1/2” x 13 1/2”
Overall Dimensions..................................................................................... 44” x 31 1/2” x 35 1/2”
Wheel size ...............................................................................................................................15’’
Tire Pressure (PSI) ................................................................................................................... 30
Unit Weight ............................................................................................................................ 38lb
Maintenance and Storage
Specifications

18
Parts Drawing & Parts List

19
Ref#
Description
Qty
Ref#
Description
Qty
1
Hopper
1
30
Spacer
1
2
Big Flat Washer Ø6
16
31
Fixed Crossover Tube
1
3
Hex Bolt M6x40
15
32
Plastic Cap
3
4
R Pin Ø3
1
33
Support Tube
1
5
Bearing
2
34
Hex Bolt M6x35
2
6
Fixed Adjustable Plate
1
35
Handle
1
7
Active Adjustable Plate
1
36
Handle Cover
2
8
Base for Spring
1
37
Axle Bushing
2
9
Hex Lock Nut M6
22
38
Crossover Tube
1
10
Spring
1
39
Spring Pin Ø4x30
1
11
Hex Lock Nut M8
3
40
Bracket
1
12
Flat Washer Ø8
2
41
Hex Bolt M6x20
7
13
Fixed Plate for Connecting Rod
1
42
Carriage Bolt M6x25
1
14
Impeller
1
43
Teeth Lock Washer Ø8
1
15
Wheel
2
44
Connecting Plate
1
16
Cotter Pin Ø5x35
2
45
Spacer
1
17
Flat Washer Ø16
8
46
Wing Nut M6
1
18
Screen
1
47
Adjusting Handle
1
19
Axle
1
48
Handle Cover
1
20
Inner Axle Bushing
2
49
Spring Washer Ø6
7
21
Outer Axle Bushing
2
50
Nylon Washer
1
22
Rivet Ø5x8
2
51
Shaft Support Plate
1
23
Frame Tube Assembly
1
52
Rain Cover
1
24
Pinion Gear
1
53
Drive Pin
1
25
Swivel Axle
1
54
Gear (Driver)
1
26
Screw M4x20
1
55
Shaft Support Cap
1
27
Spring Pin Ø3x16
1
56
Wheel Bushing
2
28
Solid Linkage
1
57
Hex Lock Nut M5
1
29
Hex Bolt M8x75
1
58
Hex Bolt M5x40
1
Parts Drawing & Parts List
Table of contents
Other Master Gardner Spreader manuals