Master MFG Revolt Installation instructions

800.825.5397 1
800.825.5397
INSTRUCTIONS FOR ASSEMBLY,
OPERATION, SERVICING & STORAGE
RECHARGEABLE MASTER GARDENER
REVMAS-Mwww.MASTER-MFG.com
V
RE OLT
A BRAND OF MASTER MANUFACTURING

2
TABLE OF CONTENTS
SPRAYER COMPONENTS . . . . . . . . . . . . . . . . . . . . . . . . . . . . . . . . . . . . . . . . . . . . . . . . . . 4
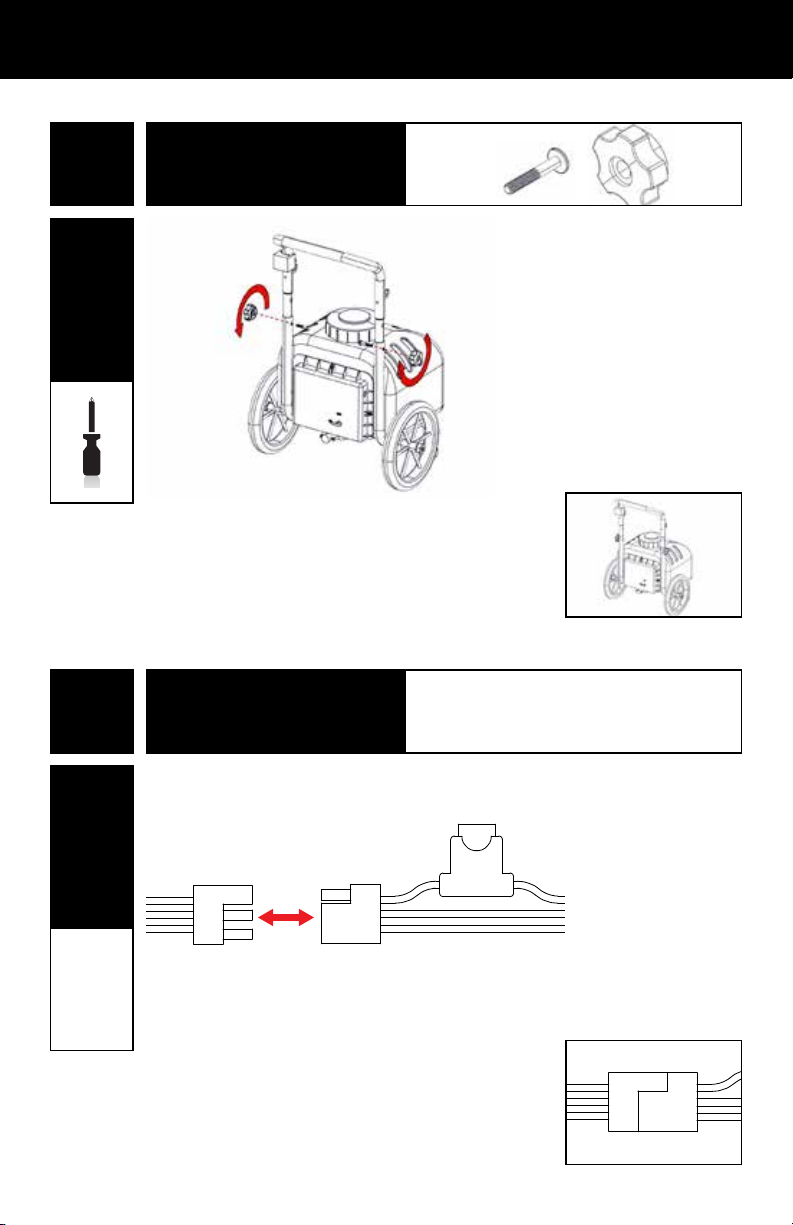
SPRAYER ASSEMBLY . . . . . . . . . . . . . . . . . . . . . . . . . . . . . . . . . . . . . . . . . . . . . . . . . . 6
IMPORTANT SAFETY . . . . . . . . . . . . . . . . . . . . . . . . . . . . . . . . . . . . . . . . . . . . . . . . . . 11
GENERAL CHEMICAL . . . . . . . . . . . . . . . . . . . . . . . . . . . . . . . . . . . . . . . . . . . . . . . . . . 12
BEFORE SPRAYING . . . . . . . . . . . . . . . . . . . . . . . . . . . . . . . . . . . . . . . . . . . . . . . . . . 13
DURING SPRAYING . . . . . . . . . . . . . . . . . . . . . . . . . . . . . . . . . . . . . . . . . . . . . . . . . . 13
AFTER SPRAYING . . . . . . . . . . . . . . . . . . . . . . . . . . . . . . . . . . . . . . . . . . . . . . . . . . 14
OPERATION - PREPARING . . . . . . . . . . . . . . . . . . . . . . . . . . . . . . . . . . . . . . . . . . . . . . . . . . 14
PREPARING SPRAYER . . . . . . . . . . . . . . . . . . . . . . . . . . . . . . . . . . . . . . . . . . . . . . . . . . 15
USING SPRAYER . . . . . . . . . . . . . . . . . . . . . . . . . . . . . . . . . . . . . . . . . . . . . . . . . . 16
SPOT SPRAYING . . . . . . . . . . . . . . . . . . . . . . . . . . . . . . . . . . . . . . . . . . . . . . . . . . 16
BROADCAST SPRAYING . . . . . . . . . . . . . . . . . . . . . . . . . . . . . . . . . . . . . . . . . . . . . . . . . . 16
OPERATION - CLEANING… . . . . . . . . . . . . . . . . . . . . . . . . . . . . . . . . . . . . . . . . . . . . . . . . . . 17
TROUBLESHOOTING . . . . . . . . . . . . . . . . . . . . . . . . . . . . . . . . . . . . . . . . . . . . . . . . . . 19
TROUBLESHOOTING TABLE . . . . . . . . . . . . . . . . . . . . . . . . . . . . . . . . . . . . . . . . . . . . . . . . . . 19
SPRAYER BREAKDOWN . . . . . . . . . . . . . . . . . . . . . . . . . . . . . . . . . . . . . . . . . . . . . . . . . . 20

800.825.5397 3
IMPORTANT NOTE:
THE PURPOSE OF THIS MANUAL IS TO ASSIST YOU IN THE
ASSEMBLY, OPERATION, SERVICING AND STORAGE OF YOUR
SPRAYER. PLEASE READ THROUGH THIS MANUAL COMPLETELY
TOO FULLY UNDERSTAND HOW TO OPERATE AND MAINTAIN YOUR
EQUIPMENT. KEEP YOUR MANUAL IN A SAFE, CONVENIENT PLACE
FOR FUTURE REFERENCE. ALWAYS MENTION THE MODEL AND
PART NUMBER IN ANY CORRESPONDENCE.
INTRODUCTION
Congratulations on the purchase of your Revolt Master Gardener. This
sprayer has been manufactured to provide years of dependable and efficient
use in spraying a wide range agricultural pesticides, herbicides and other
non-flammable liquids.
Sprayers sold shall be warranted from defects in workmanship and material
when used within the service and scope for which they were designed for
a period of two years from date of purchase. Warranty covers replacement
parts ONLY.
Contact our Spraying Division for warranty parts at 800.825.5397. DO NOT
RETURN PRODUCT TO YOUR DISTRIBUTOR/DEALER. Please have original
proof of purchase, model number of sprayer and part number of part from
illustrated parts breakdown in this manual.
WARRANTY

4
PHILLIPS SCREWDRIVER
TOOLS REQUIRED
SPRAYER
COMPONENTS
Spray Gun Lance (1)
Handle Adjustment
Knob & Bolt (2)
33-100157
Sprayer Handle (1)
INCLUDED HARDWARE
Sprayer Base Assembly (1)

800.825.5397 5
Hitch Pin (1)
33-100156
Revolt Battery Pack (1)
33-100512
Battery Charger (1)
33-100513
Trailer Tongue (1)
IMPORTANT NOTE:
THE REVOLT BATTERY PACK IS NOT CHARGED PRIOR TO SHIPPING.
IT WILL REQUIRE APPROXIMATELY FOUR HOURS TO FULLY CHARGE
WITH THE INCLUDED REVOLT BATTERY CHARGER.
Cotter Pin (1)

6
TOOLS
None
Insert the Sprayer Handle into the Sprayer Base Assembly.
Make sure the Sprayer Handle is slipped through the wire clamp
that is attached to Sprayer Base Assembly.
2.
Installs Sprayer Handle on Sprayer
PARTS
Connect Battery Charger to the open hole on top of Revolt
Battery Pack.
Plug the Battery Charger into an appropriate outlet.
TOOLS
PARTS
None
1.
Charging Revolt Battery Pack
NOTE: The Revolt Series Bat-
tery Pack is not charged out
of the carton and requires
four hours to fully charge.

800.825.5397 7
PARTS
Secure Sprayer Handle to the Sprayer with Handle Adjustment
Knobs & Bolts. Tighten securely.
Use Phillips Screwdriver to tighten screw that is on the Wire Clamp
to secure wiring to frame.
TOOLS
3.
Secures Sprayer Handle to Sprayer
TOOLS
None
Locate the Wiring Harness Connectors at base of the Sprayer
Handle and exiting the back panel of the Sprayer.
Connect Wiring Harness Connectors. Ensure they are fully seated.
4.
Connects Battery Dock to Power Switch
PARTS

8
TOOLS
PARTS
None
Thread Spray Gun Nozzle onto the end of the Spray Gun Shaft.
Make sure there is an O-ring before threading onto Spray Gun
Shaft.
5.
Connects Spray Gun Shaft to Handle
NOTE: Screw hand tight to
ensure there will be no leaks
when operating.
TOOLS
None
Insert the Revolt Battery Pack into the open dock that is situated
at the bottom of the back panel of Sprayer.
A click will be heard when properly attached.
6.
Installs Revolt Battery Pack in Dock
PARTS
NOTE: Remove from
compartment by pressing the
release button on the Battery
Pack.

800.825.5397 9
PARTS
When ready for spraying, flip the Power Switch on that is located
on the Sprayer Handle.
TOOLS
7.
Turns On Power to Sprayer
TOOLS
None
Attach Trailer Tongue to the back-end of Sprayer and align holes
between both items.
Insert Hitch Pin into open holes to secure Trailer Tongue. Add
Cotter Pin into open hole of Hitch Pin to secure Hitch Pin.
8.
Installs Trailer Tongue on Sprayer
PARTS
None
NOTE: The Power Switch will
light up on the ON position. If
it doesn’t, the Battery Pack
will need to be fully charged.

10
TOOLS
None
To convert over to broadcast spraying, turn the Back Panel Valve
Switch from Off to On.
9.
Allows for Broadcast Spraying
PARTS

800.825.5397 11
• Before Using The Battery Pack & Charger: Read this operator’s manual and all labels on the
battery pack.
• Caution: To reduce risk of injury, ONLY CHARGE REVOLT BATTERY PACK WITH REVOLT SERIES
CHARGERS. Other types of batteries may burst causing personal injury and damage. Do not wire
a battery pack to a power supply plug or the DC outlet of a vehicle. Batteries will be permanently
disabled or damaged.
• Avoid Dangerous Environments: Do not charge battery pack in rain, snow, damp or wet
locations. Do not use battery pack or charger in the presence of explosive atmosphere (gaseous
fumes, dust or flammable materials) because sparks may be generated when inserting or removing
battery pack, possibly causing a fire.
• Charge In A Well Ventilated Area: Do not allow smoking or open flames near charging battery
pack. Vented gases may explode.
• Do Not Burn Or Incinerate Battery Packs: Battery packs may explode, causing personal injury
or damage. Toxic fumes and materials are created when battery pack burns.
• Do Not Crush, Drop or Damage: Do not use a battery pack or charger that has received a sharp
blow, been dropped, run over, or damaged in any way.
• Do Not Disassemble: Incorrect reassembly may result in the risk of electric shock, fire or
exposure to battery chemicals.
• Battery Chemicals Cause Serious Burns: Never allow contact with skin, eyes or mouth. If a
damaged battery pack leaks battery chemicals, use rubber or neoprene gloves to dispose of it.
If skin is exposed to battery fluids, wash with soap and water, and rinse with vinegar. If eyes are
exposed to battery chemicals, immediately flush with water for 20 minutes and seek medical
attention. Remove and dispose of contaminated clothing.
• Do Not Short Circuit: A short circuited battery pack may cause a fire, personal injury, and
product damage. A batter pack will short circuit if a metal object makes a connection between the
positive and negative contact on a battery pack. Do not place a battery pack near anything that
may cause a short circuit such as coins, keys or nails in your pocket.
• Disposing of Revolt Battery Packs: Lithium-Ion Batteries need to be disposed of according to
federal, state and local regulations. Contact a recycling agency in your area for recycling locations.
Even discharged battery packs contain some energy. Before disposing, use electrical tape to cover
the terminals to prevent the battery pack from shorting, which could cause a fire or explosion.
WARNING
Read and understand all instructions. Failure to follow all instructions listed below,
may result in electric shock, fire and/or serious personal injury.
SAVE THESE INSTRUCTIONS

12
OPERATION - IMPORTANT SAFETY INFORMATION
Now that you have assembled your sprayer, there is some important safety
and health information you need to know with regard to handling and
spraying chemicals.
TAKE NOTE! THIS SAFETY ALERT SYMBOL FOUND THROUGHOUT
THIS SECTION IS USED TO CALL YOUR ATTENTION TO
INSTRUCTIONS INVOLVING YOUR PERSONAL SAFETY AND THE
SAFETY OF OTHERS. FAILURE TO FOLLOW THESE INSTRUCTIONS
CAN RESULT IN PROPERTY DAMAGE, INJURY OR DEATH.
GENERAL CHEMICAL SAFETY
WARNING
Pesticides are hazardous chemicals. Heed the warning below and follow all
instructions carefully. Improper handling of chemicals can result in serious injury or
illness, or cause damage to humans, animals or the general environment.
NOTE: THE USE OF CORROSIVE OR FLAMMABLE
CHEMICALS IN THIS SPRAYER IS HAZARDOUS AND WILL ALSO
VOID YOUR WARRANTY.

800.825.5397 13
BEFORE SPRAYING
• Sprayer Prep: ALWAYS inspect and prepare the sprayer before use according to the
directions provided in this manual.
• Keep Sprayer Off: Do not turn power on to the sprayer until ready to spray in order to
avoid unintentional spray release.
• Broadcast Nozzle Down: Make sure the broadcast nozzle is oriented to spray straight
down before starting the sprayer.
• Wind Speed: NEVER spray when wind exceeds 4 MPH in order to minimize spray drift.
• Clear Area: ALWAYS keep work area clear of people and pets. Post warning notices to
restrict access by the public for the period recommended on chemical label.
• Operator Age: To operate this sprayer, you must be 16 years of age or older. Pesticides
are extremely toxic to children.
• Chemical Label: ALWAYS READ and FOLLOW all chemical label instructions.
• State & Federal Laws: ALWAYS refer to state and federal regulations with regard to the
application of a particular chemical you plan to use.
• Flammables: NEVER use any flammable chemicals, such as diesel fuel, in the sprayer.
• Corrosives: DO NOT use corrosive chemicals, such as bleach, in the sprayer. They
can weaken the sprayer and its parts, resulting in leaks. Always check with chemical
manufacturer for compatibility with sprayer.
• Emergency Procedures: Before handling chemicals, carefully review the “Statement of
Practical Treatment” on the chemical label.
DURING SPRAYING
• Over Application: DO NOT over apply pesticide. Apply at a rate recommended by
chemical manufacturer. Excess pesticide can be dangerous to humans, damage
desirable plants, and contaminate soil and water sources.
• Never Point Spray Gun: NEVER point the spray gun at people or animals.
• Children & Pets: ALWAYS exercise extra caution when spraying near areas
accessible to children and pets.
• Eating & Smoking: DO NOT eat, drink, smoke, rub your eyes or touch any part of
your bare skin while handling chemicals and spraying.
• Heat & Flames: DO NOT spray near open flames or sources of heat.
• Spills: ALWAYS clean up spills immediately per instructions on the chemical label.
• Unattended: ALWAYS turn off vehicle and set brake or block wheels, turn off power
to sprayer, and relieve system pressure before leaving sprayer unattended.

14
AFTER SPRAYING
• Clean Sprayer: ALWAYS clean the sprayer immediately after use according to the
directions provided in this manual.
• Decontaminate: ALWAYS decontaminate yourself immediately after you are
finished with spraying and handling chemicals. Wash all exposed areas of the body
with soap and water. Remove and launder clothing.
• Chemical Disposal & Storage: ALWAYS dispose or store remaining chemicals
properly as recommended on the chemical label.
• Health Monitoring: Monitor the health of operators who are frequently exposed to
pesticides, as recommended by the chemical label.
WARNING
Chemical spills, sprayer leaks, personal contamination, and poisoning are
accident situations which you may encounter. All require an immediate
response. In the event these accidents take place, follow first aid
instructions on the chemical label and contact poison control for further
advice (1-800-222-1222). If victim collapses or isn’t breathing CALL 911.
WARNING
Read the following instructions carefully for inspecting and using the sprayer.
Damaged or clogged equipment could result in leaks or uncontrolled spray.
Leaks could result in injury to the operator or bystanders from chemical
exposure, or cause damage to the environment.
OPERATION - PREPARING & USING SPRAYER
If the sprayer has been used previously, it must be prepared BEFORE EACH
SUBSEQUENT USE.
IMPORTANT NOTE:
THIS SPRAYER IS NOT CERTIFIED FOR USE IN DISPENSING POTABLE
WATER OR OTHER CONSUMABLE LIQUIDS.

800.825.5397 15
PREPARING SPRAYER
• Review Safety Information: Review safety information in this manual
and manufacturer chemical label before use.
• Sprayer Attachment: Ensure the sprayer is securely attached to a
vehicle if using trailer hitch for spraying.
• Empty Tank: Ensure the sprayer has been thoroughly flushed and
drained of all residual chemical prior to uses.
• Inspect & Test: Inspect the tank and components for any cracks or
leaks. Replace any damaged parts. IMPORTANT: After any repair, ALWAYS
test for leaks with water one final time before use.
• Check Drain Cap: Before filling tank, ensure drain cap at bottom of tank
is securely tightened.
• Protective Equipment: ALWAYS wear protective equipment as directed
on the chemical label.
• Assess Wind & Area Conditions: Before spraying, determine if wind
conditions are suitable. DO NOT spray if wind speeds are greater than 4
MPH. DO NOT spray if bystanders are in the intended area and verify that
area is in a well-ventilated outdoor area.
• Power Off: Before filling tank, make sure power to the sprayer and the
vehicle is off and brakes are set to prevent unintended movement.
• Filling Tank: Remove sprayer tank lid and add chemical/water dilatation
ratios that are called out by chemical label. Ensure chemical is thoroughly
mixed with a stirring device and then securely thread tank lid back on
sprayer tank.
USING SPRAYER

16
SPOT SPRAYING
• Spot Spraying: To spot spray, pull the gun trigger. Make sure nozzle of
gun is pointed towards vegetation in need of spraying.
• Adjustable Nozzle: Twist the spray nozzle to adjust from a straight
stream to wide pattern mist.
Note: It is not unusual for the operator to be exposed to chemical drips
while adjusting the nozzle – use chemical resistant gloves when twisting.
BROADCAST SPRAYING
• Broadcast Valve Switch: Open broadcast valve switch to allow flow
from tank to boom nozzle.
• Ensure Correct Pattern: Make sure boom nozzle is pointed straight
down. If not, loosen the nozzle retaining nut and adjust orientation of the
boom nozzle opening to point straight down.
Note: It is not unusual for the operator to be exposed to chemical drips
while adjusting the broadcast nozzle. Chemical resistant gloves should be
worn.
• Turn On Power: Flip on power switch that is located on the sprayer
handle.
• Broadcast Valve Switch: Close broadcast valve switch to prevent
accidental spray release.
• Turn On Power: Flip on power switch that is located on the sprayer
handle.
USING SPRAYER (CONTINUED)

800.825.5397 17
• Drain Tank: If there is excess pesticide left in tank, drain into a suitable
container.
Note: when draining pesticides, be sure to wear protective gear such as
rubber gloves and eye protection for increased safety.
• Unused Chemical: Properly store or dispose of unused chemical in its
original, suitable container and make sure to follow chemical manufacturer’s
recommendations and according to local hazardous waste disposal regulations.
• Flush Sprayer: Flush sprayer per the chemical manufacturer’s
recommendations.
• Decontaminate & Launder: Decontaminate yourself after handling
chemicals by removing clothing worn, washing exposed body parts with soap
and water, and laundering clothing separately from other wash.
CLEANING & DECONTAMINATING SPRAYER
WARNING
Clean-up and decontamination procedures must be followed after each use.
Improper equipment clean-up and disposal of chemicals can result in
dangerous chemical exposure to humans and the environment, as well
as equipment damage.
Personal decontamination is required after spraying to minimize unsafe
exposure to chemicals and potential illness.
OPERATION - CLEANING, DECONTAMINATING & STORAGE
When done using the sprayer, it is always important to clean the sprayer and
decontaminate yourself. Do not store the sprayer with chemicals in the tank, as it
is unsafe and could also result in damage.

18
• Add RV Anti-Freeze: Pour one gallon of RV anti-freeze into the sprayer tank.
• Spray Briefly: Turn on the pump motor and squeeze the gun trigger briefly
until fluid sprays out.
PREPARING SPRAYER FOR STORAGE
SPRAYER STORAGE
Prepare the sprayer for end-of-season storage by running RV anti-freeze through
the system. This will keep internal parts lubricated, protect against corrosion, and
keep the unit from freezing.
WARNING
The sprayer will be damaged if it freezes.
Protect the sprayer from freezing during storage by following instructions
below.
• Drain RV Anti-Freeze: Drain the RV anti-freeze that is left in the tank
through the tank drain port into a suitable container.
• Flush with Water: Fill tank with fresh water and have it run through system.
Operate spray gun and boom until the system is completely flushed. Be sure to
set up containers to capture the flushing of the RV anti-freeze.
• Disposal: Dispose of RV anti-freeze and flush water properly.
REMOVING SPRAYER FROM STORAGE
IMPORTANT NOTE:
ALLOWING YOUR SPRAYER TO FREEZE, WITHOUT TAKING
PROPER WINTERIZATION STEPS, VOIDS YOUR WARRANTY.

800.825.5397 19
Here you will find solutions for some of the most common issues users have with sprayers.
PROBLEM CAUSE SOLUTION
Pump Will Not Prime Out of Product Refill Supply Container
Pump Will Not Turn On Battery Not Connected Check Battery Connection
Low Voltage Check Voltage
Fuse Blown Replace Fuse
Low Pressure or Flow Worn Spray Gun Nozzle Replace Spray Gun
Worn Boom Nozzle Replace Boom Nozzle
Inlet Air Leak Tighten Fittings or Replace Cracked Fittings
Low Voltage Check Voltage
Pump Leaks Loose Fasteners Tighten Fasteners
Pump Seals Degraded Replace Pump
Poor Spray Distribution Worn Spray Gun Nozzle Replace Spray Gun
Pump Cycles While Not Spraying Leak In The System Tighten Leaking Hose Clamps, Fittings or Replace Spray Gun
Low Voltage Check Voltage
Air Trapped In System Purge Air From System
Battery Pack Won't Charge Battery Not Connected To Charger Connect Battery Pack To Charger Until Red LED Appears
Charger Not Plugged In Pluge Charger Into Working Outlet
Surronding Air Temperature Too Hot or
Cold
Move Charger & Battery Pack To Air Temperature of 40 Deg or
Below 105 Deg
Bad Charger Replace Charger
Sprayer Won't Start Battery Pack Not Installed Properly Check Battery Pack Installation
Battery Pack Not Charged Charge Battery Pack with Charger Until LED Light Is Green
Power Switch Not Lighting Up Battery Pack Not Installed Properly Check Battery Pack Installation
Battery Pack Not Charged Charge Battery Pack with Charger Until LED Light Is Green
Battery Dock Not Working Check To See If Battery Pack Is Fully Charged & Connect. If Not
Working, Issue Is With Dock.
Bad Charger Replace Charger
Worn Spray Gun Nozzle Replace Spray Gun
Pump Cycles While Not Spraying Leak In the System Tighten Leaking Hose Clamps, Fittings or Replace Spray Gun
Faulty Pressure Switch Replace Pressure Switch
Low Voltage Check Voltage
Air Trapped In System Purge Air From System
Rough Operation Flexible Mounting Surface Mount Pump On Rigid Surface
Loose Pump Head Tighten Fasteners
Compressed Base Feet Decompress Base Feet
Rigid Plumbing Plumb Pump with Flexible Pluming
TROUBLESHOOTING

20
BREAKDOWN - TANK ASSEMBLY
ID PART # DESCRIPTION QTY
1 8027 Nozzle Nut - 11/16" 1
2 D77012 O-Ring - NBR 1
3 DF3.0 Gray Deflector Nozzle 1
4 NS-50 Nozzle Strainer 1
5 B12 Nozzle Body Nut - 11/16" 1
6 31-100249 Nozzle Bracket 1
7 E3412 Adapter - 3/4" MGHT x 1/2" NPT 1
8 33-100137 Groove Screw - 1/2" 6
9 GC-100-KIT Spray Gun Clips 1
10 3N34 Garden Hose Cap - 3/4" FGHT 1
11 33-103220 Gasket - 3/4" 1
12 EL1238 Drain Port 1
13
SG-4200-MG Spray Gun Assembly 1 14
15
16 TL-6B Tank Lid 1
17 TL-6B-GAS Tank Lid O-Ring 1
18 TLS-5D Tank Lid Strainer 1
19 33-103197 9 Gallon Tank 1
20 EL1238 Elbow - 11/16" MPS x 3/8" HB 1
21 350-004 Worm Gear Hose Clamps 6
22 33-103938 Braided Hose - 3/8" 1
23 33-103126 Screws - 5/8" 4
24 EF1000 Everflo 1.0GPM Pump 1
25 33-103938 Braided Hose - 3/8" 1
26 PBV-38HB Hose Barb Valve - 3/8" 1
27 33-103938 Braided Hose - 3/8" 1
Table of contents
Other Master MFG Paint Sprayer manuals

Master MFG
Master MFG PCD-E3-009B-MM MASTER GARDNER User manual

Master MFG
Master MFG 300 Gallon Space Saver User manual

Master MFG
Master MFG 12 VOLT SPOT SPRAYER Installation instructions

Master MFG
Master MFG S3O-61-060D-MM User manual

Master MFG
Master MFG New Direction User manual

Master MFG
Master MFG SAO-H3-015B-MM User manual

Master MFG
Master MFG SSBK-240 User manual

Master MFG
Master MFG MASTER GARDNER PCD‐E3‐009B‐MM User manual

Master MFG
Master MFG 90700008 User manual