mastro GFE / 40 RS Manual

SSeerrvviiccee
www.mastroshop.com
Mastro GmbH
Hüserstraße 53
59075 Hamm / Germany
+49 (0)2381/973 71–0
+49 (0)2381/973 71– 88

Manual Instructions for Gas Fryer
1
INSTALLATION, OPERATION and MAINTENANCE,
INSTRUCTIONS
Note: The picture is illustration only. We reserved the right to ma e technical changes in the interest in
progress without prior notice.
GAS FRYER
MODEL : GFE / 40 RS

Manual Instructions for Gas Fryer
2
Dear customer,
Than you for choosing our product as your trusted partner. We ensure you that we always give
choice to coo . In order to obtain maximum benefits of this appliance, please read this manual
instruction carefully. Please notice the warnings and safety instructions to eep your safety. DO
NOT use this appliance except its utility.
our best as we produce this appliance by using the finest materials. Gas Fryer is excellent
If you have any question or difficulty in operating this appliance, please contact your dealer
to acquire mechanic assistance.

Manual Instructions for Gas Fryer
3
Page
Cover ………… ............................................................................................................ 1
Preface ………… ......................................................................................................... 2
Table of Content …………… ........................................................................................ 3
General Information …………. ..................................................................................... 4
Safety Instructions ………….. ...................................................................................... 5
Technical Data ………… .............................................................................................. 7
•Data Table ………… ....................................................................................... 7
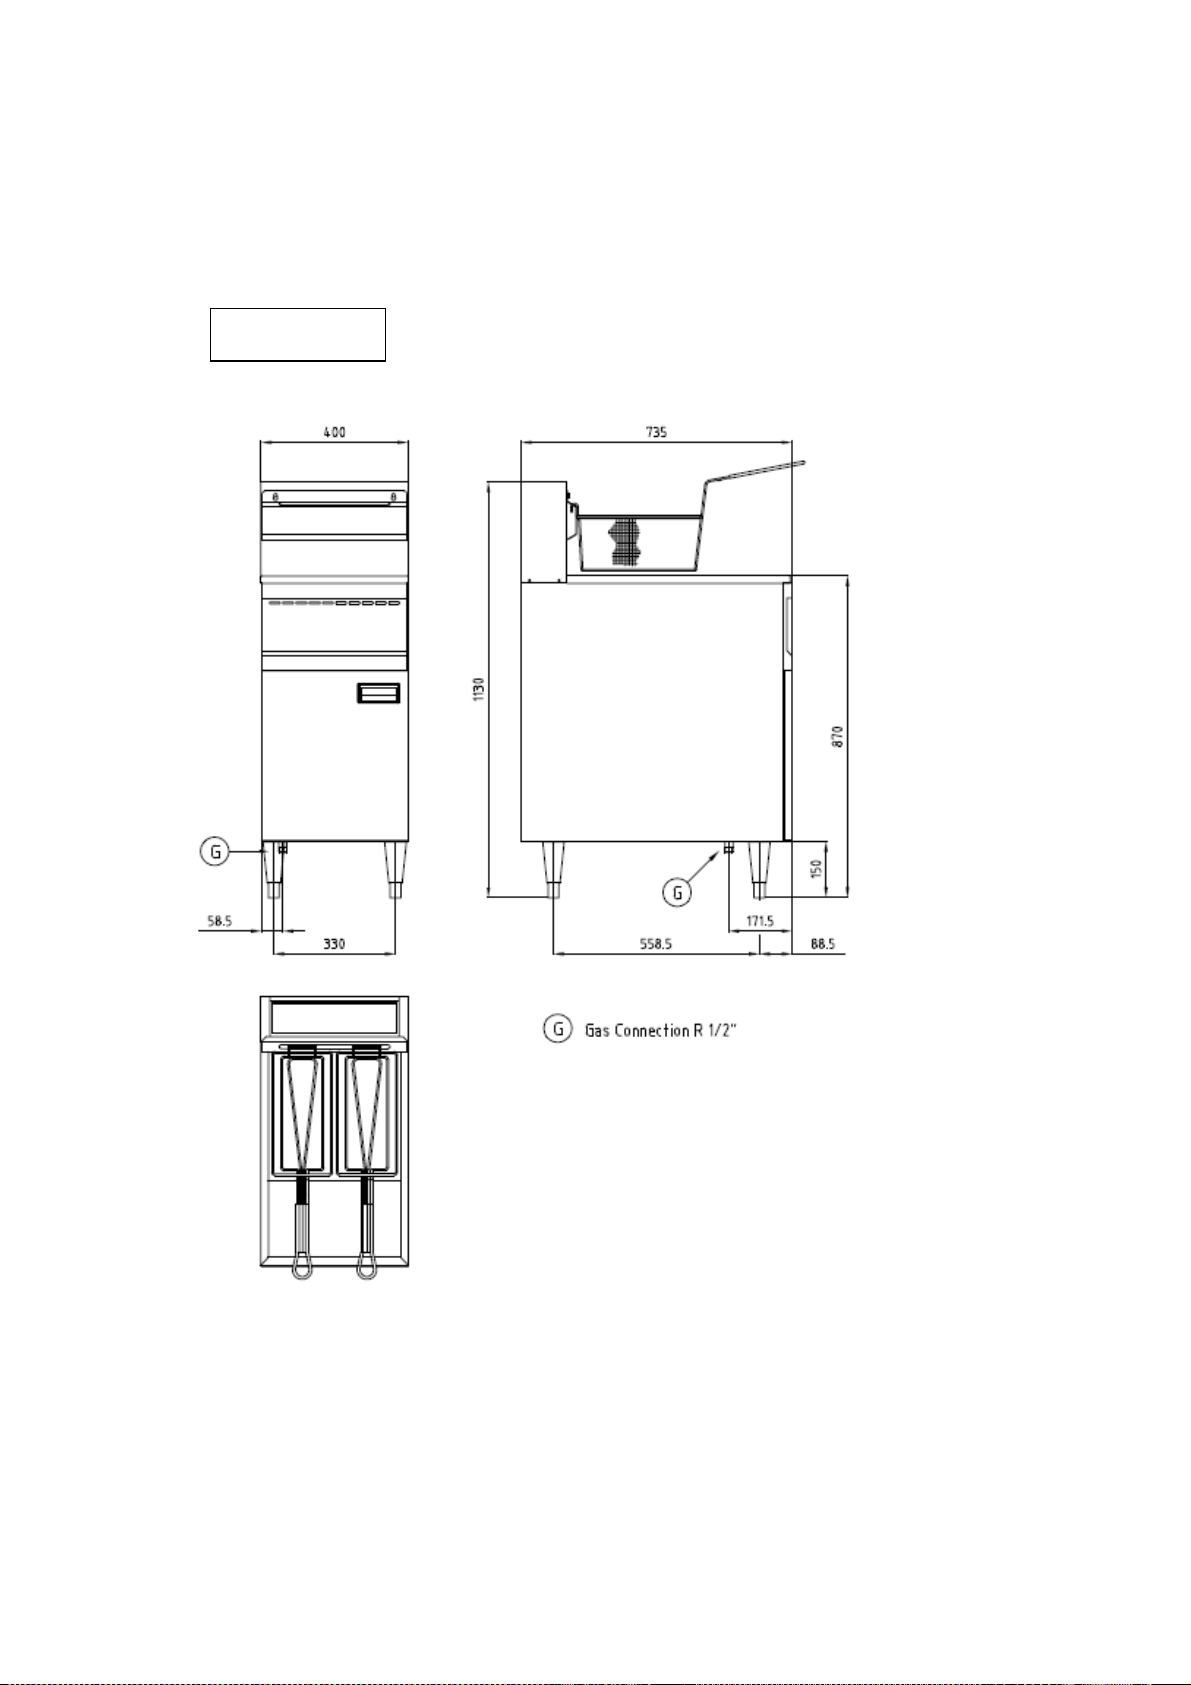
•Overall Dimension ………….. ......................................................................... 8
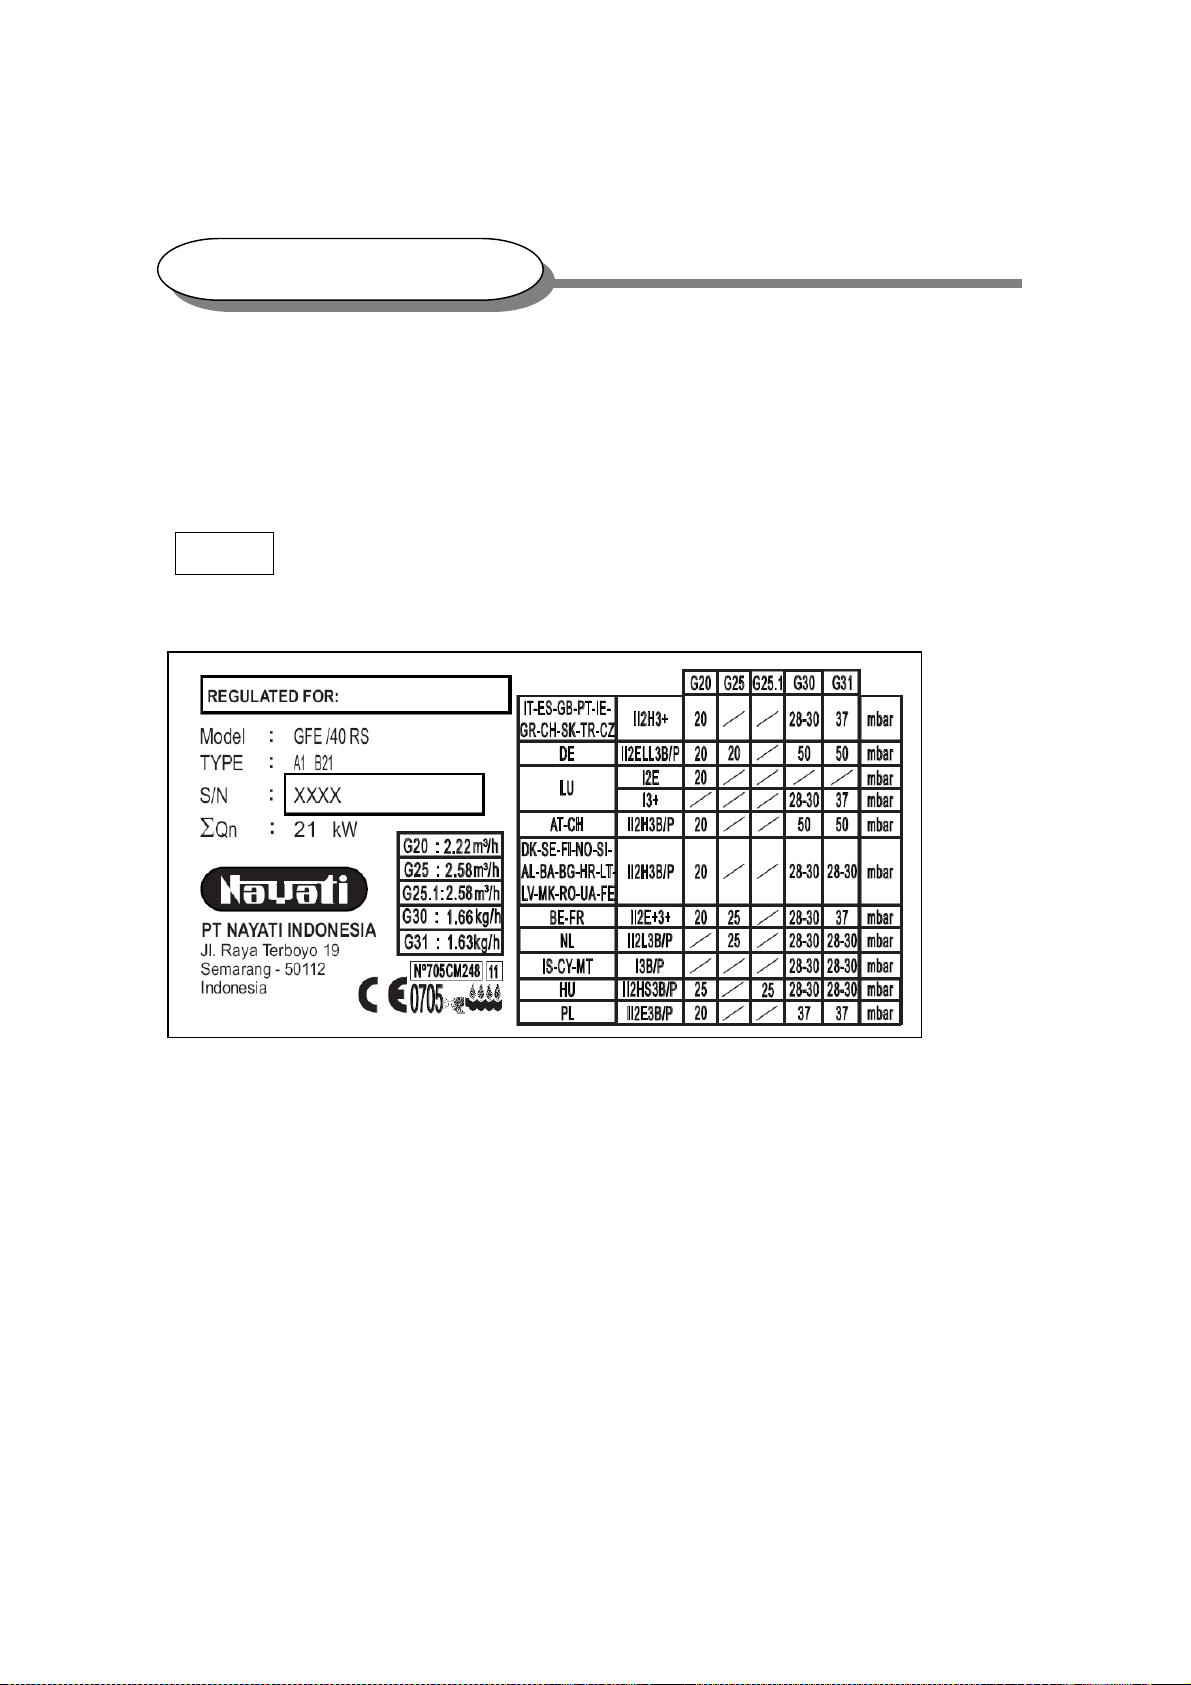
Technical Data Plates …………….. ............................................................................. 9
Component List ………. ............................................................................................... 11
Installation (for the Installer) ………….. ........................................................................ 13
•Position and Fixing …………… ....................................................................... 14
•Gas Supply Connection …………….. .............................................................. 15
•Chec ing Gas pressure and Nominal Heat Input ……………….. .................... 16
•Gas Conversion ……………. .......................................................................... 17
Primary Air Adjustment ………….. ............................................................................... 18
Control Panel Description ………….. ........................................................................... 19
Use Instructions (for user) ………… ............................................................................. 20
•Warning ………… ........................................................................................... 20
•Turn ON / OFF …………… ............................................................................. 21
Routine Cleaning and Maintenance ……………. ......................................................... 23
Trouble Shooting ……….. ............................................................................................ 25
Warranty ………… ....................................................................................................... 26
TABLE OF CONTENT

Manual Instructions for Gas Fryer
NAYATI
4
Please read this manual instruction carefully before operating this appliance.
used for deep-frying. It is very important to eep this instruction boo together with the appliance
for future consultation. If this appliance sold or transferred elsewhere, ma e sure this boo goes
with it. Therefore, the new user can read about its functions and other relevant information.
GENERAL INFORMATION
If you have any question about the appliance, please contact your nearest dealer.
Gas Fryer is an excellent coo ing appliance. This appliance is using gas. This appliance

Manual Instructions for Gas Fryer
5
Very important!: Before installing, place the appliance on solid, flat, stable and horizontal surface
and connection availability.
preparation only. Below are safety instructions that strictly conformed:
•Improper installation, maintenance, cleaning, or modification to the appliance could lead to
severe injury or death and could damage the appliance.
•The mechanics must instruct staff regularly to avoid accident and damage of the appliance.
•
•DO NOT place the appliance in a toxic area or have a ris of explosion.
•DO NOT place the appliance near flammable materials such gasoline, fat, clothes, liquid
gas, paper, etc.
•DO NOT place the appliance in wet or humid room or condition such in rain or near water
lea s, etc.
•DO NOT use the appliance for drying clothes, paper, or living animals.
•DO NOT use the appliance to heat non-food products.
•Put the appliance in a good ventilated room.
•Before cleaning or maintaining the appliance, detach the gas line and allow it to cool.
•DO NOT touch the area .This sign means VERY HOT. Beware of severe burning
injury.
•DO NOT attempt to dismantle or repair the appliance. The authorized mechanics must do
all jobs.
SAFETY INSTRUCTIONS
Read this manual instruction carefully before using Gas Fryer. This appliance is for food
Gas Fryer may be used for s illed staff only.

Manual Instructions for Gas Fryer
6
WARNING
!
DO NOT SWITCH ON THE FRYER WITH EMPTY TANK. IT
CAN CAUSE OVERHEATING and MAY DAMAGE THE
APPLIANCE.
WARNING
!
DRAIN THE OIL ONLY AFTER IT IS COOL.
HOT OIL MAY CAUSE SEVERE BURNING INJURY.

Manual Instructions for Gas Fryer
7
carried by three internal tubes at the bottom the tan . The burners are atmospheric and supplied by
a mixture of liquid gas and air or natural gas and air. This appliance also equipped by Safety
Thermocouple and Safety Thermostat to avoid overheat.
•Data Tab e
Table 1: Technical Specification
Technica Specification
Mode
GFE /
40
RS
Overa Dimension (mm)
Width
Depth
Height
400
mm
7
35 mm
870/1130 mm
Gas Consumption
21
W
Gas
In et
R
½”
Gas Connection Pressure
(mbar)
G 30 / G 31 : 28
-
30
/ 37
G 20 : 20
Drain For Oi
1”
Tank Capacity
23
Liters
Ignition
Manual
TECHNICAL DATA
Gas Fryer is made of stainless steel frame and supported by 18 liters oil tan . The heat

Manual Instructions for Gas Fryer
8
•Overa Dimension
GFE /40 RS

Manual Instructions for Gas Fryer
9
Figure 1:
Technical plate reports the current gas setting, Gas Fryer nominal data, gases table, categories,
and pressures for other CE countries.
Figure 2:
Technical Plate reports warnings in European languages and destined languages.
TECHNICAL DATA PLATES
Fig
. 1

Manual Instructions for Gas Fryer
10
Figure 3:
Technical plate reports warning and current setting on appliance pac aging.
Fig. 2
Fig
. 3

Manual Instructions for Gas Fryer
11
COMPONENT LIST

Manual Instructions for Gas Fryer
12
NO.
PART NUMBER
DESCRIPTION
QTY
1.
PD.2263
Shell Fryer Burner OVL CP C (07196349000)
4
2.
GS.3661
Primary Air Adjuster D
-
20
4
3.
PD.2265
Nozzle Std. D. 120 (07151600100) (for LPG)
4
PD.2267
Nozzle Std. D. 175 (07151
602800) (for LNG)
4
4.
GS.2185
Thermocouple 2C 24” (42924)
1
5.
GS.2186
Pilot Burner 6CH146 (66702)
1
6.
GS.2187A
Injector for Pilot (LP Gas) (for LPG)
1
GS.2187B
Injector for Pilot (Natural Gas) (for LNG)
1
7.
GS.2183
Limit Control 450
o
F (LCHM05030
0000)
1
8.
GS.218
2
Gas Thermostat 200
-
400ºF
1
9.
GS.2189A
Chrome Bezel
1
GS.2189B
Red Plastic Insert
1
GS.2189C
Blac Dial
1
GS.2189D
Temperature Overlay
1
10.
GS.2181
Gas Control
1

Manual Instructions for Gas Fryer
13
Very important!: Before installing, place the appliance on solid, flat, stable and horizontal surface
and connection availability.
The following instructions are intended for authorized and qualified installer. Before doing
installation, adjustment, and maintenance operations, the installer must follow local and legal
regulations. Cut the gas supply before doing any installation.
1. This appliance is using gas. Gas services should be installed according to:
a. Local and international standards
b. Local recommendation, such as building standards and recommendation concern with
combustion
c. Directions and regulations from the gas and power supply companies
d. Regulation concern with prevention accident measures
2. Remove all pac aging material and protective coatings.
3. Ensure gas supply is sufficient to operate this appliance.
4. Install the appliance by using Qualified Gas Filter.
5. Before testing, put the appliance in a good ventilated room and eep all flammable material
away.
6. Ta e a lea age test by using soapy water solution. Spread the soapy solution on joints and pipe
fitting. A lea age will be indicated by bubbles comes from the joints or pipefitting. Another way
is by loo ing at the gas counter. If there is no movement on the gas counter, it means no gas
lea age.
7. Before cleaning or maintaining the appliance, please isolate gas supply to the safe place.
8. Install the appliance by following Safe International Gas Standards.
INSTALLATION (for the insta er)

Manual Instructions for Gas Fryer
14
9. If the appliance has not preset to the gas availability, you must convert it into another gas type.
Authorized personnel must do this by referring to the technical data (primary air regulation and
nozzle table), changing the main burner and pilot burner nozzles. Once this has been done, a
new rating data plate should be affixed to the new data by referring to the new gas type.
•Position and Fixing
Authorized personnel must do the installation. Install the appliance according to National
Safety Standard about gas-heated standard. Place the appliance in good ventilated room with
permanent ventilation ducts to guarantee sufficient exchange of air and eep the wor place
healthy. If the Gas Fryer not connected to a flue, it is recommended to install it under efficient
hood, which could evacuate burned gases and coo ing steams.
Below is construction type according to National Regulations:
-A
1
: Appliance without fan and does not have connection to a flue or to a device for
evacuating combustion products outside the room. The combustion air and burned gas
mixed in one room.
-B
11
: Natural draught appliance connected with draught diverter. It is attached to a flue,
which evacuate combustion products outside.
-B
21
: Natural draught appliance without draught diverter. It is not directly connected to a
flue, which evacuate combustion products outside.
Ma e sure that any object around or under Gas Fryer does not obstruct air volume required for
combustion. Put away any flammable materials near Gas Fryer. When the appliance is
freestanding, eep a distance at least 10 cm from side, and rear walls. Especially when the
appliance close to wall and does not protected with fire-resistant materials made. Install the
appliance separately or side by side with other appliance according to recommended range.
Warning!
NEVER USE FREE FLAME TO FIND GAS LEAKS!

Manual Instructions for Gas Fryer
15
Put Gas Fryer on solid, flat, and horizontal floor. Adjust the height of the four feet by using
brac ets. Before turn the appliance ON, remove the protective film. Remove any adhesive with
appropriate solvent. Eliminate all pac aging material according to national laws.
•Gas Supp y Connection
-Before installing and connecting Gas Fryer to gas supply, carefully control the
fixed part of gas system, which conformed to National Building Regulation.
-Verify gas pipes sections to guarantee sufficient supply for all gas heated
appliances. Install it in similar condition to avoid excessive pressure drops.
-The pipes must be made of steel (with junctions made using white cast iron, or
galvanized steel fittings, or autogenously welded joints) or copper pipes (with
mechanical joints and couplings without seals or mastics or brazed joints).
-Control the gas bottle (if any) placed correctly and protected in dry area.
-Chec whether the gas pipes can easily inspected. If the pipes installed in floor
and wall, ma e sure that this wor done according to professional standard with
reference points that ma e it possible to find the pipes.
-Before installing Gas Fryer, ma e sure that it is set for the gas and pressure (see
Technical Data Plates). Consult the paragraph “Gas Conversion”.
-Connect Gas Fryer to gas supply using solid fittings or flexible steel pipes with
suitable sections related to nominal power and length.
-Chec whether the flexible pipes does not pass or near hot surfaces, put under
stress and traction, contact with sharp edges, or other things that could damage
the pipe.
-Install quic ON – OFF valve between the gas mains and each single appliance
where easy to reach.
-After install Gas Fryer safely, ta e a pressure test the whole gas circuit by using
lea finder spray or non-corrosive foams.
-Gas Fryer is equipped with ISO 7/ 1 screw thread, gas connection of ¾ inches
diameter and suitable adapter for ISO 228/ 1 G screw thread gas connection are
provided together with the appliance according to destined countries.

Manual Instructions for Gas Fryer
16
•Checking Gas Pressure and Nomina Heat Input (Fig. 4)
At the first installation, specialized technician must control Gas Fryer nominal heat input,
maintenance, and gas conversion. DO NOT improve Gas Fryer performance and increase
nominal heat affirmed by the manufacturer. Control heat input by using gas counter and
chronometer. Measure the exact amount of gas flow per unit of time which consumed by the
appliance at maximum power. Compare the measurement to the consumption data on Data
Technical Table 2, ± 5% tolerance is allowed. When you are measuring top deviations,
carefully chec the diameters and the quality of installed injectors and gas main pressure. If
you want to measure the main pressure while Gas Fryer is ON and using a pressure gauge for
liquids (for example U manometer, with minimum resolution 0.1 mbar), please follow direction
below:
1. Connect the flexible pipe “E” of the Manometer “M” to the inlet pressure point “C” after
unscrewing its cap.
2. Measure the connection pressure: if the reading is not within the values given in the
following table, the appliance cannot wor properly. The gas company must be informed to find
out the supply pressure problems. If necessary, install a pressure regulator.
3. Once the connection pressure has been measured, disconnect flexible pipe “E”, retighten
the screw cap of the inlet pressure point “C”. Restore the components inversely.
Table 2:
Gas Type
In et pressure (mbar)
Norma
Minima
Maxima
Natural gas G
20
20
17
25
Liquid gas G
30
/
G
31
28
/
37
20
/
25
35
/
45

Manual Instructions for Gas Fryer
17
•Gas Conversion
-Only professional and qualified mechanic can do this job.
-By loo ing at Table 1 and 2, replace Main Injector, Pilot Injector, and adjust
correctly Primary Air Setting for each Main Burner.
-Correctly adjust By-pass screw for the wor ing at minimum rates of Main Burner.
-Spare injectors are available with the appliance.
-Ma e sure the diameter printed on each injector in 1/100 of a millimeter.
-Convert the appliance after turn the gas OFF and in UP position and let Gas Fryer
cool.
C
=
Inlet pressure point
D
=
Gas pi
pe
E
=
Flexible pipe
G
=
Inlet gas connection
M
=
Manometer
R
=
Gas tap
Fig. 4

Manual Instructions for Gas Fryer
18
Gas Type Pressure
(mbar) Nozzle
Ø (mm) Primary Air
(H) Pilot Nozzle
(marking)
G30/31 28-30/37 1.2 17 LPG
50/50 1.05 14
G20 20 1.75 20
LNG
25 1.65 18
G25 20 1.9 18
25 1.85 16
PRIMARY AIR ADJUSTMENT

Manual Instructions for Gas Fryer
19
•GFE /40 RS
A :
Drain Va ve
To drain oil from the tan
B :
Gas Contro Knob
To ignite the burner
C :
Safety Button
To avoid the oil overheat
D :
Thermostat Contro Knob
To adjust the coo ing temperature
CONTROL PANEL DESCRIPTION
Table of contents
Other mastro Fryer manuals