Before using this appliance ensure that the voltage of your electricity supply is
suitable for that indicated on the rating plate of the appliance.
THIS APPLIANCE MUST BE EARTHED.
The ultimate disconnection from the power source is the mains plug. Always make
sure it is easily accessible to be unplugged in the event of an emergency.
This appliance is tted with a fused three pin mains plug to BS 1363 which will be
suitable for use in all houses tted with mains sockets to current specications.
If the tted mains plug is not suitable, remove the fuse and dispose of the mains
plug safely, immediately after removing it from the mains cable.
Fitting a new mains plug
If for any reason you need to t a new mains plug, the mains cable must be
connected as shown here. The wires in the mains cable tted to this appliance are
coloured in accordance with the following code:
If the colours of the wires in the mains cable of this appliance do not correspond
with the coloured markings identifying the terminals in your mains plug, proceed as
follows:
The wire which is coloured
• Green and Yellow: MUST be connected to the terminal which is marked with the
letter E (Earth) or symbol or coloured Green.
• Blue: MUST be connected to the terminal which is marked with the letter N
(Neutral) or coloured Blue or Black.
• Brown MUST be connected to the terminal which is marked with the letter L (Live)
or coloured Brown or Red.
Before retting the mains plug cover, check that there are no cut or stray strands of
wire inside the mains plug. Only BSI or ASTA approved 13 Amp BS1362 fuses should
be used. If you are in any way unsure which mains plug or fuse to use, always refer to
a qualied electrician.
Note: After replacing or changing a fuse on a moulded mains plug which has a fuse
cover, the cover must be retted to the mains plug, the appliance must not be used
without a fuse cover. If lost, replacement fuse covers can be obtained from an
electrical shop.
GB - 2 GB - 3 GB - 4
Keeping the cord tidy
Extend the mains cable in the kettle stand to the
required length. Locate the mains cable in one of the
slots in the stand. For safety it is recommended that
the length of exposed mains cable is kept as short as
possible. Place the kettle stand on a rm level surface
and plug in the mains plug at a standard mains
socket (240 Volt 13 Amp rated).
Caution. This kettle must only be used with the
stand provided.
Before using your kettle for the First Time
Clean your kettle by boiling a full kettle of water twice and then discarding the
water.
Filling the kettle
Slide the switch to open the lid and ll the kettle with
the required amount of water. Do not exceed
the maximum ll level (Max 1.7L) and not less than
the minimum ll level (Min 0.5L) as indicated outside
the kettle.
Caution. If the kettle is overfilled, boiling water
may be ejected from the spout and cause
scalding.
Switching on
Place the kettle on the stand and press the power
switch to the ON position (indicated by the symbol
‘1’). The indicator on the side of the kettle will light
up to indicate that the kettle is heating.
Caution. Never open the lid while the water is
boiling. The steam coming out from the kettle is
very hot.
Caution. If there is insufficient water in the kettle,
the automatic safety cut-off will operate. If this
happens, allow the kettle to cool for ten minutes
before refilling with cold water and re-boiling.
When the water has boiled
The kettle will automatically switch o (indicated by
the symbol ‘0’ ).
Caution. Ensure that the switch is not obstructed
and the lid is firmly closed. The kettle will not turn
off if the switch is obstructed or if the lid is open.
Caution. After removing the kettle, there may be
some water on the surface of the stand. This is
condensation from the steam that causes the
kettle to automatically switch off after boiling. This
is normal and should not be a cause for alarm.
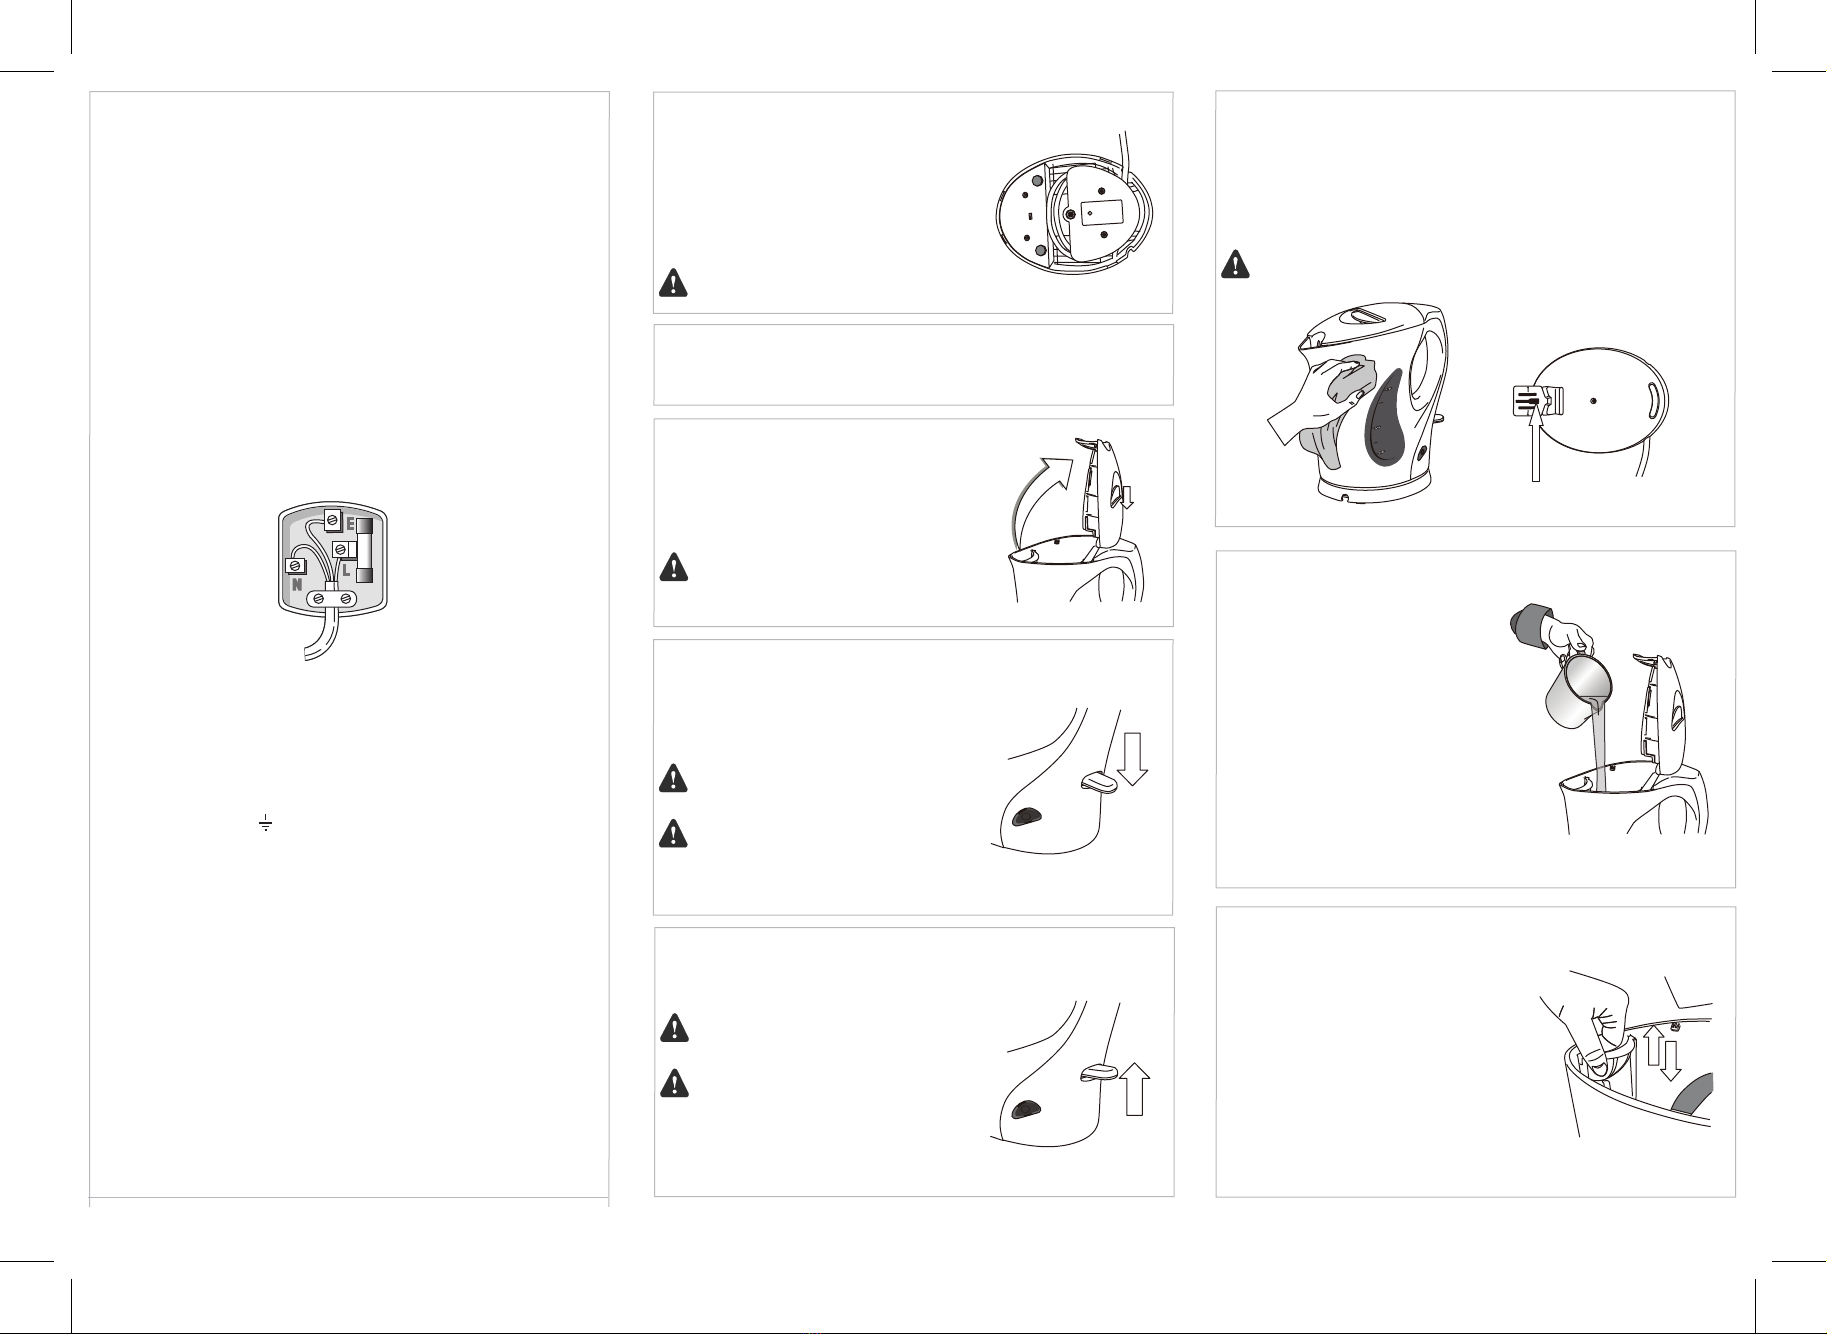
Cleaning the kettle
The kettle exterior should be cleaned with a soft damp cloth. Do not use abrasive
cleaners or scouring pads which may damage the nish of the kettle.
Never immerse the kettle or kettle stand in water and always keep the electrical
contacts dry. Disconnect from the mains before cleaning the kettle stand.
Caution. Do not insert any foreign objects or allow any liquid to spill into the Power
Connector Hole.
Descaling the kettle
Depending on the hardness of the water in your
area, limescale may be deposited on the heating
element and the inside of the kettle. This normal
build-up is not harmful to health but an
excessive amount of scale may aect the
performance of the kettle.
To descale, ll the kettle with distilled water up
to three-quarters of the Max level and bring the
water to boil. After the kettle has switched o,
add a descaling solution following the
manufacturers instructions. Never attempt to
descale the kettle by chipping or scraping with a
sharp implement.
Cleaning the removable scale filter
To prevent loose particles of limescale being
poured into your beverage, your kettle is tted with
a scale lter. You may remove the lter and t it
back in after cleaning.
To t in the lter, open the lid, place the lter inside
the bracket at the spout, and push it down till it ts
in place.
To remove the lter, open the lid, lift up the lter
from the bracket at the spout.
Power Connector Hole
Electrical Information
CONNECT GREEN AND YELLOW TO EARTH (E)
CONNECT
BLUE TO
NEUTRAL (N)
MAKE SURE THE OUTER
SHEATH OF THE MAINS
CABLE IS SECURELY HELD
BY THE CLAMP
CONNECT
BROWN TO
LIVE (L)
13 AMP FUSE
90°
1
0
1
0