Maximum S-600 FTA User manual

English User manual
Deutsch Bedienungsanleitung
Dansk Brugervejledning
Svenska Användarhandbok
MAXIMUM S-600 FTA
MAXIMUM
S-600 FTA
#7971

Copyright © Kjaerulff 1 Digital A/S
www.kjaerulff1.com

1
ENGLISH
1 INTRODUCTION ........................................................................................................................... 2
1.1 IMPORTANT SAFETY PRECAUTIONS. .....................................................................................................3
2 GENERAL INFORMATION ............................................................................................................. 6
2.1 MAIN FUNCTIONS............................................................................................................................6
2.2 CONTENT.......................................................................................................................................6
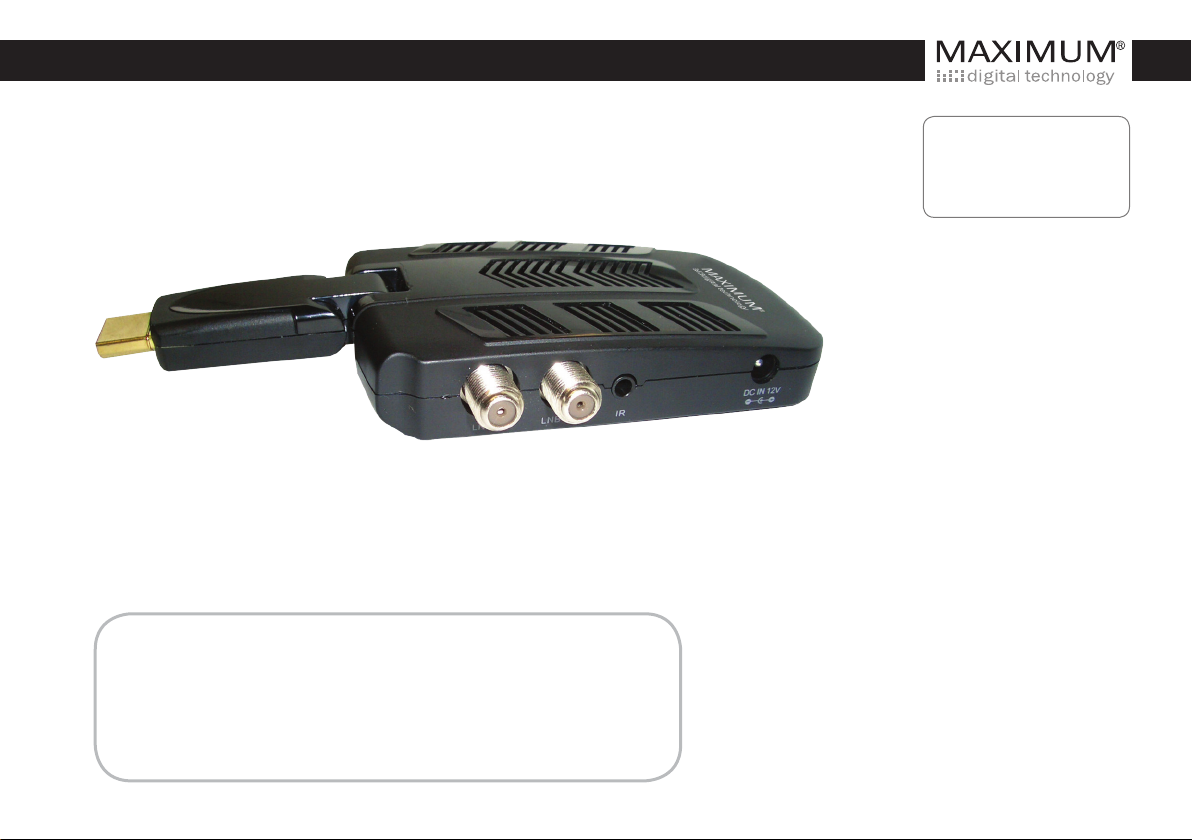
2.3 CONNECTIONS ................................................................................................................................7
2.4 REMOTE CONTROL ..........................................................................................................................8
2.5 CONNECTING TO TV OR OTHER EQUIPMENT .........................................................................................9
3 FIRST TIME INSTALLATION ........................................................................................................ 11
4 PROGRAM MANAGE SETTINGS ................................................................................................. 11
4.1 EPG (ELECTRONIC PROGRAM GUI E) ................................................................................................14
5 PICTURE SETTINGS .................................................................................................................... 15
6 CHANNEL SEARCH ..................................................................................................................... 17
6.1 SATELLITE SETTINGS .......................................................................................................................17
6.2 SATELLITE LIST ..............................................................................................................................18
7 TIME SETTING ........................................................................................................................... 21
8 SETTINGS................................................................................................................................... 22
9 SYSTEM ..................................................................................................................................... 22
10 USB ......................................................................................................................................... 24
10.1 SOFTWARE UPGRA E ...................................................................................................................25
11 TROUBLESHOOTING ................................................................................................................ 26
12 TECHNICAL SPECIFICATIONS .................................................................................................... 27
13 EEE INFORMATION .............................................................................................................. 28

2
ENGLISH
1 Introduction
Congratulations on the purchase of the MAXIMUM S-600 FTA.
Please read through this anual carefully before operating the Receiver
Should you experience any difficulties with the operation of MAXIMUM S-600 FTA,
please consult the relevant section of this anual. Alternatively you can contact
your dealer.
Copyright
Content of this anual is not to be copied, used or translated in part or as a whole
without prior consent in writing except approval of ownership of copyright and
copyright law.
Warranty
We ake certain reservations for changes in the product which are ade by the
anufacturer. Further ore we ake reservations for new software versions which
can change so e of the functions described in this anual.
The warranty does not cover parts which ay beco e defective due to isuse of
the receiver if the receiver not has been used as described in this anual.

3
ENGLISH
Moreover the warranty does not cover functions which have been changed due to
newer software versions. All changes in software are ade to i prove the daily
use and functionality of the receiver.
1.1 Important safety precautions.
Safety precautions:
Safety precautions: Before operating your new receiver, read the notes on safety
precautions carefully.
The receiver has been anufactured in accordance with international safety
standards.
1. Do not install this equip ent in a confined space such as a book case or
si ilar unit. The ventilation should not be i peded by covering the
ventilation openings with ite s such as newspaper, tablecloths, curtains
etc.
2. No naked fla e sources, such as lighted candles should be placed on the
apparatus.

4
ENGLISH
3. The receiver shall not be exposed to dripping or splashing; No objects filled
with liquids, such as vases should be placed on the apparatus.
4. The ains plug is used as disconnect device, the disconnect device shall
re ain readily operable.
5. Power cord ust be placed correctly. Do not touch the power cord and
switch when your hand is wet.
6. The nor al operating te perature of the receiver is between 5ºC and
40ºC. Use the apparatus only in oderate cli ates (Not in tropical
cli ates). This receiver is developed for indoor use.
7. The batteries shall not be exposed to excessive heat such as sunshine, fire
etc. Take attention to the environ ental aspects of battery disposal.
Caution!
The receiver contains no parts that can be replaced by the end user.
Please leave all service repairs to qualified personnel.

5
ENGLISH
Certificate of Compliance
We
Kjaerulff 1 Digital A/S
C.F. Tietgens Boulevard 19
5220 Odense SØ
Declare that the product: AXI U S-600 FTA (ite 7971),
Is in confor ity with:
RoHS 2005/95/CE
Electro agnetic Co patibility (EMC) Directive (2004/108/EC)
Standards: EN 55013: 2001+A1+A2, EN 61000-3-2: 2006, EN61000-3-3: 2008,
EN 55020: 2007
Low Voltage Directive 2006/95/EC
Standards: EN 60065: 2002 + A1: 2006 + A11: 2008

6
ENGLISH
2 General information
MAXIMUM S-600 FTA allows you to view a variety of free to air satellite channels.
2.1 ain functions
• MPEG-4 HD receiver for free to air satellite signals.
• DVB-S2
• Pre-progra ed Astra channel list
• 1 HDMI output
• DiSEqC co ands: 1.0, 1.1 and 1.2
2.2 Content
Unpack the receiver, and ake sure that the following parts are included in the
package:
- MAXIMUM S-600 FTA
- 30 c HDMI extender cable
- 100 c IR cable
- Re ote control
- Batteries (2 x AAA)
- 12V DC power supply
- Velcro tape
- User anual

7
ENGLISH
2.3 Connections
1 USB: Used to connect to an external USB 2.0 device.
2 HD I: This socket connects to HDMI in device.
3 LNB IN: Used to connect the LNB to receive the signal.
4. LNB OUT: This socket will bypass the RF signal to either your TV or
another Video syste .
5 IR: Used to connect the re ote Sensor.
6. DC IN 12V: Used to connect the 12V DC adapter.

8
ENGLISH
2.4 Remote Control
1) MUTE: Mute or Restore Audio Output.
2) INFO: Displays additional channel infor ation.
3) TTX: Displays Teletext Infor ation.
4) DTV/VCR: Shift between TV and VCR equip ent connected. (Not functional for this model.)
5) SUBTITLE: Selects Subtitles Language.
6) EXIT: Exits the current Menu or returns to the previous Menu.
7) OK: Confir s an entry or selection. Displays the list of channels.
8) VOL-/VOL+: Navigates through the Menus. Decreases/Increases volu e.
9) TV/RADIO: Switches fro TV function to Radio function and fro Radio to TV.
10) RECALL: Used to switch between the last two viewed channels.
11) GOTO: Selects the play ti e of edia.
12) PREV: Skips to the previous track during playing edia.
13) NEXT: Skips to the next track during playing edia.
14) REPEAT: Selects Repeat or turn off Repeat ode.
15) STOP: Stops edia play.
16) STANDBY: Switch the product to on or standby.
17) EPG: (Electronic Progra Guide) turns the progra guide on.
18) AUDIO: Selects an Audio Language or Audio Mode.
19) CH+/CH-: Navigates through the Menus. Selects the next/ previous Channel.
20) MENU: Turns on Main Menu.
21) FAVOURITE: Turns on Favorite Menu.
22) 0-9 (Nu eric Buttons): Selects a channel or setting.
23) FWD: Searches forwards during edia play.
24) REV: Searches backwards during edia play.
25) PLAY: Starts or resu es edia play.
26) PAUSE: Pauses edia play.
27) COLOUR BUTTONS: RED: Find function; Green: Choose resolution; Yellow: Switch aspect ratio; Blue: Ti er setting;
28) REC: Starts a recording. (Not functional for this model.)
29) LIST: Shows a list of recordings. (Not functional for this model.)

9
ENGLISH
2.4.1 Installing the Batteries
Re ove the battery cover fro the Re ote Control and put 2 x AAA size
batteries inside the co part ent.
The diagra inside the Battery Co part ent shows the correct way to install the
batteries.
2.4.2 Using the Remote Control
To use the Re ote Control, point it towards the IR “eye” at the end of the IR cable.
The Re ote Control has a range of up to 7 etres fro the receiver at an angle of
up to 60 degrees.
The Re ote Control will not operate if its path is blocked. Sunlight or very bright
light will decrease the sensitivity of the Re ote Control.
2.5 Connecting to TV or other equipment
Caution: Make sure to check the voltage specification of the wall outlet is the sa e
rating as the receiver. To prevent the risk of electric shock, do not open the
receiver.

10
ENGLISH
Note: When connecting the receiver to other
equip ent, e.g., TV, VCR and a plifier, ake sure
to refer to relevant user anual for instruction. Also,
ake sure you disconnect all the equip ent fro
the ains supply before the connection.

11
ENGLISH
3 First time installation
After all connections have been ade properly, switch on the TV and ake sure
the receiver is connected to the Main Power. Press the Power button to switch the
receiver on. If you are using the receiver for the first time or restored to Factory
efault, the Main Menu will appear on your TV screen.
(1) Select [OSD Language] and press RIGHT/LEFT key to select a language.
(2) Once you have selected the correct language press OK to continue.
(3) The receiver is pre-progra ed with an Astra channel list. This list will
auto atically be loaded.
4 Program anage Settings
To access the Menu, press the MENU button and select [Progra ].The Menu
provides options to adjust the Progra Manage Settings. Select an option and
press OK or RIGHT to adjust that setting. Press the EXIT button to exit the Menu.

12
ENGLISH
Program Edit
To edit your progra preferences (lock, skip, favourite, rena e, ove or delete),
you will need to enter the Progra Edit Menu. This Menu requires a password to
access. Enter the default password '000000'.
Set Favourite Program
You can create a short list of favourite progra s that you can easily access. Set
Favourite TV or Radio progra :
1. Select the preferred progra then press the FAVOURITE button. A list of
Favourite groups will be shown – select a group and press OK to confir . A heart-
shaped sy bol will appear and the progra is arked as a favourite.
2. Repeat the previous step to select ore Favourite progra s.
3. To confir and exit the Menu, press the EXIT key
To remove channel from Favourite group; Press the FAVOURITE button on the
Remote Control and select isable from the table.
View Favourite Program
1. Press the Favourite button and the Favourite Menu will appear.
2. Press UP/DOWN to select your Favourite Progra s.
3. Press OK to select your favourite progra .

13
ENGLISH
Delete a TV or Radio Program
1. Select the Progra and then press the BLUE button, a essage will appear.
Press OK to delete the progra .
2. Repeat the previous step to select ore progra s to delete.
Skip TV or Radio Program
1. Select the progra you would like to skip and press the GREEN button. A skip
sy bol is displayed. The progra is arked as a skip.
2. Repeat the previous step to select ore progra s.
3. To confir and exit the enu, press EXIT key.
Disable a skip on a TV or Radio progra : Press
the GREEN button on the skip progra with the skip sy bol.
ove a TV or Radio Program
1. Select the preferred progra then press the RED button. A ove sy bol will
appear.
2. Press UP/DOWN to ove the progra .
3. Press OK to confir .
4. Repeat the above steps to ove ore channels.

14
ENGLISH
Lock a Program
You can lock selected progra s for restricted view. Lock a TV or Radio Progra :
1.Select the preferred progra then press the YELLOW button. A lock- shaped
sy bol is displayed. The progra is now arked as locked.
2. Repeat the previous step to select ore progra s.
3. To confir and exit the enu, press the EXIT button.
4. Press the YELLOW button to disable the locked progra .
5. To view the locked progra , you will be asked to enter either the default
password '000000' or your last set password.
4.1 EPG (Electronic program guide)
The EPG is an on-screen TV guide that shows scheduled progra s seven days in
advance for every tuned channel. Press the EPG button on the Re ote Control to
access the guide. You can use the UP/DOWN key to select the preferred progra .
Use the LEFT/RIGTH button to change between the channels.
If there is ore than one page of infor ation, use the BLUE button for page up
and the YELLOW button for page down

15
ENGLISH
Sort
Sort your channels fro the following options:
[Default]: Original order (based on how the channels have been found)
[Encrypt]: By encrypt ode. (Free to air channels will be shown first)
[Service Na e]: Alphabetical order.
[Freq]: By frequencies. (The lowest frequency will be shown first – one satellite
position at the ti e).
5 Picture Settings
To access the Menu, press MENU then select [Picture]. The Menu provides
options to adjust the video settings. Press UP/DOWN to select an option and press
RIGHT/LEFT to adjust that setting. Press EXIT to exit the enu.
Aspect Ratio
You ust set the display for at to 4:3 Full, 4:3 Pan Scan, 4:3 Letter Box, 16:9
Wide Screen or Auto to get the axi u display when watching TV.

16
ENGLISH
Resolution
If the picture does not appear correctly, change the settings. These settings will
atch the ost co on setting for HDMI.
[480i]: for NTSC syste TV.
[480P]: for NTSC syste TV.
[576i] for PAL syste TV.
[576P]: for PAL syste TV.
[720P]: for NTSC or PAL syste TV.
[1080I]: for NTSC or PAL syste TV.
TV format
If the picture does not appear correctly, you need to change the settings. This
should atch the ost co on setting for TVs in your country.
[NTSC]: for NTSC syste TV.
[PAL]: for PAL syste TV;
[Auto]: set TV for at according to the strea auto atically
The default setting is PAL.

17
ENGLISH
6 Channel search
To access the enu, press MENU and select [Search Channel]. The Menu
provides options to adjust the Search Channel settings. Select an option and press
RIGHT/LEFT to adjust the settings. Press EXIT to exit the Menu.
6.1 Satellite settings
Configure the settings of satellites.
Satellite list: Press Up/Down to select a satellite. The settings for the relevant
satellite will be shown at the right side.
LNB Type: Press LEFT/RIGHT/OK to show the list of LNB Types which is shown
as frequencies of local oscillator. You also can enter frequency by User Single,
User Dual at botto of the list. efault LNB type is 09750/10600 which is a
universal LNB.
LNB Power: Press LEFT/RIGHT to set the LNB power. efault is ‘13/18V’.
22 kHz: Press Left/Right to switch on or off the 22 kHz. efault is ‘auto’.
Tone burst: Select or disable tone burst co and.
DiSEqC1.0: select the right DiSEqC port (up to 4) for the correct input.
DiSEqC1.1: select the right DiSEqC port (up to 16) for the correct input.

18
ENGLISH
otor: Enable/disable DiSEqC 1.2 co and. Then Press OK to show the enu
to set the positions.
ove Auto: Press LEFT/RIGHT to start to ove West/East. It will be stopped
auto atically when the signal is locked.
ove Continue: Press LEFT/RIGHT to start to ove West/East. It will keep
oving until you stop it.
ove Step [1]: Press LEFT/RIGHT to ove just a step.
Store Position: store current position of otor.
Go to Position: Press LEFT/RIGHT to go to the position stored.
Go to Reference: Reset all the positions.
6.2 Satellite list
Add satellites: Press Red to add a new satellite, in which you ust input a unique
longitude and edit the satellite's na e.
Edit satellites: Press Green to edit the selected satellite.
Delete satellite: Press Yellow to delete the selected satellite. Press OK to confir .
This manual suits for next models
1
Table of contents
Languages:
Other Maximum TV Receiver manuals