MAXSA 44640 Quick reference guide

1
ASSEMBLY & OPERATING INSTRUCTIONS
IMPORTANT: Read all instructions carefully before use
ABOUT YOUR SOLAR SECURITY LIGHT
During the day, the solar panel included with this MAXSA Solar Security Light converts sunlight
into electricity, recharging the pre-installed battery. Using this stored energy, the SMT LED lights
turn on automatically at night when motion is detected. This MAXSA Solar Security Light has
an adjustable TIME dial that allows light duration of up to 60 seconds. When the battery is fully
charged, this Solar Security Light can provide up to 200 thirty second cycles when the TIME dial
is set to the middle (30s) position.
The battery included in this unit is a sealed lead-acid 6V, 4Ah rechargeable battery and will need
to be replaced when the charging ability is decreased. The battery should last for approximately
3-5 years before it will need to be replaced
Part #44640

2
Motion-Activated Solar Security Light
www.maxsainnovations.com
INCLUDED PARTS
Carefully remove and identify all the parts from their protective packaging and lay them out in
front of you.
2
Carefully remove and identify all the parts from their protective packaging and lay
them out in front of you.
INCLUDED PARTS:
the solar panel to your Solar Security Light
by plugging the 15 foot cord into the cord
attached to the front of the Solar Security
Light. Turn and twist the cords while pressing
Adjustment dials are located on the underside of the motion sensor. Move the
motion sensor to allow for easier access to the controls. Move sensor back into
position upon completion.
Once you have identified all parts, connect the solar
panel to your Solar Security Light by plugging the
15 foot cord into the cord attached to the front of
the Solar Security Light. Turn and twist the cords
while pressing firmly together until they are attached
tightly.
Adjustment dials are located on the underside of the motion sensor. Move the motion sensor to
allow for easier access to the controls. Move sensor back into position upon completion.

3
Part # 44640
www.maxsainnovations.com
CHOOSING A LOCATION FOR YOUR SOLAR SECURITY LIGHT
This Solar Security Light comes complete with a solar panel attached to a 15 foot power cord.
For optimum sun exposure and longer light output, place the solar panel in a position that
receives at least 6-8 hours of direct sunlight per day. Placing the solar panel in a shaded
location will not allow the battery to charge fully, reducing the number of hours the light will
operate per evening. Ensure that the security light is not placed near night time light sources
such as porch lighting or street lighting.
This Solar Security Light is ideal for areas where electricity is not available — including
driveways, carports, garages and entrance doors – for safety and security around your home.
When deciding where to mount the light, keep in mind that the motion sensor has a field of
vision of 180º (horizontal) at a distance of 40 feet when the surrounding temperature is 75F. The
outside temperature will impact the detection distance.
HOW TO INSTALL YOUR SOLAR SECURITY LIGHT
Mount the Security Light onto a solid surface, using the two (2) wood/sheet metal screws
supplied. You may mount the Security Light either vertically or horizontally.
Use the four wood/sheet metal screws supplied to mount the solar panel onto a solid surface.
You can adjust the angle of the solar panel by gently rotating the solar panel to a different
locking position. Remember to face the panel south for direct sunlight exposure.
TOOLS REQUIRED FOR INSTALL
Install simply with just a Phillips-head screwdriver!

4
Motion-Activated Solar Security Light
www.maxsainnovations.com
BEFORE FIRST USE OF YOUR SOLAR SECURITY LIGHT
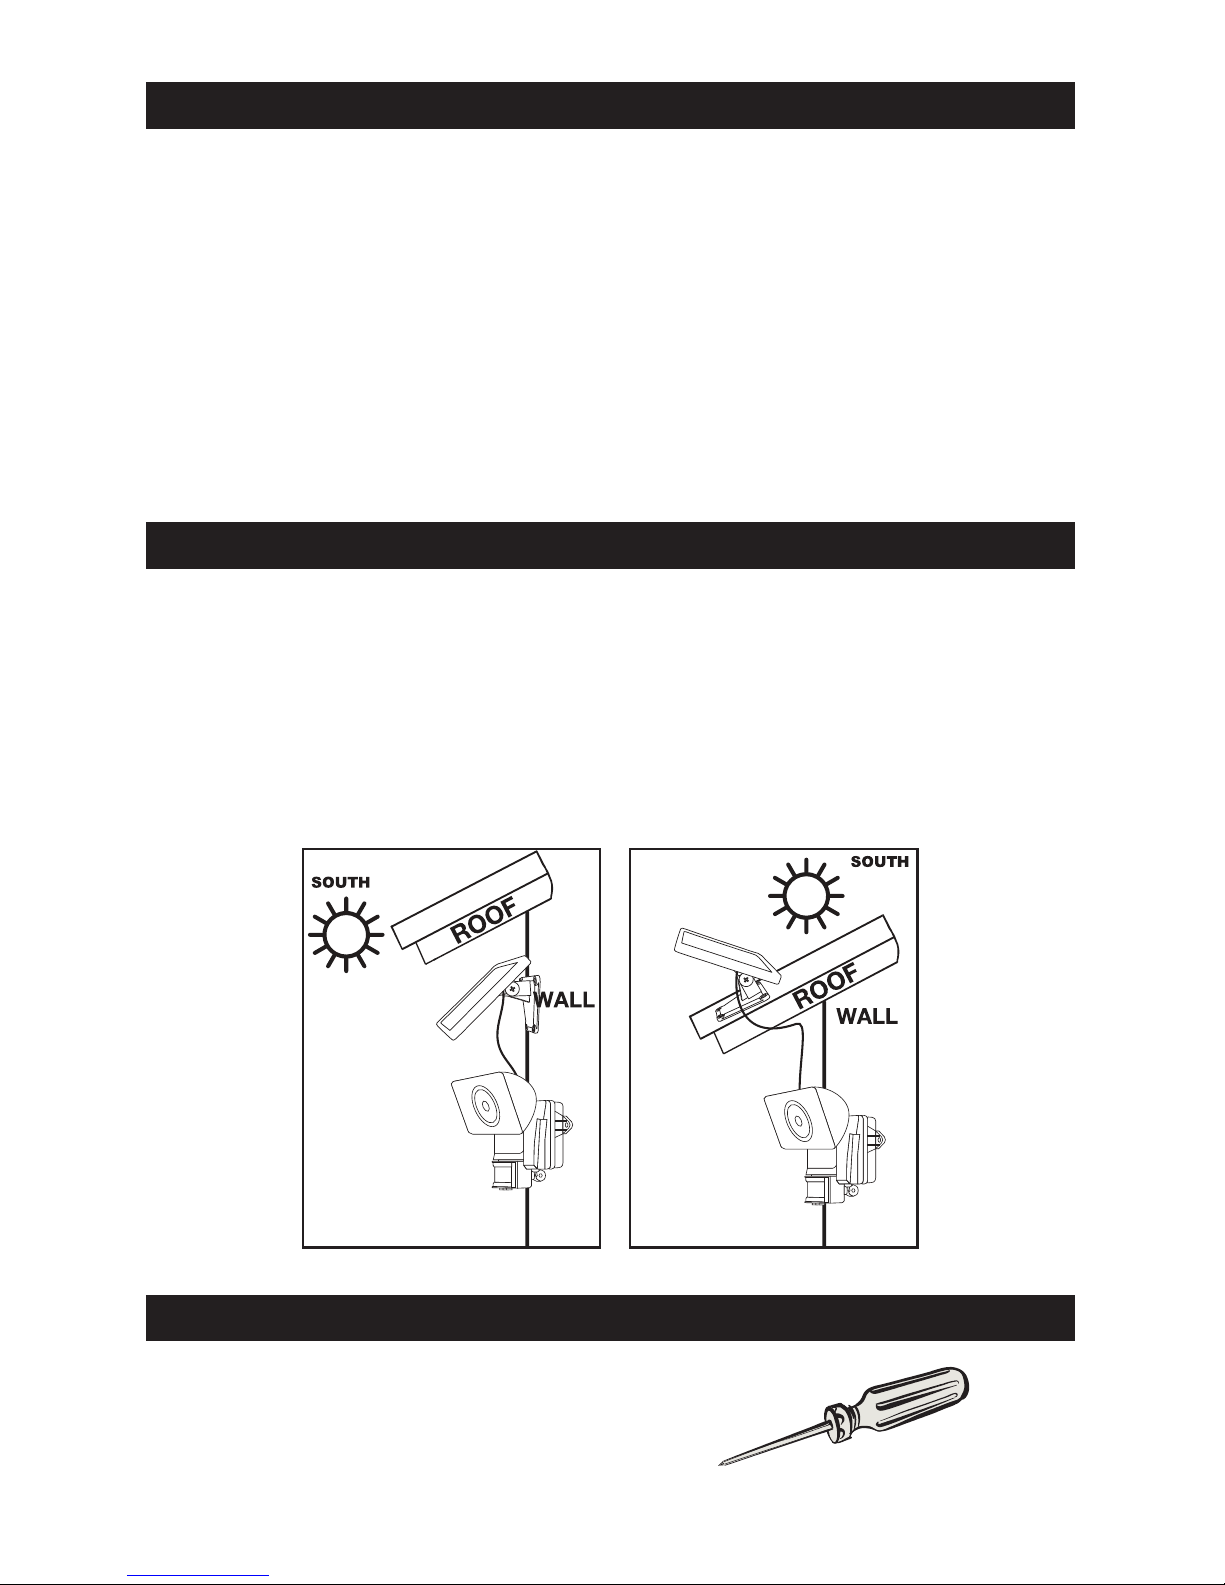
Ensure the power switch on the main body of your Security Light is in the OFF position and the
solar panel is connected to the light unit. In this position, the solar panel will charge the battery
without activating the unit.
Leave the switch in the OFF position for 3 days with the solar panel placed in direct sunlight.
This will ensure that the battery in your Solar Security Light has a full charge prior to motion
sensor adjustment and normal operation.
OPERATING YOUR SOLAR SECURITY LIGHT
After the initial 3 day charge of your Solar Security Light, move the switch on the main body
to the AUTO position. The light should come on immediately, regardless of lighting or motion
conditions. This is a test activation that happens every time the light is switched to AUTO. It
should last for approximately 30 seconds. After the test activation, leave the switch on AUTO
and your Solar Security Light is now ready for use.
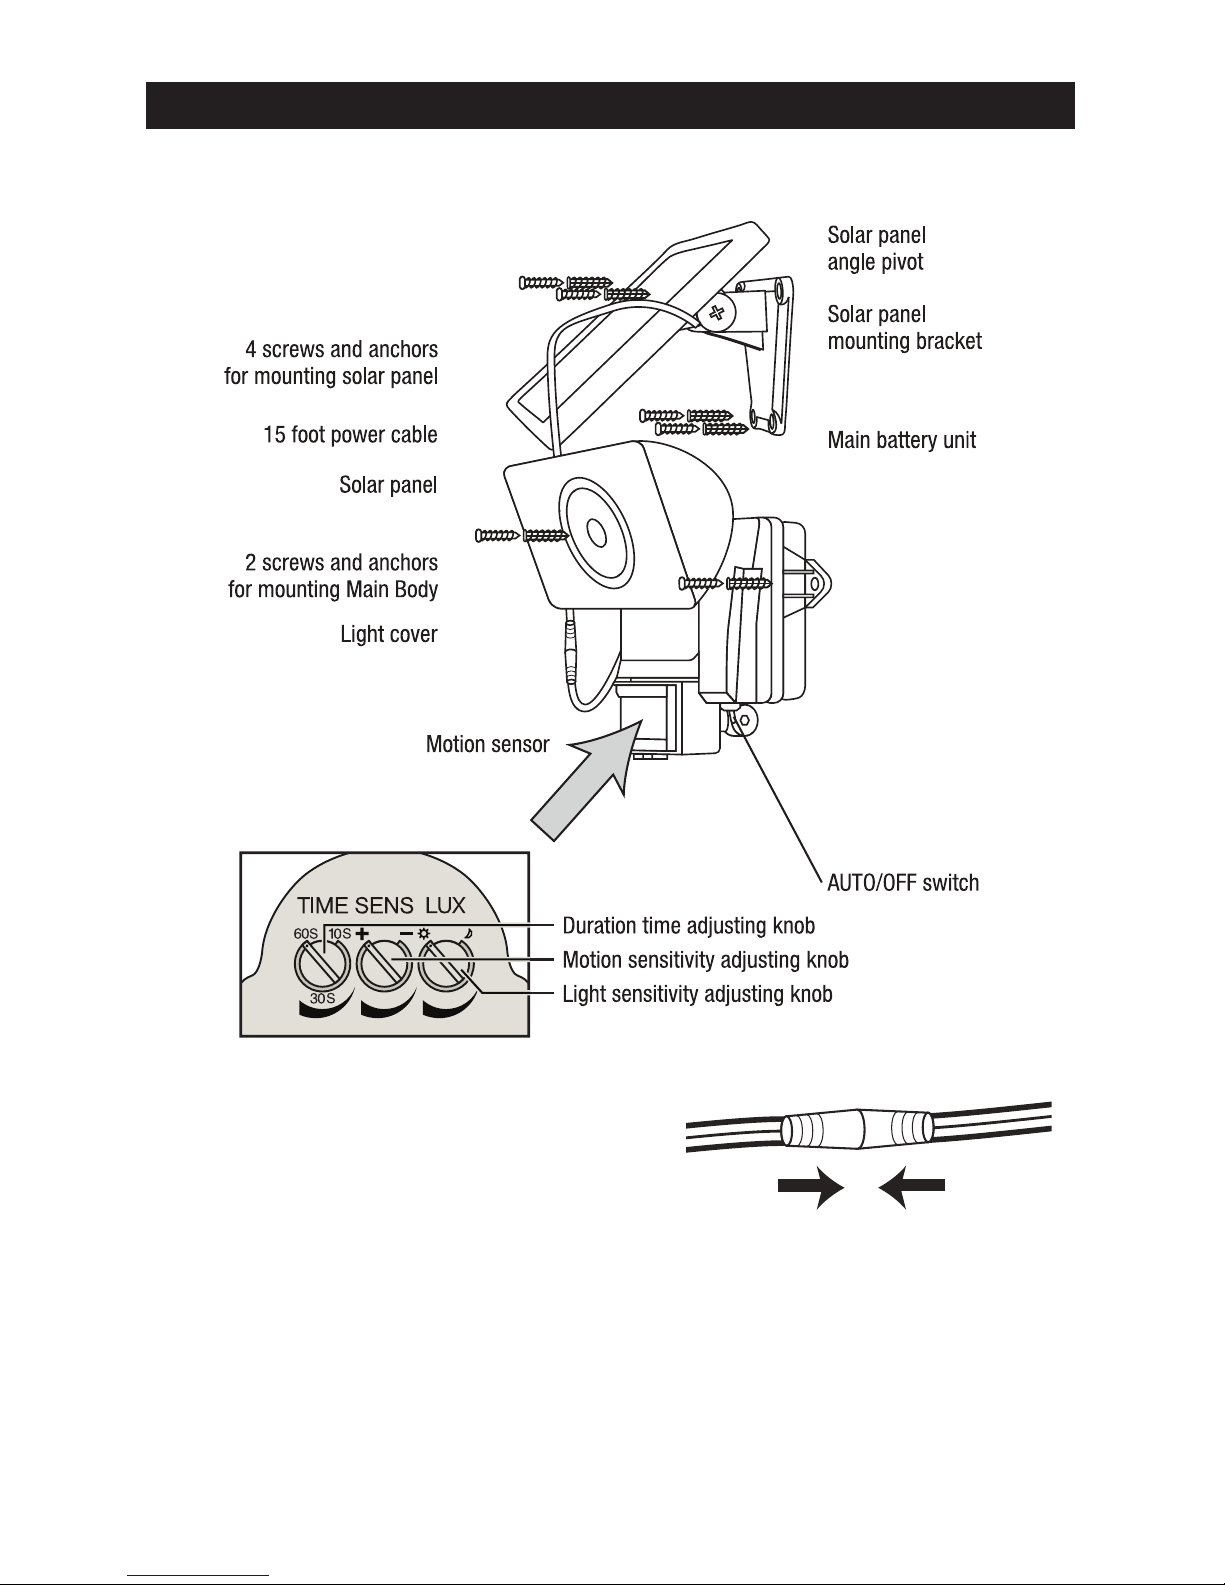
Underneath the motion sensor, there are 3 adjustment dials: TIME/SENS/LUX. The light has
been factory preset as follows:
TIME - Set at 30 seconds.
SENS - Set at a 15 - 20 foot range (when the surrounding temperature is 75 F).
LUX - Set for your Security Light to activate at dusk when motion is detected.
If the above settings are not suitable for your application, then these may be adjusted using the
steps below.
TIME PERIOD ADJUSTMENT (TIME)
The time period control dial sets the duration of the light upon each activation that the Solar
Security Light will remain illuminated after the last detected motion. The time period has an
adjustable range of 10 seconds to 1 minute.
To decrease the time period, move the dial toward the ( – ) symbol.
To increase the time period, move the dial toward the ( + ) symbol.
To test the Time Period, trigger the motion sensor and measure the length of time the light
remains activated. Adjust the TIME control until the desired illumination duration is reached.
A shorter TIME setting will conserve battery life. For best results, use the shortest TIME setting
for your location as possible.
MOTION SENSOR ADJUSTMENT (SENS)
The motion sensor on this Solar Security Light is temperature-sensitive. The cooler the
temperature, the more sensitive the motion sensor will become. Use the SENS dial to adjust
the sensitivity of the motion sensor to compensate for environmental temperature changes. The
motion sensor is most sensitive when the SENS dial is turned fully clockwise (+).
To decrease sensitivity, move the dial toward the ( – ) symbol.
To increase sensitivity, move the dial toward the ( + ) symbol.
To test the motion sensitivity, aim the sensor head toward the desired area. Set the TIME dial to
minimum ( – ) position and the LUX dial to the bright setting ().

5
Part # 44640
www.maxsainnovations.com
Walk slowly around the area of detection, changing your walking pace until the light comes
on. If light does not come on, you may need to adjust the angle of the sensor unit. Make
adjustments as needed until the desired level of sensitivity is reached. Re-adjust the TIME and
LUX dials when complete.
LIGHT LEVEL ADJUSTMENT (LUX)
The LUX dial controls the natural light level that triggers the Solar Security Light and prevents
the light from operating during daylight hours.
Your Solar Security Light comes preset for activation at dusk. If you want your security light
to activate when it is still light out, move the dial towards the sun (). If you only want your
security light to work when it gets dark, move the dial towards the moo ( ).
REPLACING THE BATTERY
When the charging ability of the batteries decreases, you can replace the battery with a new 6V,
4Ah lead acid battery. Follow the steps below when replacing the battery.
1. Remove the main unit from its mounted surface and unplug the solar panel.
2. Move the power switch on the main body to the OFF position.
3. Remove the four (4) screws on the back of the main unit that hold the halves together.
4. Once the unit is open, carefully remove the two (2) brackets holding the battery in place
by unscrewing the four (4) screws as indicated in the diagram above.
5. Carefully unplug the positive and negative cords.
6. Carefully remove the battery from its compartment and replace with a new 6V, 4Ah
rechargeable lead acid battery. Ensure that the red cord is re-attached to the red-colored
battery terminal.
(WARNING: Connecting these in the opposite direction could damage the unit.)
7. Replace the two (2) brackets to hold the battery in place by using the four (4) screws
removed in step 4, taking care not to damage any cables.
8. Re-assemble the main unit by screwing the two (2) halves of the main body together
securely.
Once assembled, mount your Solar Security Light to its original surface location.
Repeat the steps in the “Before first time use of your Solar Security Light” section on page 4 to
ensure your new battery is fully charged.

6
Motion-Activated Solar Security Light
www.maxsainnovations.com
NOTE: Do not dispose of batteries in general household trash or into a fire since the batteries
may explode. Consult your local regulations for correct disposal of batteries. The batteries
may also be returned to MAXSA Innovations at 8412 Cathedral Forest Dr., Fairfax Station, VA
22039. Do not take apart the batteries since they contain corrosive chemicals.
MAINTENANCE TIPS
The LED lights in your Solar Security Light will last up to 30,000 hours and should never need
replacement.
To keep your Solar Security Light looking new, keep the lens free of dust and deposits by wiping
occasionally with a dry cloth or with warm soapy water.
It is important that the solar panel is kept free of dirt and debris at all times. A dirty solar panel
will not allow the batteries to be fully charged. This will shorten the life of the battery and may
cause the light to malfunction.
STORAGE
If you wish to store your light indoors for more than two or three days, turn the power switch to
the OFF position to prevent damage to the batteries. Battery capacity may be reduced during
prolonged storage. For optimal performance, we recommend that you do not store your Solar
Security Light for prolonged periods of time.

7
Part # 44640
www.maxsainnovations.com
TROUBLESHOOTING
PROBLEM POSSIBLE SOLUTIONS
Light will not switch
on when there is
movement in the
detection area.
•Ensure that the power switch on the main body has been
turned to the AUTO position.
•Ensure that the motion sensor has been positioned to face
oncoming movement.
•Ensure that the battery has been fully charged in direct
sunlight for 3 sunny days. Refer to the “Before First Use of
Your Solar Security Light” section on page 4.
•Check to see that the solar panel is facing south so that it
receives direct sunlight for most of the day, enabling the
battery to fully charge.
•Check to see that the LUX control has not been set too far
towards ( ). Setting the LUX control too far towards ( ) will
cause the Solar Security Light to turn on only in complete
darkness.
•Check to see that the motion sensor is not near night time
light sources such as street lights.
Light switches on
during the day.
•The LUX control may be set too far towards the () position.
•Reposition the motion sensor.
Light switches on
for no apparent
reason.
•The SENS control may be set too far towards the (+) position.
•Moving trees, traffic, pets or birds may be getting in the area
of detection. This may be unavoidable, however the sensor
could be redirected to a height where this is less likely to
occur.
•If there are reflective objects in the detection area such as
windows, water, or white walls, you may need to redirect or
possibly reposition the motion sensor.
•Test the motion sensor by covering it completely with
cardboard and waiting several minutes to make sure it does
not detect motion. If the light still switches on, please contact
MAXSA for further assistance.
Light quickly
flashes on and off.
•Battery charge may be low. Turn the power switch to the OFF
position and charge the battery for three (3) sunny days with
the solar panel placed in direct sunlight.
•Move the LUX control more to the () position.
Light is not as
bright as normal.
•Battery charge may be low. Turn the power switch to the OFF
position and charge the battery for three (3) sunny days with
the solar panel placed in direct sunlight.

8
Please save these instructions for future reference.
1 YEAR LIMITED WARRANTY
This Solar Motion-Activated Light is warranted against faulty material and/or workmanship for a period of
1 year from date of original purchase.
The obligation of the manufacturer, under this warranty, is limited to servicing and replacing defective
parts when the unit is returned to MAXSA Innovations, freight pre-paid during the warranty period. To
obtain warranty repair, the purchase receipt should be returned with the product.
This warranty becomes void on any unit which has been tampered with, damaged by accident, or damaged
otherwise by improper operation.
This guarantee is in addition to any guarantees implied by State or Federal Legislation.
EXTENSION CORDS
A 15-foot extension cord is available for this product for $14.95. This extension cord allows the solar panel
to be placed higher or further away from the security light to ensure maximum direct sunlight exposure.
MADE IN CHINA
MAXSA Innovations
8412 Cathedral Forest Drive
Fairfax Station, VA 22039
Tel: 703-495-0661
www.maxsainnovations.com
©2012 MAXSA Innovations, LLC V12.1
Table of contents
Other MAXSA Lighting Equipment manuals
Popular Lighting Equipment manuals by other brands

Acuity Brands
Acuity Brands Aculux AX3 A WDTW installation instructions

Sensio
Sensio Ark TrioTone SE11192T0 quick start guide

Axon
Axon TASER Bolt 2 Energy Weapon user manual

Optika
Optika CL-14 instruction manual

Bathology
Bathology Spectrum 620-C Installation and operation manual

Chauvet
Chauvet TRIDENT user manual

DTS
DTS Z8 user manual

Robe
Robe ArcSource Outdoor 16 MC Integral RGBW US user manual

Generac Power Systems
Generac Power Systems CTF 10 owner's manual

Insignia
Insignia NS-DCLR32X5 Quick setup guide

Beacon
Beacon TSL VISOR installation instructions

Cooper Lighting
Cooper Lighting WaveLinx Lite User and programming manual