Maxspect Jump Series User manual

User Manual
Bedienungsanleitung
Mode d'emploi
Manual do Proprietário
Manuale d'uso
Manual de usuario
Instrukcja Obsługi
用户手册
使用說明書


1
User Memo
Dear Customer,
Thank you for purchasing this product.
For optimum performance and safety, please read these instructions carefully.
User Memo:
Date of purchase:
Dealer name:
Dealer address:
Dealer website:
Dealer email:
Dealer phone no.:
Please visit us on Facebook, Twitter or Instagram!
Facebook
Twitter
Instagram
EN

2
Package Content
Please check the content in the package.
EN

3
Precautions
Before using the Maxspect™Jump Series LED Lighting System
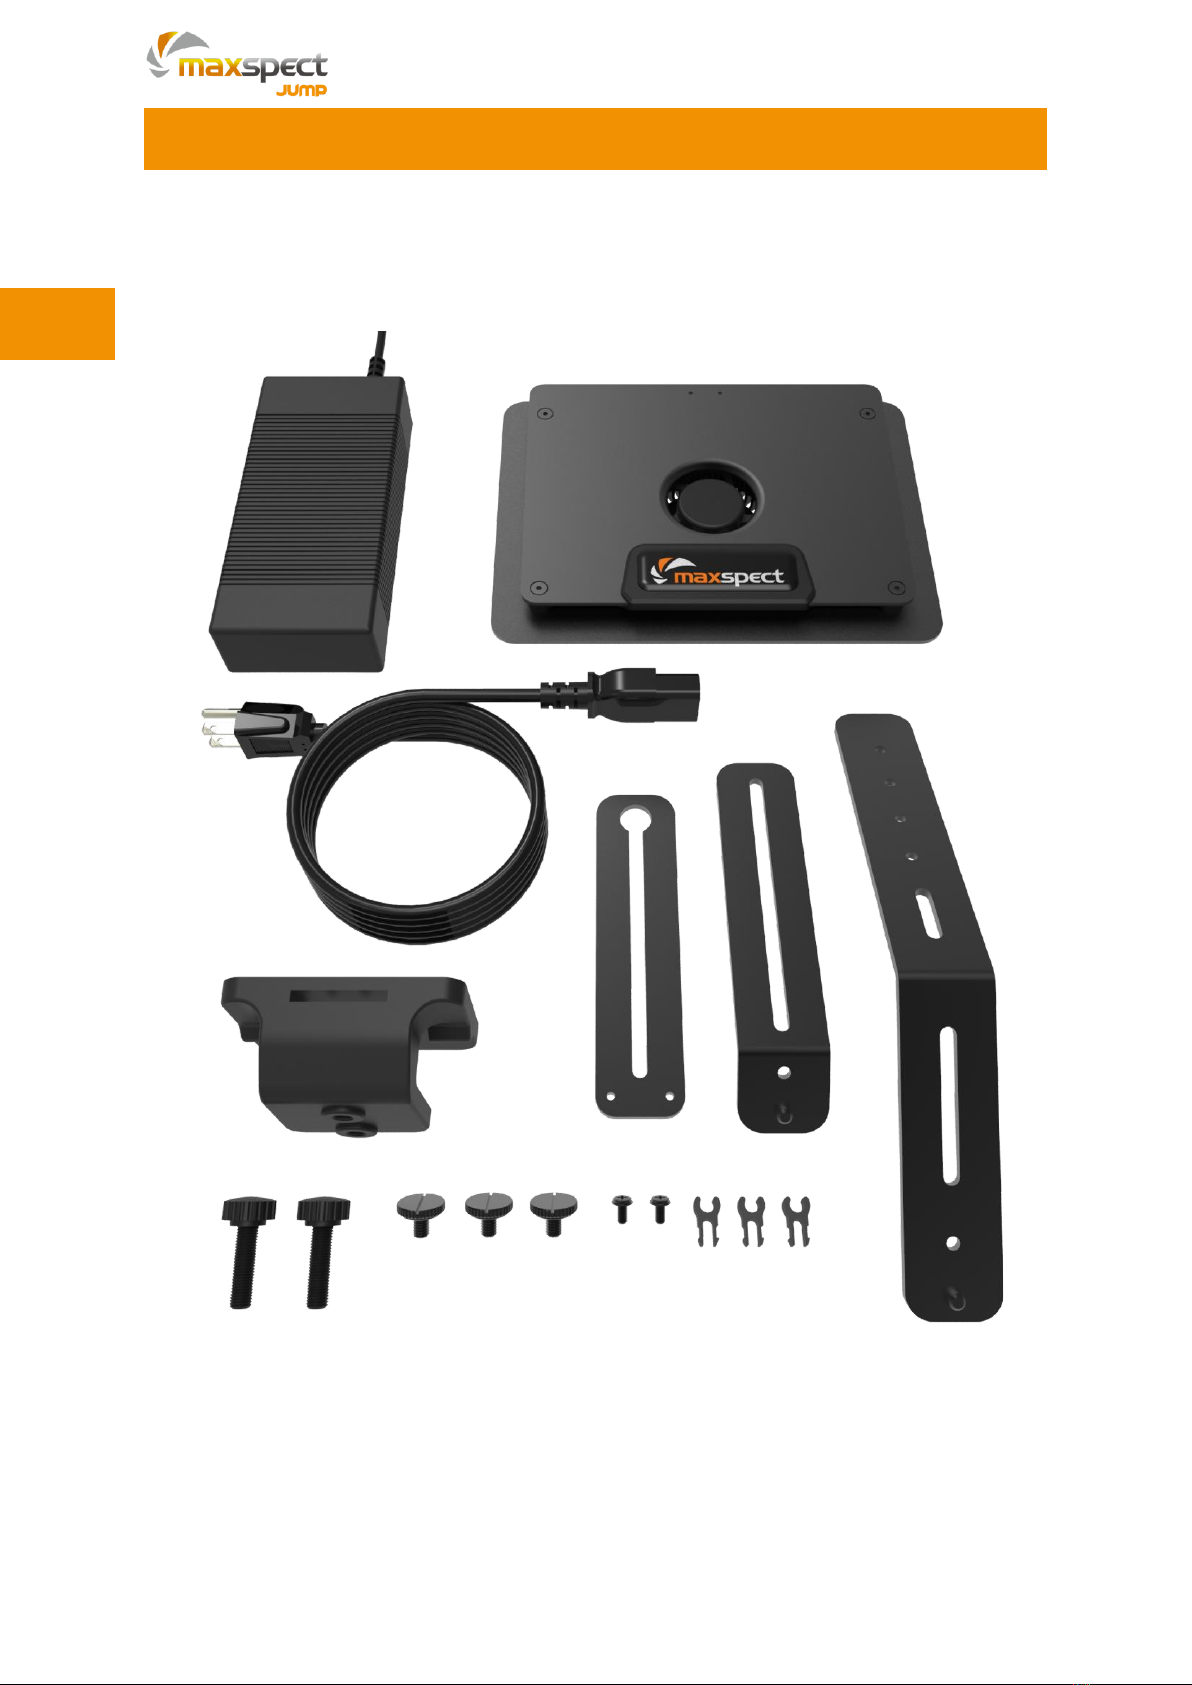
1. Remove any plastic bags and packaging material protecting the fixture.
2. Never look directly at the LED bulbs when you switch on the system. Incorrect use
of this apparatus will increase eye hazard.
On Safety
1. Power Source –Do not defeat the safety purpose of the polarized or grounding-
type plug. A polarized plug has two blades with one wider than the other. A
grounding-type plug has two blades and a third grounding prong. The wide blade
or the third prong is provided for your safety. If the plug does not fit into your
outlet, consult an electrician for replacement of the obsolete outlet.
2. Power Cord Protection –The power supply cords should be routed so that they
are not likely to be walked on or pinched by items placed upon or against them.
Never take hold of the plug or cord if your hand is wet, and always grasp the plug
body when connecting or disconnecting it.
3. Installation –Install indoor only, and use the attachments, mounting frames,
hanging kit and accessories provided and specified by the manufacturer.
On Operation
1. Operation –Always follow the operation instructions set forth in this manual when
using this Maxspect™ Jump Series LED Lighting System.
2. Heat –The apparatus should be situated away from heat sources such as radiators,
and do not expose to excessive heat such as sunshine, fire or the like.
3. Moisture –To reduce the risk of fire or electric shock, do not expose this apparatus
to rain, moisture, dripping or splashing.
4. Ventilation –The apparatus should be situated so that its location or position
does not interfere with its proper ventilation.
5. Magnetism –The apparatus should be situated away from equipment or devices
that generate strong magnetism.
6. Cleaning –Clean only with dry or damp cloth.
Before using this Maxspect™ Jump Series LED Lighting System, please read
these operating instructions carefully. Take special care to follow the safety
suggestions listed below.
Afterwards keep this manual handy for future reference.
EN

4
Installation
Mounting the LED Lighting System
Before connecting the fixture to power, first mount the system by using the provided
stand.
apprx. ±3°
Adjust the angle by tweaking the screws.
EN

5
Installation
Hanging Kits Installation (sold separately)
1
2
3
4
EN

6
SYNA-G CLOUD APP
Maxspect™ Jump Series LED Lighting System is a cloud-based controlling system. To
get full access to the fixture, you need to install SYNA-G CLOUD APP on your mobile
device. For iOS platform, please download the APP from Apple App Store, for Android
platform please download the APP from Google Play Store. Alternatively, you can also
download the app by scanning the QR-code shown below.
For detailed operation instruction, please check out the following sections, or scan
above QR-Code to visit Maxspect official channel on YouTube for tutorial videos.
Fixture
Different color of the Status Indicator represents different working status of the fixture.
Operating Instructions
iOS
Android
YouTube
Indicator
Constant On
Manual
Working Mode
Automatic
Working Mode
Preset 1
Preset 2
Preset 3
Strobing
Router Mode
Reset User
Setting
Reset WiFi
Connection
AP Mode
N/A
Status Indicator
Button
Button
EN

7
Ways of Connection
Router Mode with Internet Connection: The fixture connects to mobile device
through router, and the router is connected to the Internet. In this case, you will need
to create an account and log in the APP to get full access to the fixture.
Router Mode without Internet Connection: The fixture connects to mobile device
through router, and the router is NOT connected to the Internet. In this case, you will
get limited access to the fixture and an account is not needed.
AP Mode: The fixture connects to mobile device directly. In this case, you will get
limited access to the fixture within the cover area of the WiFi signal*, no account is
needed in this case.
*Max 10m/30ft with no obstacle between the equipment.
Operating Instructions
Function
Router Mode
With Internet
Router Mode
Without Internet
AP Mode
Auto Working Mode
√
√
√
Manual Working Mode
√
√
√
Password Setting
√
√
√
Illumination Setting Sharing
√
√
√
Multiple Fixtures Controlling
√
√
x
Fixture Bonding
√
x
x
Fixture Grouping
√
x
x
Fixture Naming
√
x
x
Global Control
√
x
x
Control Sharing
√
x
x
Router Mode
AP Mode
EN

8
Router Mode Connection
Operating Instructions
Internet
1. Press button B to check if the indicator is strobing in blue. If not, press and hold
button B for about 6s to change to the Router Mode.
2.
Open the APP to connect the fixture by following the hints*.
3.
Create an account and log in**.
4. For Android platform, choose the WiFi connection to which your mobile device has
already connected.
5.
Input password of the WiFi connection.
6.
Waiting for the connection, the indicator will strobe once if connect successfully.
7.
While a fixture with ID number starts with “MJ-L1B0”is shown on the list of
“Discovery of New Devices”, it means that the fixture is connected to your
mobile device successfully***.
*Make sure your mobile device is connected to 2.4GHz frequency network.
**1. When creating account, you will need to choose a server among Asia, Europe
and USA, which means the network service is divided in three regions. Please
choose the server which is nearest to you, otherwise you may get slower server
response. If you want to change to the other server when you think the current one
is not response fast enough, you will need to register a new account on a new
server. For example, I registered an account on Europe server with the email
address xxxx@maxspect.com, if I change the server to USA, I can use the same
email address to register a new account on USA server. In this circumstance, you
will need to connect again all LED units to the account.
2. Skip this step if the router is not connected to the Internet.
***The fixture is now bonded to the account, other account login the same network - no
matter whether it is on the same mobile device or not - cannot access to the fixture
though it is shown on the list of the APP. It is worth noting that one fixture can only
be bonded to one account, while one account can bond multiple fixtures
. If you
have multiple fixtures to connect, you need to connect them one by one.
EN

9
Turn On/Off the Fixture
Press and hold button A for 6s can turn on/off the fixture. While the fixture is
connected to mobile device in either Router Mode or AP Mode, you can turn it on by
doing any operation on the APP. After the fixture is turned on again or recovered
from power cut, it will be back to the previous working status before it was turned off.
Default Factory Setting
Indicator: Constant on in blue
Connection: Router Mode
Working Mode: Manual Working Mode
Brightness: 100% for all channels
Delete WiFi Connection:
1. Disconnect the power of the fixture.
2. Press and hold button A while reconnecting the power of fixture, then release the
button.
3. Press and hold button A for about 3s, release the button while the indicator turns
to RED,WiFi connection is deleted successfully.
4. Disconnect and reconnect again the power of the fixture.
Clear User Setting:
1. Disconnect the power of the fixture.
2. Press and hold button A while reconnecting the power of the fixture, then release
the button.
3. Press and hold button B for about 3s, release the button while the indicator turns
to GREEN,user setting is cleared successfully.
4. Disconnect and reconnect again the power of the fixture.
Operating Instructions
1.
Press button B to check if the indicator is strobing in GREEN, if not press and
hold button B for about 6s to change to AP Mode.
2.
Open the WiFi list of mobile device and choose the SSID starts with “MJ-L1B0”,
input the password “123456789”(Unchangeable).
3.
Open the APP, click “Server” on the right top side of the login page and select
“AP Mode”.
4.
While a fixture with an ID starts with “MJ-L1B0”is shown on the list of “
Discovery
of New Devices”, it means that the fixture is connected to your mobile device
successfully.
AP Mode Connection
EN

10
Working Mode
Automatic Working Mode: a set of program with programmable brightness for each
channel, which can be cycled every 24hrs.
Manual Working Mode: The fixture will be illuminating at specific brightness until
you change it manually. Press button A can also switch among the three presets*and
the setting of Manual Mode. The indicator will turn to specific color accordingly.
*The presets can only be accessed to through button A and cannot be adjusted.
Manual Mode
Preset 1
Preset 2
Preset 3
Share the Control of Fixture
Maxspect™ Jump Series LED Lighting System features a special function, which allows
you to share the control of fixture with your friends. This function can ONLY be used
in the Router Mode with Internet connection.
1. Open the APP and log in;
2. Choose the fixture which you want to share with your friend, slide the bar to the
left and click “Sharing”;
3. Select “User Account Sharing”*, input the account you want to share the
control with and click confirm;
4. On your friend's mobile device**, open the APP and log in the account you are
sharing the control with, Click on the right down side of the APP;
5. Click ;
6. Select “Invited”;
7. Click “Accept”;
8. Click , the fixture will be shown on the equipment list of the APP.
*It can also be shared by scanning the QR code by your friend's mobile device.
**The mobile device of your friend is not necessary to connect to the same WiFi
network as your mobile device connects to, as long as it is connected to the Internet.
However, the accepted account cannot share anymore the control of fixture with
other account.
Operating Instructions
Automatic
working Mode
Manual
Mode
EN

11
Retrieve the Control of Fixture
You can easily retrieve the control of fixture by the following steps:
1. Open and log in the APP on your mobile device, click on the right down side
of the APP;
2. Click ;
3. Select “Share”;
4. Select the fixture which you want to retrieve the control;
5. Select the account from which you want to retrieve the control, slide the bar to
the left, click “Cancel Sharing”*.
* If you have shared the control of the fixture with multiple accounts, you can quickly
retrieve the control from all accounts by deleting the fixture on the equipment list.
Fixture Grouping
If you have multiple fixtures bonded with an account, you can control all of them at
the same time by grouping them together.
1. Open the APP and log in;
2. Click on the bottom of the APP;
3. Click on the right upside of the APP;
4. Input group name and select the fixtures you want to group, click “Confirm”.
Now the group is shown on the list of “Device Group”, here you can control all the
fixtures within a group at the same time, or control them separately on the
equipment list. It is worth noting that if you have shared the control of fixture
with other account before grouping, it is still available now. If necessary, you can
retrieve the control either before or after grouping.
Operating Instructions
EN

12
Password Setting
•If a fixture connected to router with Internet connection, it can be seen by all
mobile devices as long as they are connected to the same network, no matter
whether they are logged in or not. For the mobile device(s) which is(are) logged
in, only the one to which the fixture is bonded can control the fixture. For the
mobile device(s) which is(are) NOT logged in, all of them can control the fixture as
long as it has no password.
•If a fixture connected to router WITHOUT Internet connection, all mobile devices
connected to the same network can control the fixture as long as it has no
password.
•If a fixture directly connected to multiple mobile devices, all of them can control
the fixture as long as it has no password.
In summary, a password can prevent the fixture from being controlled by other
mobile devices while they don't have the password. Follow below steps to set
password for a fixture.
1. In all case, choose the fixture you want to set password;
2. Click“∙∙∙”on the right upside of the APP;
3. Choose “Change Password”;
4. Input password (16 digits at most) and confirm.
Share the Setting of Illumination
SYNA-G CLOUD APP offers a function that allows you to share the illuminating
setting of Manual Mode or Auto Mode with your friends. This function can ONLY be
used in Router Mode with Internet connection.
1. Open the APP and log in;
2. Select the fixture which you want to share the setting on the equipment list;
3. Either in the Manual or Automatic Working Mode, click on the right
downside of the APP;
4. Select , then a QR code for the setting is generated*;
5. On your friend's mobile device, if the setting you share is for Automatic Working
Mode, enter the same working mode of the fixture your friend wants to use the
setting;
6. Click on the right downside of the APP;
Operating Instructions
EN

13
7. Select then choose “Scan QR Code”, the setting will be loaded
automatically.
* You can also share the setting by sending the QR code to your friend. After the QR
code is generated, click“Share”then choose the platform you prefer to use. Your
friend saves the QR code in the album then scan it by choosing “Album” on step 7.
Firmware Upgrade
If there is new firmware available, it will be upgraded automatically in the first few
minutes after the account is logged in.
1. Open the APP and log in the account;
2. Choose the fixture you want to check the firmware version;
3. Click“∙∙∙”on the right upside of the APP;
4. Choose“Get device hardware info”to check the firmware version.
Name the Fixture
Only the account to which the fixture is bonded can name the fixture. Follow below
steps to name the fixture.
1. Open the APP and log in;
2. Choose the fixture you want to name;
3. Click“∙∙∙”on the right upside of the APP;
4. Choose“Set Device Alias”to name the fixture.
Operating Instructions
EN

14
Maintenance of the fixture
User must periodically perform maintenance on the fixture, including but not limited
to the following steps:
•Use a damp cloth to clean the acrylic lens to make sure it is not covered by salt
creep or other dirt and debris. Uncleaned lens will severely affect the luminous
output of the fixture, so for best performance you should clean the lens once a
week.
•Clean the dust and debris trapped in the fan units. Regularly and properly cleaned
fans will last much longer than those that are not. Fan unit is wear-and-tear parts
and must be replaced every 24-36 months depends on the frequency of
maintenance performed on them.
•Clean / remove any salt creep or dirt and debris that had been built up or collected
on the aluminum body of the fixture, as they may affect the dissipation of heat from
the fixture.
Note: Failure to perform the above-mentioned maintenance on the fixture may cause
unnecessary damage to your fixture and may void your warranty!
Specifications
For the latest specifications on LED layout, types and color spectrum, please visit our
website www.maxspect.com, or scan below QR-Code.
Maintenance Instruction
EN

15
Maxspect (Hong Kong) Limited warrants all Maxspect™ Jump Series LED Lighting System
products against defects in workmanship for a period of 12-months from the date of purchase.
If a defect exists during the warranty period, Maxspect (Hong Kong) Limited at its option will
either repair (using new or remanufactured parts) or replace (with a new or remanufactured
unit) the product at no charge.
THE WARRANTY WILL NOT APPLY TO THE PRODUCT IF IT HAS BEEN DAMAGED BY MISUSE,
ALTERATION, ACCIDENT, IMPROPER HANDLING OR OPERATION, OR IF UNAUTHORIZED
REPAIRS ARE ATTEMPTED OR MADE. SOME EXAMPLES OF DAMAGES NOT COVERED BY
WARRANTY INCLUDE, BUT ARE NOT LIMITED TO, USING AFTER-MARKET LED BULBS AND
MODIFICATION OF THE CIRCUITRY, WHICH ARE PRESUMED TO BE DAMAGES RESULTING
FROM MISUSE OR ABUSE.
DISCLAIMER OF CONSEQUENTIAL AND INCIDENTAL DAMAGES:
You and any other user of Maxspect (Hong Kong) Limited products shall not be entitled to any
consequential or incidental damages, including without limitation, loss of use of the unit,
inconvenience, damage to personal property, phone calls, lost income or earnings. This
warranty gives you specific legal rights and you may have other rights, which vary from state
to state.
MAXSPECT LTD. MAKES NO WARRANTY OR REPRESENTATION, EITHER EXPRESS OR
IMPLIED, WITH RESPECT TO THE PRODUCT'S QUALITY, PERFORMANCE, MERCHANTABILITY,
OR FITNESS FOR A PARTICULAR PURPOSE. AS A RESULT, THIS PRODUCT, IS SOLD "AS IS,"
AND YOU THE PURCHASER ASSUME THE ENTIRE RISK AS TO ITS QUALITY AND
PERFORMANCE.
IN NO EVENT WILL MAXSPECT LTD, BE LIABLE FOR DIRECT, INDIRECT, SPECIAL,
INCIDENTAL, OR CONSEQUENTIAL DAMAGES RESULTING FROM ANY DEFECT IN THE
PRODUCT OR ITS DOCUMENTATION.
The warranty, disclaimer, and remedies set forth above are exclusive and replace all others,
oral or written, expressed or implied. At no time will any Maxspect (Hong Kong) Limited dealers,
agents, or employees be authorized to make any modifications, extension, or addition to this
warranty.
Some states do not allow the exclusion or limitation of implied warranties or liability for
incidental or consequential damages, so the above limitation or exclusion may not apply to
you.
Limited Warranty
EN


16
Nutzer-Memo
Sehr geehrter Kunde,
Vielen Dank für den Kauf dieses Produkts.
Für eine optimale Leistung und Sicherheit, lesen Sie bitte diese Anleitung
sorgfältig.
Nutzer-Memo:
Kaufdatum:
Händler:
Händleradresse:
Händlerwebsite:
Händler-E-Mail:
Händlertelefon:
Bitte besuchen Sie uns auf Facebook,Twitter oder Instagram!
Facebook
Twitter
Instagram
DE

17
Packungsinhalt
Bitte überprüfen Sie den Lieferumfang auf Vollständigkeit.
DE
Other manuals for Jump Series
2
This manual suits for next models
1
Table of contents
Languages:
Other Maxspect Aquarium manuals
Popular Aquarium manuals by other brands

All Pond Solutions
All Pond Solutions CURVE Series manual

Aqua Medic
Aqua Medic Kauderni CF Operation manual

Aqua One
Aqua One EasyGlow 80 quick start guide

Aqua Medic
Aqua Medic Turboflotor multi SL Operation manual

Blue Marine
Blue Marine Reef 120 installation manual

JBL
JBL ProCristal UV-C Compact 5W manual