Maxspect SK Series User manual

Owner's Manual
Bedienungsanleitung
Mode d'emploi
Manual do Proprietário
Instrukcja Obsługi
使用说明书
使用說明書


1
User Memo
Dear Customer,
Thank you for purchasing this product.
For optimum performance and safety, please read these instructions carefully.
User Memo:
Date of purchase:
Dealer name:
Dealer address:
Dealer website:
Dealer email:
Dealer phone no.:
Please visit us on facebook or twitter!
www.facebook.com/Maxspect
twitter.com/maxspectled
EN

2
Package and Assembly
Please check the content in the package.
x1
x1
x1
x1
x1
Remove all packing materials before assembling.
EN

3
Precautions
READ AND FOLLOW ALL SAFETY INSTRUCTIONS
1. DANGER –To avoid possible electric shock, special care should be taken since water is employed
in the use of aquarium equipment. For each of the following situations, DO NOT attempt to repair
by yourself; return the appliance to an authorized service facility for service or discard the
appliance.
a) If the appliance shows any sign of abnormal water leakage, immediately unplug it from the
power source.
b) Carefully examine the appliance after installation. It should not be plugged in if there is water
on parts not intended to be wet.
c) DO NOT operate any appliance if it has a damaged cord or plug, or if it is malfunctioning or has
been dropped or damaged in any manner.
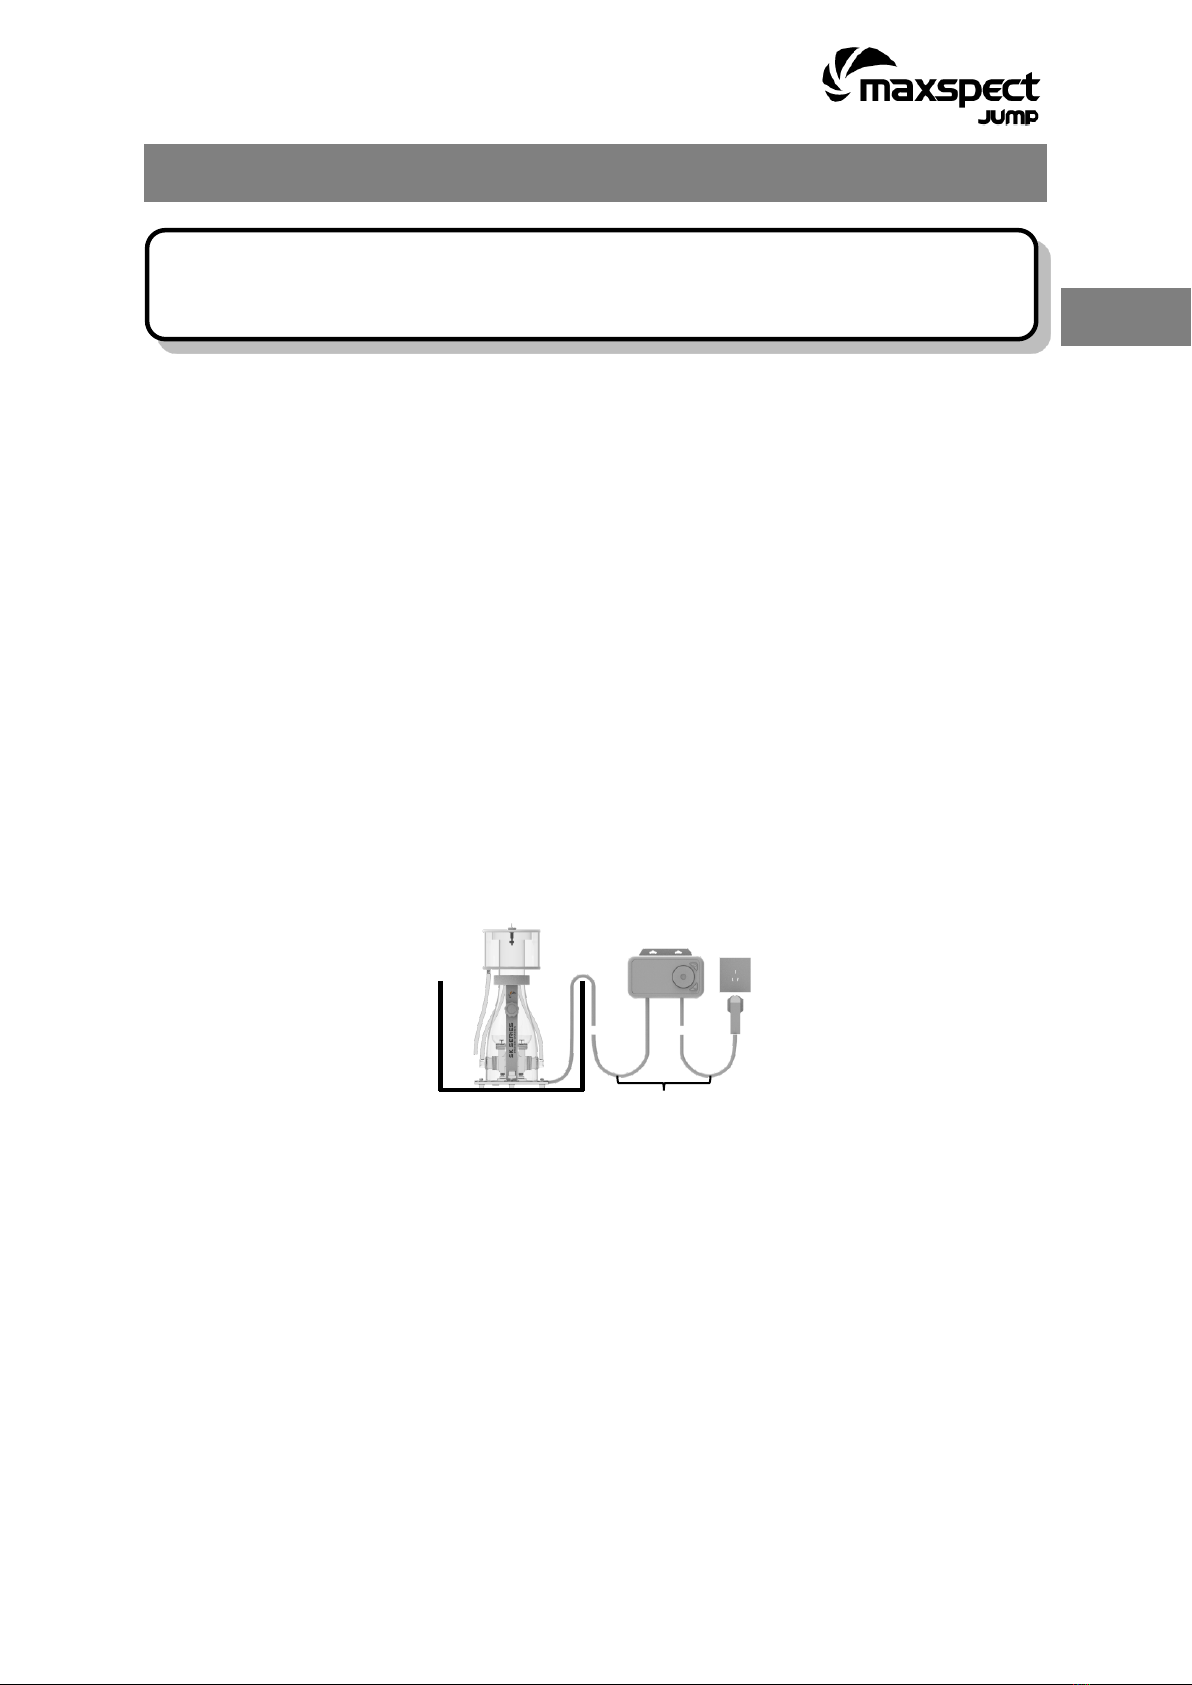
d) To avoid the possibility of the appliance plug or receptacle getting wet, position aquarium stand
and tank to one side of a wall-mounted receptacle to prevent water from dripping onto the
receptacle or plug. A “drip-loop” shown in the figure, should be arranged by the user for each
cord connecting an aquarium appliance to a receptacle. The “drip-loop” is that part of the cord
below the level of the receptacle, or the connector if an extension cord is used, to prevent
water traveling along the cord and coming in contact with the receptacle. If the plug or socket
does get wet, DO NOT unplug the cord. Disconnect the fuse or circuit breaker that supplies
power to the appliance. Then unplug and examine for presence of water in the receptacle.
2. Close supervision is necessary when any appliance is used by or near children.
3. To avoid injury, DO NOT contact moving parts or hot parts such as heaters, reflectors, lamp bulbs,
and the like.
4. Always unplug an appliance from an outlet when not in use, before putting on or taking off parts,
and before cleaning. Never yank cord to pull plug from outlet. Grasp the plug and pull to
disconnect.
5. DO NOT use an appliance for other than intended use. The use of attachments not recommended
or sold by the appliance manufacturer may cause an unsafe condition.
6. DO NOT install or store the appliances where it will be exposed to the weather or to temperatures
below freezing.
7. Make sure an appliance mounted on a tank is securely installed before operating it.
8. Read and observe all the important notices on the appliance.
9. If an extension cord is necessary, a cord with a proper rating should be used. A cord rated for less amperes
or watts than the appliance rating may overheat.
Drip Loop
Before using this Maxspect™ Jump Series Protein Skimmer please read these operating
instructions carefully. Take special care to follow the safety suggestions listed below.
Afterwards keep this manual handy for future reference.
EN

4
Preview
Preview
Maxspect™ Jump Series Protein Skimmer is a very competitive product which features with
some innovate functions.
Dual Water Inlets: Allow the skimmer sucks water from both sides of the skimmer.
Dual Needle Wheels: Each water inlet features dual needle wheels. One is spinning while
the other one is static. This unique design makes the bubbles generated even smaller and
in higher density compare to most of the traditional skimmers which using needle wheel
technology.
Over Flow Sensor: An over flow sensor which can detect the water level of the collection
cup and send warning signal when necessary.
1.
Over Flow Sensor
4.
Air Hose
7.
Water Level Adjustor
2.
Collection Cup
5.
Dual Water Inlets
8.
Dual Bubble Outlets
3.
Drain Hose
6.
Silencer
9.
Water Outlet
6
9
7
8
1
2
4
5
3
4
5
EN

5
Positioning and Commissioning
Positioning
To position the Jump Series Protein Skimmer in a proper place, there are some rules should
be followed:
Before putting the skimmer into the sump, it is recommended to clean it with fresh water.
Place the skimmer in a sump compartment where the water level is in consistent height.
An auto top-up system may be needed to keep the water level.
Place the skimmer in a place where is free of debris, gravel, sand, shells and small objects.
The optimal water level of the skimmer is in between 18-22cm/7”-8½”. Exceed the Max
water level may cause the leaking of water from the knob.
Each water inlet requires at least 2cm/1” space.
The water outlet requires at least 2cm/1” space.
For indoor use only.
Commissioning (Break-in)
After positioning the skimmer in the proper place. It is ready to put it into operation. However,
before the skimmer can perform optimally, it requires a break-in period which may last from
minutes to days of time. It depends the factors like: the adhesive residues, fats or other similar
impurities left in the skimmer, or chemistry, feeding and surface tension of the water etc. To
tune the skimmer, you can follow below two ways.
Controller: You can adjust the working speed of the pump by setting parameter through the
controller.
Water outlet: You can control the water volume flowing out of the skimmer by turning the
water level adjustor.
The response of any adjustment change is delayed in time. For detailed operation, please read
“Operation” section.
18cm
-
22cm
7”
-
8½”
2cm
/1”
EN

6
Operation Instructions
You can adjust the foaming performance by following below guidlines.
1. Water Outlet
2. Controller
Turn ON/OFF the Skimmer
Press the ON/OFF Button for about 5 seconds can turn on or off the skimmer. Each time when
the skimmer is connected to power, the system will count down from 10 seconds before it
starts to work.
Setting Working Speed
Press the Control Dial to enter speed-setting status, rotate the Control Dial to set a speed
among OFF/10/20…/100. Press again the Control Dial to save the setting.
Feeding
Press the Feeding Button can enter or exit the Feed Mode, the pump will stop working for 600
seconds(unchangable) and the Feeding Indicator will be strobing during the feeding period.
Over Flow Detection
The pump will stop working immediately when the buoy of the sensor is floating on the water,
the Over Flow Indicator will keep strobing. After the buoy is back to its normal position, it will
take 10 seconds waiting for the pump to start working again.
Rotate the knob to adjust the water outlet.
Speed/Time Indicator
Feeding Indicator
Over Flow Indicator
Control Dial
ON/OFF Button
Feeding Button
EN

7
Maintenance
Maintenance of the Appliance
The Maxspect™ Jump Series Protein Skimmer can be completely torn down for maintenance,
cleaning and servicing. This is done in the order of the steps described below. Due to the harsh
conditions of a saltwater aquarium and resulting buildup of algae and other organic matter, it
is advisable to clean the pump to ensure the longevity of appliance. Maxspect recommends
doing a cleaning every 6 months or as necessary. If there is calcium buildup, it may be
necessary to soak these parts in a mild acid solution such as vinegar. DO NOT use strong acids,
because these may damage the components. After cleaning, reassemble the appliance.
1. DO NOT disassemble the static needle wheel.
2.
The housing integrated with static needle wheel must be
installed on the correct side when reassemble the pump.
A
B
EN

8
Spare Parts
Skimmer
No.
Name
QTY
1
Over Flow Sensor
1
2
Cup Cover
1
3
Collection Cup
1
4
Silencer
1
5
Air Hose
2
6
Bubble Cup
1
7
Pump Body
1
8
Air Intake Connector
2
9
Pump Base Screw
4
10
Water Outlet
1
11
Skimmer Base
1
12
Drain Hose
1
13
Skimmer Body
1
14
Sillicone Seal
2
15
Pump Base
1
1
2
3
4
5
6
7
8
9
10
11
12
14
15
13
EN

9
Spare Parts
Pump
QTY
2
1
1
Name
Bearing
Rotor
Stator
No.
24
25
26
QTY
2
2
1
2
Name
Spinning Needle Wheel
Sillicone Seal
Rotor Cover
Sillicone Pad
No.
20
21
22
23
QTY
2
2
1
1
Name
Needle Whell Housing
Static Needle Wheel(undetachable)
Titanium Screw
Titanium nut
No.
16
17
18
19
16
17
19
20
26
21
24
25
23
22
21
20
18
17
16
23
24
EN

10
Warranty
Maxspect (HongKong) Limited warrants all Maxspect™ Jump Series Protein Skimmer
products against defects in workmanship for a period of 12-months from the date of purchase.
If a defect exists during the warranty period, Maxspect (HongKong) Limited at its option will
either repair (using new or remanufactured parts) or replace (with a new or remanufactured
unit) the product at no charge.
THE WARRANTY WILL NOT APPLY TO THE PRODUCT IF IT HAS BEEN DAMAGED BY MISUSE,
ALTERATION, ACCIDENT, IMPROPER HANDLING OR OPERATION, OR IF UNAUTHORIZED
REPAIRS ARE ATTEMPTED OR MADE. SOME EXAMPLES OF DAMAGES NOT COVERED BY
WARRANTY INCLUDE, BUT ARE NOT LIMITED TO, USING AFTER-MARKET LED BULBS AND
MODIFICATION OF THE CIRCUITRY, WHICH ARE PRESUMED TO BE DAMAGES RESULTING FROM
MISUSE OR ABUSE.
DISCLAIMER OF CONSEQUENTIAL AND INCIDENTAL DAMAGES:
You and any other user of Maxspect (HongKong) Limited products shall not be entitled to any
consequential or incidental damages, including without limitation, loss of use of the unit,
inconvenience, damage to personal property, phone calls, lost income or earnings. This
warranty gives you specific legal rights and you may have other rights, which vary from state
to state.
MAXSPECT LTD. MAKES NO WARRANTY OR REPRESENTATION, EITHER EXPRESS OR IMPLIED,
WITH RESPECT TO THE PRODUCT'S QUALITY, PERFORMANCE, MERCHANTABILITY, OR
FITNESS FOR A PARTICULAR PURPOSE. AS A RESULT, THIS PRODUCT, IS SOLD "AS IS," AND
YOU THE PURCHASER ASSUME THE ENTIRE RISK AS TO ITS QUALITY AND PERFORMANCE.
IN NO EVENT WILL MAXSPECT LTD, BE LIABLE FOR DIRECT, INDIRECT, SPECIAL, INCIDENTAL,
OR CONSEQUENTIAL DAMAGES RESULTING FROM ANY DEFECT IN THE PRODUCT OR ITS
DOCUMENTATION.
The warranty, disclaimer, and remedies set forth above are exclusive and replace all others,
oral or written, expressed or implied. At no time will any Maxspect (HongKong) Limited
dealers, agents, or employees be authorized to make any modifications, extension, or
addition to this warranty.
Some states do not allow the exclusion or limitation of implied warranties or liability for
incidental or consequential damages, so the above limitation or exclusion may not apply to
you.
EN


12
Benutzernotiz
Sehr geehrter Kunde,
Vielen Dank für den Kauf dieses Produkts.
Für eine optimale Leistung und Sicherheit lesen Sie bitte diese Anleitung sorgfältig durch.
Benutzernotiz:
Kaufdatum:
Händler:
Händleradresse:
Händlerwebsite:
Händler-E-Mail:
Händlertelefon:
Bitte besuchen Sie uns auf Facebook oder Twitter!
www.facebook.com/Maxspect
twitter.com/maxspectled
DE

13
Lieferumfang und Installation
Bitte überprüfen Sie den Lieferumfang auf Vollständigkeit.
x1
x1
x1
x1
x1
Bitte entfernen Sie vor der Inbetriebnahme alle Verpackungsmaterialien.
DE

14
Sicherheitshinweise
LESEN UND FOLGEN SIE ALLE SICHERHEITSHINWEISE
1. GEFAHR - Um das Risiko eines Stromschlags zu vermeiden, sollte bei der Verwendung von
Aquariengeräten mit Wasser besondere Vorsicht geboten werden. Für jede der folgenden Situationen,
VERSUCHEN SIE NICHT, Reparaturen selbst durchzuführen; geben Sie das Gerät zur Reparatur an ein
autorisiertes Servicezentrum zurück oder entsorgen Sie es.
a) Wenn das Gerät irgendwelche Spuren von anormalem Wasseraustritt zeigt, ziehen Sie sofort den
Stecker aus der Steckdose.
b) Überprüfen Sie das Gerät nach der Installation sorgfältig. Es sollte nicht angeschlossen werden, wenn
sich Wasser auf Teilen befindet, die nicht nass werden sollen.
c) BETREIBEN SIE NIEMALS ein Gerät mit einem beschädigten Kabel oder Stecker, das schlecht
funktioniert, gefallen ist oder in irgendeiner Weise beschädigt wurde.
d) Um zu verhindern, dass das Stromkabel und der Stecker nass werden, stellen Sie den Unterschrank
mit Ihrem Aquarium neben einer Wandsteckdose auf, so dass kein Wasser auf die Steckdose oder
den Stecker tropfen kann. Für jedes Kabel, das ein Aquariengerät mit einer Steckdose verbindet, ist
eine Tropfschleife, wie in der Abbildung unten dargestellt, einzurichten. Die Tropfschleife ist der Teil
des Kabels, der sich unter der Steckdose oder dem Anschluss befindet, wenn ein Verlängerungskabel
verwendet wird, um zu verhindern, dass Wasser an dem Kabel herunterläuft und mit der Steckdose
in Kontakt kommt. Wenn die Wandsteckdose oder der Netzstecker nass geworden sind, NICHT das
Kabel aus der Steckdose herausziehen. Die Sicherung oder den Schutzschalter, die das Gerät
versorgen, ausschalten. Ziehen Sie dann den Netzstecker und prüfen Sie, ob sich Wasser in der
Steckdose oder am Netzkabel befindet.
2. Wenn ein Gerät von Kindern oder in der Nähe von Kindern benutzt wird, ist eine strenge Ü berwachung
erforderlich.
3. Um Verletzungen zu vermeiden, berühren Sie KEINE beweglichen Teile oder heiße Komponenten wie
Heizkörper, Reflektoren, Glühbirnen usw.
4. Ziehen Sie immer den Netzstecker aus der Steckdose, wenn Sie das Gerät nicht benutzen, bevor Sie Teile
an- oder abnehmen oder bevor Sie es reinigen. Ziehen Sie niemals am Kabel, um das Gerät vom Netz zu
trennen, sondern ziehen Sie den Netzstecker.
5. Benutzen Sie das Gerät nicht für andere als die vorgesehene Anwendung. Die Verwendung von Zubehör,
das vom Hersteller des Geräts nicht empfohlen oder verkauft wird, kann zu einer gefährlichen Situation
führen.
6. Installieren oder lagern Sie das Gerät NICHT dort, wo es ungünstigen Witterungsbedingungen oder
Temperaturen unter 0°C ausgesetzt ist.
7. Vergewissern Sie sich, dass ein Gerät, das auf einem Aquarium aufgestellt wird, ordnungsgemäß
installiert ist, bevor Sie es benutzen.
8. Lesen und beachten Sie alle wichtigen Anweisungen auf dem Gerät.
9. Wenn ein Verlängerungskabel erforderlich ist, verwenden Sie ein Kabel mit entsprechender Leistung.
Ein Kabel mit einer geringeren Leistung als die des Geräts kann überhitzen.
TROPFSCHLEIFE
Bevor Sie Ihren Maxspect™ Jump Series Abschäumer verwenden, lesen Sie bitte diese
Anweisungen sorgfältig durch und befolgen Sie die Sicherheitshinweise. Mit dem
Einschalten Ihres Maxspect™ Abschäumers bestätigen Sie, dass Sie diese Anleitung
gelesen und verstanden haben. Wenden Sie sich im Zweifelsfall an Ihren Lieferanten oder
Händler.
Bewahren Sie dieses Handbuch an einem sicheren Ort für eine spätere
DE

15
Übersicht
Vorstellung
Der Abschäumer der Maxspect™ Jump Series ist ein leistungsstarker Abschäumer mit
mehreren innovativen Besonderheiten.
Zwei Wassereinlässe: ermöglichen es dem Abschäumer, Wasser von zwei Seiten
anzusaugen.
Doppelnadelräder: jeder Wassereinlass hat zwei Nadelräder, eines dreht während das
andere stillsteht. Diese einzigartige Bauweise ermöglicht es, dass die erzeugten Blasen noch
kleiner und von höherer Dichte sind als bei den meisten herkömmlichen Abschäumern, die
eine Nadelradtechnologie verwenden.
Überlaufsensor: der Maxspect™ Jump Series Abschäumer verfügt über einen
Überlaufsensor, der den Wasserstand im Auffangbehälter erfasst und bei Bedarf ein
akustisches Signal ausgibt.
1.
Überlaufsensor
4.
Luftzufuhrschlauch
7.
Wasserstandsregler
2.
Auffangbehälter
5.
Wassereingang
8.
Blasenschale
3.
Ablassschlauch
6.
Schalldämpfer
9.
Wasserausgang
6
9
7
8
1
2
4
5
3
4
5
DE

16
Aufstellung und Inbetriebnahme
Aufstellung
Um den Maxspect™ Jump Series Abschäumer ordnungsgemäß aufzustellen, müssen
bestimmte Vorschriften berücksichtigt werden:
Vor dem Aufstellen des Abschäumers in das Technikbecken ist es ratsam, ihn mit Süßwasser zu
reinigen.
Stellen Sie den Abschäumer in einem Bereich des Technikbeckens auf, in dem der Wasserstand
immer gleichbleibt. Zur Aufrechterhaltung des Wasserstandes kann ein automatisches
Nachfüllsystem erforderlich sein. Stellen Sie den Abschäumer in einem Bereich frei von Schutt,
Kies, Sand, Muscheln und anderen kleinen Gegenständen auf.
Der optimale Wasserstand für den Abschäumer im Technikbecken liegt zwischen 18 und 22 cm.
Das Überschreiten des maximalen Wasserstandes kann zu einem Wasseraustritt am
Wasserstandsregler führen.
Auf beiden Seiten der Wassereinlässe müssen mindestens 2 cm Freiraum vorhanden sein.
Außerdem muss an den Wasserausgangseiten ein Freiraum von mindestens 2 cm vorhanden sein.
Nur für die Benutzung im Innenbereich.
Inbetriebnahme (Einfahren)
Nachdem der Abschäumer an der entsprechenden Stelle platziert wurde, ist er betriebsbereit.
Bevor der Abschäumer jedoch optimal funktioniert, braucht er eine Einlaufzeit, die von
einigen Minuten bis zu mehreren Tagen dauern kann. Dies hängt von vielen Einflüsse ab,
wie z.B.: Klebstoffrückstände, Fett oder ähnliche Verunreinigungen, die im Abschäumer
zurückgeblieben sind, Ergänzungsmittel, Oberflächenspannung von Wasser und Futter usw.
Controller: Sie können die Pumpenfördermenge durch Einstellungen über den Controller
anpassen.
Wasserausgang: Sie können die Wassermenge, die den Abschäumer verlässt, durch
Drehen des Wasserstandsreglers anpassen.
Die Umsetzung von Einstellungsänderungen erfolgt nicht sofort, sondern mit zeitlicher
Verzögerung. Weitere Einzelheiten finden Sie im Abschnitt "Bedienungsanleitung".
DE
18cm/7”
-
22cm/8½”
2cm
/1”

17
Bedienungsanleitung
Sie können die Schaumleistung anpassen, indem Sie die nachstehenden
Anweisungen befolgen.
1. Wasserauslass
2. Controller
Ein/Aus-Taste
Halten Sie die Ein/Aus-Taste ca. 5 Sek. lang gedrückt, um den Abschäumer ein- oder
auszuschalten. Wenn Sie den Abschäumer an die Stromversorgung anschließen oder nach
einem Stromausfall, beginnt ein 10 Sek. -Countdown, bis der Abschäumer wieder gestartet
wird.
Einstellen der Betriebsgeschwindigkeit
Drücken Sie das Einstellrad, um in den Kurzeinstellungsmodus zu gelangen, und drehen Sie
dann das Rad, um eine Geschwindigkeit zwischen AUS/10/20/.../100 festzulegen. Drücken Sie
das Einstellrad erneut, um Ihre Wahl zu speichern.
Futtermodus
Drücken Sie die Fütterungstaste, um den Modus zu starten oder zu beenden. Der Abschäumer
wird seinen Betrieb 600 Sek. lang unterbrechen. (nicht änderbar) und die Futteranzeige blinkt
während dieser Zeit.
Überlaufsensor
Der Abschäumer wird seinen Betrieb einstellen, sobald der Schwimmer des Überlaufsensors
aufschwimmt und die Überlaufanzeige beginnt zu blinken. Sobald der Schwimmer in die
Normalposition zurückkehrt, startet der Abschäumer nach 10 Sek. wieder.
... um den Wasserausgang einzustellen.
Den Drehknopf drehen...
Geschwindigkeit/Zeit-Anzeige
Futtermodus-Anzeige
Überlaufanzeige
Einstellrad
EIN/AUS-Taste
Futtermodus-Taste
DE
Table of contents
Languages:
Other Maxspect Aquarium manuals
Popular Aquarium manuals by other brands

All Pond Solutions
All Pond Solutions CURVE Series manual

Aqua Medic
Aqua Medic Kauderni CF Operation manual

Aqua One
Aqua One EasyGlow 80 quick start guide

Aqua Medic
Aqua Medic Turboflotor multi SL Operation manual

Blue Marine
Blue Marine Reef 120 installation manual

JBL
JBL ProCristal UV-C Compact 5W manual