manuals.online logo
Brands
  1. Home
  2. •
  3. Brands
  4. •
  5. MayPole
  6. •
  7. Air Compressor
  8. •
  9. MayPole MP7950 User manual

MayPole MP7950 User manual

MP7950 12V Automatic Digital Air Compressor
www.maypole.ltd.uk
1
Item No:
Voltage:
Rated
Current:
Power
Flow Rate:
Max.
Pressure:
Sound Pressure
Sound Power
MP7950
12V - DC
8A
100 Watt
12L/Min.
160 psi
<75.2 dB(A)
<95.2dB (A)
1. ON/OFF main switch
2. LCD display
3. Handle
4. "-" button
5. "+" button
6. Unit shift button
7. Compressed air hose
8. Quick Coupler
9. 12 Vdc vehicle connector
10. Tyre connector
11. Ball needle connector
12. Inflatables connnector
13. LED light
1. TECHNICAL SPECIFICATION
2. PRODUCT SPECIFICATION
MP7950 12V Automatic Digital Air Compressor
www.maypole.ltd.uk
2
Your analogue compressor is designed to be used from the standard 12V dc socket in most vehicles, to inflate car and bike
tyres, balls, etc. This product is intended for household, consumer use only.
● Read all safety warnings and all instructions.
Save all warnings and instructions for future reference.
Work area safety
● Keep work area clean and well lit. Cluttered or dark areas
invite accidents.
● Do not operate compressor in explosive atmospheres, such
as in the presence of flammable liquids, gases or dust. Power
tools create sparks which may ignite the dust or fumes.
● Keep children and bystanders away while operating the
compressor. Distractions can cause you to lose control.
●The plug must match the outlet. Never modify the plug in
any way.
● Do not expose the compressor to rain or wet conditions.
Water entering the compressor will increase the risk of
damage.
● Do not use if the switch (1) does not turn the compressor
on and off.
● Disconnect the plug from the power source tool before
making any adjustments, changing accessories, or storing
power tools. Such preventive safety measures reduce the risk
of starting the power tool accidentally.
● Store compressor out of the reach of children and do not
allow persons unfamiliar with the compressor or these
instructions to operate the compressor.
● Always check the compressor before use. If damaged, or
worn, do not use.
Device-specific safety instructions
● This appliance may not be used by children or people with
reduced physical, sensory or mental capabilities or a lack of
experience and knowledge. Children must not use the
appliance as a plaything. Cleaning and user maintenance tasks
may not be carried out by children unless they are supervised.
● Avoid using the compressor at temperatures below +5
degrees.
● Never leave the compressor unsupervised while it is in use.
● Ensure that the ON/OFF switch is turned off when
connecting to the power supply.
● Caution! Operate the compressor only for a short time. The
appliance may overheat if operated continuously for longer
than 10 minutes. Switch the appliance off immediately and
allow it to cool down for at least 10 minutes.
● Risk of injury! Do not inflate any objects to more
than the intended pressure. They could burst and
cause injury and/or material damage.
● Do not exceed the permissible output range of the
compressor. Do not pump up any lorry, tractor or
other large tyres.
● Never use the appliance for purposes other than the
ones for which it was designed.
● The appliance must always be kept clean, dry and
free from oil or grease.
● Stay alert, watch what you are doing and use
common sense when operating a power tool. Do not
use a power tool while you are tired or under the
influence of drugs, alcohol or medication.
● Use personal protective equipment. The use of
personal protective equipment such as Eye protection
and hearing protection is recommended.
● Prevent unintentional starting. Ensure the switch is
in the off-position before connecting to power source,
picking up or carrying the tool.
● Remain alert at all times! Never use the appliance
when you are distracted or don’t feel well.
● Do not carry the appliance by the power cord and
never hang it up by the power cord. Always route the
power cord away from the appliance to the rear. Keep
cord away from heat, oil, sharp edges and moving
parts. Do not use if the cord is worn or damaged.
● The compressor and hoses can get very hot during
operation. Touching them can cause burns.
● When removing the quick coupler, always hold the
hose coupling fi rmly to avoid injury caused by the
hose flying off.
● The appliance vibrates during operation. Therefore,
always put it down during operation.
3. INTENDED USE
4. SAFETY
MP7950 12V Automatic Digital Air Compressor
www.maypole.ltd.uk
3
USE OF ACCESSORIES
Remove the required accessories from the accessory
compartment.
FITTING THE ACCESSORIES
Your inflator is supplied with the standard tapered nozzles and
the needle inflator nozzle, these are located on the bottom of
the unit.
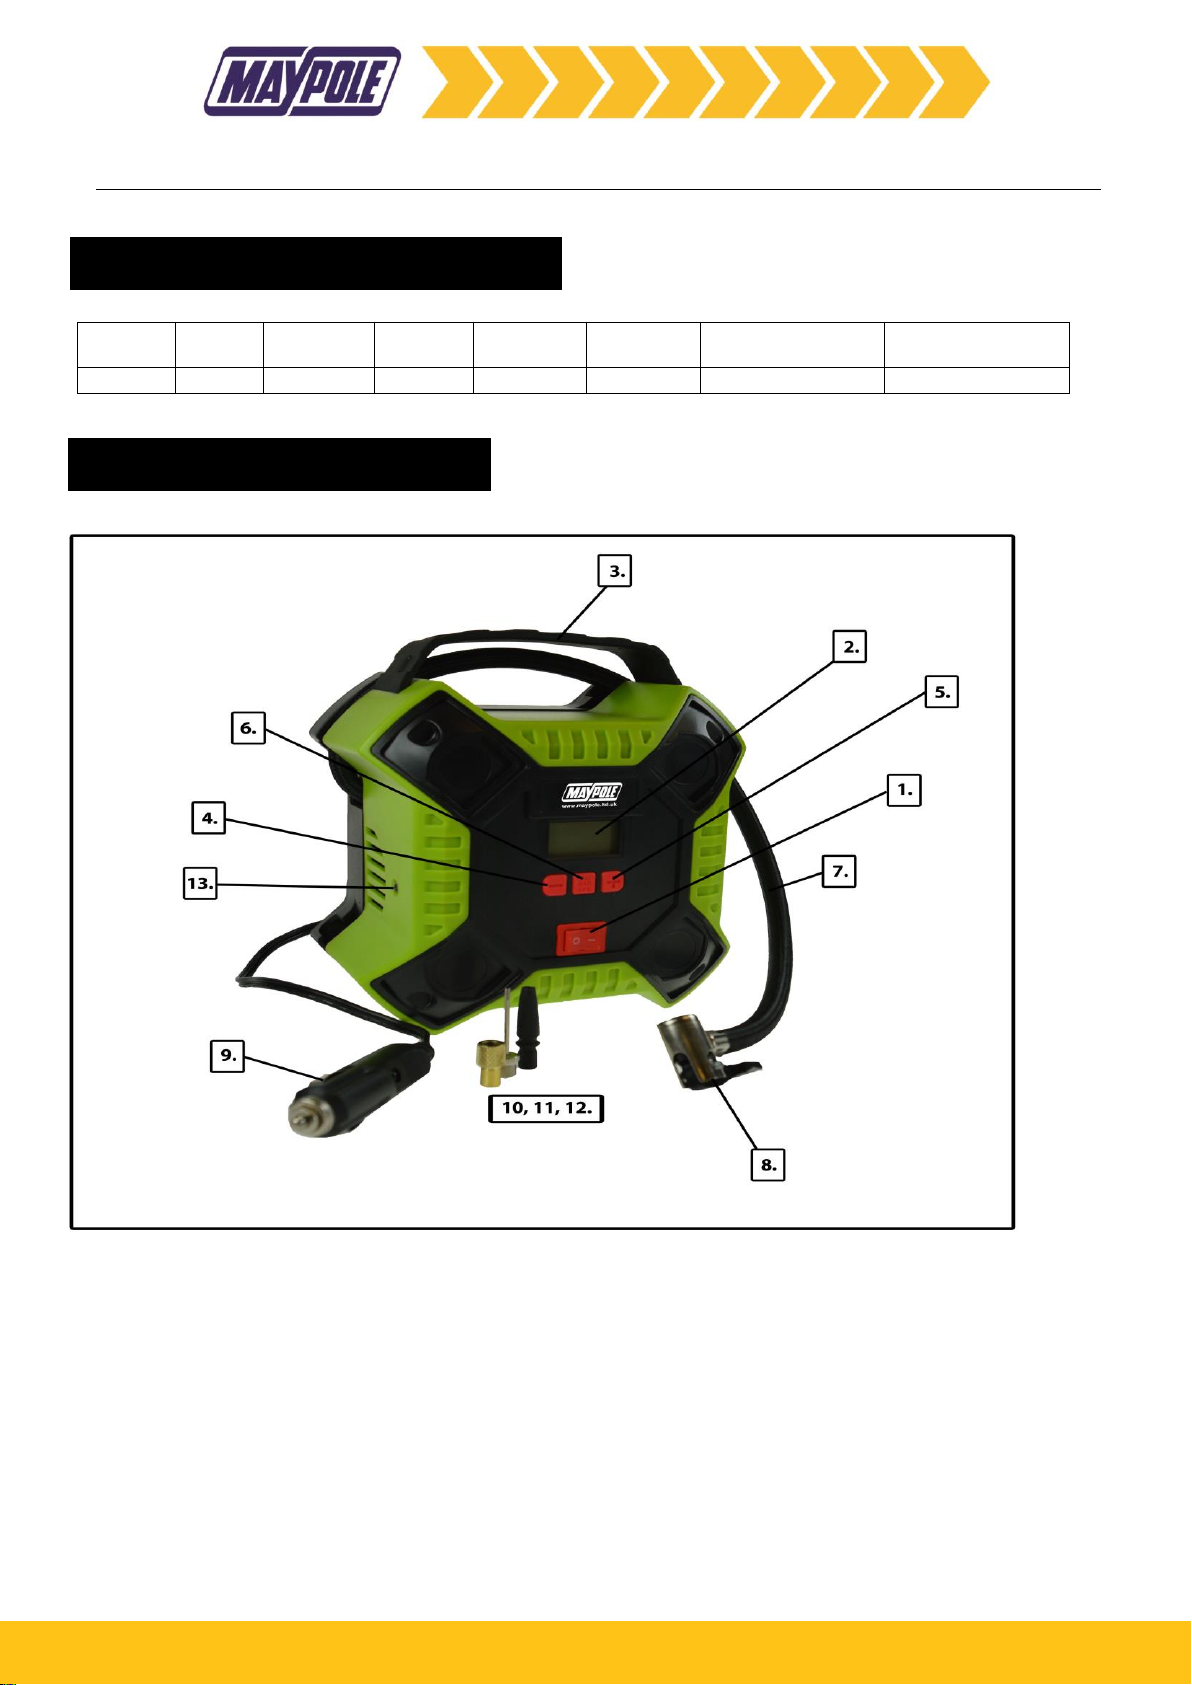
• To use the universal valve adaptor, make sure that the lever
is in the up position.
• Place the valve adapter over the stem of the inflation needle
or tapered nozzle.
• Press the lever on the valve adapter down to lock it in place.
• Place the inflation needle or tapered nozzle into the item to
be inflated.
POWER THE LCD DISPLAY
WARNING: Do not operate the inflator when the car
engine is running.
Note: Make sure that your 12 Volt accessory socket is live. On
some vehicles the accessory socket may only become live
when the ignition key is in the accessory position.
To power the display from the 12Vdc adapter, just plug the 12
Vdc vehicle connector⑨into the vehicle 12V accessory socket
QUICK START
WARNING: Never leave inflator running unattended in
this mode. In can burst car tyres and other items.
To use your inflator immediately you can do so without setting
the automatic shut-off feature.
•Before use, check the manufacturers recommended tyre
pressures for the vehicle.
•Plug the 12Vdc vehicle connector into the vehicle accessory
socket. The LCD will be powered.
• To switch between the different units (PSI, BAR or KPA) press
the unit shift button (6) until the required units are displayed.
• Connect the quick coupler (8) and an accessory, if required,
to the item to be inflated, making sure that the lever of the
coupler is in the down position to lock it in place.
Note: Make sure that the Quick Coupler is correctly fitted
to the item to be inflated.
• To start the inflator press the main switch (1) to the on
position.
• When the item is inflated as required or to stop the
inflator at any time press the main switch (1) to the off
position.
SETTING THE AUTOMATIC SHUT-OFF PRESSURE
Note: The LCD will only show inflation pressures when
the inflator is being used.
• To switch between the different units (psi, bar or kPa),
press the unit shift button (6) until the required units are
displayed.
• Press and hold either buttons - & + (4, 5) for 3 seconds,
the value will increase or decrease until get the reqired
value.
• After 3 seconds the display will flash and return to a
reading of "0.0". This is normal.
• Connect the Quick Coupler (8) and accessories, if
required, to the item to be inflated, making sure that the
lever of the quick coupler is in the down position to lock
it in place.
• To start the inflator press the main switch (1) to the on
position.
• When the item to be inflated has reached the preset
value the unit will automatically turn off.
Note: You may notice the actual pressure reading may
drop after a couple of seconds, this is normal.
• To stop the inflator at any time press the main switch
(1) to the off position.
• Remove the quick coupler and/or accessory from the
inflated item and the 12 Volt connector (9) from your
vehicle's 12 Volt accessory socket.
Note: If the main power switch is turned off, all settings
will be lost and will need to be re-entered following the
instructions under the heading 'Setting the automatic
shut-off pressure'. This is a safety feature to prevent the
risk of items OVER INFLATING.
USING THE INFLATOR AS A PRESSURE GAUGE
• Plug the 12Vdc vehicle connector into the vehicle
accessory socket. The LCD will be powered.
• Connect the quick coupler (8) to the item to be
checked.
• The LCD will display the items pressure.
• After checking, return the air hose to the storage
location.
5. OPERATION
OPERATION
MP7950 12V Automatic Digital Air Compressor
www.maypole.ltd.uk
4
The only user serviceable part is a 10Amp fuse located I the 12V connector, this can be checked by unscrewing the spring
loaded centre pin from the plug. Only replace with a fuse with identical ratings. Make sure that the machine is not live when
carrying out maintenance work. Regularly clean the machine housing with a soft cloth, preferably after each use. Keep the
ventilation slots free from dust and dirt. If the dirt does not come off use a soft cloth moistened with soapy water. Never use
solvents such as petrol, alcohol, ammonia water, etc. These solvents may damage the plastic parts.
The machine requires no additional lubrication.
In order to prevent the machine from damage during transport, it is delivered in sturdy packaging. Most of the packaging
materials can be recycled. Take these materials to the appropriate recycling locations. Take your unwanted machines to your
local dealer. Here they will be disposed of in an environmentally safe way.
Discarded electric appliances are recyclable and should not be discarded in the domestic waste! Please actively support us in
conserving resources and protecting the environment by returning this appliance to the collection centres (if available).
DECLARATION OF CONFORMITY
We declare under our sole responsibility that this product is in conformity with the following standards or standardized documents:
EN1012-1:2010; EN60204-1:2006/A1:2009; EN55014-1:2006/A2:2011;EN55014-2:2015; EN61000-3-2:2014;EN61000-3-3:2013;
in accordance with the regulations 2006/42/ЕEС, 2014/30/ЕEС.
Technical Manager
Maypole Ltd Sept 2018
6. MAINTENANCE
7. ENVIRONMENTAL PROTECTION

Other MayPole Air Compressor manuals

MayPole MP7951 User manual

MayPole

MayPole MP7951 User manual

MayPole MP7955 User manual

MayPole

MayPole MP7955 User manual

MayPole MP7949 User manual

MayPole

MayPole MP7949 User manual

Popular Air Compressor manuals by other brands

RIDGID OL50135W Operator's manual

RIDGID

RIDGID OL50135W Operator's manual

DeWalt D55154 instruction manual

DeWalt

DeWalt D55154 instruction manual

Gardner Denver AirSmart VS80-110B Operating and service manual

Gardner Denver

Gardner Denver AirSmart VS80-110B Operating and service manual

Sullair ES-6 series Operators manual and parts lists

Sullair

Sullair ES-6 series Operators manual and parts lists

Thomas T-617HDN owner's manual

Thomas

Thomas T-617HDN owner's manual

Speedaire 1WD36 Operating instructions & parts manual

Speedaire

Speedaire 1WD36 Operating instructions & parts manual

Mi-T-M ABS 80 Operator's manual

Mi-T-M

Mi-T-M ABS 80 Operator's manual

Porter-Cable C6001 instruction manual

Porter-Cable

Porter-Cable C6001 instruction manual

Will Burt 185 instructions

Will Burt

Will Burt 185 instructions

Parkside PKO 270 A1 Operation and safety notes

Parkside

Parkside PKO 270 A1 Operation and safety notes

Craftsman 919.165280 owner's manual

Craftsman

Craftsman 919.165280 owner's manual

Champion 30000 Owner's and operator's manual

Champion

Champion 30000 Owner's and operator's manual

EINHELL AK 12-250 operating instructions

EINHELL

EINHELL AK 12-250 operating instructions

Xiaomi Redmi 1S user manual

Xiaomi

Xiaomi Redmi 1S user manual

Atlas Copco XAMS 1150 CD7 T3 APP instruction manual

Atlas Copco

Atlas Copco XAMS 1150 CD7 T3 APP instruction manual

POSEIDON PE 100-T instruction manual

POSEIDON

POSEIDON PE 100-T instruction manual

Bauer Aero-Guard instruction manual

Bauer

Bauer Aero-Guard instruction manual

Plot MAM-880 user manual

Plot

Plot MAM-880 user manual

manuals.online logo
manuals.online logoBrands
  • About & Mission
  • Contact us
  • Privacy Policy
  • Terms and Conditions

Copyright 2025 Manuals.Online. All Rights Reserved.