Mazdaspeed QSEA 51 96Z Guide

1
GENUINE REAR WING
INSTALLATION AND USER’S INSTRUCTIONS
Thank you for purchasing a genuine Mazda accessory.
Before removal and installation, be sure to thoroughly read these instructions.
Please read the contents of this booklet in order to properly install and use the rear wing.
Your safety depends on it.
Keep these instructions with your vehicle records for future reference.
•There are several WARNING and CAUTION sections in this booklet concerning
safety when installing or removing the rear wing. Always read and follow them in order
to prevent injuries, accidents, and possible damage to the vehicle.
WARNING: Indicates a situation in which serious injury or death could result if the
warning is ignored.
CAUTION: Indicates a situation in which bodily injury or damage to the vehicle
could result if the caution is ignored.
•Do not modify the rear wing.
•Do not install the rear wing in any way other than described in the following instructions.
•If in any doubt, please ask your Mazda dealer to install the accessory in order to prevent
errors in installation.
•If you have any questions about the use of the accessory, ask your Mazda dealer for
proper advice before using it.
•Mazda and its suppliers are not responsible for injuries, accidents, and damage to
persons and property that arise from the failure of the dealer or installer to follow these
instructions.
•To ensure safety and reliability of the work, installation, removal and disposal work must
be carried out by an Authorized Mazda Dealership.
•Be careful not to lose removed parts, and be sure that they are kept free from scratches,
grease or other dirt.
PART NAME: REAR WING
PART NUMBER: QSEA 51 96Z
VEHICLE: Mazda RX-8
To the dealer
•Please turn over these instructions to the customer after installation.
To the customer
•Keep these instructions after installation. The instructions may be necessary for
installing other optional parts or removal of this accessory.
•Should the vehicle or this accessory be resold, always leave these instructions
with it for the next owner.
NOTE
WARNING

2
INSTALLATION VIEW
PARTS
Part Part name Spec Qty. Part Part name Spec Qty.
Rear wing
upper
ABS, same as
the body color 1Rear wing lower ABS, same as
the body color 1
Foot base
(RH, LH)
Aluminum, die-
cast 1 ea. Foot bracket
(RH, LH)
Aluminum, die-
cast 1 ea.
Hexagon socket
head bolt M5 x 15 4 Hexagon head
bolt (Upset bolt) M6 x 12 4
Truss screw M5 x 8 6 Spring washer M5 10
Plain washer M5 14 Cap nut M5 4
Urethane seal Urethane 4 Urethane sheet Urethane 2
Installation and
user’s
instructions
Paper 1 Te m p l a te
(for RH, LH) Paper, A3 size 1 ea.
2
1
•Before installation, verify that the kit includes all the following parts and that they are free of dirt,
scratches, or damage.
Note
Rear wing

3
BEFORE INSTALLATION
REQUIRED TOOLS
Prepare the following tools or items before installation.
★Wrench (8 mm, 10 mm) ★Clean, soft cloth ★Clean rag ★Drill
★Allen wrench (3 mm, 4 mm) ★Phillips screwdriver ★Duct tape ★Scissors
★Socket wrench (6 mm) ★Fastener remover ★Masking tape ★Punch
★Drill bit (3 mm, 8 mm) ★Touchup paint ★Round file
★Isopropyl alcohol (IPA) or white gasoline
WARNING
Before performing work,
park the vehicle on level
ground, apply the side
brake securely, and then
block the wheels. If the
vehicle moves while
performing work, it may
cause injury.
CAUTION
Use the most appropriate
(size, use) tool for each
task. Otherwise the parts
may be damaged.
Be sure to cover the vehicle
body with protectors or mats
when removing/installing
parts. Otherwise, the vehicle
may be scratched or
become dirty.
Place the removed parts
and the parts in the kit on a
protective sheet to prevent
scratches.
3
•Be sure to perform the installation work in a team of two or more.
CAUTION
•Refer to the Workshop Manual for removal and installation of vehicle parts. Not following the
procedures for removal/installation in the Workshop Manual could result in an accident or vehicle
malfunction.
WARNING

4
REAR WING INSTALLATION
Vehicle protection
1. Open the trunk lid, and cover the entire trunk lid opening
with a soft cloth for protection.
Rear wing (upper) assembly
1. Temporarily install the foot bracket with the M5 truss
screws, M5 spring washers, and M5 plain washers to the
rear wing (upper).
Trunk lid drilling
1. Cut out the templates.
2. Affix the templates along the edges of the trunk lid and
secure then with masking tape.
3. Tap drill hole marks with a punch in the crosshair marks
on the templates (2 locations each side).
4. Remove the template from the trunk lid.
4
•The figures show the left side; however, perform
the same procedure for the right side.
Note
•Reference lines are printed on each template. Be
sure to affix the templates in the specified position.
CAUTION
•Do not punch the trunk lid hard, otherwise it may be
deformed.
CAUTION
•There are left and right foot brackets. Be sure to
install each to the correct side.
CAUTION
LH
Template
Reference
lines
M5 truss screws
M5 spring
washers
M5 plain
washers
Foot
bracket
Rear wing
upper
Check
(
L
)
or
(
R
)
.

5
5. Drill 3-mm holes at the hole marks.
6. Widen the holes drilled in step 5 to 8 mm. (2 locations
each side)
7. After completing drilling, remove burrs around the drilled
holes with a round file.
8. Wipe off any dust or oil from the installation surface of
the rear wing using IPA.
9. Apply touchup paint and dry completely for rust
prevention.
10.Remove the cloth covering the trunk lid opening.
Foot base temporary installation
1. Align the holes and affix the urethane sheet.
2. Affix the urethane seal to the trunk lid and temporarily
install the foot base with the hexagon head bolts.
Rear wing (lower) installation
1. Position the rear wing (lower) so that it is spaced evenly
on all sides.
2. Mark the installation position with masking tape.
•To prevent scratching and overdrilling, be sure to
wrap the drill bit with duct tape.
•Completely remove particles from the trunk and
cabin, otherwise the particles may cause rust or
abnormal noise.
•Be sure to remove burrs around the drilled holes with
a round file and apply touchup paint for rust
prevention.
CAUTION
•Drills and other sharp objects can cause serious
injury. Be careful when handling drills and other
sharp objects.
WARNING
Foot base
Urethane sheet
Hexagon head bolt
Urethane seal
Cloth tape
5 mm
Touchup
paint
Round
file
Burr
Hole
Rear wing (lower)
Secured with
masking tape
Installation position
marked with
masking tape

6
3. Secure the rear wing (lower) with masking tape.
4. Install the foot base with the hexagon head bolts.
Tightening torque:
::
:
6.8−
−−
−9.8N・
・・
・m {70−
−−
−99 kgf・
・・
・cm, 61−
−−
−86 in・
・・
・lbf}
5. Remove the masking tape securing the rear wing and
remove the rear wing (lower).
6. Peel the backings of the double-sided adhesive tape on
the back of the rear wing lower as shown in the figure.
A: Peel the ends of the adhesive tape backing
approx. 50-60 mm and fold outward.
Cut the backing at the center.
B: Completely peel off the backing.
7. Align the rear wing with the masking tape marking the
installation position and press to adhere the double-
sided adhesive tape.
8. Install the M5 truss screw, M5 spring washer, and M5
plain washer to the hole shown in the figure.
Tightening torque:
6.8−
−−
−9.8 N・
・・
・m {70−
−−
−99 kgf・
・・
・cm, 61−
−−
−86 in・
・・
・lbf}
9. After installing, remove the masking tape.
•Do not remove the masking tape for the rear wing
(lower) installation position.
CAUTION
•Press the rear wing (lower) as far forward up against
the trunk lid as possible.
Adjust the position so that it is even on both sides
when viewed from the rear.
•Adjust the rear wing (lower) so that the gap between
the side lines of the trunk lid and the rear wing lower
are even on both sides.
•Make sure, by looking from above, that the hole in
the rear wing (lower) is positioned evenly in relation
to the foot base.
CAUTION
A: Fold ends of
backing outward.
B: Peel backings.
50-60 mm
•Make sure that the rear wing (lower) is installed
according to the installation marked by the masking
tape.
CAUTION
A
A
<Side view>
Press
forward
as far as
possible.
Trunk lid
M6 hexagon head bolt
<Rear view>
Rear wing
lower
Installation position
marked with
masking tape
Secured with
masking tape
Foot base
A-A cross
section view
Top view of part B
Right/left gaps
are even
<Cross section view>
Press
M5 truss screw
Peel backing
M5 spring washer
M5 plain washer

7
Rear wing upper installation
1. Install the rear wing upper with the M5 hexagon socket
head bolts, M5 spring washers, M5 plain washers, and
cap nuts.
Tightening torque:
3.5−
−−
−3.9 N・
・・
・m {36−
−−
−39 kgf・
・・
・cm,31−
−−
−34 in・
・・
・lbf}
•If there is a gap between the foot base and bracket,
loosen the M5 truss screws securing the foot bracket
and slightly adjust the gap.
CAUTION
M5 Truss screw
Cap nuts
M5 spring washer
M5 hexagon
socket head bolts
M5 plain washer

8
INSTRUCTION FOR USE
•The angle of the rear wing can be adjusted to four different levels according to driving conditions.
•For general driving, use the following angles given their excellent balance between high-speed stability
and driveability.
A Vehicle with normal bumper
B Vehicle with genuine front air dam skirt and vehicle with Mazdaspeed front bumper face
C-D For circuit driving or increasing downforce on low-traction road
*For A-D, see the figure below.
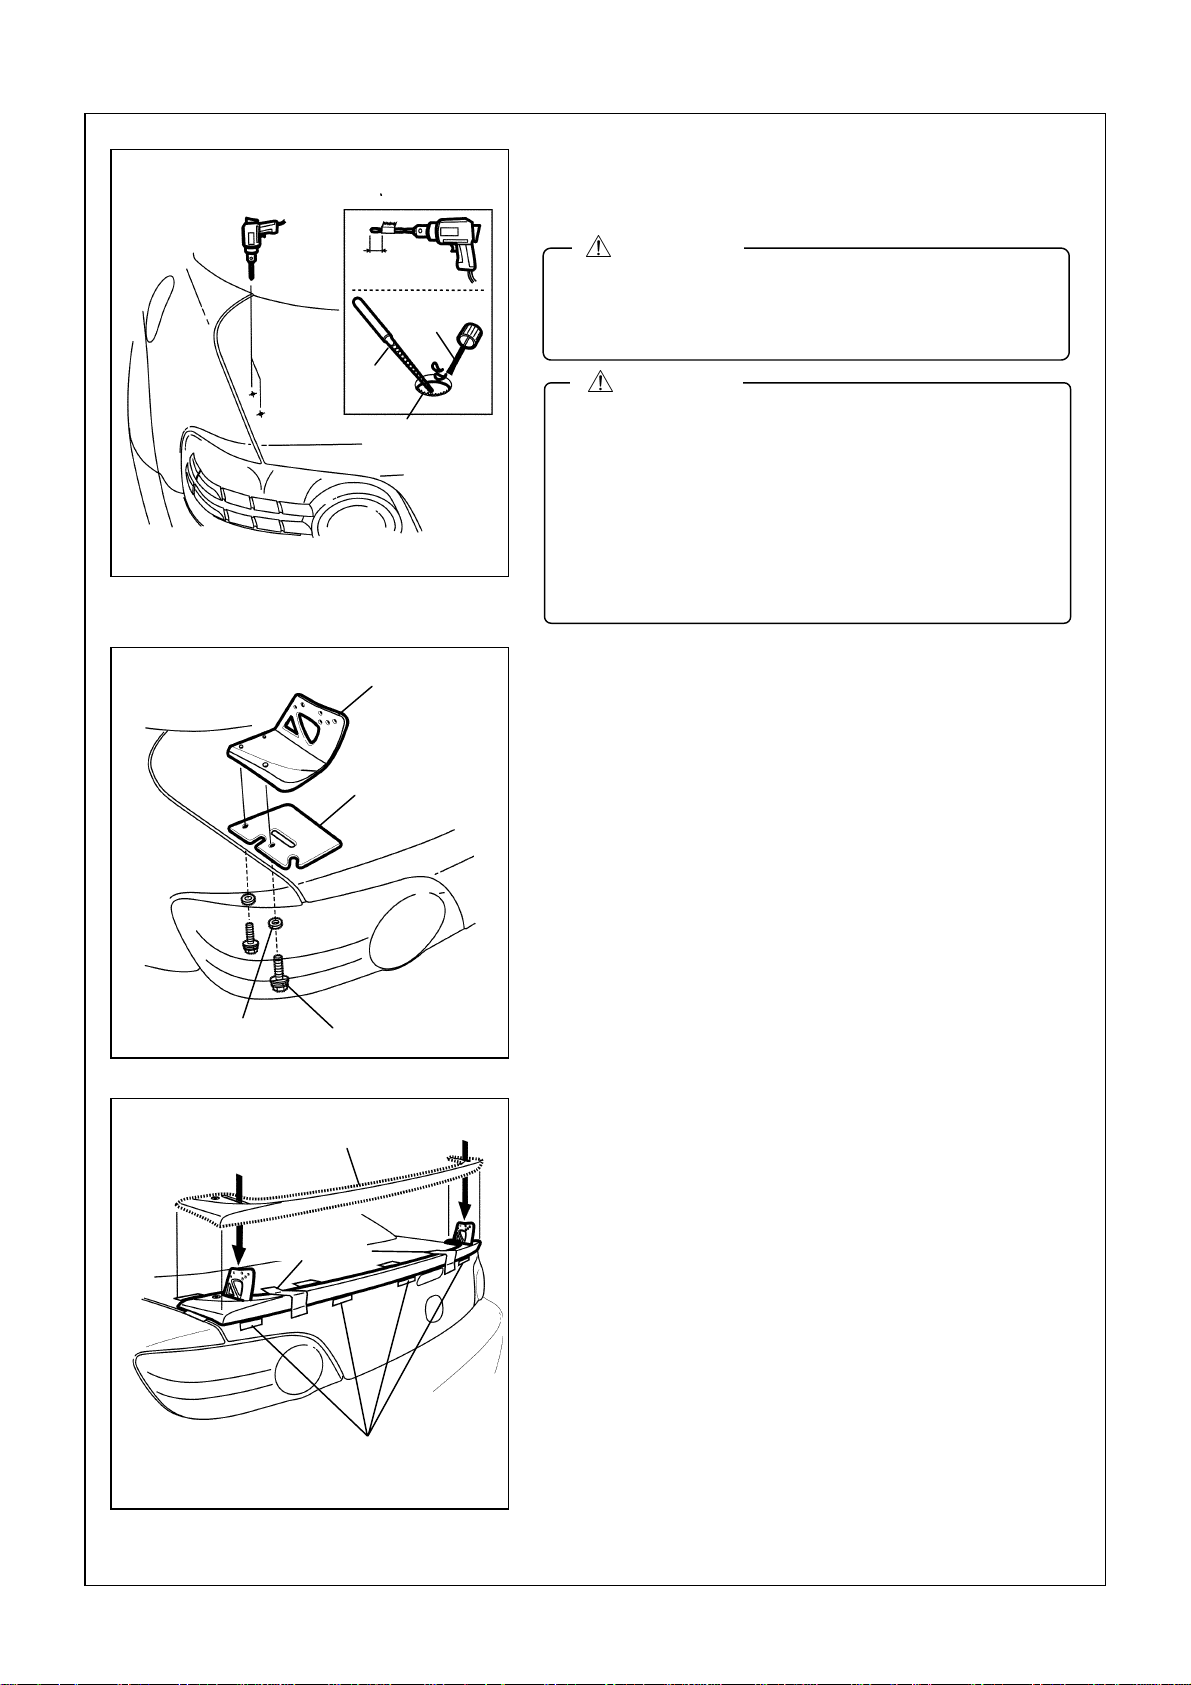
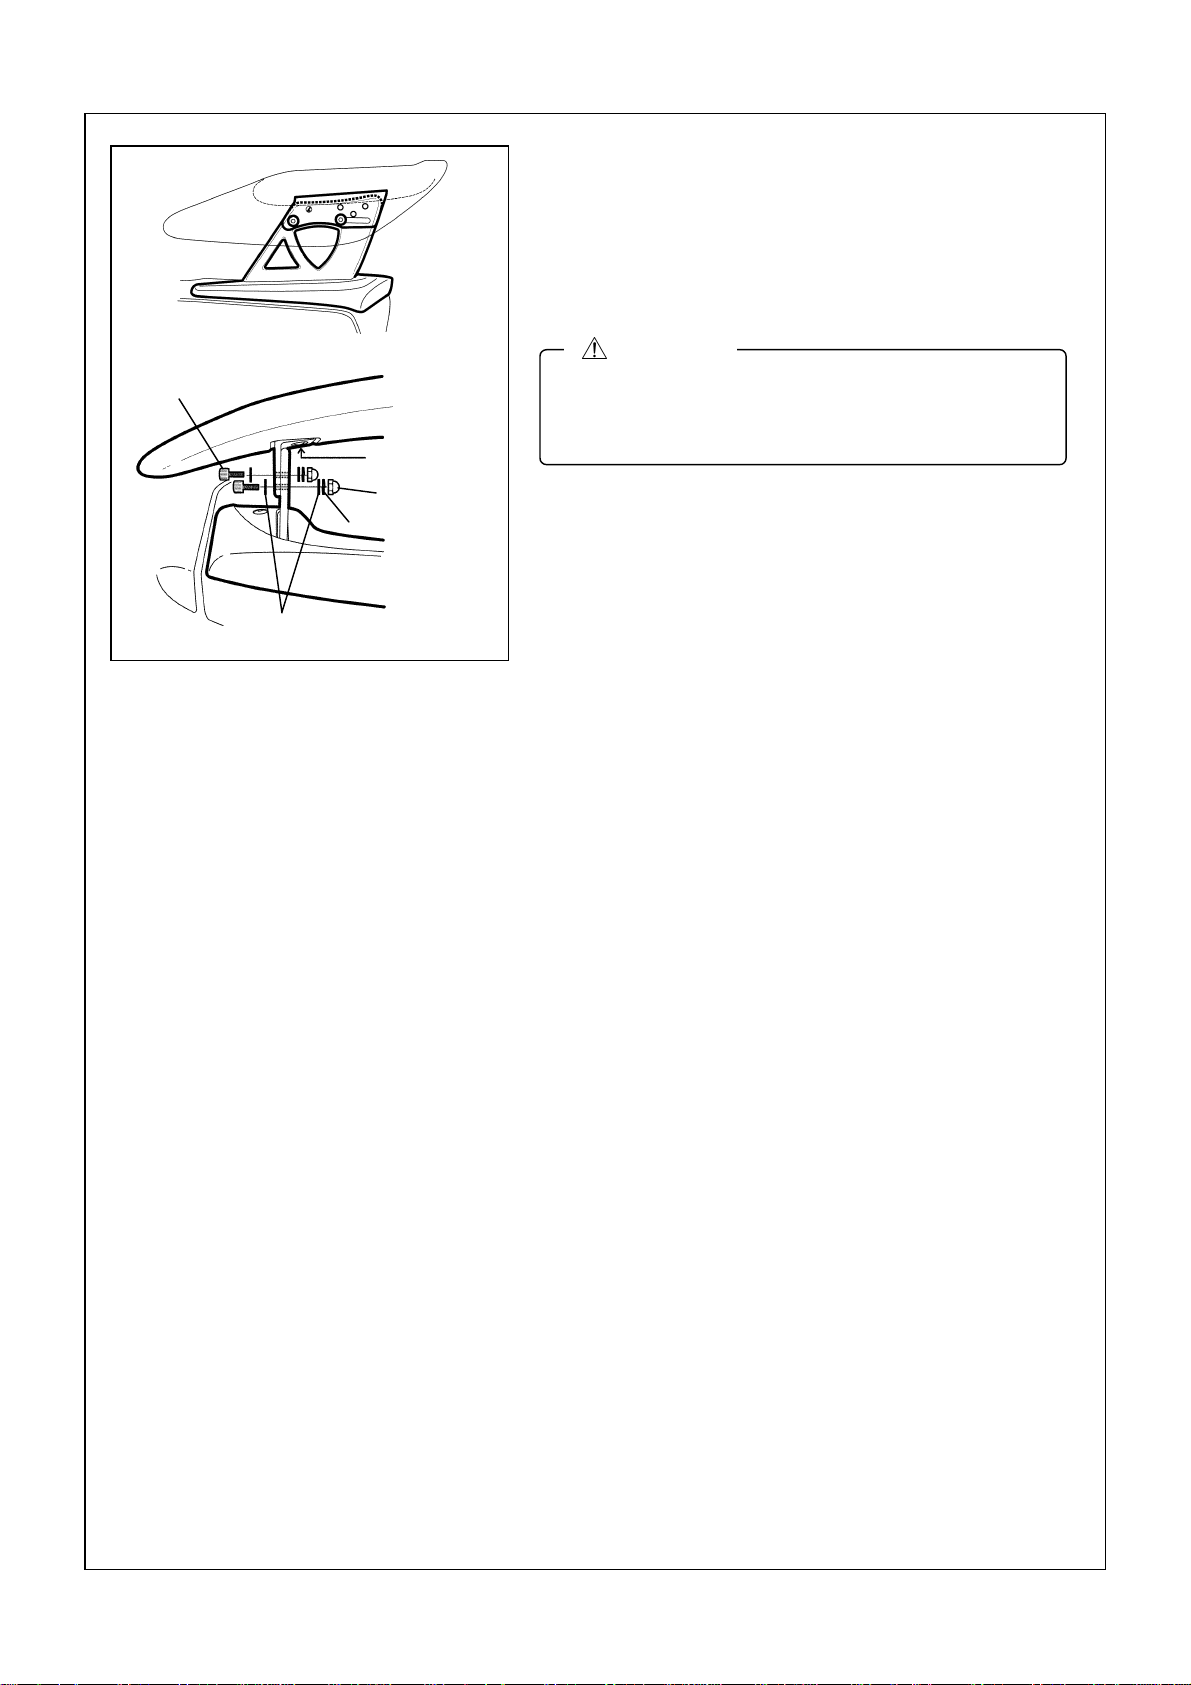
1. Loosen the bolt and nut on the front side.
2. Remove the bolt and nut on the rear side, and install them into the same hole on both sides.
3. With a torque wrench, tighten the bolt and nut securely to the specified torque.
Tightening torque: 3.5-3.9 N・
・・
・m {36-39kgf・
・・
・cm, 31-34in・lbf}
CAUTIONS FOR USE
6
•The bolt and nut tend to become loose if the rear wing angle is adjusted repeatedly. Consult your
Authorized Mazda Dealer when adjusting the angle for the sixth time.
CAUTION
•Do not drive through an automatic car wash. A brush may catch on the accessory, damaging the
vehicle and/or the rear wing.
•The rear wing is not a handle. Do not open/close the trunk holding the wing. The adjustable
mechanism may be damaged.
•Open/close the trunk lid lightly and gently. (Allow the trunk lid to close by its own weight.) If it is
opened/closed forcefully, vehicle parts and the rear wing may be damaged.
•When the accessory gets dirty, clean it with neutral detergent. Never use thinner, benzene, or any
organic solvent.
•Installation of the rear wing slightly decreases the lid holding performance when opening/closing the
trunk lid.
•When loading/unloading baggage, choose level ground and make sure that the trunk lid is fully
opened. If it is not, the vehicle body may rock slightly when baggage is placed, causing the trunk lid
to slow shut.
•When closing the trunk lid, be careful not to pinch your hand or other parts of your body.
CAUTION
Loosen and
tighten again.
D: 15°
C: 10°
B: 5°
A
: 0°
•Be sure to install the cap nuts
inside.
CAUTION
•Be sure to tighten the bolt and nut to the specified torque. If they are not tightened securely, the
accessory may come off during driving resulting in a serious accident.
WARNING
5
Table of contents