MCi SynAIRgPure 16K User manual

MCI TM
SynAIRgPURE
Owner’s Manual
www.BestLivingSystems.com
800.728.7206
www.BLSWarranty.com
About .......................................2
Specifications ..............................3
Cautions & Warnings .......................3
Product Contents ...........................4
Installation Hardware .......................4
Replacement Parts. . . . . . . . . . . . . . . . . . . . . . . . . . 4
Installation Tools............................5
Installation Requirements ..................5
Installation Process .......................6-7
Maintenance................................8
Cell Disposal................................8
Changing the Cell...........................9
Product Options ............................9
DBI Cell Installation ........................10
Warranty ....................................11

2
Welcome
About BLS HVAC
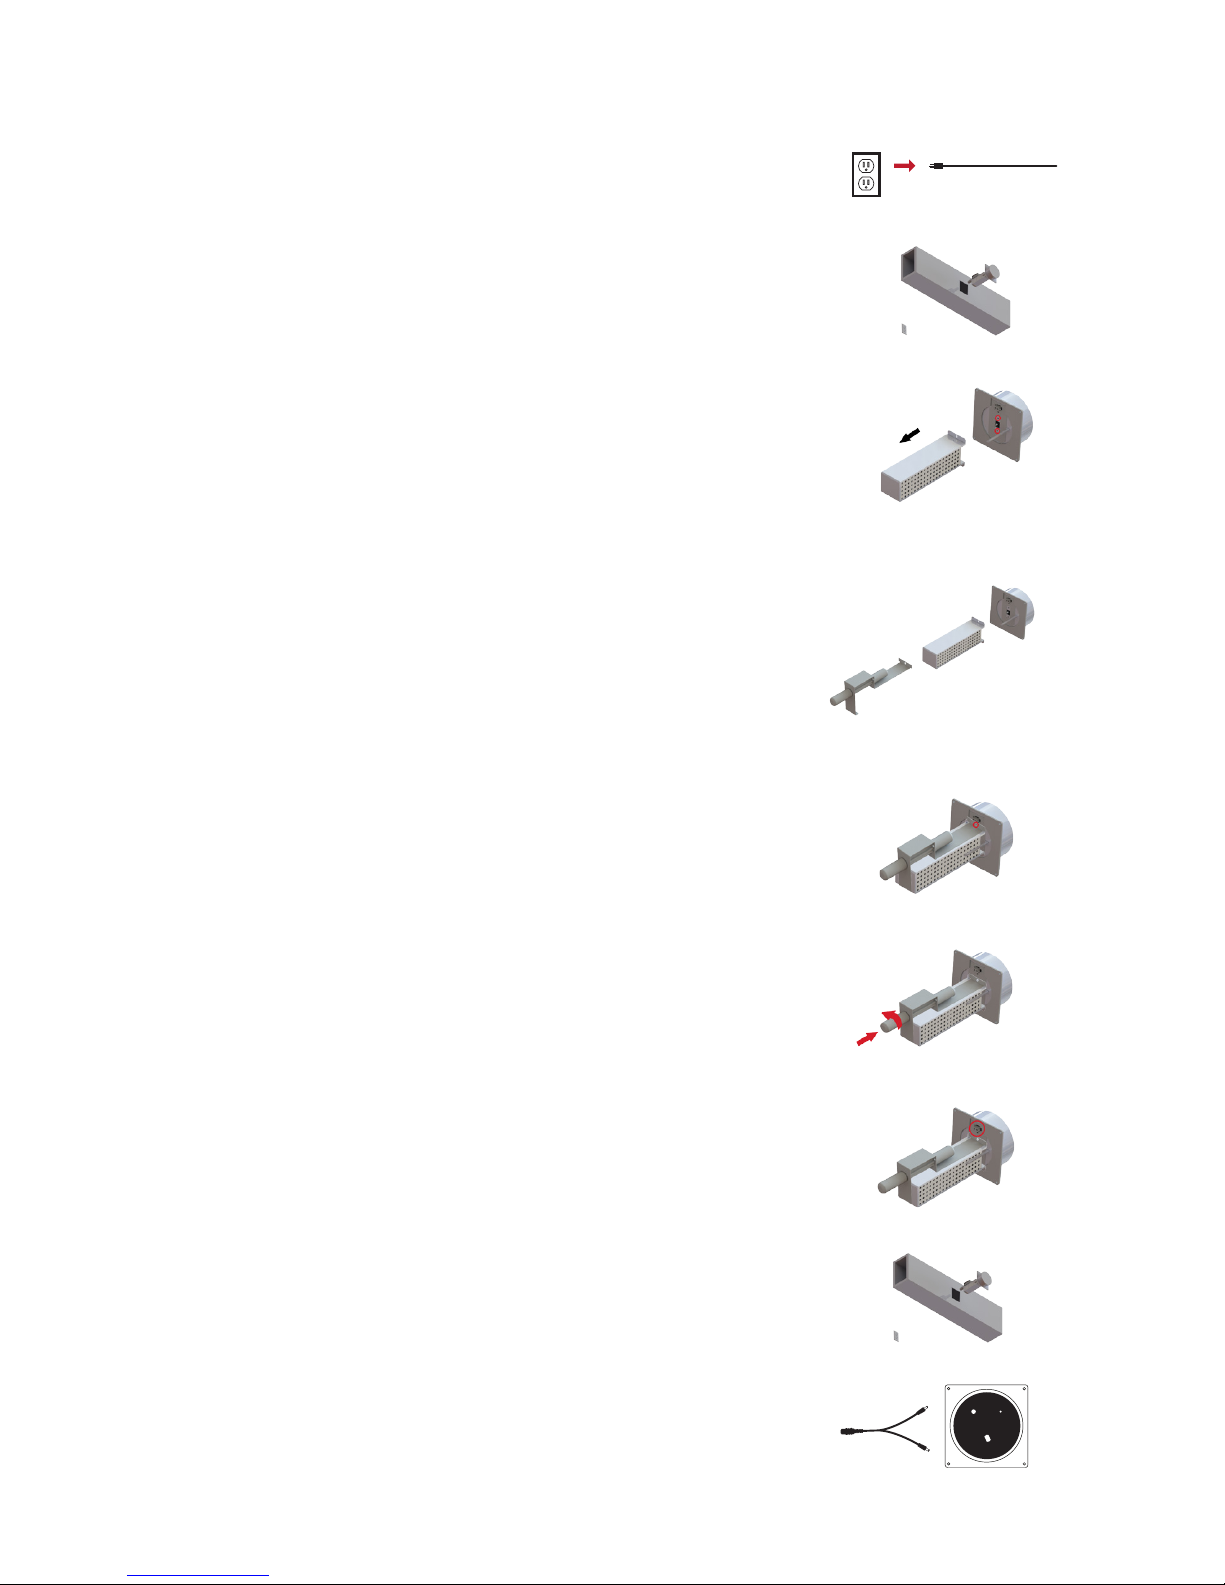
Thank you for your purchase of the MCI SynAIRgPureTM Air Purification
Enhancement System. This unit is designed to be installed into an existing
HVAC system, and used as a virtually maintenance-free enchancement to
current air purification technology.
Please read and follow all service procedures outlined in this manual.
Please record the name and phone number of your Distributor/Contractor.
Name ____________________________________________________________
Phone #: _________________________________________________________
Please record the serial number of your MCI SynAIRgPureTM.
Serial #: __________________________________________________________
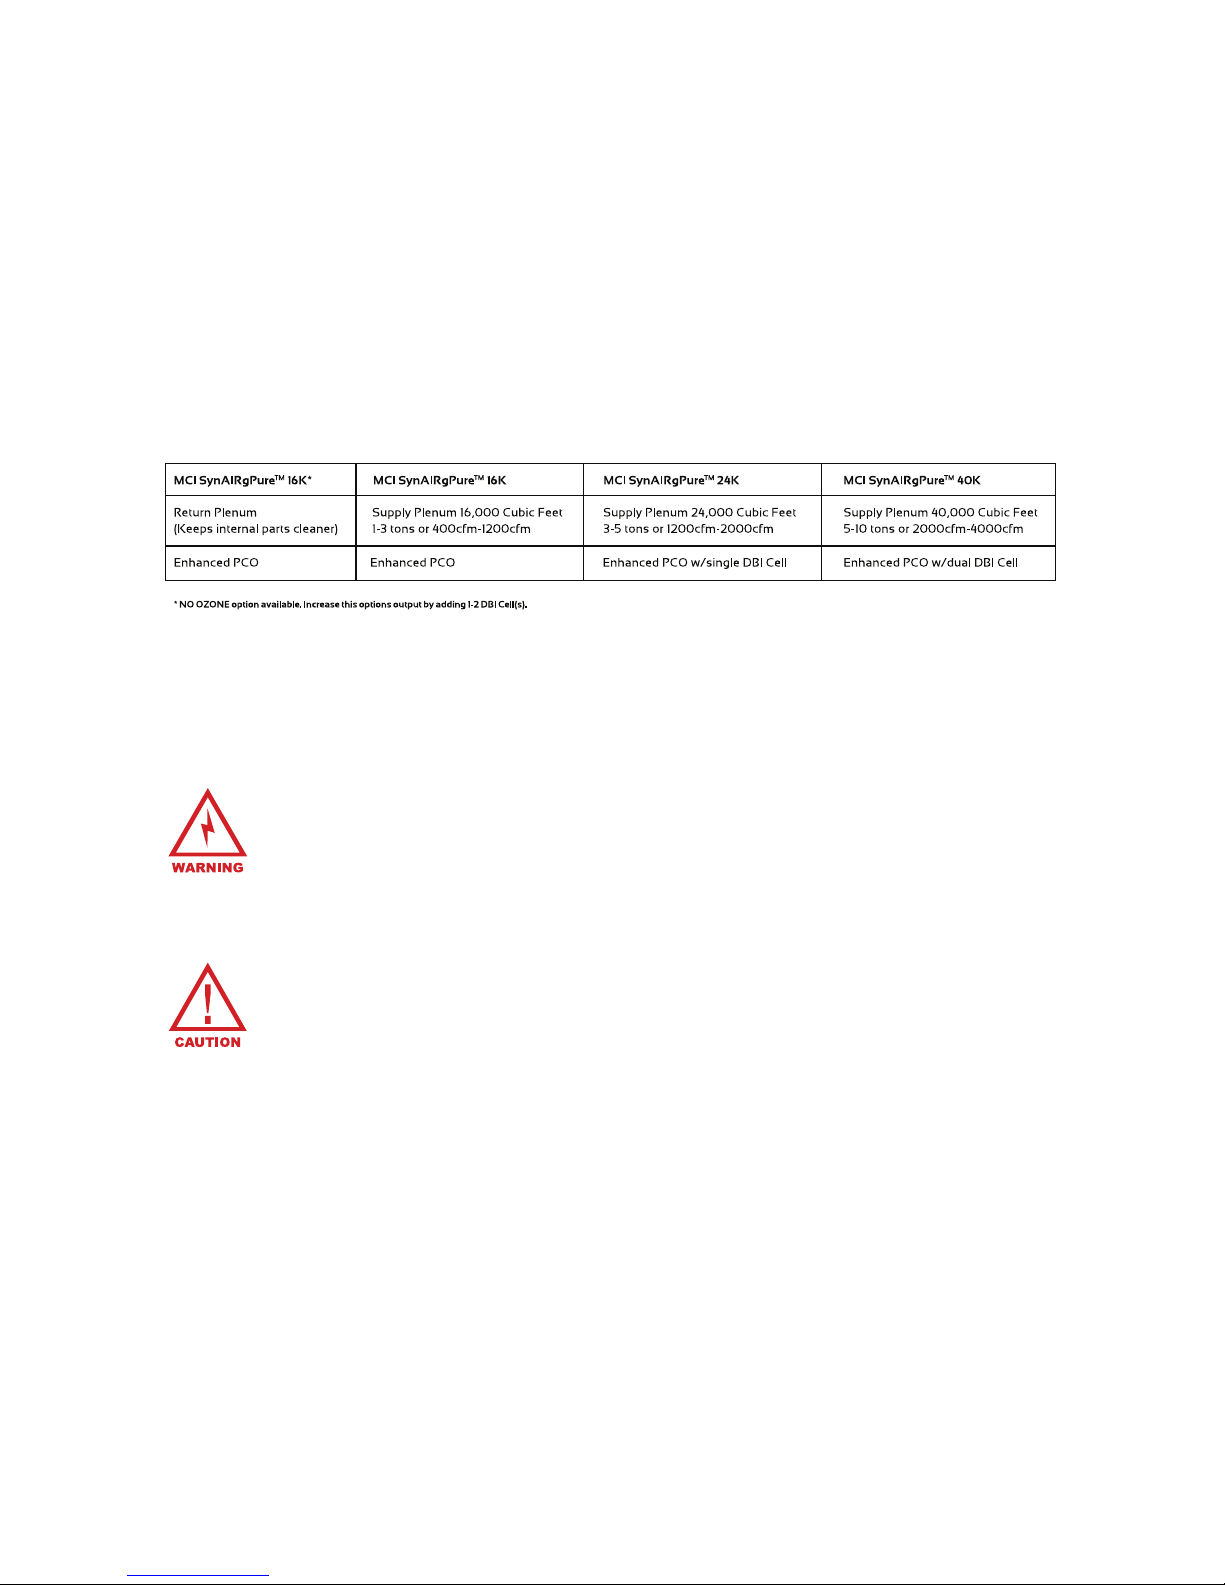
MCI SynAIRgPureTM is a new generation Air Purification Enhancement
System. Designed to work with existing purification technology to reduce
odors, smoke, and a broad spectrum of indoor air contaminants.
MCI SynAIRgPureTM is easily mounted into air conditioning and/or heating
systems where contaminants can grow. When the HVAC system is in
operation, MCI SynAIRgPureTM produces the MCITM (Multicluster-Ionization)
Process consisting of hydroperoxides, superoxide ions, and safe low level
ozone, all of which are friendly oxidizers that revert back to oxygen and
hydrogen after the oxidation of a pollutant. As a result, the air and surfaces
will be cleaner.

3
Specifications
Cautions & Warnings
WARNING: UV Light in operation. Disconnect unit from power
supply before servicing. Failure to follow warnings may result in
severe eye damage.
CAUTION: To reduce the risk of shock, this equipment may have
a grounding type plug with a third (grounding) pin. This plug will
only fit into a grounding type power outlet. If the plug does not fit
into the outlet, contact a qualified electrician or HVAC specialist to
install the proper outlet. DO NOT alter the plug in any way.
The standard MCI SynAIRgPureTM 16K uses a 9” MCITM Cell. This cell is rated
for 16,000 Cubic Feet of breathing space. (1-3 Tons HVAC System)
Up to two (2) additional DBI Cells can be added to increase the effective
area up to 40,000 Cubic Feet tons of breathing space. (5-10 Tons HVAC System)
DBI Cells can be indiviually purchased through your Distributor/Contractor.

4
Product Contents
Installation Hardware
Replacement Parts
Ballast Housing
(4) #8 - 32 Slotted Hex Machine Screw
(4) #8 - 32 Hex Machine Screw Nuts
(4) #8 - 32 Wing Nuts
12V DC Power Adapter
DBI Mounting Bracket
(Optional Addition)
12V DC Splitter Cable
(Optional Addition)
Replaceable MCITM Cell
(Includes UV Lamp)
Your BLS HVAC unit requires no periodic maintenance beyond the normal
replacement of the MCITM and DBI Cells on an annual basis. The Cells are
working when the indicator lights are on (Sight Glass for MCITM Cell and LED
for DBI Cell). For optimal performance, annual maintenance is encouraged.
If you need a cell replacement, contact your Distributor/Contractor with one of the
following part numbers:
MCITM Cell Part #: BLS16KCELL
DBI Cell Part #: BLSDBIO3CELL

5
Installation Tools
Installation Requirements
MCI SynAIRgPureTM 16K
Return Plenum (Recommended Option)
Utility Knife
Tin Snips
Phillips Head Screwdriver
Power Drill/Driver
3/8” Drill Bit
DBI Mounting Bracket
(Optional Addition)
12V DC Splitter Cable
(Optional Addition)
The MCITM Unit should be installed after
the air handler in the HVAC system in
the supply plenum.*
*Another MCI SynAIRgPureTM 16K is recommended in the
Return Plenum for additional protection and to keep the
internal parts clean.
An approximate opening of 3” W x 5” H will
need to be cut into the existing duct work
to install the unit properly.
Electrical Requirements
The unit comes with a 100-240V Power
Adapter providing flexibility of placement.
The adapter comes with a 120V plug with
ground. Locate the unit within 6 ft. of a standard 120V ground outlet.
WARNING: Long term use of an extension cord is not recommended due to safety considerations.
MCI SynAIRgPureTM 16K
Supply Plenum

6
Installation Process
1. Locate a suitable area of duct for installation.
2. Cut away any insulation to expose the duct.
3. Draw a rectangle measuring 3” W x 5” H on
the duct face.
4. Use the Drill to make 4 holes in the corners of
the marked rectangle.
5. Use the Utility Knife or Tin Snips to cut the
marked rectangle out.

7
Installation Process (Cont.)
6. Place the unit through the hole and shift it
up to cover any exposed hole.
7. Mark the screw locations in the corners of
the cover and remove the unit.
8. Drill the holes out and place the four (4)
Threaded Bolts through the holes, from the
inside, protruding out.
9. Place the four (4) Hex Nuts on the bolt and
tighten with the aid of a wrench.
10. Place the unit through the hole and thread
the remaining four (4) Wing Nuts onto the
Threaded Bolts, making sure a seal is created
along the backside of the Ballast Housing.
11. Plug your unit into the outlet.

8
Maintenance/UV Lamp Indicator
Cell Disposal
Please do not throw a used MCITM Cell or DBI Cell in the garbage. The
special germicidal UVX bulb used in the BLS HVAC contains a very small
amount of mercury. Be sure to dispose of them properly or return your used
Cells to Best Living Systems for proper disposal.
Send the used cell post paid to:
Best Living Systems
160 Lawrence-Pennington Rd.; Suite 4
Lawrenceville, NJ 08648
Your BLS HVAC unit requires no periodic maintenance beyond the normal
replacement of the MCITM Cell every 3 years.
The UV Lamp Operation Indicator on the face of the unit will glow when
the unit is in use. If the indicator does not glow and the unit has power, the
MCITM Cell needs replacing.
NOTE: For optimal performance, we recommend the replacement of the MCITM Cell every 3
years, even if the UV Lamp appears to be operating normally. Some Mechanical Contractors,
depending on contamination levels, may recommend annual replacements of lamps in
conjunction with an annual servicing of your system.
UV Lamp Operation Indicator

9
DBI Cell Options
Changing the Cell
Should you need a stronger output from your MCI SynAIRgPureTM 16K we
have an available option for 1 or 2 DBI (Dielectric Barrier Ionization) Cells
with a mounting bracket, which will increase your effective output by 3x the
normal power. (See Specifications Pg. 3 for Coverage Information)
To learn more about or to purchase the DBI Cells, contact your BLS
Distributor/Contractor or visit us online @ www.BestLivingSystems.com.
1. Unplug the unit’s power cord from the outlet.
2. Remove the Wing Nuts and unit from the duct.
3. Remove the two (2) screws holding the cell on
the rear of the Ballast Housing.
4. Replace either the UV Lamp or entire Cell with a
new Cell and fasten the two (2) screws into place.
5. Replace the Unit and the Wing Nuts.
6. Plug the unit’s power cord into the outlet.

10
DBI Cell Installation/Replacement
1. Unplug the unit’s power cord from the outlet.
2. Remove the Wing Nuts and unit from the duct.
3. Remove one (1) screw holding the cell on
the rear of the Ballast Housing, beneath the
Molex connector.
4. Place the Hook-end of the DBI Cell Mounting
Bracket over the back of the MCITM Cell, with
the screw hole overlapping the open screw
hole of the Ballast Housing.
NOTE: Do not cover the open cell sides.
5. Replace the screw to hold the DBI Cell
Mounting Bracket in place.
6. Place the DBI Cells by lining up to tabs and
inserting them into the DBI Cell Socket.
Rotate 90° to lock them into place.
7. Plug the Cable from the DBI Cells to the
connector on the rear of the Ballast Housing.
8. Replace the Unit and the Wing Nuts.
9. Install the DC Splitter Cable and then plug the
Power Cord into the outlet.

11
Warranty Information
Your BLS HVAC unit consists of three(3) seperate products. The housing, which protrudes from the HVAC duct when
installed, the MCITM Cell which extends into the ductwork and the DBI Cell(s) (if used) which also extends into the ductwork.
Your BLS HVAC Housing (Product) is warranted to be free from all defects in material and workmanship in normal
household use for a period of two (2) years from date of purchase.*
Your BLS HVAC MCITM Cell, including the bulb, is warranted to be free from all defects in material and workmanship in
normal household use for a period of two (2) years from date of purchase.
Your BLS HVAC DBI Cell is warranted to be free from all defects in material and workmanship in normal household use
for a period of one (1) year from date of purchase.*
The warranty is granted only to the original purchaser. The warranty is subject to the following provisions:
Any damages or malfunctions caused by negligence, abuse, or use not in accordance with the Product Owner’s
Manual are not covered by this warranty. Likewise, any defects or damages caused by unauthorized service or the use
of other than Genuine Best Living Systems Parts are not covered.
Best Living Systems will, at its option, repair or replace a defective Product or part(s) for the Product that is/are covered
by this warranty. As a matter of warranty policy, Best Living Systems will not refund the customer’s purchase price.
* Best Living Systems also provides, at an additional charge, a 5 year warranty on the housing and includes, as added
value, a substantial discount for the replacement cell and bulbs that may be needed during the warranty period.
For more information on the BLS Enhanced Warranty, please go to www.BLSWarranty.com or call 855.855.6070.
OBTAINING WARRANTY SERVICE
To obtain warranty service you must return the defective product along with proof of purchase to the Best Living Systems
Authorized Service Center. All shipping costs submitted under this Warranty shall be borne by purchaser. Unless
this Warranty is expressly renewed or extended by Best Living Systems, any repaired or replaced part of unit shall be
warranted to the original purchaser only for the length of the unexpired portion of the original warranty. For the location
of the nearest Best Living Systems Authorized Service Center or for other service information, please visit us online at:
www.BestLivingSystems.com/service
Before any product is sent for service, the customer should contact the Best Living Systems Authorized Service Center
to obtain a Return Merchandise Authorization (RMA) Number. This RMA Number should be clearly written on the box
before shipping. All components/parts including the remote (if applicable), manuals, and original packaging should
be included in the return if available.
FURTHER LIMITATIONS AND EXCLUSIONS ARE AS FOLLOWS
Any warranty that may be implied in connection with your purchase or use of the Product, including any warranty of
merchantability or any warranty for Fitness For A Particular Purpose is limited to the duration of this warranty. Some
states do not allow limitations on how long an implied warranty lasts, so the above limitations may not apply to you.
Your relief for the breach of this warranty is limited to the relief expressly provided above. In no event shall Best Living
Systems be liable for any consequential or incidental damages you may incur in connection with your purchase or use
of the Product. Some states do not allow the exclusion or limitation of incidental or consequential damages, so the
above limitation or exclusion may not apply to you.
This Warranty gives you specific legal rights, and you may also have other rights which vary from state to state.
REGISTRATION
Please register your Product within 10 days of purchase by visiting www.BLSWarranty.com, call 855.855.6070, or fill
out and return the enclosed warranty registration card. Registering your new Best Living Systems product entitles you
to the most up-to-date Best Living Systems warranty and promotion information.

www.BestLivingSystems.com
800.728.7206
www.BLSWarranty.com
This manual suits for next models
2
Table of contents