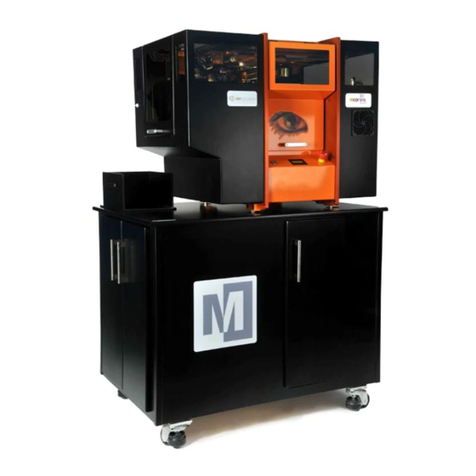
Mcor Technologies Matrix 300+ / IRIS User guide

Matrix 300+ / IRIS Training & Set-up Manual July 2014
1.Thank you
Firstly from everybody in Mcor Technologies we would like to thank you for
urchasing our 3D rinter. We have worked tirelessly to design and build you a
quality iece of recision machinery. This manual ex lains everything you need to
know to o erate your machine correctly to obtain maximum results. We ho e you
have years of satisfaction with our 3D rinter and look forward to hearing from
you via our forums and website.
Signed:
……………………………………….
Dr Conor MacCormack
CEO
Mcor Technologies Ltd
www.mcortechnologies.com 2 of 74
All Rights Reserved.

Matrix 300+ / IRIS Training & Set-up Manual July 2014
2.Content
Table of Contents
1.Thank you................................................................................................2
2.Content...................................................................................................3
2.1.Machine Com onents...........................................................................4
2.2.What Is the Matrix 300+ / IRIS?...........................................................6
2.3.So, how does it work?..........................................................................7
2.4.SliceIT...............................................................................................8
2.5.Minimum Requirements........................................................................9
2.6.Machine Location.................................................................................9
2.7.Tool-kit............................................................................................10
3.Powering u ...........................................................................................11
3.1.Multifunction head restraint:...............................................................11
3.1.1.Removal sequence.......................................................................11
3.2.Pa er Feed mechanism restraint:.........................................................12
3.3.Install the blade holder.......................................................................12
3.4.Moving the machine:..........................................................................12
4.Initialisation...........................................................................................13
5. SliceIT..................................................................................................15
5.1.Installing SliceIT................................................................................15
5.2.Licensing Activation...........................................................................18
5.3.Setting Pa er Ty e............................................................................21
5.4.Email Setting....................................................................................23
5.5. Iris Only settings..............................................................................24
5.6.Setting u the PC Network Card..........................................................25
6.Com uter Settings..................................................................................28
7. ColourIt Installation (Iris only).................................................................29
8. Machine Set-u ......................................................................................32
8.1.Setu Build.......................................................................................32
8.2.Attach the first Sheet.........................................................................35
8.3.Clean Adhesive Wi e..........................................................................38
8.4.Knife Set-u ......................................................................................40
8.5.Adhesive set-u .................................................................................48
8.6.Load Pa er........................................................................................49
9.Part com letion.......................................................................................51
10.De-cubing the art (weeding).................................................................52
11.Standby Mode.......................................................................................61
12.O erator In ut Required.........................................................................62
13.Maintenance.........................................................................................63
14.Trouble shooting:..................................................................................67
15.3D Data Design Considerations:..............................................................71
16.File size guide.......................................................................................72
17.Quick Instructions for Machine Use..........................................................73
www.mcortechnologies.com 3 of 74
All Rights Reserved.

Matrix 300+ / IRIS Training & Set-up Manual July 2014
2.1. Ma hine Components
Ensure when closing either door that your fingers are clear from any
inch oints which could cause injury.
www.mcortechnologies.com 4 of 74
All Rights Reserved.
Paper Feed Door
Front Door
E - Stop
LCD Screen
Reset button
Build Plate
Adhesive Bottle
Paper Tray

Matrix 300+ / IRIS Training & Set-up Manual July 2014
www.mcortechnologies.com 5 of 74
All Rights Reserved.
X-Axis
Y – Axis
Blade holder
Page rabber &
Page rabber Opto
Removable
Build Plate
Locking Knob
Heat Plate
Adhesive Applicator
Multifunction Head
Adhesive Bottle
Adhesive Shut-Off
valve.
Vertical = Open
Horizontal = Closed
Paper Feed rollers
Paper Tray

Matrix 300+ / IRIS Training & Set-up Manual July 2014
2.2. What Is the Matrix 300+ / IRIS?
The Matrix 300+ / IRIS is the worlds only a er based Colour 3D rinter that
uses sheets of office a er to roduce detailed, durable, low cost and eco-friendly
arts. The rinter uses a rocess called SDL, Selective De osition Lamination (an
evolution of Laminated Object Manufacturing, LOM).
BY using SDL the machine can vary the concentration of adhesive on the model
from that on the su ort material. This makes the model considerably stronger
than the su ort material. This makes the removal of the waste material, De-
cubing (weeding) much easier.(The su ort material is cut in to cubes by the
machine to facilitate ease of removal)
The consumables on your machine are A4/Letter a er, water soluble adhesive
and cutting knife. The machine is connected to a standard PC at all times which
sends the information to the 3D rinter. The software on the PC which comes with
the 3D rinter is called SliceIT. SliceIT enables the mani ulation of CAD data via
the stl, wrl, or obj file format for the generation of data necessary for the Matrix
300+ / IRIS.
Once the model has been re ared within SliceIT, a er loaded, knife de th set
and adhesive bottle filled, we are ready to make 3D objects by sim ly hitting
rint.
When the build is finished the arts are removed from the waste by a rocess
called De-cubing (weeding). De-cubing times vary de ending on the intricacy of
the art. Kee ing in mind how the art can be weeded is an im ortant as ect of
the Matrix 300+ / IRIS and needs to be considered before rinting can begin. This
is ex lained in more detail in the de-cubing cha ter.
When the arts have been weeded you will see that they are durable and can be
finished in a number of ways such as s ray ainted, hardened, lated, coated,
sealed or cast.
www.mcortechnologies.com 6 of 74
All Rights Reserved.

Matrix 300+ / IRIS Training & Set-up Manual July 2014
2.3. So, how does it work?
The Matrix 300+ / IRIS uses sim le sheets of A4/Letter a er to build u the 3D
object you desire. If your machine was urchased outside of the US you will be
using A4. Otherwise you will be using US Letter a er. The software which
controls the Matrix 300+ / IRIS is called SliceIT and it is this software that takes
the digital 3D data that you want to make and slices it into layers equal to the
thickness of the A4/Letter sheet, a rox 0.1mm. Once SliceIT calculates the 2D
rofile on each of these newly created layers, it sends the information to the
Matrix 300+ / IRIS to start building. The 2D rofile is accom lished using our
drag blade. The de th of the drag blade is accurately set and this ensures a
erfect cut every time.
The sequence within each layer for the machine is as follows:
As you can see in the flowchart above, once the 2D rofile is cut the machine
checks if its finished and if not it goes back and starts a lying adhesive for the
next layer. If the layer is the last layer in the model, the art is finished and the
art can be removed.
In the case of colour arts the ages will be re rinted with an image, also
generated by SliceIT, before been loaded in to the Iris a er tray.
www.mcortechnologies.com 7 of 74
All Rights Reserved.
Deposit adhesive on the top layer
Pull-in & pla e the next sheet
Press against heat plate
Cut 2D profile into the new top layer
Is Part finished?
Remove Finished Part
YES
NO

Matrix 300+ / IRIS Training & Set-up Manual July 2014
How do I get this 3D digital data?
There are numerous ways to generate your 3D data. You can use standard
mainstream 3D CAD rograms, online ackages, downloaded designs and 3D
scans of the actual hysical object. All of the main stream ackages available
su ort the “stl, wrl, or obj” file format. Stl is short for Stereo-lithogra hy. VRML
(wrl) is Virtual Reality Modelling Language, OBJ is a geometry definition file
format.(Note that wrl and obj files may be accom anied by gra hic images in the
form of JPEG, GIF, PNG or bitma . Obj files are always accom anied by a
materials file, mtl.). Within the CAD rogram sim ly save the design as an stl,
wrl, or obj and the rogram will generate the data automatically. Note that
SliceIT can 3D rint a colour file in monochrome.
Free designs are available from the below, although all of these stl, wrl, or obj
files may not be rintable, for various reasons. Mcor also su ly some basic
exam les.
www.thingiverse.com
www.grabcad.com
2.4. Sli eIT
The software ackage which controls the Matrix 300+ / IRIS is called SliceIT.
There are hel files in SliceIT to guide you through using the software, but here
we will only outline the main ste s. SliceIT is used to read in the stl, wrl, or obj
file, osition and mani ulate the art, slice the model into layers and send the
information to the 3D rinter.
There are 6 main ste s needed to successfully send information to the Matrix
300+ / IRIS machine. These main ste s are as follows: (Ste s 5a and 5b a ly
only to colour models).
1. Create a roject
2. O en and model – load the stl, wrl, or obj data
3. Manage the model – orientate, scale, co y, add lanes etc.
4. Generate the layers
5. Save / manage the Project – saves all the information from 1 to 4
5a: Pre- rint all of the colour ages if a licable
5b: Load the re rinted ages into the Iris a er tray, if a licable
6. Print in 3D – send the information to the Matrix 300+ / IRIS
The hel files within SliceIT will guide you through ste s.
www.mcortechnologies.com 8 of 74
All Rights Reserved.

Matrix 300+ / IRIS Training & Set-up Manual July 2014
2.5. Minimum Requirements
The following requirements are needed to run the machine correctly
1) Deskto PC running 64Bit version of Windows 7.
2) 8Gb of Ram.
3) Minimum 1Gb gra hics card.
4) Dedicated Ethernet card on the PC connected directly to rinter at all
times. S eed 10/100 or greater.
5) Cross over cable – su lied with machine
6) Tem erature range (10 – 25 Deg C)
7) Relative Humidity range (30 – 70%)
8) Table ca able of su orting 160Kg. (The Iris comes with it's own cabinet)
9) Suitable ceiling height to enable door to o en fully. Ty ically sitting on a
800mm high table, 2.4m ceiling height
Note: It is not advisable to run the 3D printer off of a laptop computer. Prolonged use of a
laptop can result in communication faults.
Note 2: The environment can effect the paper more so than the machine. It is necessary to
maintain a stable humidity and temperature around the machine. Lo humidity and high
temperature can cause paper feeding issues in the 2D printer and also cause the adhesive
to spread poorly and cure prematurely. High humidity and lo temperature can cause
aves in the paper and interfere ith the penetration / absorption of the adhesive.
Reference:
“http:// .xerox.com/do nloads/usa/en/s/supp_lib_Helpful_Facts_About_Paper.pdf”
2.6. Ma hine Lo ation
As stated in oint 6 in the minimum requirements, the machine should be located
on a sturdy table ca able of su orting the 160Kg mass of the machine.
Obviously this only a lies to 300+ machines as the IRIS comes with a cabinet.
Sufficient s ace should be left at the font and a er feed side of the machine to
allow both doors to o en fully. Attention should also be aid to the ceiling height
to enable the o ening of the doors. Because there is a large amount of mass
moving at high velocity within the machine, the momentum can cause the table
to oscillate during normal o eration. Ensure that the location of the machine is
situated to maintain the machine in the o erational range as listed in oints 4 and
5 in the minimum requirements.
www.mcortechnologies.com 9 of 74
All Rights Reserved.

Matrix 300+ / IRIS Training & Set-up Manual July 2014
2.7. Tool-kit
Each machine is su lied with a tool-kit to hel you with the day to day o eration
of the machine and carry out any routine maintenance rocedures.
The tool-kit items are shown below:
1. Blades
2. Mcor adhesive
3. Glue wheel cleaning s onge.(Dam en with warm water to use).
4. Lint free cloth.(Use with IPA to eriodically clean the a er feed rollers).
5. Tweezers.(Used when weeding / removing waste / su ort material).
6. 3mm Allen key.(Used to remove / install trans ort bracket).
4mm & 2.5mm Allen keys su lied for maintenance use only if requested.
7. Glue wheel / wi e cleaning tool.(Use this tool to remove a er / glue from
the glue wheel or wi e. Use of any metal instruments / tools an
seriously damage the me hanism and void warranty).
Note that there will also be a media devi e shipped with
the printer. This will have the operational software,
li ense file and demo files.
www.mcortechnologies.com 10 of 74
All Rights Reserved.
1
2
4
5
3
6
7

Matrix 300+ / IRIS Training & Set-up Manual July 2014
3.Powering up
WARNING: Before the machine can be switched on and o erated the
trans ortation restraints have to be removed. There are two
restraints, one for the multifunction head and one for the a er feed
mechanism.
3.1. Multifun tion head restraint:
O en the front door and remove the bracket shown in the image below with a
3mm hex key wrench.
Remove the Trans ortation Bracket From the Multifunction Head
3.1.1. Removal sequen e
Remove fasteners No1 & No2 on the bulkhead.
Move by hand the multifunction head into the centre of the machine
Then remove fastener No3 making sure not to dro the fastener into the
machine.
www.mcortechnologies.com 11 of 74
All Rights Reserved.

Matrix 300+ / IRIS Training & Set-up Manual July 2014
3.2. Paper Feed me hanism restraint:
O en the age door and remove the cable tie connecting the a er feed roller
mechanism to the side of the a er tray.
Pa er Feed Cable tie removal
Connect the ower cord from the Matrix 300+ / IRIS to a standard wall outlet.
Then connect the su lied Ethernet cross over cable between the matrix300+ and
the PC.
3.3. Install the blade holder
Locate the knife holder and install into the multifunction head. It should be in the
box of ancillaries which shi ed with the box. It will be wra ed in bubble ack.
Note, if you need to move the machine lease remove the blade
holder and secure outside the machine to revent the mechanism
falling out and becoming damaged.
3.4. Moving the ma hine:
If the ma hine is to be moved, either within a building or to
another building, the reverse of this pro edure must be arried out
to se ure the moving of parts and minimise any damage to the
ma hine. Improper transportation of the unit an result in
irreparable damage and void the warranty.
www.mcortechnologies.com 12 of 74
All Rights Reserved.

Matrix 300+ / IRIS Training & Set-up Manual July 2014
4.Initialisation
Instructions are relayed to the o erator via the LCD touch screen in the centre
control anel. The control anel is shown below
The ON/OFF switch is located at the rear of the machine. Before the machine is
switched on close both doors. When the machine is switched on the following
message will be dis layed on the LCD screen
At this oint the machine checks if both doors have been closed, if they are the
following message will be dis layed on the LCD:
The reset button is the blue button on the left hand side on the LCD screen.
www.mcortechnologies.com 13 of 74
All Rights Reserved.
Reset Button
LCD Interactive Screen
Emergency Stop Button

Matrix 300+ / IRIS Training & Set-up Manual July 2014
Once the reset button has been ressed, the machine will then erform an
initialization routine which should take 1-2 minutes. It also carries out an internal
diagnostic check.
If you forget to close one or both of the doors, the machine will detect this and
inform the o erator to close whatever door is o en, for this exam le the front
door was left o en when the machine was owered on, and the following
message was dis layed:
Again, when the doors have been closed, the machine will request that the reset
button be ressed and initialisation can take lace.
The system then “homes” all the axis, X, Y, Z Build and Z Pa er Feed, arks the
multifunction head in the XY home location and the Z build at the build height and
finally seals the adhesive axis by rotation the adhesive wheel.
When com lete, the machine is in standby mode and the LCD should dis lay the
“Standby” sign as below.
From this oint onwards the doors are locked. If the doors are forced
o en the build with sto and the job will be terminated.
www.mcortechnologies.com 14 of 74
All Rights Reserved.

Matrix 300+ / IRIS Training & Set-up Manual July 2014
5. Sli eIT
5.1. Installing Sli eIT
When you double click on the installation software, SliceIT will self install with
minimal interaction.
As the machine logs the knife travel through SliceIT, it is preferred that
the connected PC only has one user log-in. I.E. “3DPrinter”. If several
users log on as themselves, the log files that hold this value ill be
incomplete and the machine may run past the usable knife life.
www.mcortechnologies.com 15 of 74
All Rights Reserved.

Matrix 300+ / IRIS Training & Set-up Manual July 2014
Before SliceIT com letes the installation it will ask if you wish to install the
Nal erion Licensing service, below. It is essential to install this service the first
time you are installing SliceIT on the PC which will be connected to the rinter.
This is not necessary on your own remote c / la to . Click Yes in the dialogue
and a se arate installer will start to install the service. When that installer has
finished click Finish and you will be returned to the rimary Mcor installer.
www.mcortechnologies.com 16 of 74
All Rights Reserved.

Matrix 300+ / IRIS Training & Set-up Manual July 2014
5.2. Li ensing A tivation
In Slice-IT there are two ways to activate the roduct: Internet a tivation or
manual self-serve a tivation. Both methods require interaction with the
Li ense Manager utility which can be invoked from the Help menu.
Internet a tivation is the sim lest method and requires that the PC you are
licensing the software on has an Internet connection. To activate this way:
Click on the Internet Activation icon in the License Manager.
Ty e or aste in the license key you received from Mcor Technologies.
Press the Activate button.
You should receive a message to say the roduct has been activated.
At this oint you are ready to use licensed functions in Slice-IT.
Internet Activation
www.mcortechnologies.com 18 of 74
All Rights Reserved.

Matrix 300+ / IRIS Training & Set-up Manual July 2014
Manual self-serve a tivation requires a little more effort. You do not need an
Internet connection on the machine connected to the Matrix rinter, but you do
need access to another PC with an Internet connection (This method is intended
to be used in a situation where the PC connected to the Matrix rinter has one
network card and so recludes an Internet connection.) To activate with this
method you must generate and im ort a certificate (which is a long sequence of
digits) at the self-serve web-site (htt ://www.internetactivation.com). To do this:
Click on the Im ort Certificate icon in the License Manager
Co y the installation ID to the cli -board (there's a button to do this or
select and use Ctrl-C) and trans ort it to the Internet connected PC using
a standard USB memory stick or other trans ortable memory device.
On the Internet connected PC visit the self-serve web-site and aste in the
installation id.
Also ty e or aste in the license key you received from Mcor Technologies.
Press the Generate Certificate button
A certificate should be available for you to co y.
Paste the certificate into the Activation Certificate field of the License
Manager Im ort Certificate screen back on the PC connected to the rinter
Click the Im ort Certificate button.
Your roduct should now be activated and you are ready to use licensed functions
in SliceIT.
www.mcortechnologies.com 19 of 74
All Rights Reserved.
Table of contents
Other Mcor Technologies 3D Printer manuals